Last Updated: March 20, 2026
If you use a miter saw regularly, you know how important it is to have a sharp, clean blade. But when it’s time to change that blade, you might feel unsure or worried about doing it right.
Don’t worry—changing a miter saw blade is easier than you think, and you can do it safely with the right steps. In this guide, you’ll learn exactly how to change your miter saw blade quickly and confidently, so your cuts stay precise and your projects run smoothly.
Ready to take control of your tool and keep it working like new? Let’s dive in!
Credit: diy.stackexchange.com
Safety Preparations
Safety is the top priority before changing a miter saw blade. Taking proper precautions prevents accidents and injuries. Follow these key safety steps carefully to prepare your workspace and tools.
Unplug And Remove Battery
Always unplug the miter saw from the power outlet. If your saw uses a battery, remove it completely. This stops the saw from turning on accidentally. Never skip this step.
Wear Safety Gear
Put on safety glasses to protect your eyes from dust and debris. Use work gloves to shield your hands from sharp blade edges. Wear ear protection if you plan to run the saw later.
Lock Saw Arm In Position
Secure the saw arm by locking it in the lowered position. This prevents sudden movements while you work on the blade. Use the saw’s built-in lock or clamp if available.
Credit: www.youtube.com
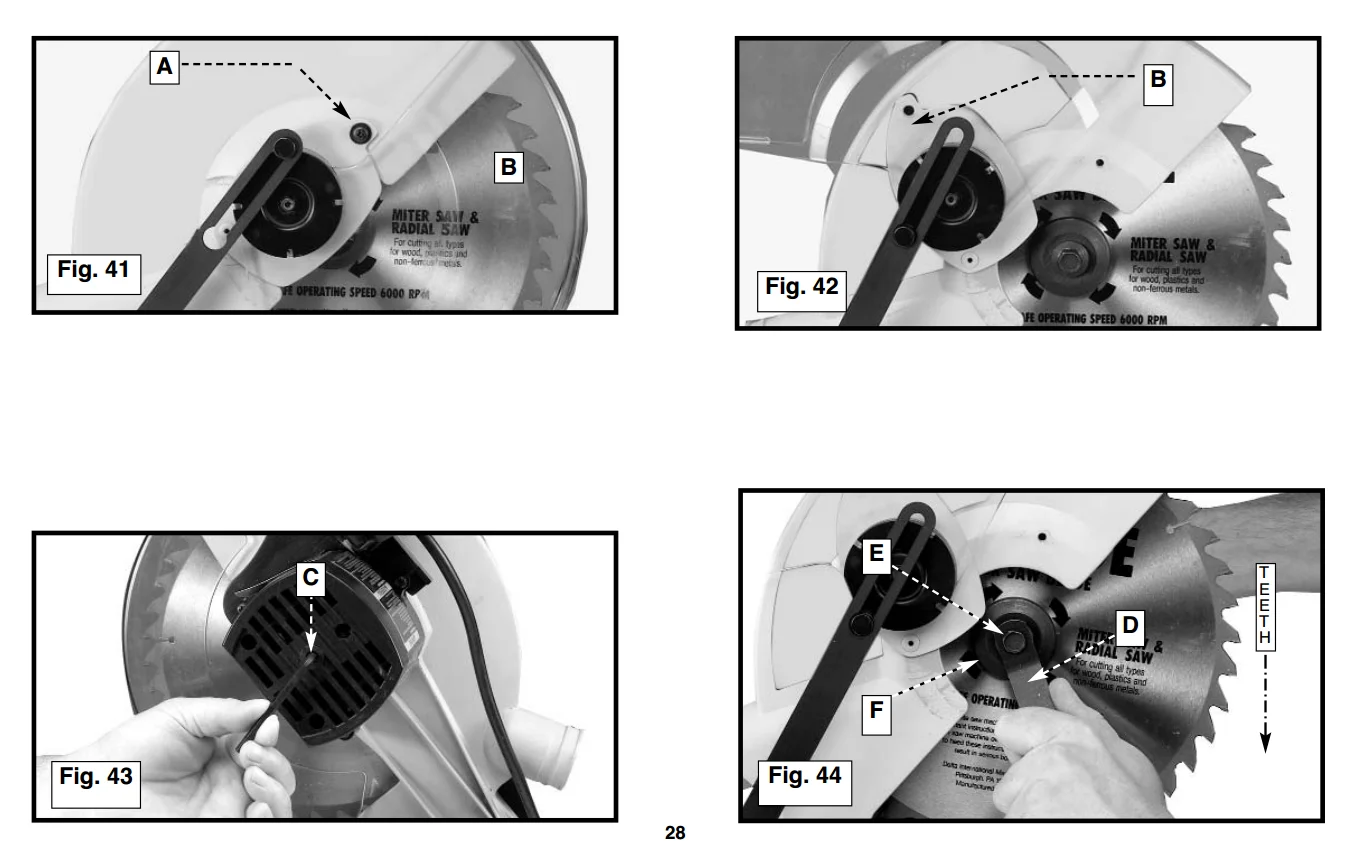
Accessing The Blade
Accessing the blade is the first step to safely changing a miter saw blade. It involves handling the blade guard, which protects you from the sharp blade. You must carefully move or remove this guard to reach the blade. Follow these steps to gain clear access and prepare the saw for blade removal.
Retract The Blade Guard
The blade guard covers the saw blade for safety. To access the blade, gently pull the guard back. This reveals the blade without removing any parts. Hold the guard in the retracted position to keep it out of the way. Be careful not to force or damage the guard while moving it.
Loosen Guard Screws If Needed
Some miter saws have screws that hold the blade guard in place. If the guard does not retract easily, check for these screws. Use a screwdriver to loosen them just enough to move the guard. Do not remove the screws completely unless the manual says to do so. Once the guard is loose, move it aside to fully expose the blade.
Engaging The Spindle Lock
Engaging the spindle lock is a key step to safely change a miter saw blade. It stops the blade from turning while you loosen or tighten the blade bolt. This prevents accidents and makes the process easier. Follow clear steps to use the spindle lock correctly before removing the blade.
Locate The Spindle Lock Button
The spindle lock button is usually near the blade on the saw’s body. Look for a small, round button or knob close to the blade guard. It may be labeled or have a symbol that shows it controls the blade’s movement. Knowing its location saves time and helps avoid confusion.
Hold And Rotate Blade To Lock
Press and hold the spindle lock button firmly. While holding it, try to rotate the blade by hand. Turn the blade until it stops moving and locks in place. This means the spindle lock is engaged. Keep pressing the button while loosening or tightening the blade bolt. Release the button only after the blade is secure or removed.
Loosening The Arbor Bolt
Loosening the arbor bolt is the key step in changing a miter saw blade. This bolt holds the blade firmly in place on the saw’s arbor. You must loosen it carefully to avoid damage or injury. Each miter saw can have a different way the bolt tightens and loosens. Understanding this helps you remove the blade quickly and safely.
Identify Reverse Thread Direction
Many miter saws use a reverse thread on the arbor bolt. This means the bolt loosens in the opposite direction of normal screws. Check how your saw blade spins when powered on. The bolt loosens by turning against that direction. For most saws, turn the bolt clockwise to loosen it. This prevents the bolt from tightening further.
Use Correct Wrench To Loosen
Always use the wrench that came with your miter saw. This wrench fits the arbor bolt perfectly. Using the right tool avoids slipping and damage. Hold the saw blade steady with a block of wood. Turn the wrench in the correct direction to loosen the bolt. Keep your hands clear of the blade edge while doing this.
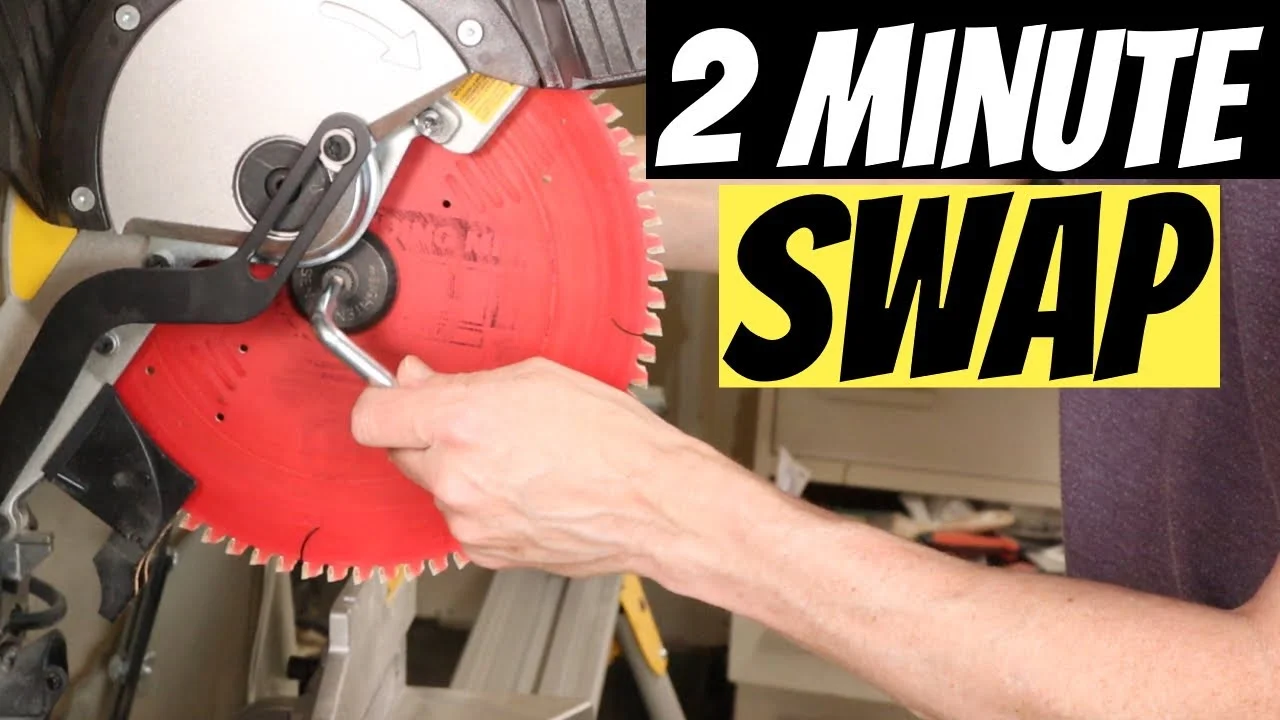
Removing And Replacing The Blade
Removing and replacing the blade on a miter saw is a key task for maintaining its performance. This process needs care and attention to keep you safe and the saw working well. Follow these steps to change the blade smoothly and correctly.
Carefully Remove Old Blade
First, unplug the miter saw to avoid accidents. Lock the saw arm down so it stays in place. Use the blade lock button to stop the blade from spinning. Find the arbor bolt holding the blade. Most miter saws have a reverse thread bolt. Turn the bolt in the opposite direction of the blade’s spin to loosen it. Remove the bolt and washer. Carefully take out the old blade by pulling it straight off the arbor. Handle the blade by its edges to avoid cuts. Set the old blade aside safely.
Install New Blade Correctly
Check the new blade for the correct size and type. Slide the new blade onto the arbor, aligning the teeth in the right direction. The teeth should face forward, matching the saw’s rotation. Replace the washer and bolt. Tighten the bolt by turning it in the opposite direction of the blade spin. Use the blade lock button to keep the blade steady while tightening. Do not over-tighten, just secure it firmly. Release the blade lock and unlock the saw arm. Plug in the saw and test it at low speed to check the blade fit. Your saw is now ready for use with the new blade installed safely.
Securing And Testing
After installing the new blade on your miter saw, securing and testing it is crucial. This step ensures safety and smooth operation. A loose blade can cause accidents or damage. Testing confirms the blade spins correctly and cuts efficiently.
Tighten Arbor Bolt Properly
Use the correct wrench to tighten the arbor bolt firmly. Do not overtighten as this can strip the threads or damage the blade. Make sure the bolt is secure enough to hold the blade in place during operation.
Check Blade Alignment
Inspect the blade to confirm it sits evenly on the arbor. The blade should be flush and not wobble. Spin the blade by hand to feel for any resistance or unusual movement. Proper alignment improves cut accuracy and extends blade life.
Restore Blade Guard And Power
Replace the blade guard carefully over the new blade. Ensure it moves freely and covers the blade fully. Plug the saw back into the power source. Before cutting, run the saw briefly to test blade rotation and guard function.

Credit: sawsonskates.com
Frequently Asked Questions
Is A Miter Saw Blade Bolt Reverse Thread?
Most miter saw blade bolts have reverse threads. Loosen the bolt by turning it opposite the blade’s rotation direction.
How To Unlock Miter Saw Blade?
To unlock a miter saw blade, push down the spindle lock button. Then, turn the blade bolt counterclockwise to loosen it. Pull out the lever or handle if your saw has one to release the blade guard. Always unplug the saw before unlocking the blade for safety.
What Should Be Done Before Changing Blades On A Power Miter Saw Or Chop Saw?
Unplug the saw and remove the battery if cordless. Wear safety glasses and gloves. Lock the saw arm up. Retract the blade guard and press the spindle lock to secure the blade.
How To Change Miter Saw Blade Dewalt?
Unplug the saw and wear safety gear. Lock the saw arm up. Press the spindle lock, then loosen and remove the blade bolt. Remove the old blade. Place the new blade with teeth facing forward. Tighten the bolt securely. Release the spindle lock and lower the arm.
How Do I Safely Remove A Miter Saw Blade?
Unplug the saw, lock the blade, then loosen the arbor nut carefully to remove the blade.
What Tools Are Needed To Change A Miter Saw Blade?
A wrench or Allen key usually fits the arbor nut to remove and install the blade.
Conclusion
Changing a miter saw blade is simple with the right steps. Always unplug the saw before starting. Use safety gear like gloves and glasses for protection. Loosen the arbor bolt by turning it opposite the blade’s rotation. Replace the old blade carefully and tighten the bolt securely.
Make sure the blade spins freely without wobbling. Regular blade changes keep your saw cutting clean and safe. Practice these steps to feel confident and work efficiently. A well-maintained blade helps you finish projects faster and with better results.
{ “@context”: “https://schema.org”, “@type”: “Article”, “headline”: “How to Change a Miter Saw Blade: Quick & Easy Step-by-Step Guide”, “description”: “Learn how to change a miter saw blade safely by understanding the steps to remove and replace the blade for accurate and efficient cutting results.”, “url”: “https://www.powertoolstoday.com/how-to-change-a-miter-saw-blade/”, “datePublished”: “2025-11-16”, “dateModified”: “2026-03-18”, “author”: { “@type”: “Organization”, “name”: “Power Tools Today”, “url”: “https://www.powertoolstoday.com” }, “publisher”: { “@type”: “Organization”, “name”: “Power Tools Today”, “url”: “https://www.powertoolstoday.com” }, “mainEntityOfPage”: { “@type”: “WebPage”, “@id”: “https://www.powertoolstoday.com/how-to-change-a-miter-saw-blade/” }, “image”: { “@type”: “ImageObject”, “url”: “https://www.powertoolstoday.com/wp-content/uploads/2025/11/How-to-Change-a-Miter-Saw-Blade-1024×576.webp” } }{ “@context”: “https://schema.org”, “@type”: “Article”, “headline”: “How to Change a Miter Saw Blade: Quick & Easy Step-by-Step Guide”, “description”: “Learn how to change a miter saw blade safely by understanding the steps to remove and replace the blade for accurate and efficient cutting results.”, “url”: “https://www.powertoolstoday.com/how-to-change-a-miter-saw-blade/”, “datePublished”: “2025-11-16”, “dateModified”: “2026-03-19”, “author”: { “@type”: “Organization”, “name”: “Power Tools Today”, “url”: “https://www.powertoolstoday.com” }, “publisher”: { “@type”: “Organization”, “name”: “Power Tools Today”, “url”: “https://www.powertoolstoday.com” }, “mainEntityOfPage”: { “@type”: “WebPage”, “@id”: “https://www.powertoolstoday.com/how-to-change-a-miter-saw-blade/” }, “image”: { “@type”: “ImageObject”, “url”: “https://www.powertoolstoday.com/wp-content/uploads/2025/11/How-to-Change-a-Miter-Saw-Blade-1024×576.webp” } }nnnn