Last Updated: March 20, 2026
If you own an angle grinder, you know how essential it is to keep the blade sharp and ready for any project. But when it’s time to change the blade, you might feel unsure or worried about doing it wrong.
Don’t worry—changing the blade on your angle grinder is simpler than you think. In this guide, you’ll learn step-by-step how to safely and quickly swap out your old blade for a new one. By the end, you’ll have the confidence to handle your angle grinder like a pro, saving time and avoiding costly mistakes.
Ready to get started? Let’s dive in!
Credit: www.reddit.com
Gather Necessary Tools
Before changing the blade on an angle grinder, gather all necessary tools. Having the right tools ready makes the process faster and safer. Missing one tool can cause frustration or damage to the grinder.
Prepare your workspace with good lighting and a clean surface. This helps keep small parts in place and avoids losing them during the change.
Safety Gear
Wear safety glasses to protect your eyes from sparks or debris. Use gloves to guard your hands against sharp edges and rough surfaces. Consider ear protection if you plan to test the grinder after blade change.
Wrench Or Spanner
Most angle grinders require a special wrench or spanner to loosen and tighten the blade flange. Check your grinder’s manual to find the correct size. Using the right tool prevents damage to the nut and spindle.
Replacement Blade Or Disc
Choose the correct blade for your task, such as cutting or grinding discs. Ensure the blade size matches your angle grinder’s specifications. Using an incorrect blade can be dangerous and reduce tool performance.
Spindle Lock Button
The spindle lock button stops the blade from turning while you loosen or tighten the flange. Verify that your grinder has this feature. It is essential for safely changing blades without slipping tools.

Credit: www.reddit.com
Ensure Safety Precautions
Safety is the top priority before changing the blade on an angle grinder. Proper precautions protect you from serious injury. Taking time to prepare ensures a smooth, risk-free process.
Ignoring safety rules can cause accidents. Always wear the right gear and handle tools carefully. Safety steps may seem simple but are essential for your protection.
Wear Protective Gear
Use safety glasses to protect your eyes from sparks and dust. Wear gloves to shield your hands from sharp edges. A dust mask helps prevent inhaling particles. Long sleeves and closed shoes add extra protection.
Unplug the angle grinder before starting any work. For cordless models, remove the battery completely. This stops the tool from turning on accidentally. Always check power is off before touching the blade.
Use The Correct Tools
Use the wrench or key supplied with the grinder to loosen the blade. Avoid using makeshift tools that may slip. A proper tool ensures a secure grip and safe blade removal. Do not force parts if they are tight.
Secure The Grinder
Place the grinder on a stable surface or clamp it down. This stops it from moving while you work. Hold the tool firmly to avoid slips. A steady grinder makes blade change safer and easier.
Check The Blade Condition
Inspect the new blade for cracks or damage before fitting it. Do not use damaged or worn blades. A good blade reduces the risk of breakage during use. Always match the blade size to the grinder’s specifications.
Disconnect Power Source
Always unplug the angle grinder before changing the blade to prevent accidents. Ensure the power source is completely disconnected for safety. This step protects you from electric shock and unexpected startup.
Why Disconnecting The Power Source Is Crucial
Disconnecting the power source prevents accidents and injuries. It stops the angle grinder from turning on unexpectedly.
Always make this your first step before changing the blade. Safety should never be overlooked when working with power tools.
How To Disconnect A Corded Angle Grinder
Unplug the grinder from the electrical outlet. Hold the plug firmly and pull it out straight.
Do not pull the cord. Pulling the cord can damage the wire and cause electric shock risks.
How To Disconnect A Cordless Angle Grinder
Remove the battery pack before you start. Locate the release button and press it to detach the battery.
Keep the battery away from the tool until the blade change is complete. This stops accidental startup.
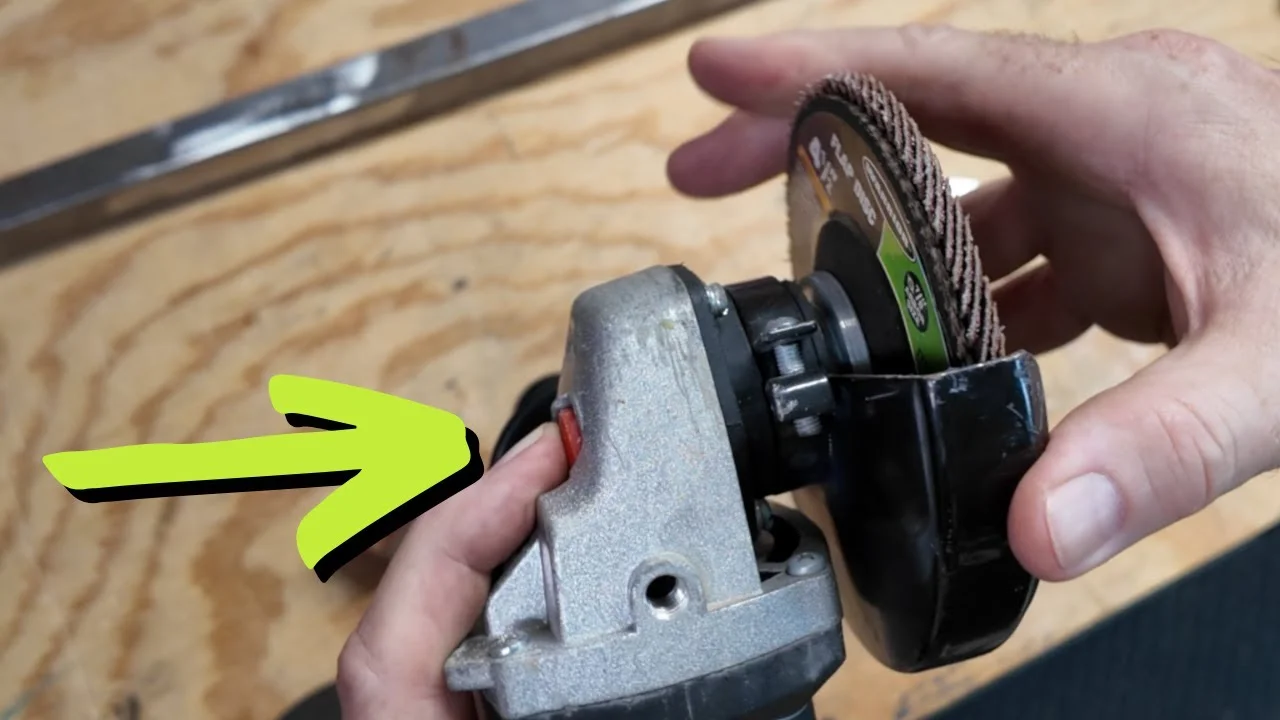
Credit: www.youtube.com
Locate Spindle Lock Button
Locating the spindle lock button is the first step to safely change the blade on an angle grinder. This button helps to stop the spindle from turning, allowing you to remove or install the blade with ease. Understanding where this button is will save time and prevent accidents.
Most angle grinders have the spindle lock button near the blade guard or on the top of the tool’s body. It is usually a small, round button that you can press with your finger or thumb. This button works by locking the spindle’s rotation, so the blade stays still while you work on it.
Before pressing the spindle lock button, make sure the angle grinder is unplugged or the battery is removed. This step ensures no accidental start, keeping you safe during the blade change process.
How To Find The Spindle Lock Button On Your Angle Grinder
Look closely near the blade area. The spindle lock button is often on the side or top. It may be labeled with a small icon or text. Press it gently to test if it locks the spindle.
Why Pressing The Spindle Lock Button Is Important
Pressing the button stops the blade from spinning. This makes it easier to loosen or tighten the blade nut. Without locking the spindle, the blade would rotate freely and be hard to remove.
Tips For Using The Spindle Lock Button Safely
Always unplug the grinder before pressing the button. Use your thumb or finger to hold it down firmly. Do not force the button if it feels stuck. Check the user manual for specific instructions.
Remove Old Blade
Removing the old blade is the first step in changing the blade on an angle grinder. This process ensures safety and prepares the tool for the new blade. Take your time and follow each step carefully.
Unplug The Angle Grinder
Always unplug the angle grinder before starting. This prevents accidental starts. Safety first.
Press The Spindle Lock Button
Locate the spindle lock button on your grinder. Press and hold it to stop the blade from turning. This locks the spindle in place.
Loosen The Clamping Flange
Use a wrench to turn the clamping flange counterclockwise. This loosens the flange that holds the blade. Keep holding the spindle lock button while doing this.
Remove The Old Blade
Once the flange is loose, carefully take off the old blade. Handle the blade by its edges to avoid cuts. Set it aside safely.
Select Correct Replacement Blade
Selecting the correct replacement blade for your angle grinder is essential. The right blade ensures safety and effective cutting or grinding. Using the wrong blade can damage the tool or cause accidents.
Every blade has specific features. Size, type, and material matter most. Choose a blade that fits your angle grinder’s specifications and the task at hand.
Select The Right Blade Size
Check the diameter of your current blade. Most angle grinders use blades between 4 and 9 inches. The replacement must match this size exactly. Using a bigger or smaller blade is unsafe and can break the tool.
Choose The Correct Blade Type
Blades come in cutting, grinding, and sanding types. Cutting blades are thin and sharp. Grinding blades are thicker and rougher. Select the blade type that fits your job. Using the wrong type reduces efficiency and risks injury.
Match Blade Material To Your Task
Blades are made from different materials. Diamond blades cut hard materials like stone and concrete. Abrasive blades work well on metal. Wood blades cut wood smoothly. Pick a blade material suited for the surface you work on.
Check Arbor Size Compatibility
The arbor hole is the center hole of the blade. It must fit your grinder’s spindle size. Common arbor sizes are 5/8 inch or 7/8 inch. A loose or tight fit can cause wobbling and unsafe operation.
Look For Quality And Safety Marks
Buy blades with safety certifications. Look for marks like ANSI, OSHA, or EN12413. These ensure the blade meets safety standards. Avoid cheap blades without any certification to reduce risk.
Install New Blade
Installing a new blade on your angle grinder is simple and quick. This step is important for safe and effective cutting or grinding. Follow the right process to ensure the blade fits correctly and stays secure during use.
Prepare The New Blade
Check the new blade for any damage or cracks. Make sure it matches the size and type your angle grinder needs. Read the blade’s instructions if available. This helps avoid mistakes later.
Place The Blade On The Spindle
Hold the angle grinder steady. Align the hole in the blade with the spindle. Slide the blade onto the spindle carefully. Ensure it sits flat against the backing flange.
Secure The Clamping Flange
Put the clamping flange on top of the blade. Note the correct side to use: flat or raised, based on blade type. Screw the flange nut onto the spindle by hand first. Do not tighten fully yet.
Tighten The Blade
Press the spindle lock button to stop the spindle from turning. Use the wrench to tighten the flange nut firmly. Avoid over-tightening to prevent damage. The blade should feel secure and not move.
Test Angle Grinder Functionality
Testing the functionality of your angle grinder after changing the blade is essential for safety and performance. This step ensures the blade is installed correctly and the tool operates smoothly. Never skip this process as it helps avoid accidents and equipment damage.
Check The Power Connection
Plug in the angle grinder or insert the battery securely. Ensure the power source is stable. A loose connection can cause the tool to stop unexpectedly.
Perform A Visual Inspection
Look at the blade and guard closely. Confirm the blade is tight and aligned properly. The guard should be in place to protect you from sparks and debris.
Start The Angle Grinder
Turn on the tool carefully. Listen for any unusual sounds. A smooth, steady noise means the blade is balanced and secure.
Test The Blade Speed
Allow the grinder to reach full speed. Watch the blade for wobbling or vibration. Excessive movement indicates improper installation or damage.
Stop And Inspect Again
Turn off the grinder and wait for the blade to stop completely. Check the blade and guard once more. Tighten any loose parts before use.
Frequently Asked Questions
How To Change Angle Grinder Blade?
Unplug the angle grinder. Press the spindle lock button to stop the blade. Use the wrench to loosen and remove the flange nut. Replace the blade, align the flange, then tighten the nut while holding the spindle lock. Plug in and test the blade securely.
How To Change Grinder Blade Without Tool?
Hold the spindle lock button to stop blade rotation. Twist the blade counterclockwise by hand or tap the flange gently to loosen. Remove and replace the blade carefully. Tighten by twisting clockwise, then release the lock button. No tools needed if the spindle lock works smoothly.
Which Way To Loosen Angle Grinder Blade?
Press the spindle lock button on the grinder. Turn the blade nut counterclockwise to loosen the angle grinder blade.
How To Get An Angle Grinder Disc Off?
Disconnect the grinder from power. Press the spindle lock button to hold the disc. Use the wrench to turn the clamping flange counterclockwise. Remove the disc carefully. Replace or clean before reassembling. Tighten the flange securely while holding the spindle lock.
How Do I Safely Change The Blade On An Angle Grinder?
Always unplug the grinder first, press the spindle lock, then use a wrench to loosen the flange nut.
Conclusion
Changing the blade on an angle grinder is simple and safe. Always unplug the grinder before starting. Use the spindle lock to hold the disc steady. Remove the clamping flange carefully, then swap the blade. Make sure the new blade fits properly and tighten the flange securely.
Regular blade changes keep your tool working well and safe. Practice these steps to handle your angle grinder with confidence. Safety first, and your projects will go smoothly every time.
Related reading: Water Stone vs Oil Stone.
Related reading: What Is an Angle Grinder Used For.
Related reading: How to Sharpen Drill Bits on a Bench Grinder.
{ “@context”: “https://schema.org”, “@type”: “Article”, “headline”: “How to Change Blade on Angle Grinder: Easy Step-by-Step Guide”, “description”: “Learn how to change blade on angle grinder by safely removing and replacing the cutting disc for effective use in grinding and cutting tasks.”, “url”: “https://www.powertoolstoday.com/how-to-change-blade-on-angle-grinder/”, “datePublished”: “2025-11-26”, “dateModified”: “2026-03-18”, “author”: { “@type”: “Organization”, “name”: “Power Tools Today”, “url”: “https://www.powertoolstoday.com” }, “publisher”: { “@type”: “Organization”, “name”: “Power Tools Today”, “url”: “https://www.powertoolstoday.com” }, “mainEntityOfPage”: { “@type”: “WebPage”, “@id”: “https://www.powertoolstoday.com/how-to-change-blade-on-angle-grinder/” }, “image”: { “@type”: “ImageObject”, “url”: “https://www.powertoolstoday.com/wp-content/uploads/2025/11/how-to-change-blade-on-angle-grinder.webp” } }nnnn