Last Updated: March 20, 2026
If you use a circular saw, you know how important a sharp blade is for clean, precise cuts. But when the blade gets dull or damaged, it’s time to replace it—and that can feel tricky if you’ve never done it before.
Don’t worry! Changing your circular saw blade is easier than you think. With just a few simple steps, you can have your saw ready to tackle any project safely and efficiently. Keep reading, and you’ll learn exactly how to swap out your blade like a pro—no confusion, no stress.
Let’s get started!
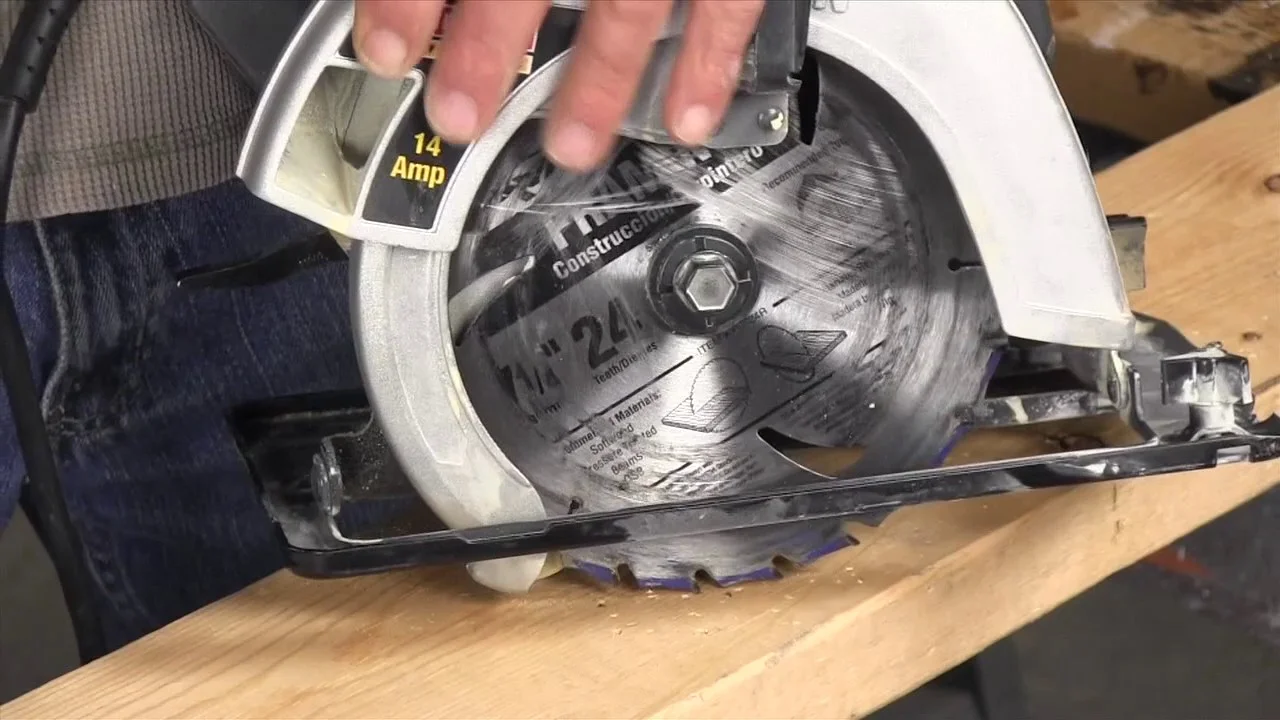
Credit: www.youtube.com
Prepare The Saw
Preparing the saw is the first step to safely change the circular saw blade. This step ensures no accidents happen during the blade replacement. Take time to get the saw ready before starting any work.
Unplug The Power Source
Always unplug the saw from the power outlet. This stops the saw from turning on by accident. Check the plug and cord for any damage. Do not proceed if the cord looks worn or broken.
Engage The Blade Guard
Move the blade guard to cover the blade completely. The guard protects your hands and fingers. Make sure it stays in place and does not move while you work.
Secure The Blade
Securing the circular saw blade is a crucial step before loosening or tightening it. A stable blade prevents accidents and damage during the change. Taking the right measures ensures safety and efficiency.
Press Spindle Lock Or Use A Wooden Block
Most circular saws have a spindle lock button. Press this button to stop the blade from turning. Hold the button firmly while you turn the wrench.
If your saw lacks a spindle lock, place a wooden block against the blade teeth. This block will stop the blade from spinning. Make sure the block fits tightly between the blade and the saw base.
Prevent Blade Movement
Preventing blade movement is key to loosening or tightening the bolt safely. Keep steady pressure on the spindle lock or wooden block. Avoid forcing the wrench too hard to prevent slipping.
Check that the saw is unplugged or the battery is removed before securing the blade. Safety first. A fixed blade means less risk and an easier blade change.
Remove The Arbor Nut
Removing the arbor nut is a key step in changing a circular saw blade. This nut holds the blade securely in place on the arbor shaft. Without loosening it, the blade cannot be taken off safely. Proper removal prevents damage to the saw and ensures your safety. Follow these simple steps to remove the arbor nut correctly.
Identify Thread Direction
Check the direction of the thread before loosening the arbor nut. Most circular saws use a standard right-hand thread. Turn the nut counterclockwise to loosen it. Some models have a reverse thread. In that case, turn the nut clockwise to loosen. Look for arrows or markings on the saw for guidance.
Use Appropriate Wrench
Select the correct wrench for the arbor nut size. Usually, a socket or open-end wrench fits best. Use the wrench to turn the nut in the right direction. Hold the saw steady to avoid slipping. Apply steady pressure until the nut loosens. Remove the nut and set it aside carefully.
Take Out Old Blade
Removing the old blade is the first step in changing a circular saw blade. It requires care to avoid injury and damage to the saw. Follow these simple steps to take out the blade safely.
Lift Blade Carefully
After loosening the bolt, raise the blade guard slowly. The blade may be sharp, so handle it with caution. Use gloves if possible to protect your hands. Lift the blade straight up to avoid bending or damaging it. Keep your fingers clear of the teeth to stay safe.
Save Washers And Flanges
Once the blade is free, remove the washers and flanges carefully. These parts hold the blade in place and must be reused. Place them in a safe spot to avoid losing any pieces. Proper reassembly depends on keeping these parts organized.
Install New Blade
Installing a new blade on your circular saw is a simple but important step. It ensures your saw cuts cleanly and safely. Follow these clear steps to put the new blade in place correctly. Take your time and handle the blade carefully.
Check Blade Orientation
Look at the new blade closely. Find the arrow on the blade that shows the rotation direction. This arrow must match the saw’s spinning direction. Installing the blade backward can cause poor cutting and damage. Make sure the teeth point in the right direction. This step helps the saw work smoothly and safely.
Slide Blade Onto Arbor
Hold the blade by the edges to avoid cuts. Place the blade onto the arbor, the round shaft in the saw’s center. Slide it gently until it fits snugly. The hole in the blade should match the arbor size exactly. Check that the blade sits flat without wobbling. This ensures steady and accurate cutting. After the blade is in place, you can secure it with the washer and bolt.
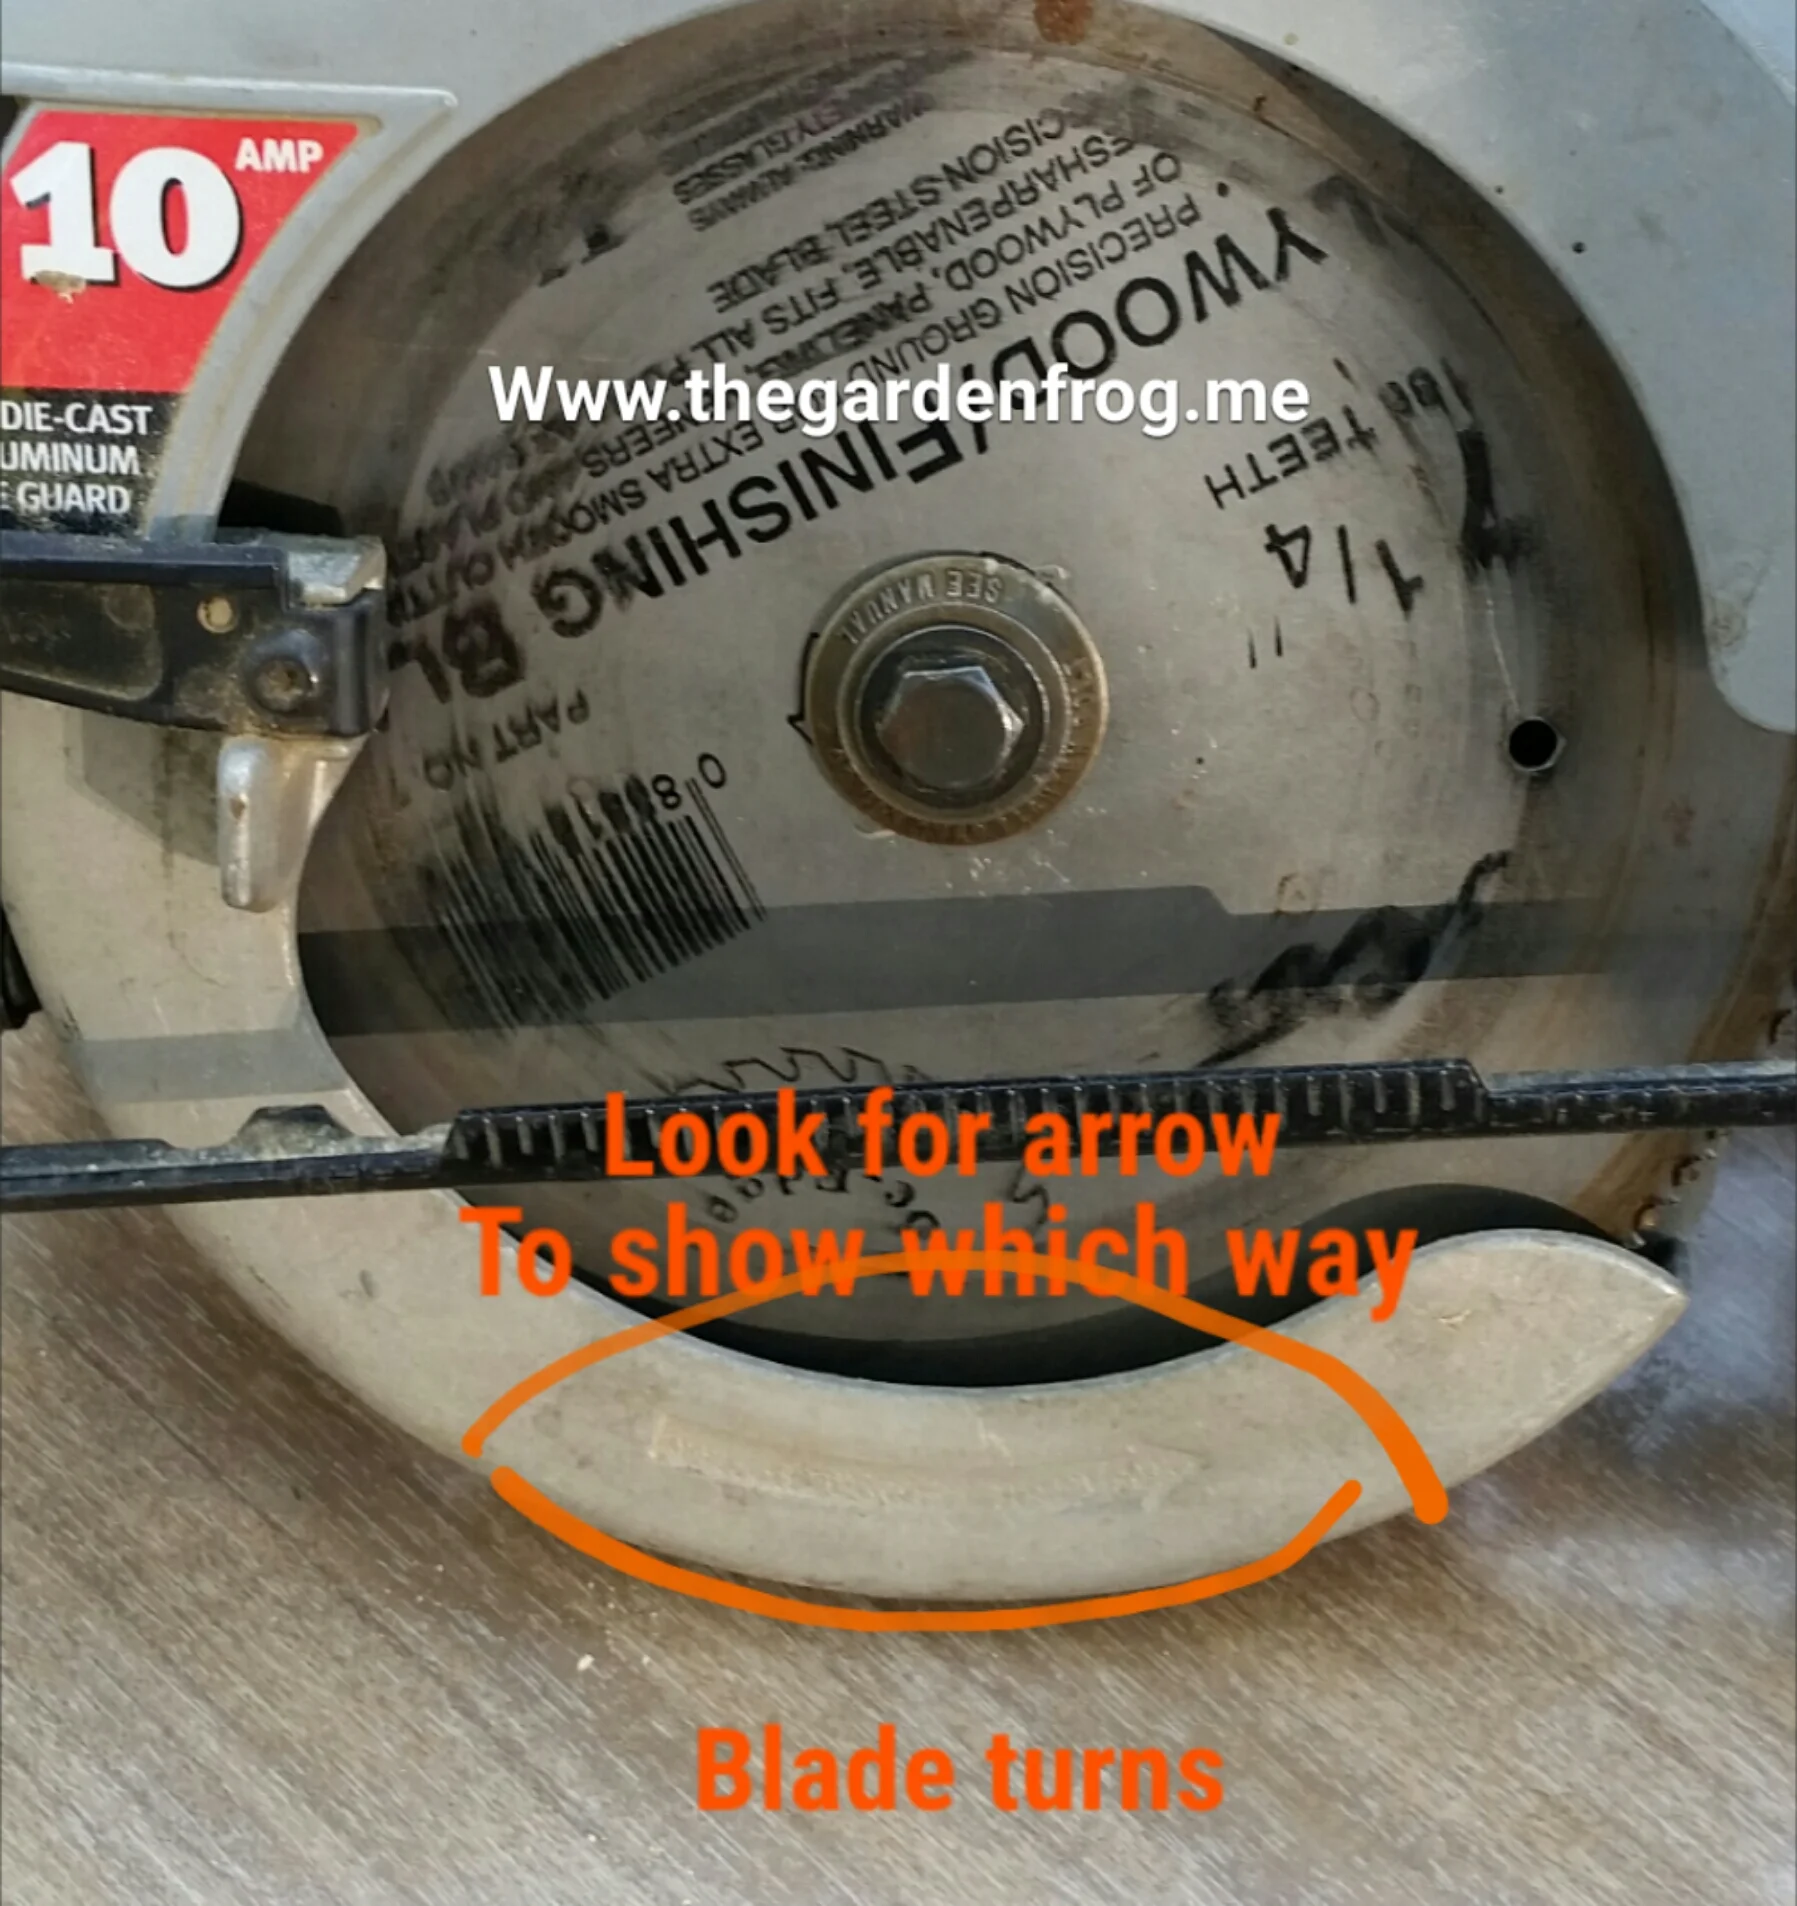
Credit: thegardenfrog.wordpress.com
Secure And Test
After placing the new blade on your circular saw, securing it properly is vital. A loose blade can cause accidents or damage. Testing ensures your saw works smoothly and safely. Follow these steps carefully to secure and test your blade.
Tighten Arbor Nut Correctly
Use the wrench provided with your saw to tighten the arbor nut. Turn it clockwise until it feels firmly snug. Avoid over-tightening to prevent damage to the blade or saw. Check that the blade sits flat and does not wobble. This step keeps the blade stable during operation.
Reconnect Power And Test Operation
Plug the saw back into the power source. Hold it firmly with both hands before switching it on. Turn on the saw and listen for unusual noises. Watch the blade spin smoothly without shaking. If everything feels right, your blade change is successful and safe to use.
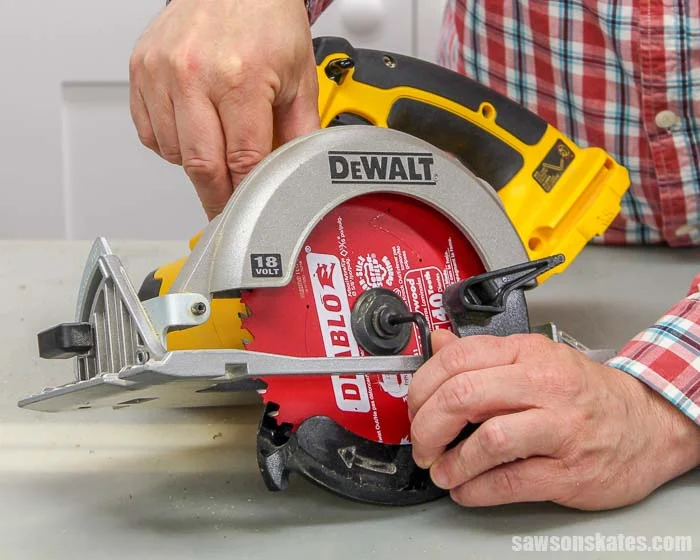
Credit: sawsonskates.com
Frequently Asked Questions
How Do You Change The Blade On A Circular Saw?
Unplug the circular saw. Press the spindle lock to hold the blade. Use a wrench to loosen and remove the arbor bolt. Lift the guard, slide out the old blade, and insert the new one. Tighten the bolt securely. Reconnect power and test the saw.
Is A Circular Saw Blade Bolt Reverse Thread?
Circular saw blade bolts usually have standard right-hand threads. Only some miter saws use reverse threads. Tighten clockwise, loosen counterclockwise.
Which Direction To Loosen Circular Saw Blade?
Loosen the circular saw blade bolt by turning it counterclockwise. Follow “lefty loosey, righty tighty” for standard blades.
How To Change Circular Saw Blade Without Spindle Lock?
Unplug the saw for safety. Wedge a piece of wood between blade teeth and guard. Hold the blade steady and use a wrench to loosen the bolt. Remove the bolt, washer, and old blade. Install the new blade, then tighten the bolt securely.
How Do I Safely Remove A Circular Saw Blade?
Unplug the saw first. Use the blade lock or wedge to stop blade spinning. Then, loosen and remove the bolt.
What Tools Do I Need To Change A Circular Saw Blade?
A wrench or socket, blade lock tool, and safety gloves are essential to change the blade safely.
Conclusion
Changing a circular saw blade is simple with the right steps. Always unplug your saw before starting to stay safe. Use the correct tools to remove and install the blade. Make sure the blade fits tightly and faces the right way.
Regularly changing blades keeps your saw working well and cuts clean. Practice these steps, and you will change blades quickly and safely every time. Keep your saw sharp and ready for any project ahead.
{ “@context”: “https://schema.org”, “@type”: “Article”, “headline”: “How to Change Circular Saw Blade: Quick & Safe Step-by-Step Guide”, “description”: “Learn how to change circular saw blade safely by following step-by-step instructions to maintain tool performance and ensure accurate cutting results.”, “url”: “https://www.powertoolstoday.com/how-to-change-circular-saw-blade/”, “datePublished”: “2025-11-15”, “dateModified”: “2026-03-18”, “author”: { “@type”: “Organization”, “name”: “Power Tools Today”, “url”: “https://www.powertoolstoday.com” }, “publisher”: { “@type”: “Organization”, “name”: “Power Tools Today”, “url”: “https://www.powertoolstoday.com” }, “mainEntityOfPage”: { “@type”: “WebPage”, “@id”: “https://www.powertoolstoday.com/how-to-change-circular-saw-blade/” }, “image”: { “@type”: “ImageObject”, “url”: “https://www.powertoolstoday.com/wp-content/uploads/2025/11/How-to-Change-Circular-Saw-Blade-1024×576.webp” } }nn