Last Updated: March 20, 2026
If you own a concrete mixer, you know how important it is to keep it clean. Leftover concrete can harden inside the drum, making your mixer less efficient and shortening its lifespan.
But cleaning a concrete mixer doesn’t have to be a tough, time-consuming task. In fact, with the right steps, you can quickly restore your mixer to perfect working condition. In this guide, you’ll learn simple and effective ways to clean your concrete mixer, save time, and avoid costly repairs.
Ready to make your mixer work like new again? Let’s dive in!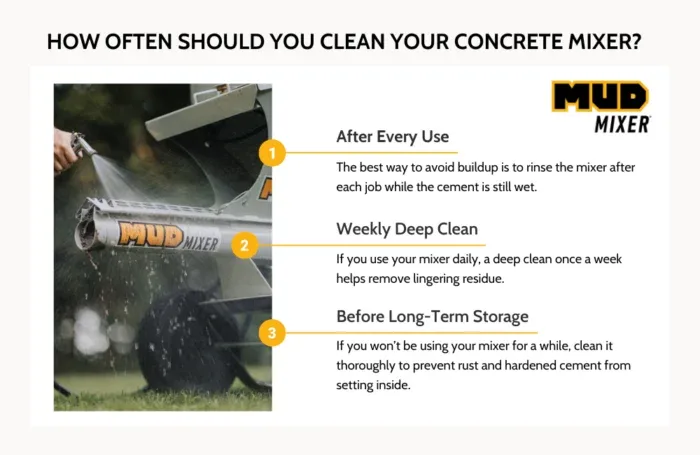
Credit: mudmixer.com
Prepare The Mixer
Preparing the concrete mixer is the first step to ensure thorough cleaning. Proper preparation helps remove all traces of concrete and protects the machine from damage. Start by clearing out any leftover material to make cleaning easier.
This step also prevents concrete from hardening inside the drum. Next, gather the right tools for a smooth cleaning process. Having everything ready saves time and effort.
Remove Leftover Concrete
Use a shovel or scraper to remove wet or dry concrete from the drum. Focus on corners and edges where concrete tends to stick. Be careful not to damage the drum surface while scraping.
Remove as much material as possible before rinsing. This prevents hardened chunks from blocking the cleaning process. Dispose of leftover concrete properly to avoid mess and hazards.
Gather Cleaning Tools
Collect essential cleaning tools such as a stiff brush, hose, and bucket. A pressure washer helps remove stubborn concrete faster. Gloves and safety goggles protect you during cleaning.
Having all tools at hand keeps the process smooth. Prepare water supply for rinsing the drum after scraping. Proper tools make cleaning easier and more effective.
Rinse The Drum
Rinsing the drum is a key step in cleaning a concrete mixer. It removes leftover cement and prevents buildup inside the drum. Proper rinsing keeps the mixer in good condition and ready for the next job.
Using water during rinsing helps wash away any fresh concrete before it hardens. The drum should be rotating to make sure water reaches all surfaces. This step makes cleaning easier and faster.
Add Water While Rotating
Start by adding clean water into the drum. Turn on the mixer and let it rotate slowly. The spinning motion spreads water inside the drum evenly.
Keep the drum moving for several minutes. This action loosens any wet or dry concrete stuck to the surface. Avoid stopping too soon, as cement may harden and become difficult to remove.
Use Pressure Washing
Pressure washing helps remove tough cement stains and residue. Aim the water stream directly at the drum’s interior. Move the nozzle around to cover every area.
Pressure washing can reach spots that simple rinsing might miss. Take care not to damage the drum’s surface by holding the nozzle too close. A strong water jet removes buildup effectively and saves time.
Scrub Stubborn Residue
Stubborn residue in a concrete mixer can be tough to remove. Dried concrete and cement build-up stick to the drum and blades. These residues reduce the mixer’s efficiency. Scrubbing the residue is a key step. This process ensures the mixer stays clean and lasts longer.
Use Scrapers And Brushes
Start by scraping off large chunks of dried concrete. Use a sturdy scraper or putty knife. Be careful not to damage the drum surface. After scraping, scrub the remaining residue with a stiff brush. A wire brush works well for tough spots. Brush in circular motions to lift the cement. Repeat until the surface looks clean.
Apply Mild Detergents
Apply a mild detergent to the drum and blades. Mix the detergent with warm water for best results. Use a soft brush or sponge to scrub the detergent into the residue. The detergent helps break down the cement. Let it sit for a few minutes before scrubbing again. Rinse thoroughly with clean water to remove all soap. This step prevents future build-up and keeps the mixer clean.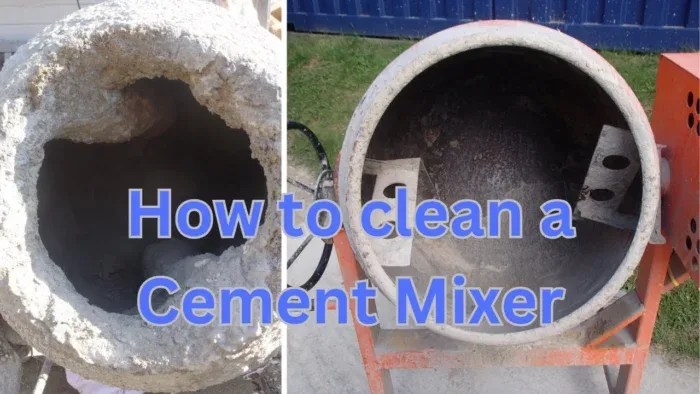
Credit: www.youtube.com
Dry And Inspect
After cleaning your concrete mixer, drying and inspecting are key steps. These help keep the mixer in good shape and ready for the next job. Moisture left inside can cause rust and damage. Checking for any damage early saves time and repair costs later.
Remove Moisture
Start by wiping the inside of the drum with a dry cloth. Use air hoses if available to blow out water from hard-to-reach spots. Leave the drum open in a dry area to allow air to circulate. Avoid closing the drum while it is still wet. This prevents rust and mold from forming inside the mixer.
Check For Damage
Look closely at the drum and blades for cracks or dents. Inspect the motor and mixing paddles for wear or loose parts. Check the frame and wheels for any signs of rust or bending. Fix small problems right away to avoid bigger repairs later. Regular inspection extends the life of your concrete mixer and keeps it working well.
Maintenance Tips
Maintaining a concrete mixer is key to keeping it working well and lasting longer. Proper care stops cement buildup and avoids damage. Clean mixers mix better and save time on repairs.
Regular Cleaning Schedule
Set a cleaning routine after every use. Remove leftover concrete before it hardens. Rinse the drum with water while it spins. This stops cement from sticking inside. Check for any stuck pieces and scrape them off. Regular cleaning keeps the mixer in good shape and ready for the next job.
Avoid Harsh Chemicals
Use mild soap or special concrete cleaner. Harsh chemicals can damage the metal parts. Avoid acids or bleach, which cause rust. Water and gentle scrubbing work best to remove dirt and cement. Protect the mixer by choosing safe cleaning products. This helps keep the mixer strong and reliable for years.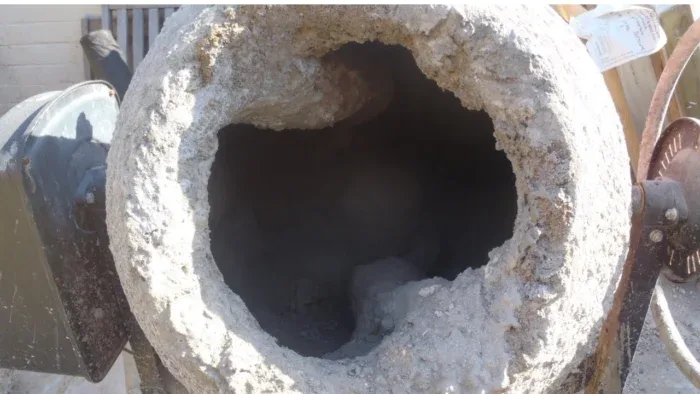
Credit: www.youtube.com
Conclusion
Cleaning your concrete mixer regularly saves time and money. Start by removing leftover cement with a scraper or shovel. Rinse the drum with clean water while it spins to loosen debris. Repeat rinsing until no residue remains. Always dry the drum before the next use.
A clean mixer works better and lasts longer. Keep up this simple routine after every job. It prevents buildup and keeps your equipment in top shape. Clean tools mean smoother work and fewer problems. Simple steps make a big difference.
Frequently Asked Questions
Scrape out leftover cement using a shovel. Rinse the drum with clean water while rotating it. Repeat until clean. Dry the drum before use.
Remove leftover cement with a scraper or shovel. Rinse the drum with water while spinning it. Repeat until clean. Dry the drum before use.
Yes, Dawn dish soap can clean concrete, especially oil and grime. Use with a scrub brush or power washer for best results. Avoid overuse on stamped or sealed concrete to prevent residue. Consider a pH-neutral cleaner for delicate surfaces.
Remove leftover cement with a scraper. Rinse the drum with clean water while rotating. Repeat until clean. Dry the drum before next use. Regularly check and lubricate moving parts for smooth operation. Store the mixer in a dry place to prevent rust and damage.
Clean the mixer after every use to prevent cement from hardening inside.
Use a shovel, scraper, water hose, and stiff brush for best results.
Related reading: How to Mix Concrete in a Bucket Without a Mixer.
Related reading: How to Use a Demolition Hammer to Remove Tile.
{ “@context”: “https://schema.org”, “@type”: “Article”, “headline”: “How to Clean Concrete Mixer: Quick & Easy Step-by-Step Guide”, “description”: “Learn how to clean concrete mixer equipment effectively to maintain its performance by removing cement residue and preventing buildup after each use.”, “url”: “https://www.powertoolstoday.com/how-to-clean-concrete-mixer/”, “datePublished”: “2025-11-09”, “dateModified”: “2026-03-18”, “author”: { “@type”: “Organization”, “name”: “Power Tools Today”, “url”: “https://www.powertoolstoday.com” }, “publisher”: { “@type”: “Organization”, “name”: “Power Tools Today”, “url”: “https://www.powertoolstoday.com” }, “mainEntityOfPage”: { “@type”: “WebPage”, “@id”: “https://www.powertoolstoday.com/how-to-clean-concrete-mixer/” }, “image”: { “@type”: “ImageObject”, “url”: “https://www.powertoolstoday.com/wp-content/uploads/2025/11/How-to-Clean-Concrete-Mixer-Quick-Easy-Step-by-Step-Guide-1024×576.webp” } }nn