Last Updated: March 27, 2026
Cutting a dado with a router is a skill that can take your woodworking projects to the next level. A dado is a groove cut into the surface of a board, usually to accept the edge of another board. You often see dados used in bookshelves, cabinets, and drawer construction, where strong joints are essential. While there are different ways to cut a dado, using a router offers accuracy, versatility, and a clean finish. If you want to achieve professional-looking joints, learning how to cut a dado with a router is worth your time.
But even though the process looks simple in videos, mistakes are common. A slight error can make the groove too loose or too tight, causing frustration and wasted materials. This guide will walk you through every step of cutting a dado with a router, from tool selection to finishing touches.
You’ll find practical tips, common pitfalls, and advanced advice—everything you need to get confident results.
Why Use A Router For Dados?
A router is one of the most versatile tools in any workshop. When it comes to dados, routers offer several advantages:
- Precision: Routers let you control the width and depth of the cut precisely.
- Clean Edges: The spinning bit makes smooth, splinter-free cuts, even across wood grain.
- Adjustability: You can adjust the cutting depth and switch bits for different dado widths.
- Less Tear-Out: Compared to saw blades, routers cause less chipping, especially in plywood.
Some may use table saws or dado stacks, but routers are safer for beginners and offer more flexibility, especially for smaller workpieces.
Types Of Dados And Router Bits
Before you start, it’s helpful to know the different types of dados and the router bits used to cut them.
Common Dado Types
- Standard Dado: Straight groove across the grain.
- Stopped Dado: Groove ends before the edge, making a hidden joint.
- Rabbeted Dado: Groove that also has a shoulder, often for stronger joints.
Router Bit Choices
The bit you choose will affect the quality and size of the dado. Here’s a quick comparison of popular bits for dado cutting:
| Bit Type | Best For | Notes |
|---|---|---|
| Straight Bit | Basic dados | Most common; available in fixed widths |
| Upcut Spiral Bit | Clean bottom dados | Excellent chip removal |
| Downcut Spiral Bit | Clean top edges | Less tear-out on face |
| Combination Bit | General use | Mixes features of up/downcut |
Tip: For plywood, use a bit slightly smaller than the nominal thickness, as plywood is often undersized.
Credit: www.woodsmith.com
Tools And Materials Needed
To cut a dado with a router, gather these items:
- Router: Plunge or fixed-base
- Router bit: Usually a straight or spiral bit, sized to your groove
- Guide or straightedge: For accurate routing
- Clamps: To secure your guide and workpiece
- Tape measure and pencil: For marking layout lines
- Safety gear: Eye protection, hearing protection, and a dust mask
- Test scrap wood: For practice cuts
Optional tools can make the process easier:
- Router edge guide: Attaches to the router for precise cuts
- Dado jig: Special jigs for repeatable grooves
- Vacuum or dust extractor: Keeps your workspace clean
Planning Your Dado
Good preparation is key to perfect dados. Start by considering the following:
Choosing Dado Width And Depth
The width should match the thickness of the mating board. For example, a shelf made from 3/4″ plywood needs a 3/4″ dado, but most plywood is slightly thinner. Always measure the real thickness.
Depth is usually 1/3 the thickness of the board. For a 3/4″ side panel, cut a dado about 1/4″ deep.
Marking Your Layout
Precise layout lines are crucial. Use a sharp pencil and a square. Mark both edges of the dado, not just the center, so your guide aligns perfectly.
Non-obvious insight: Always measure from the same edge of your board when marking multiple dados. This avoids small errors that can add up over a large project.

Credit: www.youtube.com
Setting Up Your Router
A well-set router makes clean, accurate dados. Here’s how to set up:
Selecting And Installing The Bit
- Choose a bit that matches your dado width. For odd sizes, you may need to make two passes.
- Unplug the router.
- Insert the bit fully, then pull it out about 1/8″ before tightening the collet.
Why pull out slightly? This prevents the bit from getting stuck when the collet tightens and allows for heat expansion.
Setting Cutting Depth
- Use the router’s depth stop or a depth gauge.
- Test the depth on scrap wood to confirm before cutting your actual workpiece.
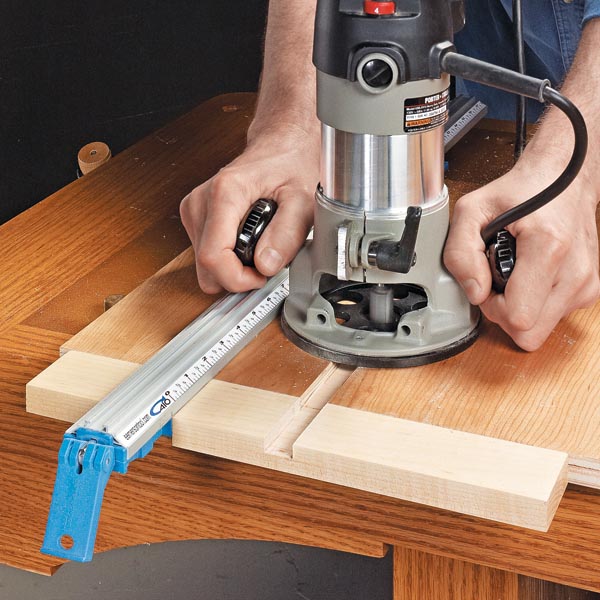
Setting Up A Guide
You need a straightedge or fence to guide your router. Clamp it firmly to your workpiece, so the bit travels exactly between your layout lines.
Non-obvious insight: Measure the distance from the edge of your router base to the edge of the bit. Add this to your layout line, so your guide is in the right position. Don’t guess!
Making A Test Cut
Before cutting the real piece, always make a test cut on scrap wood. This checks:
- Bit depth and width
- Position of your guide
- Quality of the cut (look for burning or tear-out)
If needed, adjust your setup and retest.
Cutting The Dado: Step-by-step
Let’s move to the main event—cutting the dado.
1. Secure Your Workpiece
Clamp your workpiece to your bench. It must not move while routing. Use non-marring pads to avoid dents.
2. Position The Router And Guide
Align the router base with your guide or fence. Double-check that the bit is just outside your layout line.
3. Start The Router Safely
- Hold the router firmly with both hands.
- Start the router before contacting the wood.
4. Make The First Pass
- Lower the bit to just above the surface.
- Plunge or lower the router slowly until the bit reaches full depth.
- Move the router steadily, keeping the base flat and tight to the guide.
- Do not force the router; let the bit do the work.
5. Clean Up The Groove
After the first pass, vacuum the groove and check the fit with your mating board.
6. Make Multiple Passes (if Needed)
For wide or deep dados, make several shallow passes. Increase depth 1/8″ at a time. This produces a cleaner cut and protects your router bit.
7. Check Your Work
Test the fit. The mating board should slide in smoothly but not be loose. If it’s too tight, adjust your guide slightly and take another light pass.
Pro tip: For a perfect fit, aim for a “press fit” where the mating board holds itself in place but is not forced.
Tips For Cleaner, Safer Dados
- Feed Direction: Always feed the router against the bit’s rotation (usually left to right).
- Keep the Router Flat: Tipping can cause uneven grooves.
- Use a Sharp Bit: Dull bits cause burning and tear-out.
- Secure Everything: Both the workpiece and guide must be clamped tightly.
Common Mistakes And How To Avoid Them
Even experienced woodworkers make errors. Here’s how to avoid the most common ones:
| Mistake | What Happens | How to Prevent |
|---|---|---|
| Wrong Guide Placement | Dado is off location | Measure from router base to bit edge |
| Moving Too Fast | Rough edges, tear-out | Go slow and steady |
| Too Deep in One Pass | Burning, overloads router | Take shallow passes |
| Loose Clamps | Guide moves, crooked groove | Double-check clamp tightness |
| No Test Cut | Bad fit, wasted material | Always test on scrap first |
Advanced Techniques
Once you master basic dados, you can try these advanced methods:
Using Dado Jigs
Special jigs let you cut dados perfectly sized for plywood (which is often undersized). They guide the router for a snug fit every time.
Stopped Dados
To make a groove that doesn’t go all the way across, mark start and stop points. Lower the router into the wood at your start mark, and lift it out at the end mark. Practice this on scrap first—stopped dados are tricky but look clean in finished furniture.
Double-pass Dados For Odd Sizes
If your bit isn’t the exact width you need, use two passes. After the first cut, shift your guide by the difference needed, and cut again. Take care to keep both cuts parallel.

Credit: www.popularwoodworking.com
Finishing The Dado
After cutting, you might need to clean up the groove:
- Chisel the corners if you used a round bit and want square ends.
- Sand lightly to remove any burn marks or fuzz.
- Check for fit one last time before assembly.
If you’re gluing the joint, lightly sand the mating surfaces for better adhesion.
When Not To Use A Router For Dados
While routers are excellent for most dados, there are situations where another tool may be better:
- Very wide dados: Table saw with a dado stack might be faster.
- Production runs: Dedicated machines are more efficient for hundreds of grooves.
- Very small workpieces: Hand tools or a router table offer more control.
Always consider the safety, accuracy, and time required before choosing your method.
Safety Reminders
Routing is safe with proper habits:
- Always wear eye and hearing protection.
- Don’t wear loose clothing or jewelry.
- Unplug the router when changing bits.
- Keep hands clear of the bit.
- Let the router come to a full stop before setting it down.
It’s easy to get comfortable after a few successful cuts, but always treat the router with respect.
Practical Example: Bookshelf Build
Imagine you’re building a bookshelf. You want your shelves to fit perfectly and hold heavy books without sagging. You choose to cut 3/4″ dados in the side panels.
- Measure your shelf thickness (actual, not nominal).
- Mark your dado positions, using a story stick for repeatability.
- Set up your router with a 3/4″ straight bit.
- Clamp your guide for each dado.
- Make test cuts, then rout the real grooves.
- Dry-fit the shelves for a tight, sturdy result.
This method gives a clean, professional look and a very strong joint compared to just screwing shelves into the sides.
How Routers Compare To Other Tools For Dados
Routers are not the only way to cut dados. Here’s how they compare with two other common methods:
| Method | Precision | Ease of Use | Best For |
|---|---|---|---|
| Router | High | Medium | Most projects, custom sizes |
| Table Saw + Dado Stack | High | Easy | Repeat cuts, wide grooves |
| Hand Tools | Medium | Challenging | Small pieces, detailed work |
For most home woodworkers, the router offers the best mix of accuracy, safety, and flexibility.
Further Learning
If you want to go deeper, many professional woodworkers share video tutorials. The Fine Woodworking site has detailed guides and advanced tips for router joinery.
Frequently Asked Questions
What Is A Dado, And Why Is It Used?
A dado is a groove cut across the grain of a board. It is used to make strong, hidden joints, often for shelving or cabinet construction.
Can I Cut A Dado With Any Router?
Almost any handheld router can cut dados, but a plunge router is easier for stopped dados. Make sure the router is powerful enough for the bit size you use.
How Do I Get A Perfect Fit If My Plywood Is Undersized?
Use a bit slightly smaller than the shelf thickness, then make a second pass to widen the dado until it fits snugly. Specialized plywood bits are available for this purpose.
How Deep Should A Dado Be?
A typical dado is one-third the thickness of the board, but this can vary. For a 3/4″ side panel, a 1/4″ deep dado is common.
Is It Better To Use A Router Or Table Saw For Dados?
Both work well. Use a router for precision, clean edges, and custom sizes. Use a table saw with a dado stack for fast, repeatable cuts on larger pieces.
Cutting a dado with a router is a valuable skill that opens up new possibilities in woodworking. With careful setup, practice, and attention to detail, you can achieve strong, professional joints every time.
