Last Updated: March 20, 2026
If you’ve ever struggled with screws splitting your wood or going in crooked, drilling a pilot hole is the simple trick you need to master. Knowing how to drill a pilot hole correctly not only makes your projects easier but also gives you stronger, cleaner results every time.
In this guide, you’ll learn exactly when and how to drill pilot holes, what size drill bit to use, and tips to avoid common mistakes. By the end, you’ll feel confident tackling your next project like a pro. Ready to get started?
Let’s dive in!
Credit: www.youtube.com
Choosing Drill Bit Size
Choosing the right drill bit size is key to drilling a perfect pilot hole. The drill bit must fit the screw properly. This prevents wood from splitting and ensures a strong hold. Picking the correct size depends on the screw and the wood type. Small mistakes here can ruin your project. Use the right bit to save time and effort.
Matching Bit To Screw Shank
The drill bit should match the screw shank size. The shank is the smooth part under the threads. The pilot hole must be as wide as the shank. This allows the threads to bite into the wood. If the hole is too small, the wood may split. If too large, the screw will be loose. Measure the screw shank before choosing your bit.
Adjusting For Wood Type
Softwood needs a smaller pilot hole than hardwood. Softwood is easier to drill and less likely to split. Hardwood is dense and can crack if the hole is too small. Use a drill bit slightly larger for hardwood. For very hard wood, test on a scrap piece first. This helps avoid mistakes and damages. Adjust bit size based on wood density and screw size.
Setting Drill Depth
Setting the correct drill depth is key to drilling a good pilot hole. It controls how deep the screw will go. This step helps avoid damage to the material. It also ensures the screw holds firmly. Two simple methods can help set drill depth accurately. Both work well for beginners and pros.
Using Tape As Depth Marker
Wrap a piece of tape around the drill bit. Place it at the point matching your desired depth. The tape acts as a clear visual stop. When drilling, stop once the tape touches the surface. This method is quick and requires no extra tools. It works well for most types of pilot holes. Always use bright colored tape for better visibility.
Attaching A Depth Stop
A depth stop is a small collar that fits on the drill bit. It limits how far the bit can enter the material. Slide the stop to the right spot on the bit. Tighten it securely so it won’t move. This method provides consistent and precise depth control. Depth stops are reusable and ideal for multiple holes. They are especially helpful for hardwood or thick materials.
Drilling Techniques
Drilling techniques play a crucial role in creating clean and accurate pilot holes. Proper methods help prevent common problems and ensure the screw holds firmly. Using the right drilling approach saves time and improves the final result.
Drilling Straight And Steady
Keep the drill perpendicular to the wood surface. This ensures the hole is straight and the screw fits properly. Hold the drill firmly with both hands to avoid slipping.
Start drilling slowly to create a small guide hole. Increase speed once the bit is stable. Avoid pushing too hard; let the drill bit do the work. Steady pressure helps prevent wobbling and uneven holes.
Avoiding Wood Splitting
Choose the correct drill bit size for the screw. A pilot hole slightly smaller than the screw prevents wood from splitting. Drill to the screw’s length to reduce pressure on the wood.
In hardwoods, drill a full-length pilot hole to protect the wood fibers. For softwoods, a shallower hole may be enough. Use masking tape on the drill bit to mark the depth and avoid drilling too deep.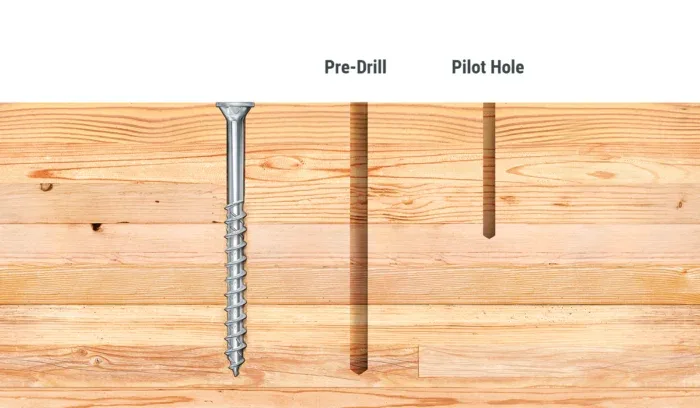
Credit: mtcsolutions.com
Pilot Holes For Different Materials
Drilling pilot holes varies depending on the material you work with. Different materials need different drill bits and techniques. Choosing the right approach helps prevent damage and ensures a strong hold. Below, learn how to handle pilot holes for softwoods, hardwoods, metal, and masonry.
Softwoods Vs Hardwoods
Softwoods are easier to drill. Use a slightly smaller drill bit than the screw diameter. This helps the screw grip without splitting the wood. For hardwoods, drill a pilot hole the same size as the screw core. This reduces the risk of cracking. Hardwoods are dense and require more care to avoid damage.
Always drill deep enough to match the screw length. This allows the screw to fit fully and hold tight. For softwoods, you may not always need a pilot hole. But hardwoods almost always require one for the best results.
Metal And Masonry Considerations
Metal and masonry need special bits and techniques. Use a high-speed steel bit for metal pilot holes. Start with a small bit, then increase size if needed. Drill slowly and use cutting oil to keep the bit cool. This prevents damage and extends bit life.
Masonry requires a masonry drill bit with a carbide tip. Use a hammer drill setting for concrete or brick. Drill straight and apply steady pressure. Do not force the drill to avoid cracking the material. Always match pilot hole size to the type of anchor or screw used.
Alternatives Without A Drill
Not everyone has a drill handy, but pilot holes still need making. There are simple ways to start a hole without power tools. These methods work well for light projects or quick fixes. Using basic hand tools or manual techniques can guide your screws safely into wood.
Using Hand Tools
A common tool for making pilot holes is an awl. It is a pointed metal tool used to punch a small hole. Place the awl where the screw will go. Press and twist it to create a shallow hole. This hole helps the screw start without splitting the wood.
Another option is a nail and hammer. Choose a nail thinner than the screw. Tap the nail lightly into the wood to make a small hole. Remove the nail and insert the screw. This method works best on softwood or thin materials.
Creating Pilot Holes Manually
Use a sharp screwdriver to begin a pilot hole. Push the tip into the wood and twist slowly. This action carves out a small hole for the screw. It takes more effort but works in a pinch. Make sure to control the pressure to avoid damage.
For tougher wood, try heating a metal rod or nail. Heat until hot and press it into the wood. The heat burns a small hole, easing screw insertion. Be careful with this method to avoid burns or fire hazards.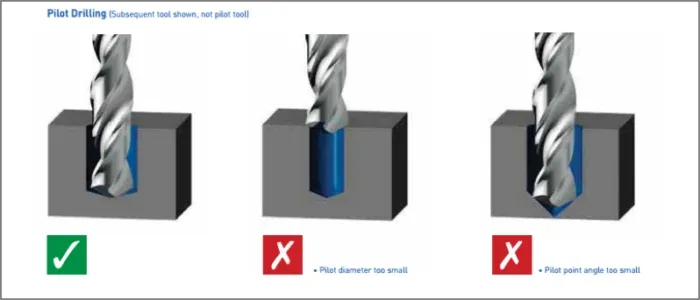
Credit: www.bigdaishowa.com
Conclusion
Drilling a pilot hole makes screw driving easier and prevents wood splitting. Choose the right drill bit size to match your screw. Mark the drill bit for the correct depth before starting. Take care with hardwoods by drilling deeper holes.
For softwoods, a shallow hole often works well. Using these simple steps improves your project’s strength and finish. Practice a few times to gain confidence and skill. Remember, patience leads to better results in woodworking tasks.
Frequently Asked Questions
Drill the pilot hole as deep as the screw length. This guides the screw and prevents wood splitting. Use tape or a depth stop to measure accurately.
Choose a drill bit matching the screw’s inner diameter, excluding the threads. This ensures easy driving and prevents wood splitting.
Yes, drill pilot holes in 2x4s to prevent wood splitting and ease screw insertion. Use a drill bit matching the screw’s inner diameter.
Yes, you can create a pilot hole without a drill using a nail and hammer to make a small starter hole. This helps guide screws and prevents wood splitting.
A pilot hole is a small guide hole that helps screws go in straight and prevents wood from splitting.
Pick a bit slightly smaller than the screw’s core to allow easy screw insertion and strong grip.
