Last Updated: March 20, 2026
If you’re serious about woodworking, you know how important clean, precise cuts are. But working with a table saw can be tricky—and even dangerous—when you don’t have the right setup.
That’s where a table saw sled comes in. It’s a simple, yet powerful tool that boosts your safety, accuracy, and efficiency every time you make a cut. Imagine cutting your wood pieces perfectly every single time, with less risk of kickback and no guesswork.
In this guide, you’ll learn exactly how to make a table saw sled that fits your needs and helps you take your woodworking projects to the next level. Ready to make your table saw safer and more precise? Let’s get started!
Credit: www.finewoodworking.com
Why Use A Table Saw Sled
A table saw sled is an essential tool for woodworkers. It helps make precise, safe cuts on a table saw. Using a sled brings many advantages that improve your cutting experience. From safety to accuracy, the sled makes work easier and more reliable.
Safety Benefits
A sled keeps your hands far from the blade. It holds the wood steady on a solid base. This reduces chances of slips or kickbacks. The sled guides the wood smoothly through the blade. It protects you from accidents and injuries.
Accuracy Improvements
The sled provides a firm and flat surface to cut on. It aligns the wood perfectly with the blade. This ensures straight and square cuts every time. You avoid crooked or uneven edges. Accuracy is much better than freehand cutting.
Repeatable Cuts
Once set up, the sled allows you to make the same cut again. You can measure and mark stops on the sled. This makes identical cuts fast and simple. Repeatable cuts save time and improve project quality. It is perfect for cutting multiple pieces to the same size.
Reduced Tear-out
The sled supports the wood fully while cutting. This support helps reduce splintering and tear-out. The wood fibers stay intact, leaving a clean edge. Tear-out is a common problem with crosscuts. The sled reduces waste and improves finish quality.
Versatility For Angled Cuts
The sled can be adjusted for angled or miter cuts. You can add fences or stops at different angles. This expands the types of cuts you can make on one tool. Angled cuts are easier and safer with a sled. It increases the sled’s usefulness for many projects.
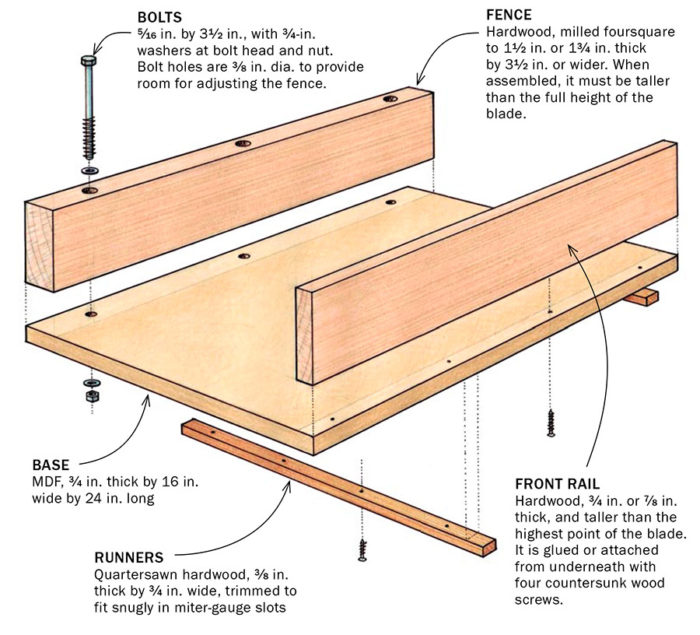
Materials Needed
Gathering the right materials is the first step to building a reliable table saw sled. Choosing quality parts ensures the sled will be safe, sturdy, and accurate. Each material plays a key role in the sled’s performance and durability.
Below are the main materials you will need, broken down by their purpose in the build.
Plywood Thickness
Use plywood that is at least 3/4 inch thick for the sled base. This thickness offers a solid, stable surface. Thinner plywood may flex or warp during use. Baltic birch plywood is a popular choice because it is strong and has a smooth surface. Avoid particle board or soft plywood as they wear quickly and lack durability.
Wood For Fences
Fences guide the workpiece during cuts, so choose wood that is straight and stable. Hardwoods like maple or oak work well, but quality softwoods such as pine can also be used. The fence should be flat and square to the base for accurate cuts. Make sure the wood is free from warps and cracks.
Runners And Hardware
Runners fit into the table saw miter slots to guide the sled smoothly. Use hardwood strips or hardwood dowels for runners. They must match the width and thickness of the miter slots exactly. For hardware, select screws that are long enough to hold parts firmly but not so long they split the wood. Use wood glue for extra strength in joints.
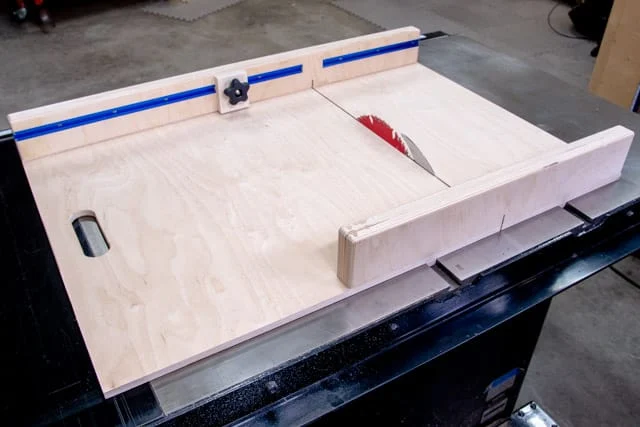
Building The Base
Building the base is the first step in making a sturdy table saw sled. The base supports the workpiece and guides the sled smoothly along the saw. A strong, flat base ensures accurate cuts and safe operation. Use quality materials to create a solid foundation for your sled.
Start by choosing the right plywood. The thickness and flatness affect the sled’s performance. The base must fit your table saw and allow easy movement. Careful preparation here saves time and effort later.
Cutting The Plywood
Use a good quality plywood sheet, at least 3/4 inch thick. Cut it to the size that fits your table saw surface with some room for the sled runners. Measure twice, cut once. Use a straight edge or a guide to make clean, straight cuts. Smooth the edges with sandpaper to avoid splinters. A well-cut base helps the sled slide evenly and safely.
Ensuring A Flat Surface
Check the plywood for any warps or twists before assembly. Lay it on a flat surface and look for gaps underneath. If the plywood is not flat, the sled will not run smoothly. Use clamps and weights to flatten the plywood if needed. Sand any high spots gently to level the surface. A flat base keeps the sled stable and improves cutting accuracy.
Credit: fixthisbuildthat.com
Making And Attaching Runners
Making and attaching runners is a key step in building a table saw sled. Runners guide the sled along the saw’s miter slots. They must fit precisely to ensure smooth, safe cuts. This section explains how to choose runner material, fit runners to your table saw, and secure them firmly to the sled base.
Choosing Runner Material
Selecting the right material for runners affects sled performance. Hardwood like maple or oak works well. These woods are strong and resist wear. Some use plastic or nylon strips for quieter operation. Avoid soft woods that can dent or wear quickly. The material should fit tightly in the miter slot without wobbling.
Fitting Runners To Table Saw
Measure the width and depth of your table saw’s miter slots. Cut runners slightly larger for a snug fit. Use a block plane or sandpaper to trim runners carefully. Test fit runners in the slots often. They should slide smoothly but not have side-to-side play. A tight fit prevents the sled from shifting during cuts.
Securing Runners To Base
Place runners on the sled base aligned with the miter slots. Clamp them firmly in place. Drill pilot holes to avoid wood splitting. Use screws to attach runners securely. Check for any gaps or uneven spots. The runners must sit flat against the base. Tight attachment keeps the sled stable and safe during use.
Adding The Fence
Adding the fence to your table saw sled is a crucial step. The fence guides your wood pieces, ensuring straight and square cuts every time. A well-attached fence improves safety and accuracy. It holds the workpiece steady and prevents it from moving during cuts. Follow clear steps to cut, align, and secure the fence properly.
Cutting The Fence Wood
Select a straight, sturdy piece of wood for the fence. A hardwood or plywood strip about 3/4 inch thick works well. Cut it to the length of your sled base. Use a saw with a fine blade to get a clean, straight edge. Smooth any rough spots with sandpaper to ensure a tight fit.
Aligning For Square Cuts
Place the fence on the sled base. Use a carpenter’s square to check the angle. The fence must be perfectly perpendicular to the blade. Adjust its position until the square reads exactly 90 degrees. This alignment ensures your cuts are accurate and consistent. Double-check the angle before securing the fence.
Securing The Fence
Clamp the fence in place once aligned. Drill pilot holes through the sled base into the fence. Use screws to fasten it tightly without splitting the wood. Avoid over-tightening to prevent damage. After securing, test the fence by making a few test cuts. Confirm it holds firm and maintains square cuts.
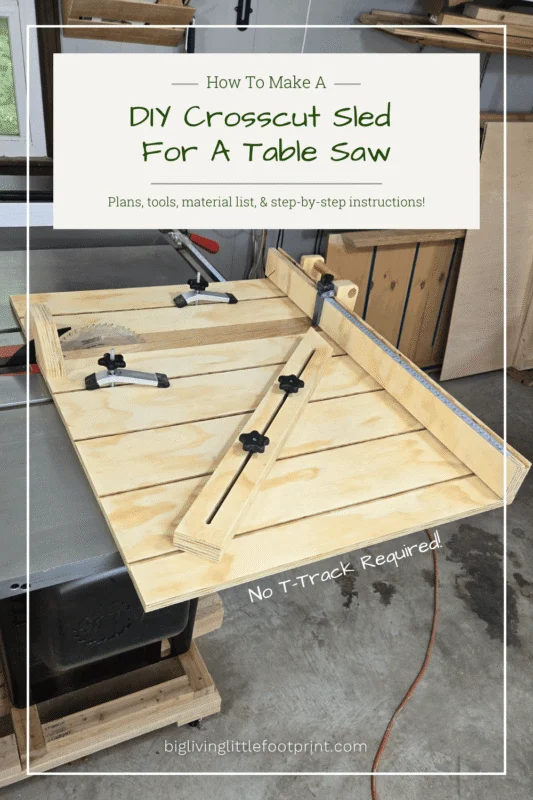
Using And Maintaining The Sled
Using and maintaining your table saw sled properly ensures safe and precise cuts every time. A well-kept sled improves your woodworking experience and extends the sled’s life. This section explains how to set up the sled for cuts, add stop blocks, and care for it with cleaning and storage tips.
Setting Up For Cuts
Place the sled firmly on the table saw, making sure it slides smoothly. Align the sled’s fence square to the blade for accurate cuts. Use clamps or screws to secure your workpiece to the sled. Check the blade height before cutting to match the material thickness. Always keep your hands away from the blade path. Test the setup with scrap wood to confirm precision.
Adding Stop Blocks
Attach stop blocks to the sled’s fence for repeatable cuts. Measure the distance from the blade to the block carefully. Use wood or metal as stop blocks for durability. Clamp or screw the blocks firmly to avoid movement during cutting. Adjust blocks to cut multiple pieces of the same size quickly. Remove or reposition blocks easily to change cut lengths.
Cleaning And Storage Tips
Clean sawdust and debris from the sled after each use. Use a soft brush or compressed air to clear tight spots. Wipe the sled’s surface with a dry cloth to keep it smooth. Apply a thin coat of wax on the runners to maintain smooth sliding. Store the sled flat in a dry area to prevent warping. Avoid placing heavy objects on the sled during storage.
Credit: www.biglivinglittlefootprint.com
Frequently Asked Questions
How Can I Make A Homemade Sled?
Use a flat wooden board as the base and attach smooth runners underneath for sliding. Add a sturdy handle for control. Secure a backstop to hold the rider safely. Sand edges for comfort and paint for weather protection. Test on snow before use.
What Thickness Plywood For Crosscut Sled?
Use 3/4-inch (18mm) plywood for a sturdy, stable crosscut sled. It balances durability and ease of handling.
Why Make A Table Saw Sled?
A table saw sled enhances safety by keeping hands away from the blade. It improves accuracy with stable support and enables repeatable, precise cuts on various workpieces.
What Is The Best Wood For Table Saw Sled Runners?
Hardwoods like maple, birch, or oak are best for table saw sled runners. They offer durability and smooth gliding. Choose straight, well-dried wood to ensure accurate cuts and long-lasting performance. Avoid softwoods as they wear out quickly and reduce sled precision.
What Is A Table Saw Sled Used For?
A table saw sled helps make safer, more accurate crosscuts on wood pieces.
How Thick Should Plywood Be For A Sled Base?
Use plywood at least ¾ inch thick for a strong, stable sled base.
Conclusion
Building a table saw sled improves your cutting safety and accuracy. The sled holds wood firmly, reducing movement during cuts. It also helps make repeatable, clean cuts every time. Use simple materials and follow clear steps for a sturdy sled.
This project suits beginners and saves time in woodworking. Enjoy safer, more precise work with your new table saw sled. Keep practicing to improve your skills and confidence.
{ “@context”: “https://schema.org”, “@type”: “Article”, “headline”: “How to Make a Table Saw Sled: Easy Steps for Precision Cuts”, “description”: “Learn how to make a table saw sled to improve cutting accuracy and safety by guiding wood precisely across the saw blade for consistent results.”, “url”: “https://www.powertoolstoday.com/how-to-make-a-table-saw-sled/”, “datePublished”: “2025-11-15”, “dateModified”: “2026-03-18”, “author”: { “@type”: “Organization”, “name”: “Power Tools Today”, “url”: “https://www.powertoolstoday.com” }, “publisher”: { “@type”: “Organization”, “name”: “Power Tools Today”, “url”: “https://www.powertoolstoday.com” }, “mainEntityOfPage”: { “@type”: “WebPage”, “@id”: “https://www.powertoolstoday.com/how-to-make-a-table-saw-sled/” }, “image”: { “@type”: “ImageObject”, “url”: “https://www.powertoolstoday.com/wp-content/uploads/2025/11/How-to-Make-a-Table-Saw-Sled-1024×576.webp” } }{ “@context”: “https://schema.org”, “@type”: “Article”, “headline”: “How to Make a Table Saw Sled: Easy Steps for Precision Cuts”, “description”: “Learn how to make a table saw sled to improve cutting accuracy and safety by guiding wood precisely across the saw blade for consistent results.”, “url”: “https://www.powertoolstoday.com/how-to-make-a-table-saw-sled/”, “datePublished”: “2025-11-15”, “dateModified”: “2026-03-19”, “author”: { “@type”: “Organization”, “name”: “Power Tools Today”, “url”: “https://www.powertoolstoday.com” }, “publisher”: { “@type”: “Organization”, “name”: “Power Tools Today”, “url”: “https://www.powertoolstoday.com” }, “mainEntityOfPage”: { “@type”: “WebPage”, “@id”: “https://www.powertoolstoday.com/how-to-make-a-table-saw-sled/” }, “image”: { “@type”: “ImageObject”, “url”: “https://www.powertoolstoday.com/wp-content/uploads/2025/11/How-to-Make-a-Table-Saw-Sled-1024×576.webp” } }nnnn