Last Updated: April 1, 2026
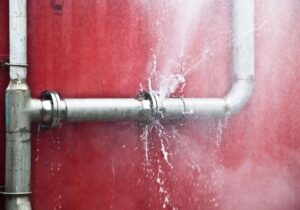
Sealing pipe joints may seem like a small detail, but it’s one of the most important steps in any plumbing, heating, or gas line installation. A properly sealed joint stops leaks, prevents water damage, and keeps your systems safe for years.
Whether you’re fixing a leaky faucet or building a new home, knowing how to seal pipe joints the right way can save you money, time, and headaches. But with many types of pipes, sealants, and methods, it’s easy to make mistakes.
This guide will walk you through everything you need to know—step by step—so you can seal pipe joints like a pro, even if you’re just starting out.
Understanding Pipe Joints And Why They Leak
Before jumping into sealing methods, it’s helpful to understand what a pipe joint really is and why leaks happen in the first place. A pipe joint is the spot where two pipes connect. You find them in plumbing, heating, and even gas lines. The quality of a joint depends on how well the two pieces fit together, how they’re fastened, and—most importantly—how they’re sealed.
Leaks usually happen because:
- The joint wasn’t tightened enough.
- Old sealant has worn away.
- The wrong sealant was used.
- The pipes have shifted or corroded.
Even a tiny gap can let water or gas escape, which is why good sealing is so important.
Types Of Pipes And Joints You’ll Encounter
Not every pipe is the same, and different materials need different approaches. Here are the most common types:
| Pipe Material | Common Uses | Typical Joint Type |
|---|---|---|
| Steel (Galvanized, Black) | Water, Gas, Heating | Threaded |
| Copper | Water Supply | Soldered, Compression |
| CPVC/PVC | Water, Drainage | Solvent Welded |
| PEX | Water Supply | Crimp, Clamp, Push-fit |
| Brass | Water, Gas | Threaded, Compression |
The type of pipe and joint will determine the best way to seal it. For example, you can’t use pipe dope on a soldered copper joint, and you shouldn’t use Teflon tape on a PVC glue joint.
Credit: callwisler.com
Essential Tools And Materials For Sealing Pipe Joints
Having the right tools will make your job easier and safer. Here’s what you’ll often need:
- Pipe wrenches or adjustable pliers
- Pipe cutter or hacksaw (for cutting)
- Thread seal tape (Teflon tape)
- Pipe joint compound (pipe dope)
- Solvent cement (for PVC/CPVC)
- Emery cloth or sandpaper (to smooth metal or copper)
- Brushes (for applying compound or cleaning)
- Rags (for cleanup)
Advanced kits may include specialty sealants, crimping tools for PEX, and leak detection fluid for gas lines.
Choosing The Right Sealant For The Job
Not all sealants work on every pipe type. Using the wrong one can cause leaks or even damage the pipe. Here’s a quick guide:
| Sealant Type | Best For | Not For | Notes |
|---|---|---|---|
| Teflon Tape | Threaded metal/plastic | Compression, soldered, glued | Easy to apply, no mess |
| Pipe Dope (Compound) | Threaded metal/plastic | Glued, soldered | Good for gas lines; some are water-specific |
| Solvent Cement | PVC, CPVC | Metal, PEX, threaded | Bonds pipes together permanently |
| PTFE Paste | Threaded, high-temp | Soldered | Withstands higher pressure/heat |
| O-rings/Gaskets | Compression, push-fit | Threaded, glued | Always check for wear before use |
Pro tip: For gas lines, always use a pipe dope labeled for gas, as regular Teflon tape can break down.
How To Seal Threaded Pipe Joints
Most leaks happen at threaded joints because they’re not sealed correctly. Here’s how to do it right:
1. Prepare The Threads
Make sure both the male (outside) and female (inside) threads are clean. Use a wire brush or rag to remove old sealant, rust, or dirt. If threads are damaged, replace the fitting.
2. Choose Your Sealant
For most water and air lines, Teflon tape is enough. For gas or high-pressure lines, use pipe dope or PTFE paste—sometimes both.
3. Apply The Sealant
- For Teflon tape: Start at the end of the male thread and wrap 2–3 layers in the direction of the threads (usually clockwise). Cover all threads but avoid blocking the pipe opening.
- For pipe dope: Brush a thin, even layer over the threads. Don’t glob it on.
4. Connect And Tighten
Screw the male fitting into the female fitting by hand. Use pipe wrenches to tighten about 1–2 turns past hand-tight. Don’t overtighten, or you could crack the fitting.
5. Test For Leaks
Turn on the system slowly and check for drips. For gas, use soapy water or a leak detection solution—bubbles mean a leak.
Non-obvious insight: Many beginners forget to wrap Teflon tape in the direction of the threads. Wrapping the wrong way can cause the tape to unravel as you tighten, making the seal useless.
Sealing Compression Joints
Compression fittings are common for copper and some plastic pipes. They use a compression ring (ferrule) and nut to seal.
Steps:
- Slide the compression nut and then the ring onto the pipe.
- Insert the pipe into the fitting body.
- Slide the ring and nut back to the fitting and hand-tighten the nut.
- Tighten with wrenches—one on the fitting body, one on the nut—until snug. Avoid overtightening, which can crush the ring and cause leaks.
Common mistake: Over-tightening actually causes leaks by distorting the ring, not preventing them.
Sealing Soldered (sweat) Joints
Soldered joints are used for copper pipes. This method uses melted metal (solder) to bond the pipe and fitting.
How To Do It:
- Cut and clean the pipe and fitting ends. Use emery cloth until shiny.
- Apply flux (a chemical cleaner) to both surfaces.
- Assemble the joint fully.
- Heat the joint with a propane torch until the flux bubbles.
- Touch solder to the joint—capillary action will draw it in.
- Let cool naturally; don’t move the joint while it sets.
Pro tip: Too much heat burns the flux and blocks the solder from flowing. Practice makes perfect.
Sealing Pvc And Cpvc Joints
Plastic pipes like PVC and CPVC use a chemical weld for a watertight seal.
Steps:
- Cut the pipe square and dry fit the pieces.
- Deburr the edges with a knife or sandpaper.
- Prime the pipe with purple primer (if required).
- Apply solvent cement to both pipe and fitting.
- Push and twist the pieces together, holding for 30 seconds.
Let the joint cure as directed before turning on water (usually 2–24 hours).
Sealing Push-fit And Pex Joints
Push-fit and PEX fittings are easy—just push the pipe in. They use internal O-rings for the seal.
- Ensure the pipe is cut straight and free of burrs.
- Insert fully for a secure seal.
- For PEX, use the correct crimp or clamp rings and tools.
Non-obvious insight: PEX pipes can expand and contract with temperature, so always use the recommended expansion space and support.
Testing Your Sealed Joints
Testing is critical. Never skip this step.
- For water: Turn on slowly and inspect for leaks.
- For gas: Use a soapy water solution or a commercial leak detector.
- For high-pressure: Watch for drops in pressure on the gauge.
If you find a leak, disassemble, clean, and try again with fresh sealant.

Credit: www.antala.uk
When To Call A Professional
Some situations are risky for DIY, such as:
- Gas lines
- Old, corroded pipes
- Main water supplies in large buildings
If you’re unsure, it’s safer and often cheaper to get expert help than to risk a major leak.
Common Mistakes To Avoid
- Using the wrong sealant for the pipe type.
- Not cleaning threads or pipe ends before sealing.
- Overtightening (especially with compression or plastic).
- Skipping leak testing after work is done.
- Mixing different pipe materials without proper adapters.
Extra Tips For A Lasting, Leak-free Seal
- Always check the expiration date on solvent cements and pipe dopes.
- Store Teflon tape in a dry place—moisture can make it less sticky.
- For outdoor pipes, use UV-resistant sealants if available.
- Label your pipes if you’re sealing several at once—this helps you check them all later.
- If you’re working on old pipes, consider replacing the joint rather than just resealing.
Frequently Asked Questions
How Many Wraps Of Teflon Tape Should I Use On Pipe Threads?
Usually, 2 to 3 full wraps are enough for most pipes. Too many layers can make it hard to screw the fittings together, and too few won’t seal well.
Can I Use Pipe Dope And Teflon Tape Together?
Yes, for high-pressure or gas lines, many professionals use both. Put Teflon tape on first, then a thin layer of pipe dope. But always check the manufacturer’s guidelines.
What Happens If I Overtighten A Pipe Joint?
Overtightening can crack plastic fittings, strip threads, or crush compression rings. This actually causes more leaks. Tighten just enough to feel snug and secure.
How Long Should I Wait Before Turning On Water After Sealing Joints?
It depends on the sealant used:
- Teflon tape or pipe dope: Immediate use is usually fine.
- Solvent cement (PVC/CPVC): Wait at least 2 hours, up to 24 hours for full strength.
Where Can I Learn More About Plumbing Codes And Safety?
Check your local building codes or visit trusted sources like the National Fire Protection Association for up-to-date safety standards.
Sealing pipe joints may not look exciting, but doing it right means no leaks, no wasted water, and no expensive repairs. With the right tools, sealant, and technique, you can handle most pipe joints with confidence. Remember, if you get stuck or feel unsure, don’t hesitate to ask for help.
Safe and solid joints are always worth the extra time and care.
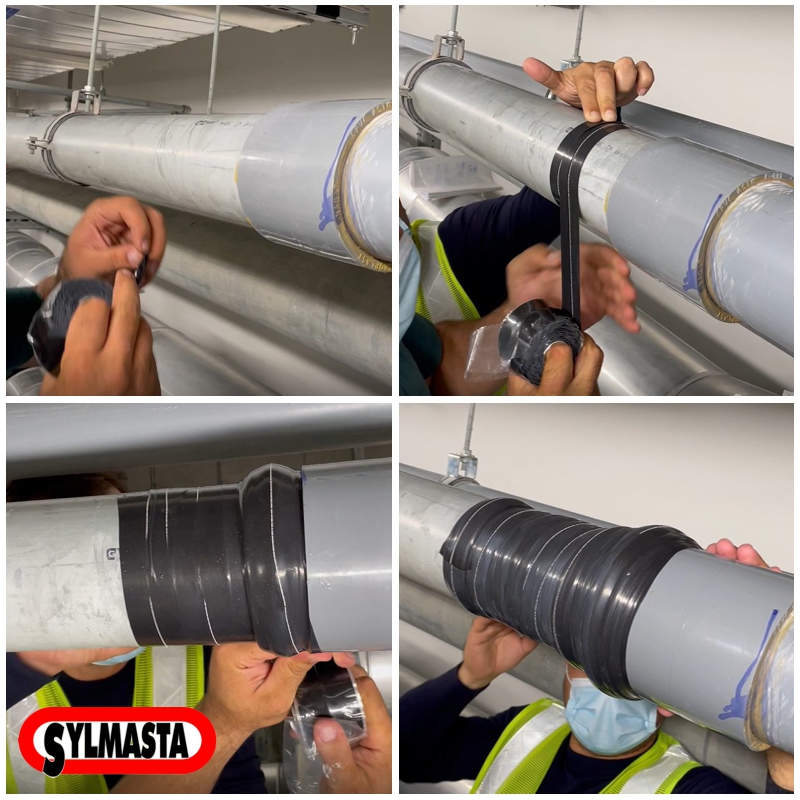
Credit: sylmasta.com
Read also: Drain Inspection Camera Guide: How to Choose and Use
