Last Updated: March 21, 2026
Is your hedge trimmer struggling to cut through branches like it used to? Dull blades not only make your trimming job harder but can also damage your plants and wear out your tool faster.
The good news is, sharpening your hedge trimmer blades is easier than you think—and it can bring your tool back to life. In this guide, you’ll discover simple, step-by-step methods to sharpen your hedge trimmer safely and effectively. Whether you prefer using a flat file or want to try a faster angle grinder technique, you’ll learn how to get those blades razor-sharp again.
Keep reading, and take control of your garden maintenance with blades that cut clean and smooth every time.
Credit: www.popularmechanics.com
Tools Needed
Gathering the right tools makes sharpening your hedge trimmer easier and safer. Proper equipment helps keep blades sharp and extends their life. Prepare all items before starting to avoid interruptions.
Flat File
A flat file is essential for sharpening each tooth on the blade. It smooths and reshapes the edges carefully. Use a file with a fine to medium cut for best results.
Clamp Or Vice
Secure the hedge trimmer firmly using a clamp or vice. This keeps the blades steady while you work. A steady blade prevents accidents and uneven sharpening.
Protective Gloves
Wear protective gloves to protect your hands from sharp edges. Gloves also improve grip on tools and blades. Safety is key when handling sharp objects.
Safety Glasses
Safety glasses shield your eyes from metal filings and debris. Eye protection prevents injuries during the sharpening process. Always wear them when working with files or grinders.
Angle Grinder With Flap Disc (optional)
An angle grinder with a flap disc speeds up sharpening for experienced users. It removes metal quickly and smooths blade edges. Use this only if you are confident and careful.
Small Flat File Or Burr Stone
A small flat file or burr stone helps clean up burrs after sharpening. Burrs are tiny sharp edges that can damage plants or skin. Removing them ensures a smooth, safe blade.
Preparing The Trimmer
Preparing the hedge trimmer is key before sharpening its blades. A proper setup ensures safety and better results. Take your time to get everything ready.
Start by cleaning the blades to remove dirt and sap. This makes the sharpening process smoother. Use a brush or cloth to clear debris.
Next, disconnect the power source. Remove the battery from cordless trimmers or unplug electric ones. This step prevents accidents during sharpening.
Secure The Blades
Clamp the hedge trimmer firmly to a stable surface. If you remove the blades, use a vice to hold them steady. This stops movement and helps sharpen evenly.
Identify The Bevel Angle
Look closely at the blade teeth. Notice the angled, beveled edge on the moving blade. The bevel angle guides how you file the teeth during sharpening.
Gather The Right Tools
Use a flat file for manual sharpening. Choose a file size that fits the blade teeth well. For faster work, an angle grinder with a flap disc can help but needs care.
Identifying The Bevel Angle
Identifying the bevel angle is the first step in sharpening a hedge trimmer. The bevel angle is the slanted edge on each tooth of the blade. Knowing this angle helps keep the blade sharp and effective.
The bevel angle varies between different trimmers. Most blades have a bevel angle between 25 and 35 degrees. Keeping the original angle while sharpening is important for best cutting performance.
What Is The Bevel Angle?
The bevel angle is the sloped edge on the cutting tooth. It helps the blade slice through branches smoothly. Each tooth has a small angled surface called a bevel.
How To Find The Bevel Angle On Your Blade
Look closely at the blade teeth. The angled edge is on the moving blade. The stationary blade is flat and does not have a bevel. Use a small protractor or angle gauge for accuracy.
Why Maintaining The Bevel Angle Matters
Sharpening at the wrong angle weakens the blade. It causes dull cuts and more effort while trimming. Matching the original bevel angle keeps the blade sharp longer and cuts cleanly.
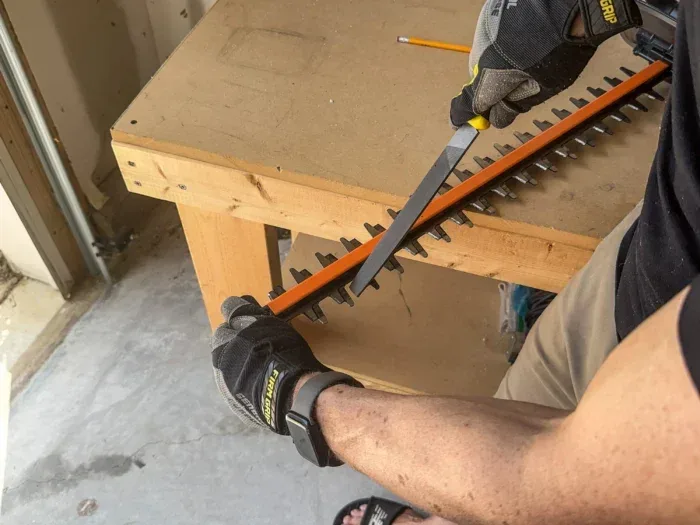
Sharpening With A File
Sharpening a hedge trimmer with a file is a simple and effective method. It helps maintain sharp blades for clean cuts. Using the right technique preserves the blade’s edge and extends its life. A flat file works best for this task. Always match the file angle to the blade’s bevel. Take your time and use smooth, even strokes. This approach is safe and requires no special tools.
Filing Each Tooth
Secure the hedge trimmer before starting. Use a clamp or a vice for stability. Remove the battery from electric models to prevent accidents. Find the beveled edge on each tooth of the moving blade. Hold the flat file at the same angle as the bevel. Stroke the file forward along the edge smoothly. Do not file back and forth. Sharpen each tooth one by one. Keep the pressure light and consistent. This keeps the edge sharp and even.
Sharpening The Back Edge
Many trimmers also need the back edge sharpened. Flip the blade over to access the bottom side. Use the flat file to make the back edge flat and smooth. File gently to avoid removing too much metal. This step helps the blades cut efficiently. Check for any burrs after filing. Remove burrs with a fine file or sandpaper. A clean back edge improves the blade’s performance. It also reduces wear and tear during use.
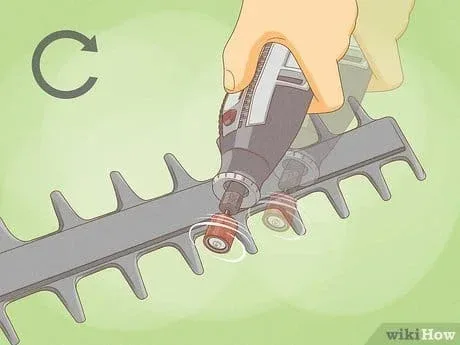
Using An Angle Grinder
Using an angle grinder to sharpen a hedge trimmer offers speed and precision. This method suits those comfortable handling power tools. It quickly restores sharpness to dull blades, saving time on garden maintenance. Proper setup and safety steps are essential before starting.
Setting Up The Grinder
Choose a grinder with a flap disc or grinding wheel. Secure the hedge trimmer blade firmly in a vice. Remove any batteries or power sources from the trimmer. Wear safety goggles and gloves for protection. Check the grinder’s speed and ensure the disc is intact.
Grinding The Teeth
Turn on the grinder and hold it steady. Gently touch the grinding disc to each tooth’s beveled edge. Move the grinder smoothly along the edge to sharpen it evenly. Avoid pressing too hard to prevent damage or overheating. Keep the angle consistent with the original bevel.
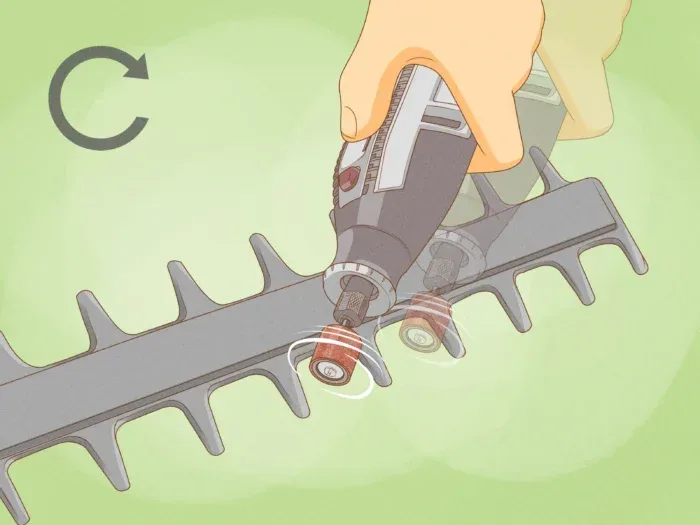
Flipping And Repeating
Once one side is sharpened, flip the blade over carefully. Repeat the grinding process on the opposite side’s teeth. Ensure both sides are sharpened equally for balanced cutting. After sharpening, wipe the blade clean to remove metal dust. Check the blade for sharpness before reassembling.
Credit: www.wikihow.com
Removing Burrs
Removing burrs is an important step after sharpening hedge trimmer blades. Burrs are tiny, rough edges that form on the blade after filing. They can reduce cutting efficiency and cause damage to plants. Removing these burrs improves the blade’s performance and extends its life.
Use a small flat file or a fine grit sharpening stone to remove burrs. Gently run the tool along the edge where burrs appear. This process smooths the blade and prepares it for clean cuts.
Identifying Burrs On Hedge Trimmer Blades
Look closely at the blade edges after sharpening. Burrs often look like small, jagged metal flakes. They feel rough to the touch and can catch on your fingers. Identifying burrs is easy with good lighting and careful inspection.
Tools Needed For Burr Removal
A small flat file works well for removing burrs. A fine sharpening stone or sandpaper can also help. Choose a tool that fits the blade size and shape. Keep the tool clean and use light pressure during removal.
Step-by-step Burr Removal Process
Hold the blade firmly or clamp it in a vice. Run the flat file gently along the underside of each tooth. Use light, even strokes to avoid damaging the blade. Check frequently to see if burrs have disappeared. Repeat until the edges feel smooth and clean.
Cleaning The Blades
Cleaning the blades is a vital step before sharpening a hedge trimmer. Dirt, sap, and debris build up on the blades during use. This buildup can dull the blades faster and make sharpening less effective. Clean blades improve cutting performance and extend tool life.
Proper cleaning also prevents rust and corrosion. Rust weakens the metal and damages the sharp edges. Keeping the blades clean ensures smooth and safe operation every time.
Gathering Cleaning Supplies
Start by collecting the right cleaning supplies. You will need a stiff brush, a soft cloth, gloves, and a cleaning solution. A mixture of warm water and mild dish soap works well. For stubborn sap, use a little rubbing alcohol or specialized blade cleaner.
Removing Debris And Sap
Wear gloves to protect your hands. Use the stiff brush to scrub off dirt and leaves stuck between the blades. Dip the cloth in the cleaning solution and wipe the blades carefully. For sap, apply rubbing alcohol on a cloth and rub the sticky spots gently until clean.
Drying And Inspecting The Blades
Dry the blades thoroughly with a clean cloth. Moisture left on the blades can cause rust. After drying, check the blades closely for any damage or rust spots. Clean blades make sharpening easier and safer.
Applying Lubricant
After cleaning, apply a light coat of lubricant or oil to the blades. This prevents rust and keeps the blades moving smoothly. Use a cloth to spread the oil evenly along the blade edges and pivot points.
Checking Blade Alignment
Checking blade alignment is a crucial step before sharpening your hedge trimmer. Proper alignment ensures the blades cut efficiently and safely. Misaligned blades can cause uneven cuts and damage the trimmer.
Start by inspecting the blades closely. Look for any gaps or overlaps between the moving and stationary blades. The blades should be parallel and close together without touching.
How To Inspect Blade Alignment
Turn off and unplug the hedge trimmer. Hold the blades firmly and try to gently move one blade against the other. Both blades should move smoothly and align evenly along their length.
If you notice any wobbling or uneven gaps, the blades may be misaligned. Check for bent or damaged parts that need adjustment or replacement.
Adjusting Blade Alignment
Use a screwdriver or wrench to loosen the screws or bolts holding the blades. Move the blades carefully until they line up evenly.
Do not tighten the screws fully until you confirm the blades stay in alignment after testing their movement. Tighten the screws gradually while checking blade position.
Testing Blade Movement After Alignment
Manually move the blades back and forth to ensure smooth action. The blades should cut through air without rubbing or catching.
Properly aligned blades reduce wear and improve cutting performance. Regularly check alignment before each sharpening session.
Credit: www.wikihow.com
Frequently Asked Questions
What Is The Best Way To Sharpen Hedge Trimmers?
Secure the blades and remove power source. Use a flat file or angle grinder to sharpen each tooth at the original bevel angle. File in one direction, then flip and sharpen the other side. Remove burrs with a small file.
Clean sap and check blade alignment before use.
Is It Worth Sharpening Hedge Trimmers?
Sharpening hedge trimmers improves cutting efficiency, extends blade life, and reduces effort. Regular sharpening keeps trims clean and precise.
What Is The Best File To Sharpen Hedge Trimmers With?
Use a flat file with the original bevel angle to sharpen hedge trimmer teeth precisely. It ensures clean, sharp edges and safer cutting.
Can You Use Wd-40 To Lubricate Hedge Trimmer Blades?
WD-40 can clean and protect hedge trimmer blades but does not provide lasting lubrication. Use a proper blade lubricant for smooth operation.
How Often Should I Sharpen My Hedge Trimmer Blades?
Sharpen blades after every 20-30 hours of use or when cutting feels slow and uneven.
Conclusion
Sharpening your hedge trimmer keeps it cutting clean and saves time. Always work carefully, keeping the original angle on each tooth. Use the right tools—a flat file for beginners or a grinder for faster results. Remember to secure the blades and remove power sources before starting.
Regular sharpening helps your trimmer last longer and work better. With these simple steps, you can maintain sharp blades and enjoy easier trimming every season. Give your trimmer the care it needs for the best performance.
You might also find this helpful: how to use a hedge trimmer.
{ “@context”: “https://schema.org”, “@type”: “Article”, “headline”: “How to Sharpen a Hedge Trimmer: Easy Steps for Perfect Blades”, “description”: “Learn how to sharpen a hedge trimmer with simple steps to maintain blade efficiency and extend the toolu2019s lifespan for precise and safe trimming.”, “url”: “https://www.powertoolstoday.com/how-to-sharpen-a-hedge-trimmer/”, “datePublished”: “2026-01-30”, “dateModified”: “2026-03-18”, “author”: { “@type”: “Organization”, “name”: “Power Tools Today”, “url”: “https://www.powertoolstoday.com” }, “publisher”: { “@type”: “Organization”, “name”: “Power Tools Today”, “url”: “https://www.powertoolstoday.com” }, “mainEntityOfPage”: { “@type”: “WebPage”, “@id”: “https://www.powertoolstoday.com/how-to-sharpen-a-hedge-trimmer/” }, “image”: { “@type”: “ImageObject”, “url”: “https://www.powertoolstoday.com/wp-content/uploads/2025/11/how-to-sharpen-a-hedge-trimmer.jpg” } }{ “@context”: “https://schema.org”, “@type”: “Article”, “headline”: “How to Sharpen a Hedge Trimmer: Easy Steps for Perfect Blades”, “description”: “Learn how to sharpen a hedge trimmer with simple steps to maintain blade efficiency and extend the toolu2019s lifespan for precise and safe trimming.”, “url”: “https://www.powertoolstoday.com/how-to-sharpen-a-hedge-trimmer/”, “datePublished”: “2026-01-30”, “dateModified”: “2026-03-19”, “author”: { “@type”: “Organization”, “name”: “Power Tools Today”, “url”: “https://www.powertoolstoday.com” }, “publisher”: { “@type”: “Organization”, “name”: “Power Tools Today”, “url”: “https://www.powertoolstoday.com” }, “mainEntityOfPage”: { “@type”: “WebPage”, “@id”: “https://www.powertoolstoday.com/how-to-sharpen-a-hedge-trimmer/” }, “image”: { “@type”: “ImageObject”, “url”: “https://www.powertoolstoday.com/wp-content/uploads/2025/11/how-to-sharpen-a-hedge-trimmer.jpg” } }nnnn