Last Updated: March 21, 2026
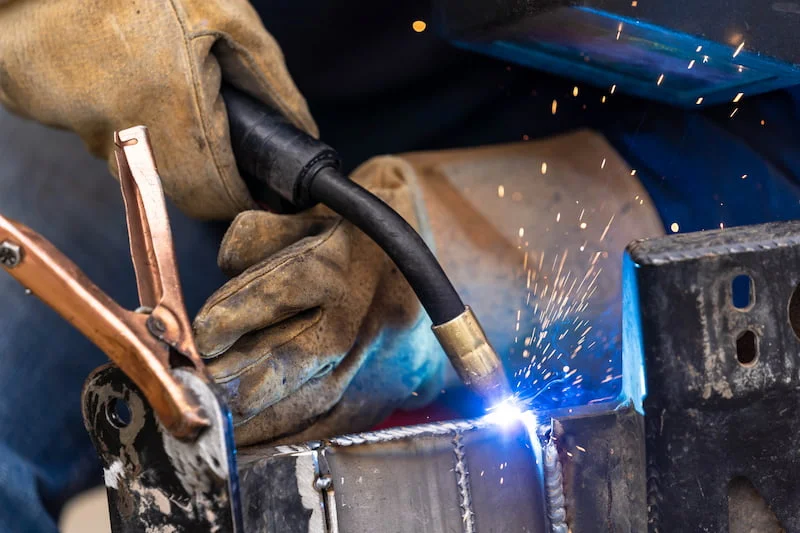
If you’ve ever wanted to tackle metal projects or repair work, learning how to use a MIG welder is a smart move. MIG welding is one of the easiest and most efficient ways to join metals, even if you’re just starting out.
Imagine being able to create strong, clean welds without complicated setups or endless trial and error. In this guide, you’ll discover simple, step-by-step instructions that make MIG welding approachable and manageable. Whether you’re fixing a fence, building something new, or just curious about welding, you’ll gain the confidence to get started quickly and safely.
Ready to master the basics and bring your metalwork ideas to life? Let’s dive in.
Essential Safety Gear
Using a MIG welder requires more than just skill. Safety is the top priority. Proper gear protects you from sparks, heat, and harmful rays. Wearing the right equipment reduces injury risks and keeps you comfortable.
Before starting, gather all essential safety gear. This gear creates a barrier between you and the welding hazards. Each piece plays a key role in keeping you safe and focused on your work.
Protective Welding Helmet
A welding helmet shields your eyes and face from bright light and sparks. Choose one with an auto-darkening feature for easy use. This helmet prevents eye damage and skin burns.
Fire-Resistant Clothing
Wear long sleeves and pants made from fire-resistant material. Avoid synthetic fabrics that melt easily. Durable clothing guards your skin from sparks and hot metal.
Heavy-Duty Welding Gloves
Welding gloves protect your hands from heat and sharp objects. Pick gloves that fit well and allow good movement. They also help you grip the welding gun safely.
Proper Footwear
Use leather boots or shoes with steel toes. These protect your feet from falling objects and hot debris. Avoid open-toed shoes or sneakers during welding.
Respiratory Protection
Welding fumes can harm your lungs. Use a respirator or work in a well-ventilated area. This reduces inhaling dangerous gases and particles.
Setting Up Your Welder
Setting up your MIG welder correctly is essential for safe and effective welding. Proper setup ensures strong welds and prevents equipment damage. Take your time to prepare the machine and workspace before you start welding.
Gather all necessary materials and tools. Check your welding area for safety and good ventilation. Follow these steps carefully to set up your MIG welder.
Connecting The Ground Clamp
Attach the ground clamp firmly to a clean, bare metal surface. This completes the electrical circuit needed for welding. Make sure the clamp is tight and secure to avoid poor connections or weak welds.
Installing The Wire Spool
Open the welder’s side panel to access the wire feed mechanism. Place the wire spool on the spindle, ensuring it spins freely. Feed the wire into the drive rolls, matching the wire size to the machine settings.
Setting The Voltage And Wire Speed
Adjust the voltage and wire speed according to the metal thickness and type. Use the chart inside your welder’s cover as a guide. Start with recommended settings and fine-tune based on your welding results.
Connecting The Gas Supply
Attach the gas hose to the welder and the gas cylinder. Open the cylinder valve slowly. Set the gas flow rate between 15 and 20 cubic feet per hour (CFH) for most applications. Proper gas flow protects the weld from contamination.
Choosing The Right Settings
Choosing the right settings on a MIG welder is key to making good welds. Proper settings help control the heat and wire speed. This control affects the strength and appearance of the weld. Adjusting settings to fit your project can prevent common problems like poor penetration or too much spatter.
Each welding job may need different settings. Factors such as metal type, thickness, and position guide your choices. Taking time to set the machine correctly saves effort and materials. It also helps produce safe, quality welds every time.
Setting the VoltageVoltage controls the heat of the arc. Higher voltage means a hotter arc and deeper weld penetration. Lower voltage gives a cooler arc and a smaller weld bead. Use the voltage chart on your machine as a starting point. Adjust slightly if the weld is too weak or too wide.
Choosing Wire Feed SpeedThe wire feed speed controls how fast the welding wire moves. Faster wire feed adds more filler metal to the weld. Slow wire feed may cause the arc to go out or create weak welds. Find the balance where the arc burns steady and smooth. Watch your weld bead to check if speed is right.
Selecting the Gas Flow RateShielding gas protects the molten weld from air contamination. Flow rate is usually between 15 and 25 cubic feet per hour. Too low flow lets air in, causing porosity. Too high flow can cause turbulence and spatter. Set the flow to keep a clean, stable arc shield.
Credit: fractory.com
Preparing Your Workpiece
Preparing your workpiece is a crucial step before starting MIG welding. A clean, well-prepared surface ensures strong and smooth welds. Dirt, rust, and paint can weaken the weld and cause defects. Taking time to prepare your workpiece saves effort and improves the final result.
Proper preparation also helps the welding wire feed correctly and the gas to shield the weld area effectively. It reduces the chance of contamination and spatter. Preparing your workpiece is a simple but important part of the welding process.
Clean The Surface
Remove all dirt, oil, and grease from the metal surface. Use a degreaser or a cloth with a cleaning solvent. This helps the weld bond better to the metal.
Use a wire brush or grinder to remove rust and old paint. The clean metal surface allows the welding arc to flow smoothly.
Cut And Fit The Pieces
Cut your metal pieces to the right size and shape using a saw or cutting torch. Make sure the edges are smooth and even for a better fit.
Fit the pieces together tightly. Proper alignment reduces gaps and makes the weld stronger.
Clamp The Workpieces
Use clamps to hold the metal pieces in place. This prevents movement during welding. A steady workpiece leads to cleaner, more accurate welds.
Check the alignment again before starting to weld. Adjust the clamps if needed to keep everything secure.
Mastering Gun Angle And Distance
Getting the gun angle and distance right is key to good MIG welding. These two factors control the weld’s shape, strength, and quality. Holding the gun at the correct angle helps the wire melt smoothly into the metal. Keeping the right distance prevents defects like spatter and weak joints.
Practice and attention to these details will improve your welds quickly. Small changes make a big difference in the final result.
Ideal Gun Angle For Strong Welds
Hold the MIG gun at about 10 to 15 degrees from vertical. This angle allows the wire to feed steadily into the joint. Point the gun slightly in the direction of travel. This helps guide the weld pool and avoid gaps. Too steep or too flat angles can cause poor penetration or excess spatter. Adjust the angle slightly as you move along the joint to keep the weld smooth.
Maintaining Proper Distance From Workpiece
Keep the gun nozzle ¾ to 1 inch away from the metal. This distance keeps the arc stable and the wire feeding smoothly. Too close can cause the wire to stick or the arc to blow out. Too far causes the arc to become weak and the weld to be porous. Use the nozzle as a guide and adjust slightly as you weld to maintain this gap.
Consistent Travel Speed And Movement
Move the gun steadily along the joint at a moderate speed. Too slow causes too much heat and wide weld beads. Too fast leads to weak welds and poor fusion. Keep your hand steady and use a smooth motion. This helps maintain a consistent angle and distance throughout the weld. Practice on scrap metal to develop a steady rhythm.
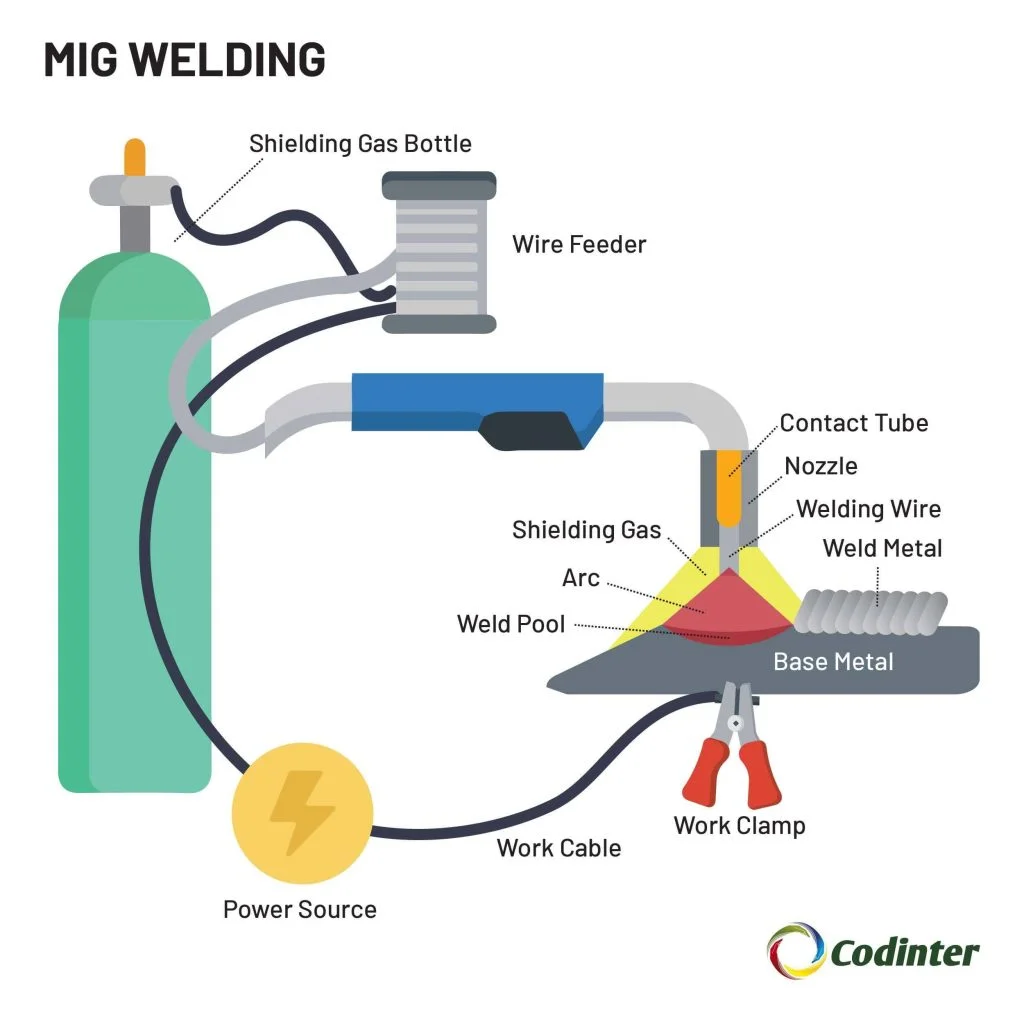
Credit: www.codinter.com
Controlling Travel Speed And Arc Length
Controlling travel speed and arc length is key to good MIG welding. These two factors affect the weld’s strength, appearance, and quality. Proper control helps avoid problems like weak joints, burn-through, or excess spatter. Understanding how to manage travel speed and arc length will improve your welding results.
Controlling Travel Speed
Travel speed means how fast you move the welding gun along the joint. Moving too fast causes a weak weld with poor penetration. Moving too slow creates a wide, messy bead and can cause burn-through. Keep a steady pace that matches your wire feed speed. Practice moving the gun smoothly to maintain an even weld bead.
Maintaining Proper Arc Length
Arc length is the distance between the welding tip and the metal surface. A short arc length gives a strong, concentrated weld but risks sticking the wire. A long arc length causes spatter and weak welds. Hold the gun about 1/4 inch from the workpiece. Adjust this distance slightly to match your material and settings.
Tips For Consistent Control
Keep your wrist steady and move the gun in a straight line. Use both hands if needed for better control. Watch the weld pool closely to judge if your speed or arc length needs adjusting. Regular practice on scrap metal helps build muscle memory. Consistent control leads to cleaner, stronger welds with less cleanup.
Techniques For Different Materials
Using a MIG welder requires different techniques for various materials. Each metal has unique properties that affect the welding process. Understanding these differences helps achieve strong, clean welds. This section explains simple methods for common materials.
Steel Welding Techniques
Steel is the most common metal for MIG welding. Use a mild steel wire and shielding gas like CO2 or a mix of argon and CO2. Set the voltage medium to high. Hold the gun at a 10 to 15-degree angle. Move steadily to create an even bead. Avoid staying too long in one spot to prevent warping.
Aluminum Welding Techniques
Aluminum needs special care due to its softness and heat sensitivity. Use a spool gun or push the wire gently. Use 100% argon gas for shielding. Lower the voltage slightly to avoid burning the metal. Keep the gun angle steady and use a faster travel speed. Clean the metal surface before welding to remove oxide.
Stainless Steel Welding Techniques
Stainless steel requires precise control to avoid discoloration and cracking. Use a stainless steel wire and a mix of argon with small amounts of CO2 or oxygen. Use medium voltage and slower travel speed for better control. Keep the gun angle consistent. Clean the metal to avoid contamination and weak welds.
Thin Metal Welding Techniques
Thin metals need careful handling to prevent burn-through. Use lower voltage and faster wire feed. Keep the gun angle small and move quickly. Use a small diameter wire for better control. Practice on scrap pieces to adjust settings and improve technique.

Credit: www.cwbgroup.org
Inspecting And Improving Welds
Inspecting and improving welds is essential for strong, safe joints. Good welds last longer and look better. Checking welds helps catch mistakes early. Fixing issues improves the final result and prevents failures.
Focus on the weld’s appearance, strength, and consistency. Use simple tools and careful observation. Small changes in technique can make a big difference. This section explains how to inspect and improve your MIG welds effectively.
Visual Inspection Of Weld Beads
Look closely at the weld bead after cooling. The bead should be even and smooth. Avoid cracks, holes, or gaps in the weld. Check for any discoloration or burn marks. These could mean improper heat or gas flow.
Good weld beads have a uniform width and height. They should blend well with the base metal. Uneven beads might need adjusting wire speed or angle. Practice steady hand movement for better results.
Testing Weld Strength
Test weld strength by gently tapping or flexing the joint. Strong welds resist cracking or breaking. If the weld fails, it needs improvement. You can also cut a sample and inspect the inside.
Look for full penetration, meaning the weld goes through the metal. Weak spots often show incomplete fusion or porosity. Adjust your settings to increase heat or wire feed if needed.
Improving Weld Quality
Adjust voltage and wire speed for better welds. Too much heat causes burn-through or warping. Too little heat leads to weak, cold welds. Keep the welding gun at the correct angle, usually 10-15 degrees.
Maintain a steady travel speed to avoid gaps or excess buildup. Clean the metal surface before welding to remove rust or oil. Use the right shielding gas to protect the weld pool from contamination.
Frequently Asked Questions
How To Use A Mig Welder Step By Step?
Wear safety gear and clamp the ground. Open the gas valve and turn on the welder. Set voltage and wire speed. Hold the gun at a 15-degree angle. Maintain steady travel speed and consistent arc length. Move smoothly along the joint to create a clean weld.
Is Mig Welding Easy For Beginners?
MIG welding is easy for beginners due to its simple operation, continuous wire feed, and fewer settings to manage. Practicing correct gun angle and speed ensures strong, consistent welds with minimal cleanup. This makes it ideal for learning welding basics quickly and efficiently.
Do You Push Or Pull When Using A Mig Welder?
Push the MIG welder gun away from the weld puddle at a 10-15 degree angle. This produces a cleaner, smoother weld. Pulling can cause more spatter and weaker welds. Pushing ensures better gas coverage and consistent bead appearance. Maintain steady speed for best results.
What Volts Do I Run On Mig To Have The Best Welds?
Set MIG welder voltage between 18-24 volts for best welds. Adjust based on metal thickness and wire size. Use machine charts as a guide. Maintain proper wire feed speed for consistent, strong welds. Practice to fine-tune settings for your specific project.
What Safety Gear Is Needed For Mig Welding?
Wear a welding helmet, gloves, long sleeves, and safety glasses to protect yourself from sparks and UV light.
Conclusion
Using a MIG welder can be simple with the right steps. Always wear safety gear before starting. Set your machine’s voltage and wire speed carefully. Practice on scrap metal to improve your technique. Keep a steady gun angle and travel speed.
Consistent practice builds confidence and better welds. Enjoy creating strong, clean welds with ease. Welding takes patience but gets easier over time. Keep learning and stay safe while you weld.
{ “@context”: “https://schema.org”, “@type”: “Article”, “headline”: “How to Use a Mig Welder: Expert Tips for Perfect Welds Every Time”, “description”: “Learn how to use a MIG welder by understanding its function, setup, and techniques for joining metals efficiently and safely in various welding projects.”, “url”: “https://www.powertoolstoday.com/how-to-use-a-mig-welder/”, “datePublished”: “2025-12-08”, “dateModified”: “2026-03-18”, “author”: { “@type”: “Organization”, “name”: “Power Tools Today”, “url”: “https://www.powertoolstoday.com” }, “publisher”: { “@type”: “Organization”, “name”: “Power Tools Today”, “url”: “https://www.powertoolstoday.com” }, “mainEntityOfPage”: { “@type”: “WebPage”, “@id”: “https://www.powertoolstoday.com/how-to-use-a-mig-welder/” }, “image”: { “@type”: “ImageObject”, “url”: “https://www.powertoolstoday.com/wp-content/uploads/2025/11/how-to-use-a-mig-welder.jpg” } }{ “@context”: “https://schema.org”, “@type”: “Article”, “headline”: “How to Use a Mig Welder: Expert Tips for Perfect Welds Every Time”, “description”: “Learn how to use a MIG welder by understanding its function, setup, and techniques for joining metals efficiently and safely in various welding projects.”, “url”: “https://www.powertoolstoday.com/how-to-use-a-mig-welder/”, “datePublished”: “2025-12-08”, “dateModified”: “2026-03-19”, “author”: { “@type”: “Organization”, “name”: “Power Tools Today”, “url”: “https://www.powertoolstoday.com” }, “publisher”: { “@type”: “Organization”, “name”: “Power Tools Today”, “url”: “https://www.powertoolstoday.com” }, “mainEntityOfPage”: { “@type”: “WebPage”, “@id”: “https://www.powertoolstoday.com/how-to-use-a-mig-welder/” }, “image”: { “@type”: “ImageObject”, “url”: “https://www.powertoolstoday.com/wp-content/uploads/2025/11/how-to-use-a-mig-welder.jpg” } }nnnn