Last Updated: March 30, 2026
If you’ve ever wanted to add smooth edges, decorative grooves, or precise cutouts to your woodworking projects, mastering a wood router is your next step. Using a wood router might seem tricky at first, but once you know the basics, it becomes one of the most powerful tools in your workshop.
In this guide, you’ll learn exactly how to use a wood router safely and effectively, even if you’re just starting out. Ready to transform your woodwork and bring professional-looking details to your creations? Keep reading, because these simple steps will make you confident and skilled with your wood router in no time.
Choosing The Right Router Bit
Choosing the right router bit is key to successful woodworking. The bit shapes the wood and creates the design you want. Using the wrong bit can ruin your project or damage the wood. Selecting the proper bit depends on the cut type and wood material. Understanding bit types helps you make the best choice for your work.
Types Of Router Bits
There are many router bit types for different tasks. Straight bits cut simple grooves and dados. Flush trim bits help match edges perfectly. Round-over bits create smooth, curved edges. Chamfer bits cut angled edges for decoration. Cove bits make concave shapes for detail work. Each type fits a specific use in woodworking.
Choosing Bit Size And Material
Bit size affects the depth and width of cuts. Larger bits remove more wood but need careful handling. Smaller bits give fine details but require slower cuts. Most bits come in carbide or high-speed steel. Carbide bits last longer and stay sharp. Pick the bit size and material based on your project needs.
Understanding Router Bit Shanks
Bit shanks connect the bit to the router. Common shank sizes are 1/4 inch and 1/2 inch. Larger shanks provide better stability and less vibration. Choose a shank size compatible with your router. Using the right shank improves control and safety while routing.
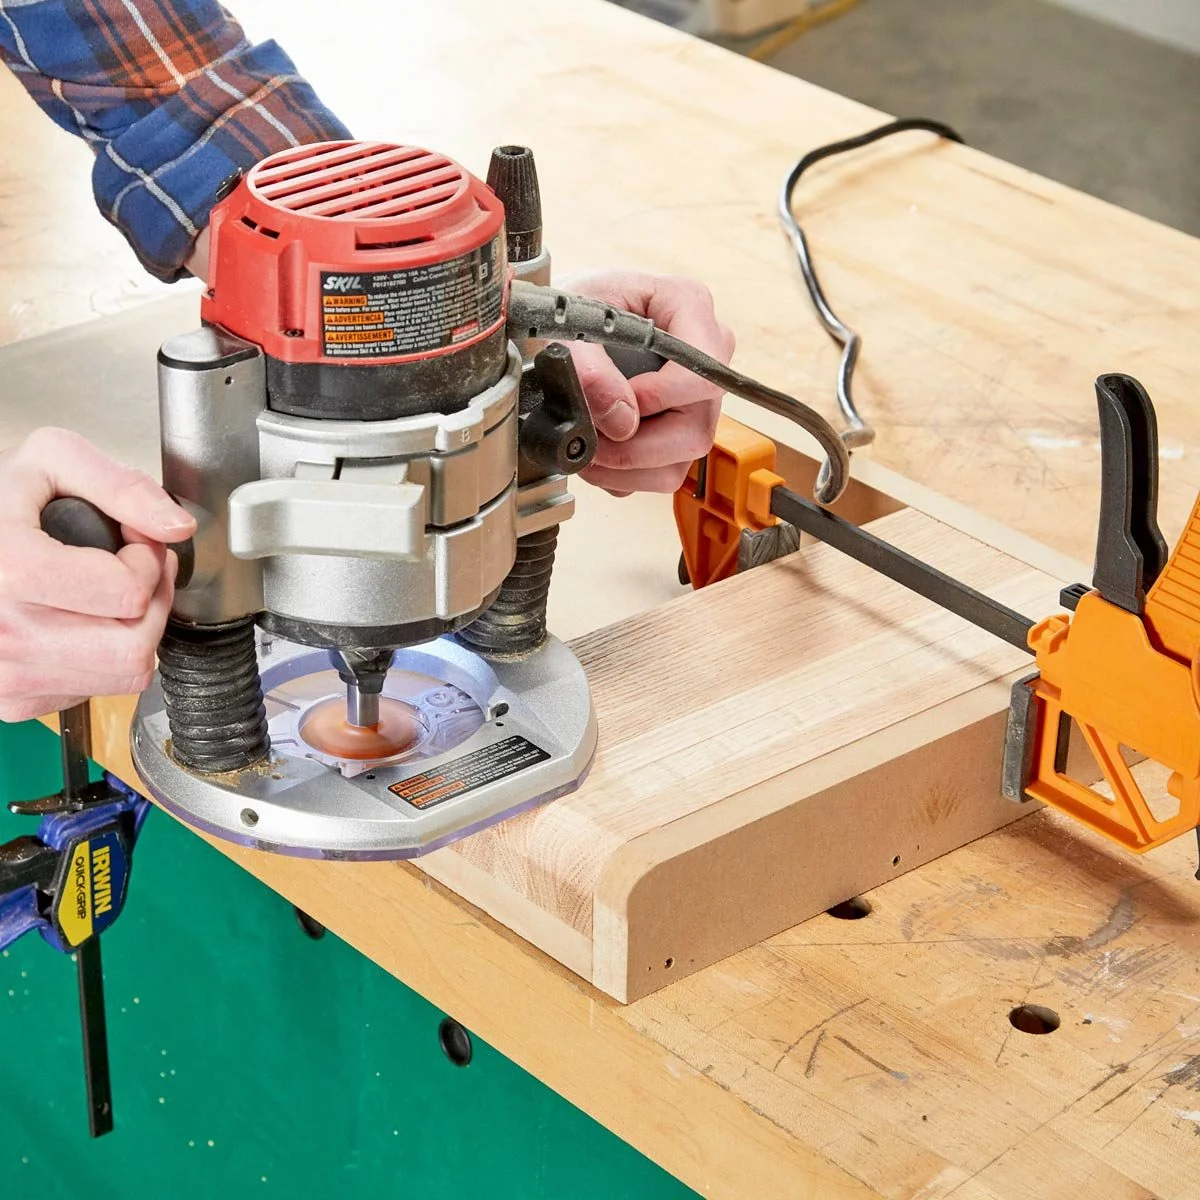
Credit: www.familyhandyman.com
Setting Up Your Wood Router
Setting up your wood router properly ensures safe and accurate work. A well-prepared router makes every cut smooth and precise. Take time to organize your workspace and check your tool before starting.
Select a bit that matches your project needs. Router bits come in many shapes and sizes. Each bit creates a different edge or groove. Look at the bit’s diameter and cutting depth. This helps you achieve the desired cut.
Installing The Router Bit Securely
Turn off and unplug the router before installing the bit. Insert the bit firmly into the collet. Tighten the collet nut using the wrench. Check if the bit is straight and locked in place. A loose bit causes poor cuts and is unsafe.
Setting The Cutting Depth
Adjust the depth to control how deep the bit cuts. Use the router’s depth adjustment knob or ring. Make small test cuts on scrap wood first. This avoids cutting too deep on your actual workpiece. Accurate depth gives clean and consistent results.
Clamp your wood firmly to the workbench. Movement during routing can ruin the cut and cause accidents. Use sturdy clamps or a vise for stability. Ensure the workpiece stays still throughout the process. A steady base helps maintain control of the router.
Adjusting Depth And Speed
Adjusting the depth and speed of a wood router is key for clean and precise cuts. These settings control how deep the bit cuts into the wood and how fast the bit spins. Proper adjustments help avoid tear-out and ensure smooth edges. Learning to set these correctly improves the quality of your work and keeps you safe.
Adjusting The Depth Of Cut
Start by unplugging the router for safety. Loosen the depth adjustment knob or lever. Lower or raise the router base to set the cutting depth. Use a ruler or depth gauge to measure the bit’s extension. Tighten the knob firmly to lock the depth in place. Test the depth on a scrap piece before cutting your project.
Setting The Router Speed
Most routers have variable speed controls. Lower speeds suit larger bits to prevent burning the wood. Higher speeds work well with smaller bits for cleaner cuts. Adjust the speed dial to match your bit size and wood type. Start at a slower speed, then increase if needed. Always follow the manufacturer’s speed recommendations for your router bit.
Tips For Safe And Effective Adjustments
Always unplug the router before changing depth or speed. Make small changes and test on scrap wood. Avoid cutting too deep in one pass; use multiple shallow passes instead. Keep hands clear of the bit during adjustments. Proper settings reduce bit wear and extend tool life.
Securing Your Workpiece
Securing your workpiece is the first step to safe and precise routing. A stable piece prevents movement, which can cause uneven cuts or accidents. Properly fixed wood also helps the router follow your intended path exactly. Spend time on this step to improve both safety and quality.
Using Clamps To Hold Wood Firmly
Clamps are the most common way to secure wood. Place them near the edges, not in the router’s path. Tighten clamps enough to stop any shift but avoid crushing the wood. Use multiple clamps for larger pieces to keep the entire workpiece steady.
Working On A Router Table
A router table holds the wood flat and steady. It offers better control for detailed cuts. Use featherboards to press the wood against the fence. This keeps the workpiece from lifting or sliding sideways. A router table is ideal for repetitive or precise tasks.
Choosing The Right Work Surface
Use a flat, solid surface to support your workpiece. Avoid surfaces that wobble or have gaps. If needed, add a sacrificial board under your wood. This protects your table and prevents tear-out at the edges. A good work surface adds stability and safety to your work.
Proper Router Handling Techniques
Proper router handling techniques ensure safety and precision. Handling your wood router with care controls the tool and improves results. These techniques reduce the risk of accidents and protect your workpiece from damage.
Using the correct grip and posture helps maintain steady control. Understanding how to move the router smoothly prevents uneven cuts and splintering. Each step in handling the router builds confidence and skill.
Using Both Hands For Stability
Always hold the router with both hands. This provides better balance and control. One hand grips the main handle, the other supports the front. Firm but relaxed pressure keeps the router steady.
Using two hands helps guide the router along your desired path. It limits shaking or drifting off the line. Stability is key for clean, straight cuts.
Maintaining Proper Posture
Stand comfortably with feet shoulder-width apart. Keep your body relaxed but ready to move. Lean slightly forward to follow the router smoothly. Avoid bending your back or reaching awkwardly.
Good posture reduces fatigue during longer tasks. It helps keep your hands steady and cuts precise. Move your whole body, not just your arms, for consistent results.
Controlling Feed Rate And Direction
Push the router against the wood at a steady pace. Do not force it; let the bit do the cutting. Move the router in the correct direction, usually against the bit’s rotation. This control prevents burn marks and chip-out.
Feed rate affects the quality of the cut and bit life. Slow and steady movement creates smooth edges. Practice feeling the right speed for different wood types and bit sizes.
Keeping The Router Base Flat
Ensure the router base stays flat against the wood surface. Tilting the base can cause uneven cuts or gouges. Use light pressure to keep the base in full contact during the cut.
A flat base helps distribute force evenly and guides the router accurately. Check the base position often, especially on curves or angled cuts. This simple habit improves the final finish.
Making Straight And Curved Cuts
Making straight and curved cuts with a wood router allows for precise shaping of wood pieces. These cuts add detail and style to your woodworking projects. Learning how to control the router helps achieve clean edges and smooth curves.
Practice and patience improve your cutting skills. Use the right tools and techniques for each type of cut. Safety is key to avoid mistakes and injuries.
Using A Guide For Straight Cuts
Attach a straight edge guide to your wood surface. This guide keeps the router on a fixed path. Move the router slowly along the guide for a clean, straight cut. Make sure the router bit is set to the correct depth before starting. Holding the router steady prevents wobbling and uneven lines.
Freehand Curved Cuts
For curved cuts, choose a sharp bit that suits the curve radius. Mark the curve clearly on your wood piece. Hold the router firmly and move it smoothly along the curve line. Keep a steady speed to avoid rough edges. Practice on scrap wood to get comfortable with controlling curves freehand.
Using Templates For Curved Cuts
Create or buy a template matching the desired curve shape. Clamp the template securely on the wood. Use a flush-trim bit with a bearing that follows the template edge. Guide the router so the bearing stays against the template. This method creates perfect, repeatable curved cuts with less effort.
Using Guides And Templates
Using guides and templates with a wood router helps create precise and consistent cuts. They act as a physical path for the router to follow. This ensures even edges and shapes every time you work on a project.
Guides are especially useful for straight cuts or repeated patterns. Templates work well for complex shapes or intricate designs. Both tools reduce errors and improve your woodworking results.
What Are Router Guides?
Router guides are attachments or tools that control the router’s movement. They can be straight edges, circles, or custom shapes. By clamping or fixing the guide to your wood, the router follows its edge. This keeps your cut smooth and accurate.
How To Use Templates With A Router
Templates are patterns made from wood or plastic. You place the template on the workpiece. Then, use a special router bit called a flush trim or pattern bit. This bit has a bearing that rides along the template edge. It cuts the wood to match the template perfectly.
Tips For Securely Clamping Guides And Templates
Always clamp guides and templates tightly. Loose guides cause uneven cuts and can be dangerous. Use sturdy clamps that hold the material without slipping. Check the setup before starting the router. Safety and precision depend on a solid setup.
Credit: www.youtube.com
Maintaining And Troubleshooting
Maintaining and troubleshooting your wood router keeps it working smoothly. Regular care prevents damage and costly repairs. Knowing common issues helps fix problems fast. This section guides simple steps to maintain and troubleshoot your router.
Cleaning Your Wood Router
Dust and debris build up during use. Unplug the router before cleaning. Use a soft brush to remove sawdust. Wipe the exterior with a damp cloth. Keep vents clear to avoid overheating. Clean the collet to hold bits firmly. Regular cleaning extends the router’s life.
Checking And Replacing Router Bits
Dull bits reduce cutting quality and strain the motor. Inspect bits before each use. Look for chips or wear on the edges. Replace bits that are damaged or dull. Use the correct bit size for your router. Store bits in a dry place to prevent rust.
Lubricating Moving Parts
Lubrication keeps the router running smoothly. Apply light oil to the plunge posts and adjustment knobs. Avoid over-lubricating to prevent dust buildup. Check the manufacturer’s guide for recommended lubricants. Regular lubrication reduces friction and wear.
Troubleshooting Common Issues
Router won’t start? Check the power source and switch. Motor overheating? Clean vents and reduce continuous use time. Bit not spinning? Inspect the collet and tighten it securely. Excessive vibration? Make sure the bit is balanced and properly installed. Listen for unusual sounds indicating internal problems.

Credit: www.homedepot.com
Frequently Asked Questions
What Does A Wood Router Do For Beginners?
A wood router helps beginners cut, shape, and smooth wood edges accurately. It creates grooves, patterns, and decorative designs easily.
How To Use A Router Step By Step For Woodworking?
Choose the right router bit for your project. Insert the bit securely with the router off. Set the cutting depth. Clamp your wood firmly. Hold the router steady and guide it along the marked path. Complete the cut smoothly for clean, precise edges.
How To Use A Trim Router For Beginners?
Choose the right bit and securely install it. Set the cutting depth. Clamp the wood firmly. Hold the router steady. Move the router smoothly along the edge.
How Does A Router Work For Dummies?
A router connects your devices to the internet and each other. It assigns unique local IP addresses and directs data packets efficiently. It sends your web requests to the modem and ensures the correct device receives the internet response.
What Is A Wood Router Used For In Woodworking?
A wood router cuts grooves, shapes edges, and hollow outs wood precisely and easily.
Conclusion
Using a wood router can improve your woodworking projects. Start with the right bit and set the depth carefully. Always secure your wood before cutting. Hold the router firmly and move it steadily for smooth edges. Practice on scrap wood to build confidence.
With patience, your skills will grow quickly. Enjoy making clean cuts and detailed designs. A wood router is a helpful tool for many tasks. Keep safety in mind, and take your time. Soon, you will create beautiful woodwork with ease.
