Last Updated: March 21, 2026
Is your leaf blower acting up or refusing to start? Often, the culprit is a dirty carburetor blocking fuel flow and cutting power.
You don’t have to be a mechanic to fix this. With a little time and the right steps, you can clean your leaf blower carburetor yourself and get it running smoothly again. In this guide, you’ll learn simple, clear instructions to clean your carburetor the right way—so you can spend less time troubleshooting and more time enjoying a perfectly maintained yard.
Ready to bring your leaf blower back to life? Let’s dive in!
Credit: www.searspartsdirect.com
Signs Of A Dirty Carburetor
A dirty carburetor affects your leaf blower’s performance. It stops the engine from running smoothly. Recognizing the signs early helps you fix issues fast. This keeps your tool working well longer.
Engine Struggles To Start
The leaf blower may not start easily. You might need several tries before it fires up. This happens because fuel flow is blocked inside the carburetor.
Irregular Engine Speed
The engine speed changes on its own. It may run fast, then slow down suddenly. This means the carburetor is not mixing fuel and air properly.
Engine Stalls Or Dies
The engine can stop running without warning. It may stall when you increase the throttle. This shows the carburetor jets might be clogged or dirty.
Poor Throttle Response
The leaf blower feels weak when you press the throttle. It does not respond quickly or powerfully. Dirty carburetor parts restrict fuel delivery causing this lag.
Black Smoke From Exhaust
Black smoke coming from the exhaust signals too much fuel is burning. A dirty carburetor can cause a rich fuel mixture, leading to smoke and poor efficiency.
Strong Fuel Smell
You may notice a strong smell of gasoline. This often happens when fuel leaks from a dirty carburetor or when fuel is not burned correctly.
Tools And Materials Needed
Gathering the right tools and materials makes cleaning a leaf blower carburetor easier and safer. Using proper items ensures you reach all carburetor parts and remove dirt effectively. Below is a list of essential tools and materials to prepare before starting the cleaning process.
Basic Hand Tools
A set of screwdrivers with flathead and Phillips tips is necessary. Small wrenches or socket sets help remove carburetor bolts. Tweezers or needle-nose pliers assist in handling tiny parts and springs.
Carburetor Cleaner Spray
Use a carburetor cleaner spray made for small engines. This spray dissolves gum, varnish, and dirt inside the carburetor passages. Avoid using harsh chemicals that may damage rubber seals.
Compressed Air Canister
A can of compressed air clears out loosened debris and dries the carburetor quickly. It helps blow through narrow jets and tubes where dirt hides.
Cleaning Brushes And Picks
Small nylon or brass brushes scrub stubborn grime without scratching metal parts. Picks or toothpicks remove deposits from tiny holes and crevices safely.
Safety Gear
Wear safety glasses to protect your eyes from spray and debris. Gloves keep your hands clean and safe from chemicals.
Clean Cloths And Containers
Use lint-free cloths to wipe parts dry and clean surfaces. Small containers or trays hold screws and small pieces, preventing loss during cleaning.
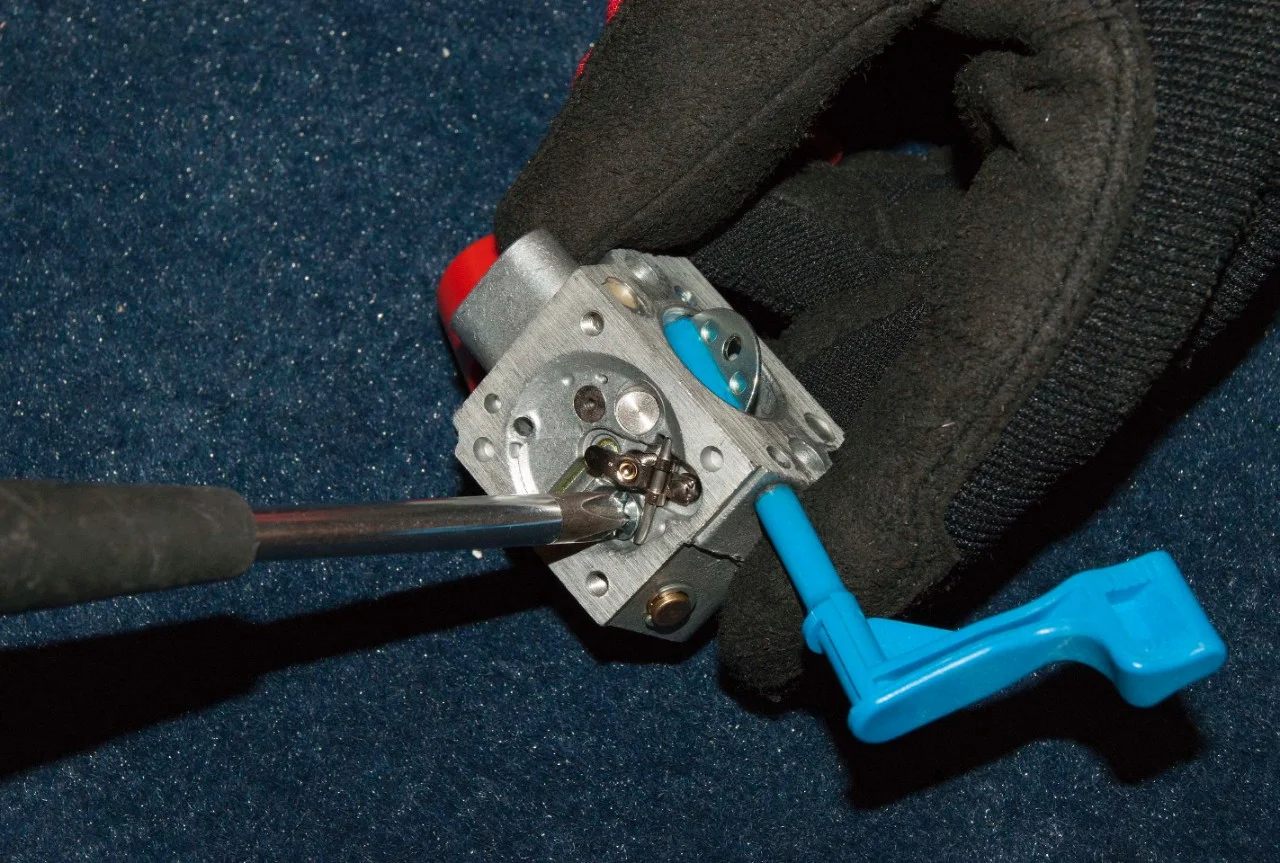
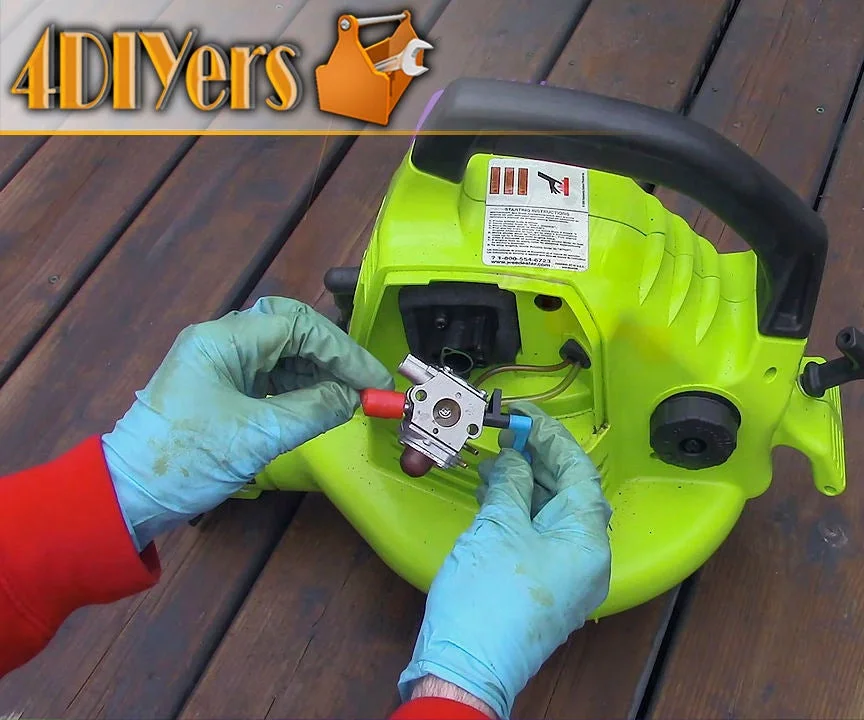
Removing The Carburetor
Removing the carburetor is an important step in cleaning your leaf blower. It gives you full access to the parts that need cleaning. Taking out the carburetor carefully helps avoid damage to other components. Follow the steps below to remove the carburetor safely and easily.
Prepare The Leaf Blower For Removal
Start by turning off the leaf blower. Make sure it is cool to touch. Remove the spark plug wire to prevent accidental starting. Drain any fuel from the tank to avoid spills. Place the blower on a clean, flat surface.
Disconnect The Fuel Lines And Linkages
Locate the fuel lines connected to the carburetor. Use pliers to gently pull off the fuel hoses. Be careful not to tear them. Next, detach the throttle and choke linkages. Note how these parts connect for reassembly later.
Remove The Carburetor From The Engine
Find the screws or bolts holding the carburetor in place. Use the correct screwdriver or wrench to loosen them. Carefully pull the carburetor away from the engine. Avoid forcing it to prevent breaking any parts. Set the carburetor on a clean workbench.
Credit: www.instructables.com
Disassembling The Carburetor
Disassembling the carburetor is the first key step in cleaning your leaf blower. This process lets you access all parts that need cleaning. Careful disassembly prevents damage and helps spot worn-out parts. Follow each step patiently for best results.
Gather Necessary Tools And Prepare Workspace
Start by collecting small screwdrivers and pliers. Use a clean, well-lit area to work. Lay down a cloth to catch tiny parts. Keep a container ready to hold screws and springs safely.
Remove The Carburetor From The Leaf Blower
Turn off the leaf blower and disconnect the spark plug for safety. Unscrew the bolts holding the carburetor in place. Carefully detach the fuel lines and throttle linkage. Take note of their positions for easy reassembly.
Disassemble The Carburetor Components
Begin by removing the carburetor cover and the float bowl. Take out the float and needle valve gently. Unscrew the jets and other small parts. Keep all pieces organized in order of removal.
Inspect And Handle Small Parts With Care
Check for cracks, wear, or clogs in each component. Use a magnifying glass if needed. Handle delicate parts like jets and needles carefully to avoid bending. Cleanliness is vital before moving to the cleaning phase.
Cleaning Jets And Passages
Cleaning jets and passages is key to a smooth-running leaf blower. Dirt and debris block fuel flow. This causes poor engine performance or no start at all.
Clearing these small parts helps fuel move freely. It improves engine power and saves you repair costs. The process requires care and the right tools.
Removing The Carburetor Bowl
Start by removing the carburetor bowl. This part holds fuel and covers jets. Use a screwdriver to loosen screws carefully. Place the bowl on a clean surface.
Check for dirt or old fuel inside the bowl. Clean it with a soft cloth before moving on.
Spraying Carburetor Cleaner Into Jets
Use carburetor cleaner spray to clear jets. Spray directly into all small openings. The cleaner dissolves gum and varnish buildup inside. Repeat spraying until no residue remains.
Do not force anything into the jets. The spray pressure is enough to clean them gently.
Using A Small Brush For Stubborn Dirt
Some dirt sticks tight and needs scrubbing. Use a soft brush like a toothbrush. Gently scrub around jets and passages. Avoid using metal tools that can damage parts.
Brush in small circular motions to loosen deposits. Then spray cleaner again to wash away loosened dirt.
Blowing Out Passages With Compressed Air
Compressed air removes leftover debris and cleaner. Blow air through all jets and passages. This step clears any blockages that remain.
Hold the carburetor steady to avoid damage. Make sure to wear eye protection from flying debris.
Reassembling The Carburetor
Reassembling the carburetor is a crucial step after cleaning. Proper assembly ensures the leaf blower runs smoothly. Take your time and follow each step carefully. Misplaced parts can cause the engine to malfunction.
Use a clean workspace to avoid losing small parts. Organize screws, gaskets, and components in order. Check each piece for damage before assembling. Replace any worn parts to maintain performance.
Reinstalling The Float And Needle Valve
Start by placing the float back in its position. Make sure it moves freely without sticking. Attach the needle valve to the float arm carefully. The valve controls fuel flow and must seal properly.
Attaching The Gaskets And Diaphragm
Lay the gaskets flat on the carburetor body. Avoid bending or tearing them. Place the diaphragm over the gasket. Align all holes with the carburetor’s screw holes. A tight seal prevents air leaks.
Securing The Carburetor Cover
Position the cover over the diaphragm and gasket. Insert screws by hand first to avoid cross-threading. Tighten screws evenly in a crisscross pattern. Do not overtighten; it can crack the cover.
Reconnecting Fuel Lines And Linkages
Attach fuel lines to the correct ports on the carburetor. Check for cracks or stiffness in the tubes. Connect throttle and choke linkages carefully. Ensure they move smoothly without binding.
Final Inspection And Testing
Look over the entire carburetor for loose parts or gaps. Confirm all screws and connections are secure. Reinstall the carburetor onto the leaf blower engine. Start the blower to test for proper operation.
Reinstalling And Testing
After cleaning the carburetor, reinstalling and testing are crucial steps. Proper reassembly ensures the leaf blower works efficiently. Testing confirms the carburetor functions correctly and the engine runs smoothly.
Reattaching The Carburetor To The Engine
Place the carburetor back in its original position. Secure it tightly with screws or bolts. Reconnect any linkages or springs carefully. Attach fuel lines without twisting or bending. Make sure all connections are firm and leak-free.
Connecting The Air Filter And Housing
Install the air filter over the carburetor intake. Ensure it fits snugly to prevent dirt entry. Attach the air filter housing securely. This protects the carburetor from dust and debris.
Starting And Adjusting The Leaf Blower
Fill the fuel tank with fresh fuel. Pull the starter cord slowly until the engine fires. Let the engine warm up for a few minutes. Adjust the idle speed using the carburetor screws. Increase throttle to test smooth acceleration.
Checking For Leaks And Proper Operation
Inspect all fuel lines and connections for leaks. Watch the engine for any unusual noises or sputtering. Confirm the leaf blower runs steadily at different speeds. If needed, fine-tune the carburetor settings for better performance.
Preventive Maintenance Tips
Preventive maintenance keeps your leaf blower carburetor working well. It stops dirt buildup and fuel problems. Regular care extends the life of your tool. Simple steps prevent costly repairs and improve performance.
Use Fresh Fuel Only
Old fuel clogs the carburetor quickly. Always use fresh gasoline mixed with the right oil. Avoid storing fuel in the blower for long periods. Empty the tank after each use if possible.
Clean The Air Filter Regularly
A dirty air filter lets dust enter the carburetor. Check and clean the air filter often. Replace it if it looks worn or damaged. Clean air improves engine efficiency and reduces carburetor wear.
Inspect Fuel Lines And Filter
Fuel lines can crack or clog over time. Look for leaks, cracks, or blockages regularly. Replace any damaged parts immediately. A clean fuel system helps the carburetor work smoothly.
Run The Engine Until It Stops
Run the blower until it uses all fuel in the tank. This prevents fuel from sitting in the carburetor. Stale fuel causes varnish and gum deposits. Emptying fuel helps keep the carburetor clean.
Store Properly During Off-season
Store the blower in a dry place away from dust. Remove the spark plug and add a few drops of oil in the cylinder. Pull the starter rope slowly to spread oil inside. This protects internal parts during storage.
Credit: www.youtube.com
Frequently Asked Questions
How Do You Unclog A Carburetor Without Removing It?
Spray carburetor cleaner into the air intake and jets. Remove the float bowl to clean deposits. Use compressed air to clear passages. Repeat if needed. This unclogs the carburetor without full removal.
How To Clean A 2 Stroke Leaf Blower Carburetor?
Remove the carburetor bowl to access jets. Spray carburetor cleaner inside all openings. Scrub with a small brush. Use compressed air to clear passages. Reassemble and test the leaf blower.
What Is The Best Carburetor Cleaner For A Leaf Blower?
The best carburetor cleaner for a leaf blower is Sea Foam or a dedicated spray carburetor cleaner. Both remove deposits and improve fuel flow efficiently. Use a small brush and compressed air for thorough cleaning.
Why Does My Leaf Blower Keep Dying When I Give It Gas?
Your leaf blower dies when you give it gas due to clogged carburetor jets, dirty fuel filter, or blocked fuel lines. Clean or rebuild the carburetor and inspect fuel components to fix this issue.
How Often Should I Clean A Leaf Blower Carburetor?
Clean the carburetor at least once a year or when the blower runs poorly.
Conclusion
Cleaning your leaf blower carburetor keeps your tool running smoothly. Regular care prevents clogs and poor performance. Use proper cleaning methods and tools for best results. Take your time and follow each step carefully. A clean carburetor saves you money on repairs.
Keep your leaf blower ready for any yard task. Simple maintenance extends its life and efficiency. Now, you can enjoy easy, effective yard work without worries.
{ “@context”: “https://schema.org”, “@type”: “Article”, “headline”: “How to Clean a Leaf Blower Carburetor: Easy Steps for Peak Performance”, “description”: “Learn how to clean a leaf blower carburetor by understanding its role in fuel mixing and ensuring optimal engine performance through proper maintenance.”, “url”: “https://www.powertoolstoday.com/how-to-clean-a-leaf-blower-carburetor/”, “datePublished”: “2025-12-14”, “dateModified”: “2026-03-18”, “author”: { “@type”: “Organization”, “name”: “Power Tools Today”, “url”: “https://www.powertoolstoday.com” }, “publisher”: { “@type”: “Organization”, “name”: “Power Tools Today”, “url”: “https://www.powertoolstoday.com” }, “mainEntityOfPage”: { “@type”: “WebPage”, “@id”: “https://www.powertoolstoday.com/how-to-clean-a-leaf-blower-carburetor/” }, “image”: { “@type”: “ImageObject”, “url”: “https://www.powertoolstoday.com/wp-content/uploads/2025/11/how-to-clean-a-leaf-blower-carburetor.jpg” } }{ “@context”: “https://schema.org”, “@type”: “Article”, “headline”: “How to Clean a Leaf Blower Carburetor: Easy Steps for Peak Performance”, “description”: “Learn how to clean a leaf blower carburetor by understanding its role in fuel mixing and ensuring optimal engine performance through proper maintenance.”, “url”: “https://www.powertoolstoday.com/how-to-clean-a-leaf-blower-carburetor/”, “datePublished”: “2025-12-14”, “dateModified”: “2026-03-19”, “author”: { “@type”: “Organization”, “name”: “Power Tools Today”, “url”: “https://www.powertoolstoday.com” }, “publisher”: { “@type”: “Organization”, “name”: “Power Tools Today”, “url”: “https://www.powertoolstoday.com” }, “mainEntityOfPage”: { “@type”: “WebPage”, “@id”: “https://www.powertoolstoday.com/how-to-clean-a-leaf-blower-carburetor/” }, “image”: { “@type”: “ImageObject”, “url”: “https://www.powertoolstoday.com/wp-content/uploads/2025/11/how-to-clean-a-leaf-blower-carburetor.jpg” } }nn