Last Updated: March 20, 2026
If you use nail drill bits regularly, you know how quickly they can get clogged with dust, gel, or acrylic residue. But did you know that keeping your bits clean isn’t just about performance—it’s also about protecting your health and extending the life of your tools?
You might be wondering what the easiest and safest way to clean these tiny but essential pieces is. You’ll discover simple, step-by-step methods to clean and disinfect your nail drill bits properly. Stick around, because mastering this skill will save you time, money, and frustration while keeping your nails flawless and your workspace hygienic.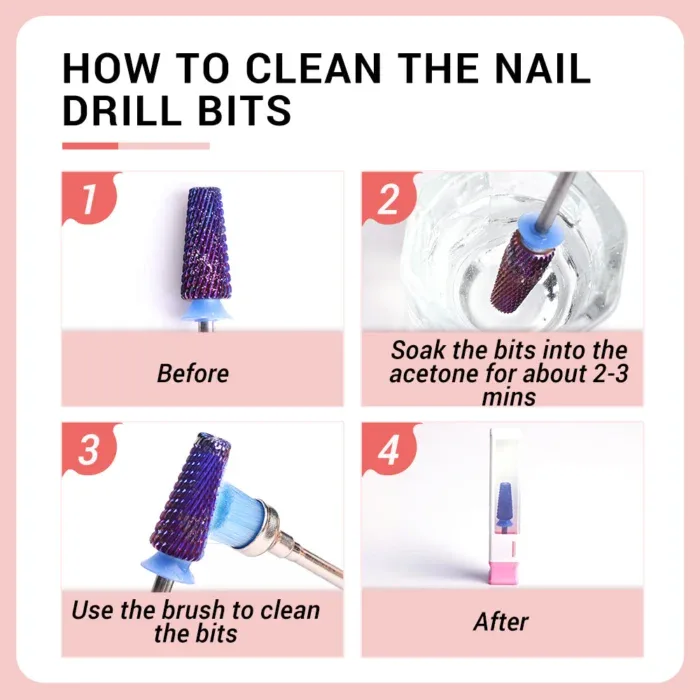
Credit: www.melodysusie.com
Choosing Cleaning Supplies
Choosing the right cleaning supplies is key for keeping nail drill bits in top shape. Proper supplies remove dirt, debris, and bacteria effectively. They also protect the bits from damage. Clean bits last longer and perform better during nail services.
Safe Solvents For Nail Bits
Use solvents that clean well without harming the metal or coating. Acetone is a popular choice. It dissolves polish and residue quickly. Rubbing alcohol (isopropyl alcohol) disinfects and dries fast. Hydrogen peroxide kills germs and is gentle on bits. Avoid harsh chemicals that cause rust or wear.
Tools For Scrubbing And Soaking
Soft brushes help remove stuck-on debris without scratching. Nylon or soft-bristle brushes work best. Small containers or bowls hold the solvent for soaking bits. Soaking loosens hardened product and bacteria. Use a clean cloth or paper towel to dry bits after cleaning. Proper tools make the process easier and safer.
Removing Visible Debris
Removing visible debris from nail drill bits is essential for maintaining their performance. Dirt and residue can block the bits and reduce their effectiveness. Cleaning these bits regularly keeps them working smoothly and extends their lifespan.
Start by focusing on the visible dirt. This step prepares the bits for deeper cleaning and disinfection later. Proper removal of debris ensures that the bits stay safe and hygienic for every use.
Using Brushes And Soap
Use a small brush to clean nail drill bits. A toothbrush or a special bit cleaning brush works well. Dip the brush in warm, soapy water.
Gently scrub the bit to remove dust and particles. Soap helps break down oils and residues. Rinse the bit under running water to wash away loosened debris. Dry the bit thoroughly with a clean cloth or air dry it.
Techniques For Stuck-on Residue
Sometimes residue sticks tightly to the bits. Use a wooden or plastic stick to scrape off hardened debris carefully. Avoid metal tools that can damage the bit surface.
Soak the bits in acetone for a few minutes to dissolve tough residue. After soaking, use the brush again to remove loosened particles. Rinse and dry the bits completely before storing or disinfecting them.
Disinfecting Methods
Disinfecting nail drill bits is essential to keep them clean and safe. Proper disinfection removes bacteria, fungi, and viruses. It also extends the life of your drill bits. Use effective methods to ensure your tools are hygienic before every use. Below are two common ways to disinfect nail drill bits effectively.
Soaking In Acetone Or Alcohol
Soak your nail drill bits in acetone or isopropyl alcohol for 5 to 10 minutes. Acetone dissolves nail product residues quickly. Alcohol kills most germs on the surface of the bits. Use a small glass container to hold the liquid safely. After soaking, rinse the bits with water and dry them completely. Avoid soaking bits with glued parts to prevent damage.
Using Commercial Disinfectants
Commercial disinfectants are made specifically for nail tools. Follow the instructions on the product label carefully. Usually, you soak the bits for the recommended time. Some disinfectants require rinsing after use, while others do not. Always wear gloves when handling strong chemicals. Store bits in a clean container after disinfecting to keep them sterile.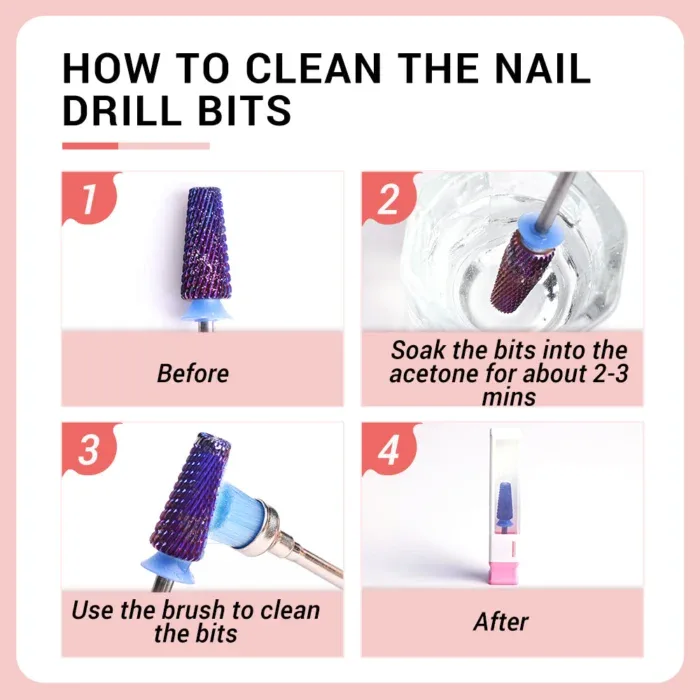
Credit: www.melodysusie.com
Sterilization Techniques
Proper sterilization of nail drill bits is essential for safe and hygienic nail care. It removes bacteria, fungi, and viruses that can cause infections. Choosing the right sterilization technique protects clients and extends the life of your tools.
Ultrasonic Cleaning Benefits
Ultrasonic cleaners use sound waves to clean nail drill bits deeply. These waves create tiny bubbles that remove dirt and debris from hard-to-reach places. This method is gentle and effective, preventing damage to the bits.
Ultrasonic cleaning also reduces the need for harsh chemicals. It saves time by cleaning multiple bits at once. After cleaning, bits are easier to sterilize with other methods.
Heat Sterilizers And Autoclaves
Heat sterilizers use high temperatures to kill germs on nail drill bits. Autoclaves are a type of heat sterilizer that uses steam under pressure. This method is highly effective for complete sterilization.
Autoclaving ensures bits are free from all bacteria and viruses. It also helps maintain the quality and sharpness of the bits. Always follow the manufacturer’s instructions for safe use of heat sterilizers.
Drying And Storing Bits
Drying and storing nail drill bits correctly keeps them in good shape. Proper care stops damage and keeps bits safe for use. After cleaning, bits must dry fully to avoid rust or bacteria growth.
Store bits in clean, dry places to keep them ready for the next use. Proper storage also helps organize your tools and prevents loss or mix-ups.
Preventing Rust And Contamination
Always dry bits completely after cleaning. Use a clean cloth or let them air dry on a paper towel. Avoid storing bits when damp. Moisture causes rust and bacteria growth quickly.
Keep bits away from humid areas. Use silica gel packs in storage containers to absorb moisture. Check bits regularly for rust or dirt. Clean and dry them again if needed.
Proper Storage Containers
Choose storage containers that protect bits from dust and moisture. Plastic or metal cases with individual slots work best. Each bit should have its own space to avoid damage or contamination.
Label containers for easy identification. Keep containers closed tightly to prevent dirt entry. Store containers in cool, dry places away from direct sunlight. This helps bits last longer and stay clean.
Safety Tips For Handling
Handling nail drill bits safely is key to protecting yourself and your clients. Proper safety measures reduce risks of infections and injuries. Follow simple steps to keep your workspace clean and safe.
Wearing Gloves And Masks
Always wear gloves when cleaning drill bits. Gloves protect your skin from chemicals and debris. Use disposable gloves and change them often. Wear a mask to avoid breathing dust or particles. Masks keep your lungs safe from harmful substances. Clean your hands before and after wearing gloves.
Avoiding Cross-contamination
Use separate containers for dirty and clean drill bits. Never mix used bits with disinfected ones. Clean and disinfect bits immediately after use. Sterilize tools with approved solutions or machines. Avoid touching cleaned bits with bare hands. Label storage areas to keep tools organized and safe.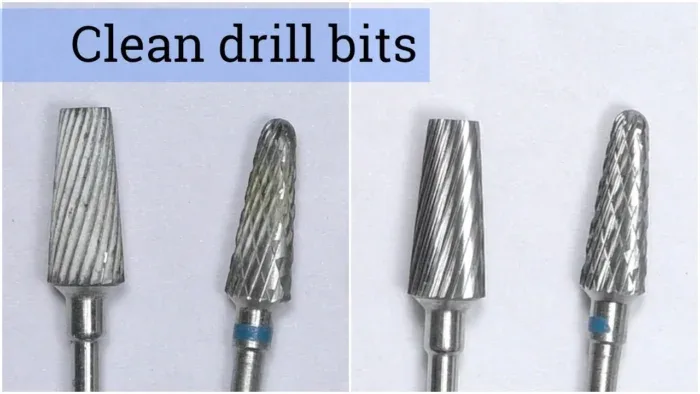
Credit: www.youtube.com
Conclusion
Cleaning nail drill bits keeps them safe and working well. Regular cleaning stops germs and product buildup. Use simple tools like a brush, acetone, and disinfectant solution. Always dry bits fully before storing them. Clean bits last longer and protect your nails.
Remember, small steps make a big difference. Keep your nail drill bits clean for the best results every time.
Frequently Asked Questions
Soak nail drill bits in acetone for 5-10 minutes to dissolve product residue and disinfect. Rinse with water and dry thoroughly.
Soak nail drill bits in acetone for 5-10 minutes to dissolve product and kill bacteria. Scrub with a brush, then rinse and dry. Disinfect with rubbing alcohol if needed. Store bits in a clean, dry place to maintain hygiene and performance.
Yes, you can clean nail drill bits with alcohol. Soak them briefly in rubbing alcohol to disinfect and remove debris effectively.
Yes, use rubbing alcohol to clean nail tools by soaking them for at least 10 minutes. It disinfects and removes bacteria effectively.
Clean drill bits after every client to prevent infections and maintain tool efficiency.
Use acetone or a disinfectant solution to soak and remove debris effectively.
