Last Updated: March 21, 2026
Setting up your TIG welder the right way is the key to making clean, strong welds every time. Whether you’re a beginner or looking to sharpen your skills, knowing how to configure your machine correctly can save you time, frustration, and wasted materials.
In this guide, you’ll discover simple, step-by-step instructions to get your TIG welder ready for action. By following these tips, you’ll gain better control over your welding process and achieve professional results faster than you might expect. Ready to master your TIG setup and weld like a pro?
Let’s dive in.
Gathering Equipment
Gathering the right equipment is the first step to set up a TIG welder properly. Proper tools and safety gear help ensure smooth welding and protect you from hazards. Prepare your workspace by collecting everything before you start. This saves time and avoids interruptions during welding.
Essential Tools
Start with the TIG welder machine suitable for your projects. Choose the correct tungsten electrodes based on the metal type. A welding torch with a good grip helps control the arc easily. Use filler rods that match the metal you plan to weld. A gas regulator and hose are needed to control the shielding gas flow. Keep a clean brush or grinder handy to prepare the metal surface. Clamps and magnets hold the pieces steady during welding. A welding table or flat surface provides a safe work area.
Safety Gear
Wear a welding helmet with a proper shade to protect your eyes. Use flame-resistant gloves to shield your hands from heat and sparks. Wear a long-sleeve welding jacket or apron made from durable material. Safety glasses protect your eyes during grinding and cleaning. Use ear protection if you work in noisy environments. Ensure proper ventilation to avoid inhaling fumes. Keep a fire extinguisher nearby for emergencies.
Choosing Power Source
Choosing the right power source is crucial for setting up a TIG welder. It affects the quality of the weld and the types of materials you can work on. Understanding the differences in power settings helps you use your machine efficiently and safely.
Ac Vs Dc Settings
TIG welders offer two main current types: AC and DC. AC stands for alternating current, which changes direction periodically. It is best for welding aluminum and magnesium. AC helps clean the metal surface while welding.
DC means direct current, which flows in one direction only. DC is ideal for welding steel, stainless steel, and copper. It provides a stable arc and deeper penetration for these metals.
Choosing AC or DC depends on the material you plan to weld. Some machines allow switching between the two, giving more flexibility.
Power Requirements
Check the power supply available in your workshop before setting up the TIG welder. Most welders need either 110V or 220V input. Higher voltage welders provide more power for thicker materials.
Make sure your electrical outlet can handle the welder’s amperage. Using the wrong power source can cause damage to the machine or poor welds.
Consider your welding projects. For light work and thin metals, a lower power source is fine. For heavy-duty welding, choose a welder that supports higher power input.
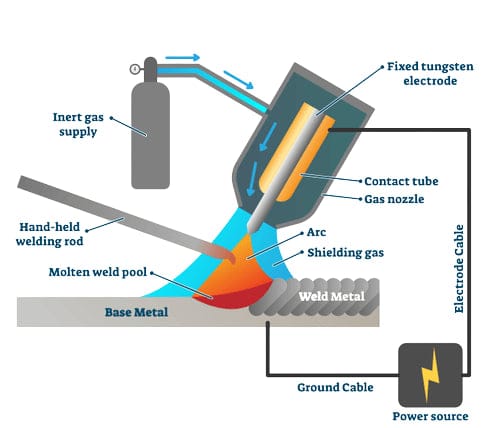
Connecting The Tig Torch
Connecting the TIG torch correctly is essential for safe and effective welding. This step ensures the torch works smoothly and produces clean welds. Focus on assembling the torch parts and setting the right polarity for your project.
Torch Assembly
Start by attaching the tungsten electrode to the torch. Insert it firmly but avoid over-tightening. Secure the collet and collet body to hold the tungsten in place. Next, screw on the ceramic cup. This part directs the shielding gas during welding.
Check all parts for tightness to prevent gas leaks. Attach the torch cable to the power source. Make sure the connection is secure and free of damage. Proper assembly helps maintain consistent gas flow and electrical contact.
Polarity Setup
Set the polarity according to the metal you weld. For most TIG welding on steel and stainless steel, use direct current electrode negative (DCEN). This setup provides good penetration and control.
For aluminum and magnesium, use alternating current (AC). AC helps clean the metal surface and melts the base material evenly. Double-check your machine’s settings before starting.
Incorrect polarity can cause poor weld quality and damage the tungsten. Always verify the polarity matches your welding task for the best results.
Setting Up The Ground Clamp
Setting up the ground clamp is a crucial step in preparing your TIG welder. It completes the electrical circuit and ensures a stable welding arc. Poor grounding can cause weak welds and unsafe conditions. Take time to set the ground clamp properly for the best welding results.
Proper Placement
Attach the ground clamp to clean, bare metal close to your work area. Avoid painted, rusty, or oily surfaces. These layers block electrical flow and cause poor grounding. Use a wire brush to clean the metal if needed. The closer the clamp is to the weld, the better the current flow.
Ensuring Good Contact
Check that the clamp grips the metal firmly. Loose contact can cause sparks and erratic arc behavior. Tighten the clamp securely but avoid damaging the metal. A solid connection keeps the electrical circuit stable. Test the setup by starting the arc and watching for consistent weld quality.
Adjusting Amperage
Adjusting the amperage on a TIG welder is a key step to achieve clean, strong welds. Amperage controls the heat produced by the welder. Too much heat can burn through the metal, while too little heat causes poor fusion. Finding the right setting depends on the metal type and thickness. Proper amperage ensures smooth weld beads and good penetration. Understanding how to control amperage helps improve welding quality and safety.
Determining Correct Amps
Start by identifying the metal type and thickness. Thicker metals need higher amperage. For example, steel usually requires about 1 amp per 0.001 inch of thickness. A 1/8 inch steel plate needs roughly 125 amps. Aluminum needs AC current and slightly different settings. Always check your welder’s manual for specific guidelines. Test welds on scrap metal help find the best amperage. Look for smooth weld beads without burn-through or poor fusion.
Using Foot Pedal Control
The foot pedal lets you adjust amperage while welding. First, set the machine’s maximum amperage. Do not start at full power. Press the pedal lightly to start the arc with low heat. Press harder to increase amperage as needed. This control gives better precision over the weld pool. It reduces the risk of burning through the metal. Practice using the pedal on scrap metal to get a feel for the response. Foot pedal control helps make cleaner, more controlled welds.
Credit: yeswelder.com
Preparing Tungsten Electrode
Preparing the tungsten electrode is a key step in setting up a TIG welder. This process affects the weld quality and arc stability. A well-prepared electrode ensures a clean, precise weld with minimal contamination.
Proper preparation includes selecting the right electrode type and sharpening it correctly. Each step influences the welding performance and ease of use.
Sharpening Techniques
Sharpen the tungsten electrode to a fine point. Use a dedicated tungsten grinder or a belt sander. Avoid using a regular grinding wheel, as it contaminates the electrode.
Hold the electrode steady and grind it lengthwise. This creates a smooth, tapered tip. A sharp point focuses the arc and improves control.
For AC welding, especially aluminum, use a rounded tip. This shape helps maintain a stable arc and reduces tungsten contamination.
Electrode Types
Choose the electrode type based on the material and welding current. Pure tungsten electrodes (green) suit AC welding on aluminum and magnesium. They provide good arc stability.
Thoriated tungsten electrodes (red) work well for DC welding on steel and stainless steel. They offer better arc starting and longevity.
Cerium and lanthanated electrodes (orange and blue) are good all-around choices. They perform well on both AC and DC with excellent arc stability.
Gas Flow Setup
Proper gas flow setup is crucial for successful TIG welding. It protects the weld from contamination. Setting up the gas flow correctly ensures a clean and strong weld. This section explains how to select shielding gas and adjust the regulator and flow settings.
Selecting Shielding Gas
Shielding gas prevents oxygen and moisture from reaching the weld. Argon is the most common choice for TIG welding. It works well with steel, stainless steel, and aluminum. Sometimes, a mix of argon and helium improves heat and weld quality. Pure helium is less common but useful for thicker metals. Choose the gas based on the metal type and welding conditions.
Regulator And Flow Settings
The regulator controls gas pressure from the tank. Connect it securely to avoid leaks. Set the flow rate to provide a steady gas shield. Typical flow rates range from 15 to 25 cubic feet per hour (CFH). Lower flow can cause contamination; higher flow wastes gas and creates turbulence. Adjust flow depending on the welding environment and torch size. Use a flow meter for accurate measurement. Always check for leaks before starting to weld.
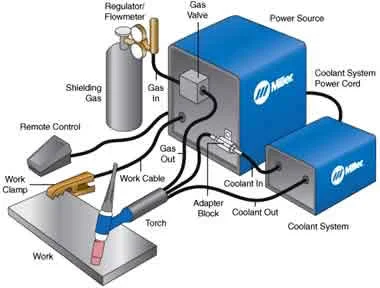
Credit: www.millerwelds.com
Performing Test Welds
Performing test welds is a crucial step after setting up your TIG welder. It helps confirm that your machine settings match the metal and thickness you plan to work on. Test welds allow you to check the quality of the weld bead and see if any adjustments are needed. Use scrap metal similar to your project material to avoid wasting good pieces.
Test welds reveal how well the heat and filler material combine. They show if the weld is strong, smooth, and free of defects. Taking time for test welds reduces mistakes and improves your final work. Pay close attention to how the weld bead looks and feels during this process.
Evaluating Weld Quality
Look at the weld bead for smoothness and even width. Check for cracks, porosity, or excessive spatter. A good weld bead should be clean and shiny with a consistent shape. Feel the weld to see if it is smooth or rough. Inspect the penetration to ensure it fuses well with the base metal. Poor penetration means weak joints, so avoid it.
Fine-tuning Settings
Adjust the amperage if the weld is too flat or too raised. Too much heat burns through the filler rod. Too little heat causes the weld to hump up. Change the travel speed to control bead shape. Slower speed creates wider beads, while faster speed narrows them. Modify the gas flow if the weld oxidizes or becomes dirty. Small changes can make big improvements in weld quality.
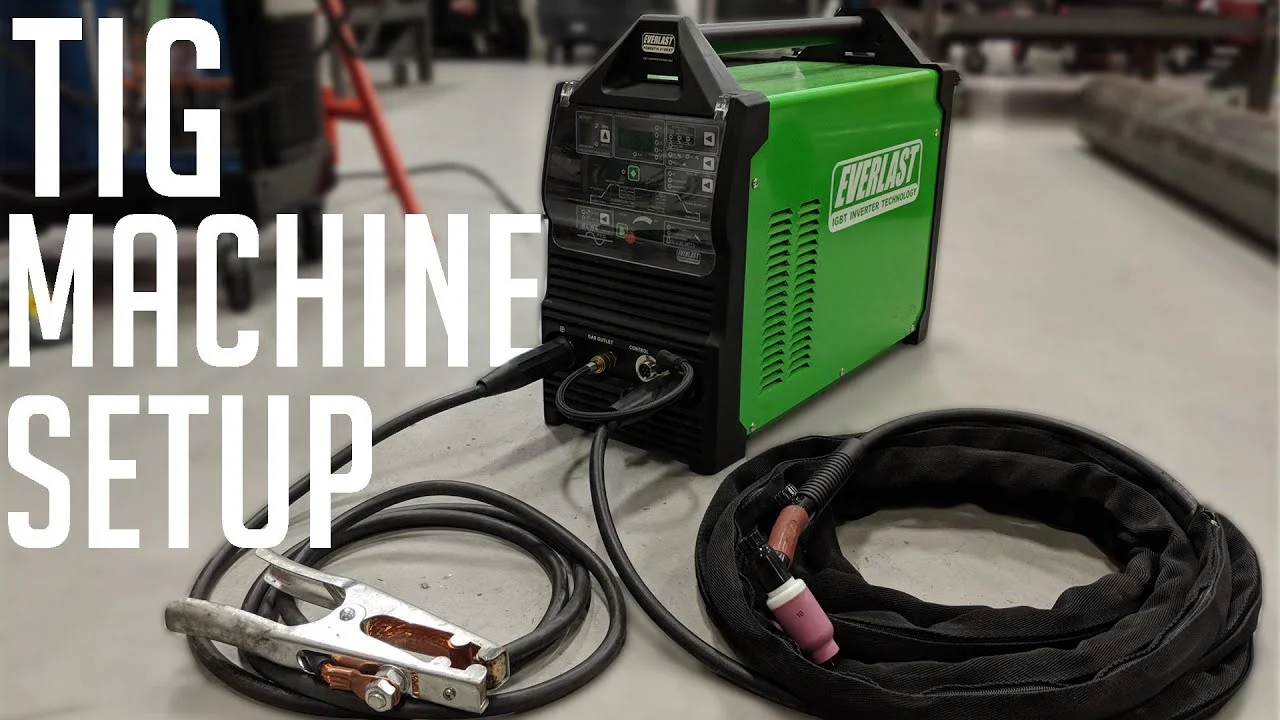
Credit: www.youtube.com
Frequently Asked Questions
How To Set Amps For Tig Welding?
Set TIG welding amps based on material thickness: about 1 amp per 0. 001 inch thickness. Adjust using test welds for proper penetration. Use foot pedal for precise control. Avoid overheating or underheating by observing weld bead and filler rod behavior.
Sharpen tungsten for better arc stability.
Do I Hook My Tig Torch To My Positive Or Negative Lead?
Connect your TIG torch to the negative lead for DC welding. For AC welding, especially aluminum, connect the torch to the positive lead. Always check your machine’s manual, as some models may require different polarity settings.
What Do You Tig Weld On Ac Or Dc?
Use AC for TIG welding aluminum and magnesium to clean oxides. Use DC for TIG welding steel, stainless steel, and other ferrous metals.
What Is Needed To Run A Tig Welder?
To run a TIG welder, you need a power source, TIG torch, tungsten electrode, shielding gas (usually argon), and proper safety gear.
What Equipment Is Needed To Set Up A Tig Welder?
You need a TIG welder, tungsten electrode, shielding gas, welding torch, and safety gear.
Conclusion
Setting up a TIG welder takes patience and careful adjustments. Start by preparing your machine and materials properly. Test different settings on scrap metal to find what works best. Keep the tungsten sharp and adjust amperage for clean, strong welds.
Practice often to build confidence and skill. This simple process helps you weld safely and effectively every time.
{ “@context”: “https://schema.org”, “@type”: “Article”, “headline”: “How to Set Up a Tig Welder: Step-by-Step Guide for Beginners”, “description”: “Learn how to set up a Tig welder by understanding its components, settings, and basic steps to ensure precise and clean welding results.”, “url”: “https://www.powertoolstoday.com/how-to-set-up-a-tig-welder/”, “datePublished”: “2025-11-29”, “dateModified”: “2026-03-18”, “author”: { “@type”: “Organization”, “name”: “Power Tools Today”, “url”: “https://www.powertoolstoday.com” }, “publisher”: { “@type”: “Organization”, “name”: “Power Tools Today”, “url”: “https://www.powertoolstoday.com” }, “mainEntityOfPage”: { “@type”: “WebPage”, “@id”: “https://www.powertoolstoday.com/how-to-set-up-a-tig-welder/” }, “image”: { “@type”: “ImageObject”, “url”: “https://www.powertoolstoday.com/wp-content/uploads/2025/11/how-to-set-up-a-tig-welder.webp” } }nn{“@context”:”https://schema.org”,”@type”:”FAQPage”,”mainEntity”:[{“@type”:”Question”,”name”:”How To Set Amps For Tig Welding?”,”acceptedAnswer”:{“@type”:”Answer”,”text”:”Set TIG welding amps based on material thickness : about 1 amp per 0. 001 inch thickness. Adjust using test welds for proper penetration. Use foot pedal for precise control. Avoid overheating or underheating by observing weld bead and filler rod behavior.”}},{“@type”:”Question”,”name”:”Do I Hook My Tig Torch To My Positive Or Negative Lead?”,”acceptedAnswer”:{“@type”:”Answer”,”text”:”Connect your TIG torch to the negative lead for DC welding. For AC welding, especially aluminum, connect the torch to the positive lead. Always check your machine’s manual, as some models may require different polarity settings.”}},{“@type”:”Question”,”name”:”What Do You Tig Weld On Ac Or Dc?”,”acceptedAnswer”:{“@type”:”Answer”,”text”:”Use AC for TIG welding aluminum and magnesium to clean oxides. Use DC for TIG welding steel, stainless steel, and other ferrous metals.”}},{“@type”:”Question”,”name”:”What Is Needed To Run A Tig Welder?”,”acceptedAnswer”:{“@type”:”Answer”,”text”:”To run a TIG welder, you need a power source, TIG torch, tungsten electrode, shielding gas (usually argon), and proper safety gear.”}},{“@type”:”Question”,”name”:”What Equipment Is Needed To Set Up A Tig Welder?”,”acceptedAnswer”:{“@type”:”Answer”,”text”:”You need a TIG welder, tungsten electrode, shielding gas, welding torch, and safety gear.”}}]}nn{“@context”:”https://schema.org”,”@type”:”HowTo”,”name”:”How to Set Up a Tig Welder: Step-by-Step Guide for Beginners”,”step”:[{“@type”:”HowToStep”,”position”:1,”name”:”Gathering Equipment”,”text”:”Gathering the right equipment is the first step to set up a TIG welder properly. Proper tools and safety gear help ensure smooth welding and protect you from hazards. Prepare your workspace by collecting everything before you start. This saves time and avoids interruptions during welding. Essential “},{“@type”:”HowToStep”,”position”:2,”name”:”Connecting The Tig Torch”,”text”:”Connecting the TIG torch correctly is essential for safe and effective welding. This step ensures the torch works smoothly and produces clean welds. Focus on assembling the torch parts and setting the right polarity for your project. Torch Assembly Start by attaching the tungsten electrode to the to”},{“@type”:”HowToStep”,”position”:3,”name”:”Setting Up The Ground Clamp”,”text”:”Setting up the ground clamp is a crucial step in preparing your TIG welder. It completes the electrical circuit and ensures a stable welding arc. Poor grounding can cause weak welds and unsafe conditions. Take time to set the ground clamp properly for the best welding results. Proper Placement Attac”},{“@type”:”HowToStep”,”position”:4,”name”:”Adjusting Amperage”,”text”:”Adjusting the amperage on a TIG welder is a key step to achieve clean, strong welds. Amperage controls the heat produced by the welder. Too much heat can burn through the metal, while too little heat causes poor fusion. Finding the right setting depends on the metal type and thickness. Proper ampera”}]}