Last Updated: March 20, 2026
Are your drill bits getting dull and slowing down your projects? You don’t have to toss them out or buy new ones.With just an angle grinder and a little know-how, you can bring your drill bits back to razor-sharp condition quickly and easily. Imagine saving money and time by sharpening your own bits at home, keeping your tools ready for any job.In this guide, you’ll learn step-by-step how to sharpen drill bits with an angle grinder — even if you’ve never done it before. Ready to make your drill bits like new again? Let’s get started!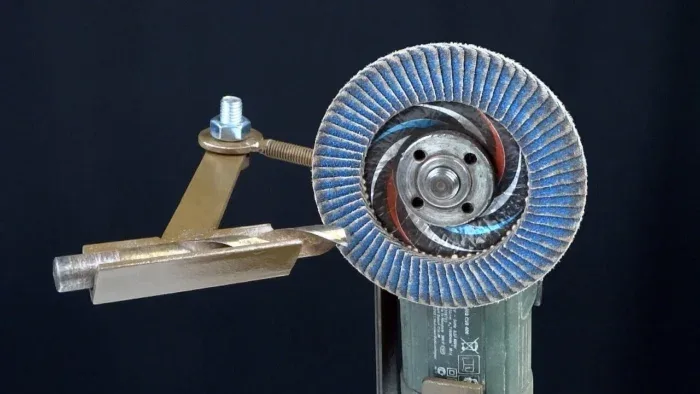 Credit: binictools.comTools And Materials NeededSharpening drill bits with an angle grinder requires the right tools and materials. Having these ready ensures a smooth and safe process. Each item plays a role in achieving sharp, precise drill bits. Below is a detailed list of what you will need.
Angle Grinder
The angle grinder is the main tool for sharpening drill bits. Choose one with a comfortable grip and adjustable speed. A smaller, lightweight model offers better control. Ensure the grinder is in good working condition before starting.Grinding Wheel
Attach a grinding wheel suitable for metal sharpening to the angle grinder. A wheel made of aluminum oxide or silicon carbide works best. Check that the wheel is clean and free of cracks or damage. This ensures safe and effective sharpening.Safety Gear
Protect yourself with safety gear. Wear safety glasses to shield your eyes from sparks and metal shards. Use gloves to protect your hands from heat and sharp edges. A dust mask helps prevent inhaling metal dust. Ear protection reduces noise exposure.Drill Bits
Gather the drill bits you want to sharpen. Inspect them for heavy damage or wear. Bits that are too worn may need replacement instead of sharpening. Organize the bits by size to make the process easier.Marker Or Chalk
Use a marker or chalk to mark the cutting edges of the drill bits. This helps guide your grinding and keeps the angles consistent. Clear markings improve accuracy during sharpening.Workbench Or Clamp
A stable workbench or clamp is essential. Secure the drill bits firmly to avoid movement. This stability allows for precise grinding and reduces the risk of accidents.Water Or Lubricant
Keep water or a lubricant nearby to cool the drill bits during sharpening. Overheating can damage the metal and reduce bit life. Frequently dipping the bit in water helps keep temperatures low.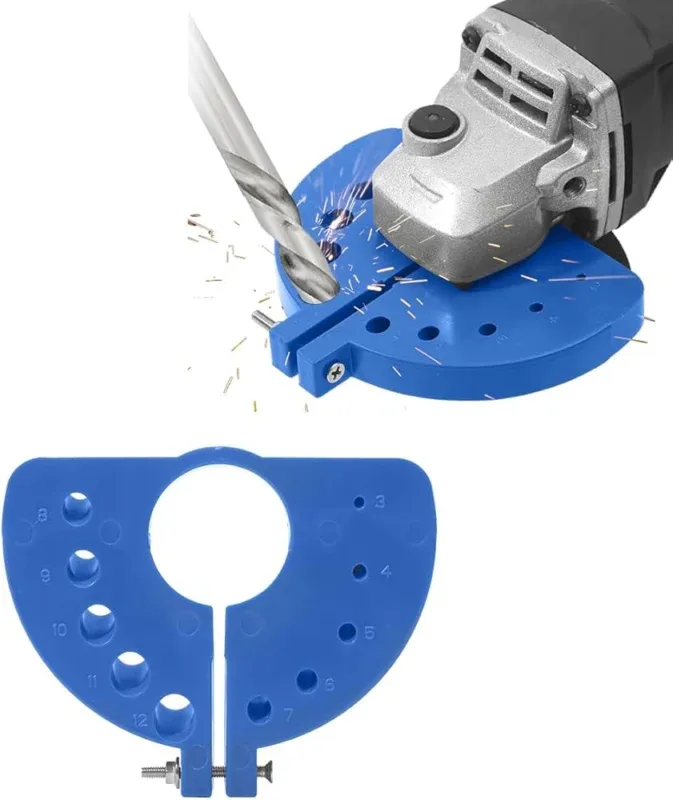 Credit: www.amazon.comPreparing The Drill BitPreparing the drill bit before sharpening is essential for good results. The bit must be clean and free from dirt or rust. This makes the sharpening process smoother and more effective.It is important to inspect the drill bit carefully. Look for any deep nicks or damage that might affect performance. Small scratches are normal, but big chips need attention.
Cleaning The Drill Bit
Use a wire brush or cloth to remove dirt and rust. Clean the entire surface, especially near the cutting edges. This helps the grinder work better on the metal.Checking For Damage
Hold the drill bit up to the light. Look closely at the tip and edges. If the bit has large chips or bends, sharpening might not fix it.Marking The Cutting Edges
Use a marker to highlight the cutting edges. This guides your grinding and keeps the angles even. Proper angles improve drilling speed and accuracy.Securing The Drill Bit
Clamp the drill bit firmly in a vise or holder. This keeps it steady during sharpening. A steady bit prevents mistakes and uneven edges.Setting The Correct AngleSetting the correct angle is vital when sharpening drill bits with an angle grinder. The angle affects the cutting efficiency and the lifespan of the bit. A well-sharpened bit cuts smoothly and lasts longer. Understanding the main angles involved helps you achieve the best results.Point Angle
The point angle is the angle at the tip of the drill bit. It controls how the bit cuts into the material. A common point angle is 118 degrees. This angle works well for soft metals, wood, and plastic. For harder materials, use a flatter angle around 135 degrees. A flatter angle reduces walking and increases durability. Matching the point angle to the material improves cutting performance.Lip And Clearance Angles
The lip or clearance angle is behind the cutting edge. It prevents the bit from rubbing against the material. If this angle is too low, the bit cuts too aggressively. If too shallow, the bit won’t cut efficiently. The ideal clearance angle allows smooth cutting without extra friction. Maintaining this angle is key for fast and clean drilling. Use steady hand movements to keep this angle consistent while grinding.Sharpening Steps With Angle GrinderSharpening drill bits with an angle grinder requires precision and care. Following the right steps ensures your drill bits regain their cutting power quickly. This section breaks down the sharpening process into clear, manageable steps.Positioning The Bit
Hold the drill bit firmly with pliers or a clamp. Secure the bit at a comfortable angle to the grinding wheel. The tip should face the grinder’s surface carefully. Align the bit’s cutting edge parallel to the wheel. This alignment helps maintain the correct angle for sharpening. Avoid pressing too hard to prevent overheating or damage.Grinding Technique
Start the grinder and gently touch the bit’s cutting edge to the wheel. Move the bit steadily side to side for an even grind. Keep the same angle throughout the process, usually around 60 degrees. Grind in short bursts to avoid overheating the metal. Cool the bit often by dipping it in water. Check the edge regularly for sharpness and shape. Stop grinding once the edge looks smooth and even.Cooling And Safety TipsCooling and safety are key when sharpening drill bits with an angle grinder. The process generates heat fast. Overheating can damage the drill bit’s metal. Proper cooling keeps the bit strong and sharp. Safety steps protect you from sparks and injuries.Taking time to cool the drill bit during sharpening extends its life. Wearing the right gear lowers the risk of harm. Small actions make the job safer and more effective.Cooling The Drill Bit Properly
Dip the drill bit in water often. This cools the metal quickly. Use a small container with clean water nearby. Avoid grinding the bit for more than a few seconds at once. Let it cool before grinding again. This stops the metal from getting too hot and losing hardness.Do not use oil or any flammable liquid to cool the bit. Water is safer and works well. Keep the water clean. Dirty water can cause rust on the bit.Wearing Protective Gear
Always wear safety glasses to protect your eyes. Sparks and metal bits can fly off during grinding. Use gloves to protect your hands from heat and sharp edges. Wear a long-sleeve shirt to cover your arms. Use ear protection to reduce noise from the grinder.Make sure your shoes are closed-toe. Avoid loose clothing or jewelry that can get caught in the grinder. Tie back long hair for safety.Safe Handling Of The Angle Grinder
Hold the angle grinder firmly with both hands. Keep a steady grip and control the speed. Use the correct grinding wheel for metal. Check the grinder and wheel for damage before use. Never use a cracked or worn wheel.Work in a clean, well-lit area. Clear any flammable materials away from your workspace. Switch off the grinder and unplug it when not in use. Always wait for the wheel to stop spinning completely before setting the tool down.Testing And Finishing TouchesTesting and finishing touches are key steps after sharpening drill bits with an angle grinder. These steps ensure the bit works well and lasts longer. A sharp bit cuts cleanly and drills faster, saving time and effort.After grinding, check the drill bit carefully. Look for smooth edges and symmetrical cutting surfaces. Uneven edges can cause wobbling or poor drilling performance. Proper finishing enhances the bit’s efficiency and safety.Testing The Sharpness
Hold the drill bit and run your finger lightly along the edge. It should feel sharp but not rough or jagged. Next, test the bit on a scrap piece of wood or metal. The bit should cut smoothly without excessive force.Look for clean holes without splinters or burrs. If the bit struggles or makes rough cuts, sharpening may need repeating. Always wear safety glasses during testing to protect your eyes from debris.Checking The Angle And Symmetry
Use a drill bit gauge or a simple protractor to check the angle of the sharpened edges. The angle should match the original design, usually between 118 and 135 degrees. Symmetry is important to prevent the bit from wandering while drilling.Rotate the bit slowly and observe if both cutting edges appear even. Unequal edges cause vibration and reduce drilling accuracy. Adjust the edges carefully with the angle grinder to restore symmetry if needed.Smoothing And Polishing Edges
Use a fine-grit sanding stone or a bench grinder with a soft wheel to smooth rough edges. This step removes small burrs left from grinding and reduces friction during drilling. Smooth edges also help the bit last longer.Polish the cutting surfaces lightly to create a clean finish. Avoid removing too much material. The goal is a sharp, smooth edge that cuts efficiently without overheating or dulling quickly.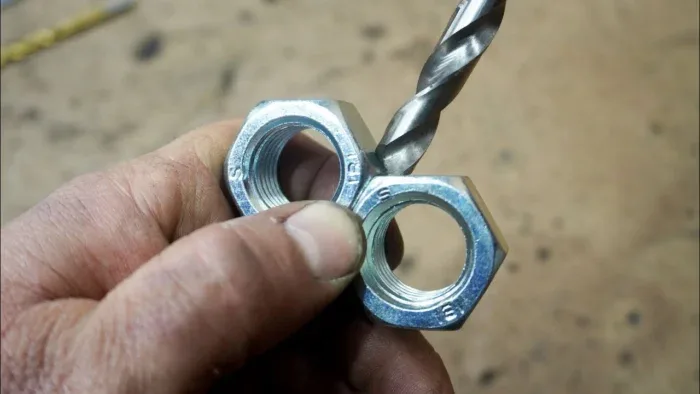 Credit: www.youtube.com
Frequently Asked Questions
Can You Sharpen Drill Bits With An Angle Grinder?
Yes, you can sharpen drill bits with an angle grinder. Maintain the correct angle and cool the bit to avoid overheating. Practice ensures even sharpening and prevents damage.What Is The Easiest Way To Sharpen A Drill Bit?
Use a bench grinder or angle grinder to carefully reshape the drill bit’s tip. Maintain the correct angle and cool it with water.What Is The Best Angle To Sharpen A Drill Bit?
The best angle to sharpen a drill bit is typically 118 degrees for general use. Use 135 degrees for harder materials to prevent walking and increase durability. Maintain equal angles on both cutting edges for efficient drilling.What Type Of Grinding Wheel For Sharpening Drill Bits?
Use a medium-grit aluminum oxide grinding wheel for sharpening standard drill bits. It offers durability and precise sharpening.How Do I Sharpen Drill Bits Using An Angle Grinder?
Hold the drill bit firmly and carefully grind the cutting edge at the right angle.What Angle Is Best For Sharpening Drill Bits?
A 118-degree angle suits most materials; harder metals may need 135 degrees.Conclusion
Sharpening drill bits with an angle grinder saves money and time. Practice steady grinding to keep the right angle. Always wear safety gear to protect your eyes and hands. Check the bit often to avoid over-grinding. A sharp drill bit works faster and lasts longer.With simple steps, your drill bits will perform like new. Try this method carefully and see the difference yourself.Related reading: How to Sharpen Drill Bits on a Bench Grinder.
{ “@context”: “https://schema.org”, “@type”: “Article”, “headline”: “How to Sharpen Drill Bits With Angle Grinder: Quick & Easy Guide”, “description”: “Learn how to sharpen drill bits with angle grinder by understanding the process to restore cutting edges for improved drilling accuracy and tool longevity.”, “url”: “https://www.powertoolstoday.com/how-to-sharpen-drill-bits-with-angle-grinder/”, “datePublished”: “2025-11-09”, “dateModified”: “2026-03-18”, “author”: { “@type”: “Organization”, “name”: “Power Tools Today”, “url”: “https://www.powertoolstoday.com” }, “publisher”: { “@type”: “Organization”, “name”: “Power Tools Today”, “url”: “https://www.powertoolstoday.com” }, “mainEntityOfPage”: { “@type”: “WebPage”, “@id”: “https://www.powertoolstoday.com/how-to-sharpen-drill-bits-with-angle-grinder/” }, “image”: { “@type”: “ImageObject”, “url”: “https://www.powertoolstoday.com/wp-content/uploads/2025/11/How-to-Sharpen-Drill-Bits-With-Angle-Grinder-Quick-Easy-Guide-1024×576.webp” } }nn