Last Updated: March 21, 2026
If you’ve ever wondered how to join metal pieces quickly and securely, learning how to use a spot welder is a skill you don’t want to miss. Whether you’re working on a DIY project, repairing car panels, or diving into metal fabrication, mastering spot welding can save you time and give your work a professional finish.
In this guide, you’ll discover simple, step-by-step instructions to get started with your spot welder confidently. By the end, you’ll know exactly how to set up, operate, and perfect your welds, making your metalwork stronger and more reliable. Ready to transform your skills and tackle your next project like a pro?
Let’s dive in!

Credit: www.youtube.com
Spot Welder Types
Spot welders come in various types, each designed for specific tasks. Choosing the right type affects the quality of your welds and ease of use. Understanding the main types helps you work safely and efficiently.
Transformer Spot Welders
Transformer spot welders use a large transformer to deliver high current. They create strong welds quickly. These welders are common in industrial settings. They handle thick metal sheets well. Their size can be bulky, so they fit better in workshops.
Capacitor Discharge Spot Welders
Capacitor discharge welders store electrical energy in capacitors. They release energy in a short burst. This type works best for thin metals. It is ideal for delicate tasks like battery tab welding. These welders are compact and easy to move.
Portable Spot Welders
Portable spot welders are lightweight and easy to carry. They use less power but still weld small parts. These welders fit small repair jobs and hobby projects. Their compact size makes them great for fieldwork. Power supply can be battery or plug-in type.
Pedestal Spot Welders
Pedestal spot welders have a fixed base and adjustable arms. They offer precise control over welding pressure. These welders suit repetitive tasks in factories. They provide stability for better weld quality. Pedestal welders handle medium to heavy metals well.
Preparing Metal Surfaces
Preparing metal surfaces is a crucial step before using a spot welder. Clean metal ensures strong, reliable welds. Dirt, rust, and oil block the welding current. This can cause weak joints or failed welds.
Proper surface preparation helps the metal pieces fuse correctly. It improves electrical conductivity at the weld point. This results in better heat generation and a solid bond. Taking time to prepare metals saves effort in the welding process.
Cleaning The Metal Surfaces
Remove all rust, paint, and grease from the metal. Use a wire brush or sandpaper for best results. Wipe the surface with a clean cloth and a degreaser. Ensure the metal is dry before welding. Clean surfaces allow the weld to penetrate deeply.
Aligning Metal Pieces Correctly
Place the metal sheets flat and flush against each other. Misalignment can cause weak or uneven weld spots. Use clamps or fixtures to hold the metals steady. Good contact between the surfaces is essential for heat transfer. Check that edges match and there are no gaps.
Checking Metal Thickness
Measure the thickness of both metal pieces. Spot welder settings depend on metal thickness. Thicker metals require higher current and longer weld time. Adjust the welder to match the metal for strong welds. Incorrect settings can burn through or create weak joints.
Adjusting Welder Settings
Adjusting the settings on a spot welder is key to a strong and clean weld. Different metals and thicknesses need different settings. Getting these right saves time and prevents damage.
Start by understanding the main controls. These usually include current, time, and pressure. Each affects the weld quality in its own way. Adjusting them correctly helps create a solid bond between metal pieces.
Adjusting The Welding Current
The welding current controls the heat generated during the weld. Higher current means more heat. Use higher current for thicker metals. Lower current works better for thin metals. Too much current can burn the metal, while too little may not join it well.
Setting The Weld Time
Weld time is how long the current flows. Longer time lets heat build up. Shorter time avoids overheating. Adjust time based on metal type and thickness. Start with a short time and increase if the weld is weak. Too long can cause warping or holes.
Adjusting Electrode Pressure
Pressure holds the metal pieces together. It also helps heat spread evenly. Apply firm but not excessive pressure. Too little pressure causes poor contact. Too much pressure can squeeze out molten metal. Adjust pressure to fit the metal thickness and type.
Testing And Fine-tuning Settings
Test welds help find the best settings. Weld a small sample piece first. Check the weld strength and appearance. Adjust current, time, or pressure if needed. Keep testing until the weld is strong and clean. This saves time on the final work.
Credit: www.xometry.com
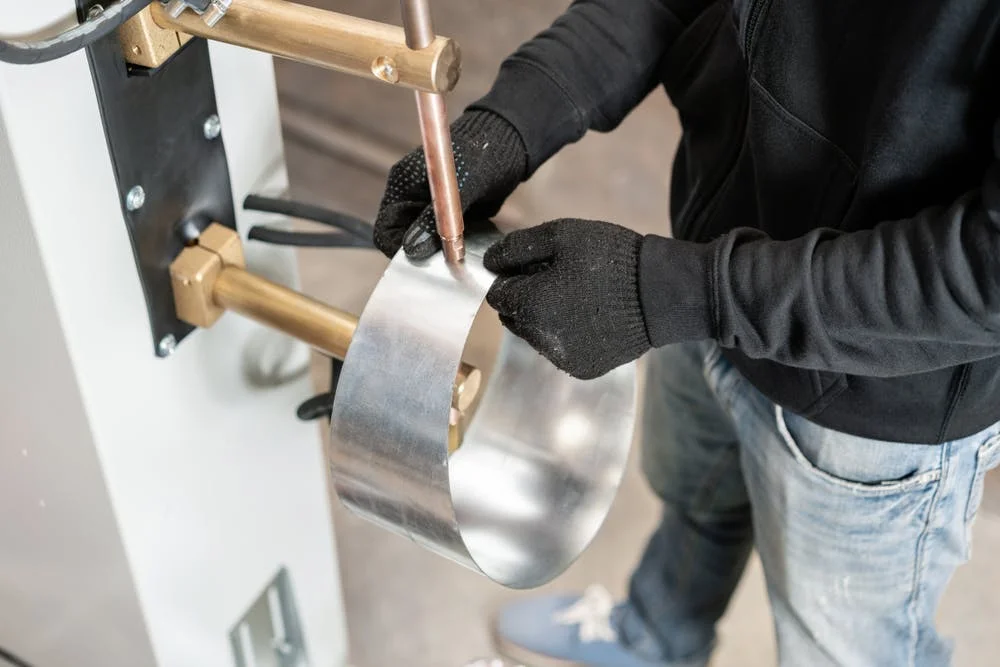
Positioning Electrodes
Positioning the electrodes correctly is key to a strong spot weld. This step affects the quality and durability of the weld. Proper electrode placement ensures even heat and pressure on the metal pieces.
Electrodes must touch the metal surfaces firmly. They press the pieces together to create a solid bond. Misaligned electrodes cause weak or uneven welds.
Understanding Electrode Alignment
Keep electrodes aligned with the metal pieces. Both electrodes should face each other directly. This alignment helps heat concentrate where the metals meet. Avoid tilting or offsetting the electrodes during welding.
Setting Electrode Pressure
Apply steady pressure through the electrodes. Too little pressure causes poor contact and weak welds. Too much pressure can deform the metal. Adjust pressure to hold metal sheets tightly without crushing.
Choosing The Right Electrode Size
Match electrode size to metal thickness. Large electrodes spread heat over a wide area. Small electrodes focus heat for thin metals. Correct size improves weld strength and prevents damage.
Cleaning And Maintaining Electrodes
Keep electrode tips clean and smooth. Dirt or oxidation reduces conductivity and heat transfer. Use a file or grinder to maintain clean electrode surfaces. Replace worn electrodes to maintain weld quality.
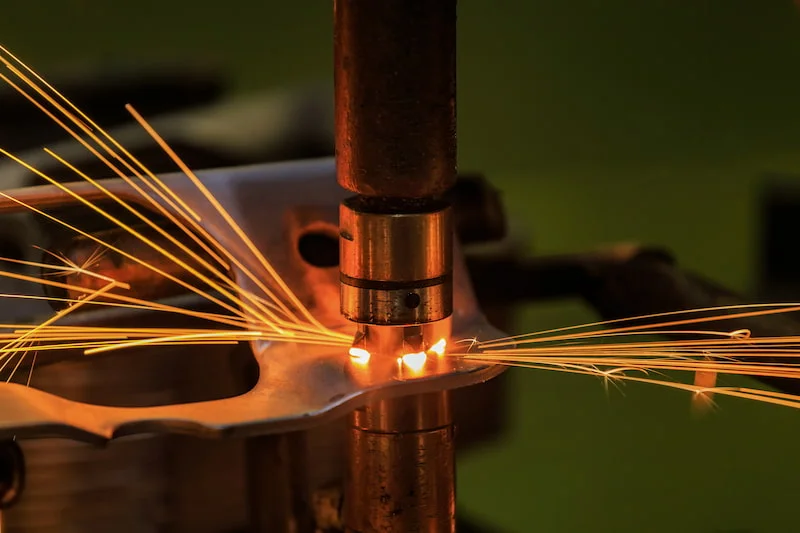
Applying Pressure And Current
Applying pressure and current is the heart of the spot welding process. Both must work together perfectly to create a strong weld. Pressure holds the metal pieces tight. Current heats the metal until it melts at the spot. Without enough pressure, the weld will be weak. Without the right current, the metal will not fuse properly.
Understanding how to control pressure and current helps you make solid, lasting welds. This section explains how to apply both in the correct way.
Applying The Right Pressure
Use the spot welder’s controls to set pressure. Too little pressure lets metal move, causing a poor weld. Too much pressure can squeeze out molten metal. This makes the weld weak or uneven.
Start with moderate pressure. Adjust based on metal thickness and type. Thicker metals need more pressure to hold firmly. Thin metals need less pressure to avoid damage.
Setting The Correct Current
Current flows through the electrodes and melts the metal. Set the current level according to the metal’s thickness. High current melts metal quickly but can burn through thin sheets.
Lower current works for thin metals but may not join thick pieces well. Use the spot welder’s dial or digital control to adjust current. Test on scrap metal to find the best setting.
Synchronizing Pressure And Current
Pressure and current must work together for a strong weld. Apply pressure first, then activate the current. Keep pressure steady during welding to avoid gaps.
After the weld, maintain pressure while the metal cools. This helps form a tight bond. Practice adjusting both controls until welds look smooth and hold firm.
Techniques For Consistent Welds
Consistent welds are key to strong and reliable spot welding. Proper techniques help avoid weak spots and defects. These steps ensure your welds are uniform every time.
Using the right technique improves weld quality and saves material. Focus on preparation, machine settings, and steady handling.
Clean the metal pieces before welding. Remove rust, paint, and dirt using a wire brush or sandpaper. Clean surfaces allow better electrical contact and stronger welds. Align the metal sheets properly to ensure even pressure.
Setting Electrode Pressure
Adjust electrode pressure according to metal thickness. Too little pressure causes weak welds. Too much pressure can deform the metal. Use consistent pressure for every weld spot. Check the machine’s pressure gauge before starting.
Controlling Weld Time And Current
Set the weld time and current based on metal type and thickness. Longer weld time or higher current creates a stronger weld. Avoid overheating, which can weaken the metal. Test settings on scrap metal to find the best combination.
Maintaining Electrode Condition
Keep electrodes clean and smooth. Worn or dirty electrodes reduce weld quality. Regularly dress electrode tips with a file or grinder. Replace electrodes when they become too small or damaged.
Consistent Hand Positioning
Hold the spot welder steady during the weld. Keep the electrodes aligned with the weld spot. Avoid shifting or moving until the weld cools. Consistent hand positioning ensures uniform weld size and strength.
Troubleshooting Common Issues
Troubleshooting common issues with a spot welder helps keep your work smooth and safe. Spot welders can face problems that affect weld quality or machine function. Knowing how to identify and fix these issues saves time and materials.
Check your spot welder regularly for signs of trouble. Simple fixes often solve most problems.
Electrode Not Heating Properly
Check the power supply and connections first. Loose cables reduce current flow and cause weak heating. Clean the electrode tips to remove dirt or oxidation. Dirty tips block current and reduce heat. Replace worn electrodes to maintain good contact and heat.
Weak Or Inconsistent Welds
Adjust the pressure on the electrodes. Too little pressure causes poor contact between metal pieces. Too much pressure may squeeze out the molten metal. Set the correct welding time and current for the metal thickness. Improper settings cause weak or uneven weld spots.
Electrodes Sticking To The Metal
Clean the metal surface before welding. Dirt, rust, or paint can cause sticking. Use the right electrode shape and size for the job. Check welding parameters; high current or long weld time may cause sticking. Reduce current or time to prevent electrodes from sticking.
Machine Not Powering On
Verify the power source and fuse. A blown fuse stops power to the welder. Inspect the on/off switch and wiring for damage. Faulty switches or loose wires block power flow. Contact a technician if internal components fail.
Uneven Weld Spots
Ensure the metal pieces are aligned correctly. Misalignment causes uneven welds and weak joints. Maintain clean and smooth electrode surfaces. Worn electrodes cause uneven pressure and heat. Adjust welding parameters to match metal type and thickness.
Safety Tips For Spot Welding
Spot welding is a powerful technique for joining metal pieces quickly and effectively. Safety is a top priority during spot welding. Proper precautions protect you from burns, electric shock, and harmful fumes. Follow these essential safety tips to work confidently and avoid accidents.
Wear Proper Protective Gear
Always wear safety goggles or a welding helmet. This shields your eyes from sparks and bright light. Use heat-resistant gloves to protect your hands. Wear long sleeves and pants made from flame-resistant material. Closed-toe shoes are a must to protect your feet.
Work In A Well-ventilated Area
Spot welding creates fumes that can be harmful to breathe. Make sure your workspace has good airflow. Use fans or open windows to keep fresh air moving. Avoid welding in small, enclosed spaces without ventilation.
Keep Your Workspace Clean
Remove flammable materials from the welding area. Sparks can easily ignite paper, cloth, or liquids. Keep your work surface tidy to prevent trips and falls. Organize cables and tools to avoid accidental damage.
Inspect Equipment Before Use
Check the spot welder for any damage or loose parts. Ensure the electrodes are clean and properly aligned. Faulty equipment can cause poor welds or injury. Regular maintenance improves safety and welding quality.
Handle Electrical Components Safely
Turn off the spot welder when not in use. Avoid touching live electrical parts during operation. Use insulated tools if adjustments are needed. Stay dry to reduce the risk of electric shock.
Credit: fractory.com
Frequently Asked Questions
How Do You Spot Weld For Beginners?
Clean and align metal pieces. Adjust welder settings for thickness. Place metals between electrodes. Apply pressure and trigger the welder briefly. Check weld quality and repeat if needed.
How Is A Spot Welder Used?
A spot welder joins metal sheets by applying pressure with electrodes and passing electric current to create weld spots.
What Are The Steps In Spot Welding?
Clean and align metal surfaces precisely. Adjust welder settings for thickness. Position electrodes on metal sheets. Apply electrode pressure firmly. Activate welder to pass current, creating the weld spot.
What Metals Cannot Be Spot Welded?
Metals like high-carbon steels, titanium, aluminum, copper, and alloys with high electrical resistivity cannot be effectively spot welded.
What Is The Main Purpose Of A Spot Welder?
A spot welder joins two metal sheets by applying heat and pressure at small points.
Conclusion
Using a spot welder is simple with the right steps. Always clean metal surfaces before welding. Adjust pressure and settings for best results. Keep electrodes aligned and steady during the process. Practice safety by wearing protective gear at all times.
Spot welding joins metals quickly and securely. With care and attention, your welds will be strong. Try small projects first to build confidence. Spot welding can save time and effort in metalwork. Remember, patience and practice improve your skills over time.
{ “@context”: “https://schema.org”, “@type”: “Article”, “headline”: “How to Use a Spot Welder: Expert Tips for Perfect Welds”, “description”: “Learn how to use a spot welder to join metal surfaces by applying heat and pressure through electrodes for strong, precise welds in fabrication tasks.”, “url”: “https://www.powertoolstoday.com/how-to-use-a-spot-welder/”, “datePublished”: “2025-12-07”, “dateModified”: “2026-03-18”, “author”: { “@type”: “Organization”, “name”: “Power Tools Today”, “url”: “https://www.powertoolstoday.com” }, “publisher”: { “@type”: “Organization”, “name”: “Power Tools Today”, “url”: “https://www.powertoolstoday.com” }, “mainEntityOfPage”: { “@type”: “WebPage”, “@id”: “https://www.powertoolstoday.com/how-to-use-a-spot-welder/” }, “image”: { “@type”: “ImageObject”, “url”: “https://www.powertoolstoday.com/wp-content/uploads/2025/11/how-to-use-a-spot-welder.jpg” } }{ “@context”: “https://schema.org”, “@type”: “Article”, “headline”: “How to Use a Spot Welder: Expert Tips for Perfect Welds”, “description”: “Learn how to use a spot welder to join metal surfaces by applying heat and pressure through electrodes for strong, precise welds in fabrication tasks.”, “url”: “https://www.powertoolstoday.com/how-to-use-a-spot-welder/”, “datePublished”: “2025-12-07”, “dateModified”: “2026-03-19”, “author”: { “@type”: “Organization”, “name”: “Power Tools Today”, “url”: “https://www.powertoolstoday.com” }, “publisher”: { “@type”: “Organization”, “name”: “Power Tools Today”, “url”: “https://www.powertoolstoday.com” }, “mainEntityOfPage”: { “@type”: “WebPage”, “@id”: “https://www.powertoolstoday.com/how-to-use-a-spot-welder/” }, “image”: { “@type”: “ImageObject”, “url”: “https://www.powertoolstoday.com/wp-content/uploads/2025/11/how-to-use-a-spot-welder.jpg” } }nnnn