Are you trying to figure out if your capacitor is working properly but don’t know where to start? Testing a capacitor with a multimeter is easier than you might think, and it can save you time and money on repairs.
Whether you’re fixing appliances, electronics, or HVAC systems, knowing how to check a capacitor’s health is a valuable skill. In this guide, you’ll learn simple, step-by-step methods to test your capacitor quickly and safely using a multimeter — no advanced tools or expertise needed.
Keep reading, and you’ll gain the confidence to diagnose capacitor issues like a pro.
Types Of Capacitors
Capacitors come in different types. Each type has unique features and uses. Knowing these helps test them correctly with a multimeter. Some capacitors store more charge, while others work better at high frequencies. The size, shape, and material also vary. Below are the common types of capacitors you may find.
Electrolytic Capacitors
Electrolytic capacitors store large amounts of charge. They are often used in power supplies and audio equipment. These capacitors are polarized, meaning they have a positive and negative side. Testing requires attention to this polarity to avoid damage. They look like small cans with two leads.
Ceramic Capacitors
Ceramic capacitors are small and non-polarized. They work well in high-frequency circuits. These capacitors have a ceramic material as the dielectric. They are common in radios, computers, and other electronics. Testing them is simpler because polarity does not matter.
Tantalum Capacitors
Tantalum capacitors are similar to electrolytic but smaller and more stable. They also have polarity, so testing must respect this. These capacitors provide steady capacitance in small packages. They are often found in mobile devices and medical equipment.
Film Capacitors
Film capacitors use a plastic film as the dielectric. They offer good stability and low loss. These capacitors are usually larger and non-polarized. They are common in audio and power electronics. Testing film capacitors is straightforward due to their stable nature.
Supercapacitors
Supercapacitors store very high charge for short periods. They are used for backup power and energy storage. These capacitors have a larger physical size. Testing supercapacitors often requires special settings on a multimeter. They are different from regular capacitors in capacity and use.
Safety Precautions
Testing a capacitor with a multimeter involves handling electrical components that can store energy. Taking safety precautions is important to avoid shocks and damage to the device or yourself. Understanding and applying these safety steps will help keep you safe during testing.
Discharge The Capacitor Before Testing
Capacitors can hold a charge even after power is off. Use a resistor or a screwdriver with an insulated handle to safely discharge it. Never touch the capacitor terminals directly before discharging.
Wear Protective Gear
Use safety glasses to protect your eyes from sparks or debris. Wear insulated gloves to reduce the risk of electric shock. Avoid loose clothing that can catch on components.
Use A Multimeter With Proper Ratings
Choose a multimeter rated for the voltage and capacitance you will test. Using the wrong tool can cause inaccurate readings or damage. Check your multimeter’s manual before starting.
Work In A Dry, Well-lit Area
Keep your workspace dry to prevent electrical hazards. Good lighting helps you see connections clearly and avoid mistakes. Clear the area of clutter to focus on the task.
Disconnect Power Sources
Always turn off and unplug the circuit or device before testing. This reduces the risk of electric shock and protects your multimeter. Confirm no power flows with your meter before proceeding.
Tools Needed
Testing a capacitor requires specific tools to ensure accurate results. Having the right equipment makes the process simple and safe. This section covers the essential tools needed to test a capacitor with a multimeter.
Digital Multimeter
A digital multimeter is the main tool for testing capacitors. It measures voltage, resistance, and capacitance. Choose a multimeter with a capacitance testing feature for best results. This tool provides clear readings on a digital display.
Insulated Test Leads
Insulated test leads connect the multimeter to the capacitor. They protect you from electric shock. Use leads that fit securely into the multimeter and make good contact with the capacitor terminals.
Screwdriver Or Capacitor Discharge Tool
A screwdriver or a special discharge tool safely releases stored electricity. Capacitors can hold charge even when power is off. Discharging the capacitor prevents shocks and damage to your multimeter.
Protective Gloves
Wear insulated gloves to protect your hands. Capacitors can hold dangerous voltage. Gloves add an extra layer of safety while handling electrical components.
Safety Glasses
Safety glasses protect your eyes from sparks or debris. They are important when working with electrical parts. Always wear them during testing to avoid injury.
Credit: www.electricaltechnology.org
Preparing The Capacitor
Preparing the capacitor is the first step before testing it with a multimeter. This step ensures safety and accurate readings.
Capacitors can hold an electric charge even after power is off. Discharging the capacitor is essential to avoid shocks and damage to the multimeter.
Discharging The Capacitor
Use a screwdriver with an insulated handle to short the capacitor leads. Hold the metal part of the screwdriver across both terminals. This safely releases stored energy.
Be careful not to touch the metal parts of the capacitor or the screwdriver. Wait a few seconds after discharging before testing.
Inspecting The Capacitor
Check the capacitor’s body for any visible damage. Look for bulges, cracks, or leaks. Damaged capacitors should be replaced instead of tested.
Clean the capacitor terminals if they look dirty or corroded. Use a small brush or cloth to remove any dirt or rust.
Setting Up Your Work Area
Work in a dry, well-lit area. Keep the capacitor on a non-conductive surface like wood or plastic. This avoids accidental shorts during testing.
Gather your multimeter and necessary tools nearby. Having everything ready will speed up the testing process.
Setting The Multimeter
Setting the multimeter correctly is the first step to test a capacitor. A proper setup ensures accurate and safe measurements. Follow these simple steps to prepare your multimeter.
Choosing The Right Multimeter Mode
Turn on your multimeter. Select the capacitance mode, often marked with a symbol like “—|(—” or “F” for farads. If your multimeter lacks this mode, use the resistance (ohms) setting to perform a basic check.
Adjusting The Range Setting
Set the range to match the capacitor’s expected value. For example, if the capacitor rating is in microfarads (µF), choose a range that includes this value. Auto-ranging multimeters adjust this automatically.
Preparing The Probes
Connect the black probe to the common (COM) port. Insert the red probe into the port labeled for capacitance or voltage. Ensure the probes are clean and undamaged for a reliable reading.
Safety Precautions Before Testing
Discharge the capacitor fully before testing. Use a resistor or a screwdriver with an insulated handle to short the terminals. This prevents damage to the multimeter and avoids electric shock.
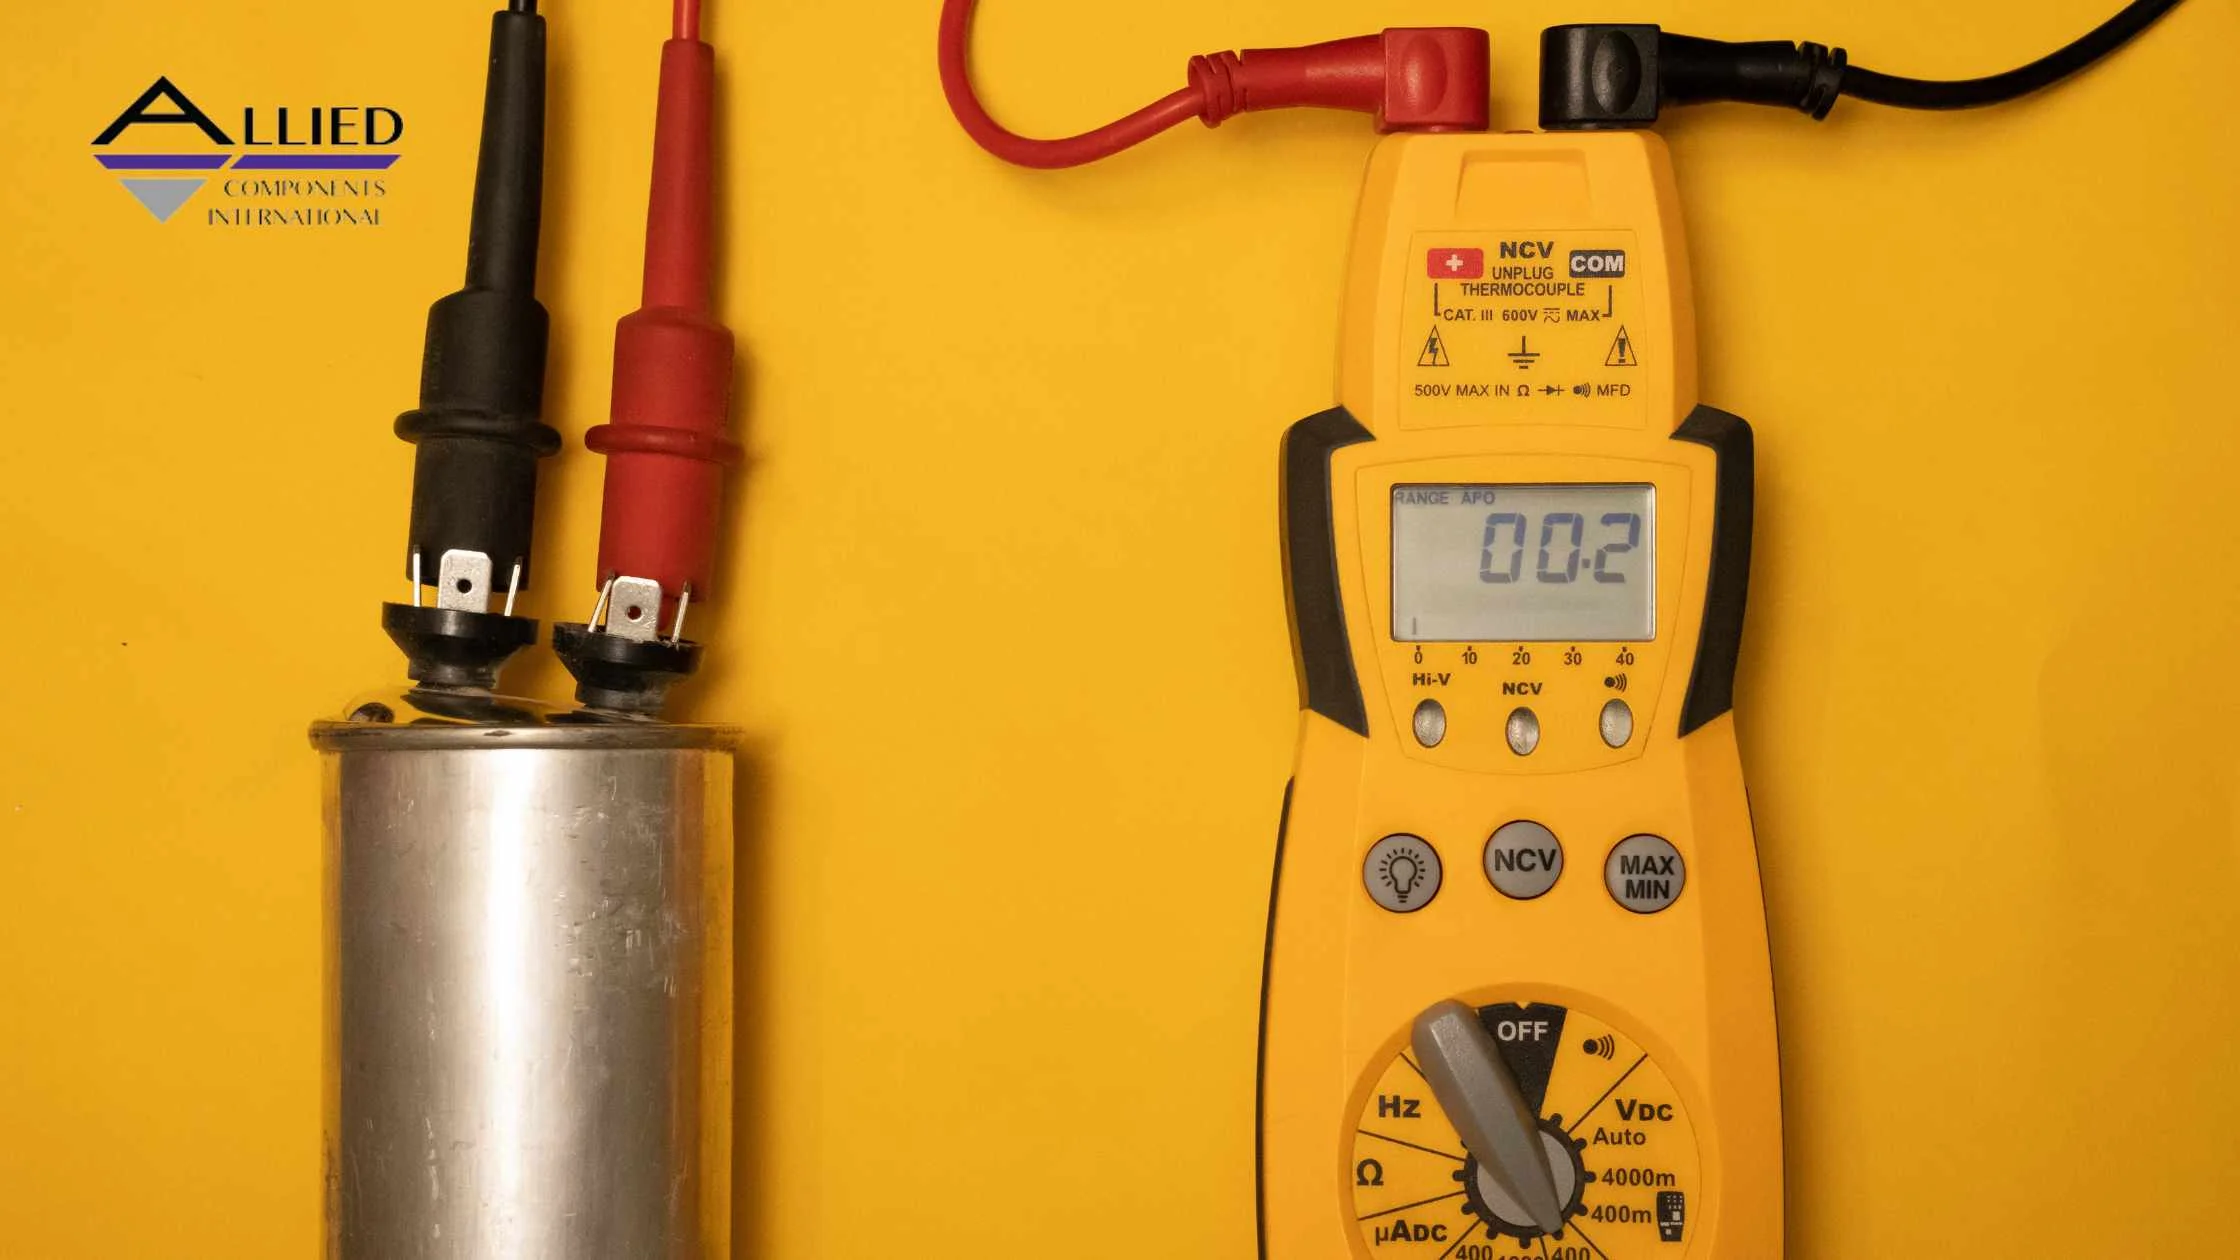
Credit: www.alliedcomponents.com
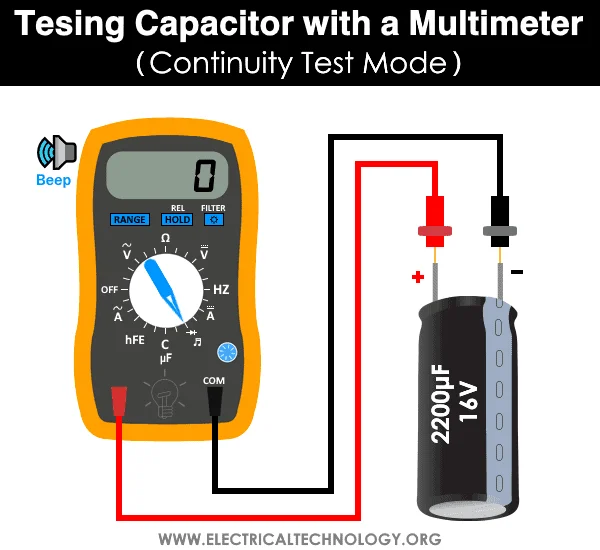
Testing Capacitance
Testing a capacitor with a multimeter involves measuring its capacitance or resistance. Begin by discharging the capacitor, then connect the meter leads to its terminals. Watch the reading to see if it matches the capacitor’s rated value for a proper test.
Understanding Capacitance Testing
Testing capacitance shows how much charge a capacitor can hold. It helps find out if the capacitor works well or not. A multimeter with a capacitance setting measures this value. This test is simple and fast.
Before testing, discharge the capacitor fully. This step keeps you safe and protects the multimeter. Use a resistor or a screwdriver with an insulated handle to discharge it.
Setting Up The Multimeter
Turn on your multimeter and select the capacitance mode. This mode often has a symbol like “—|(|—”. If your multimeter lacks this mode, you cannot measure capacitance directly.
Next, connect the multimeter probes to the capacitor terminals. Polarity matters for polarized capacitors. Red probe goes to positive, black to negative.
Reading The Capacitance Value
Watch the multimeter display after connecting probes. It shows the capacitance in microfarads (µF) or nanofarads (nF). Compare this reading to the capacitor’s labeled value.
A reading close to the labeled value means the capacitor is good. A much lower or zero reading shows a bad or damaged capacitor. Very high or infinite reading means the capacitor is open or broken.
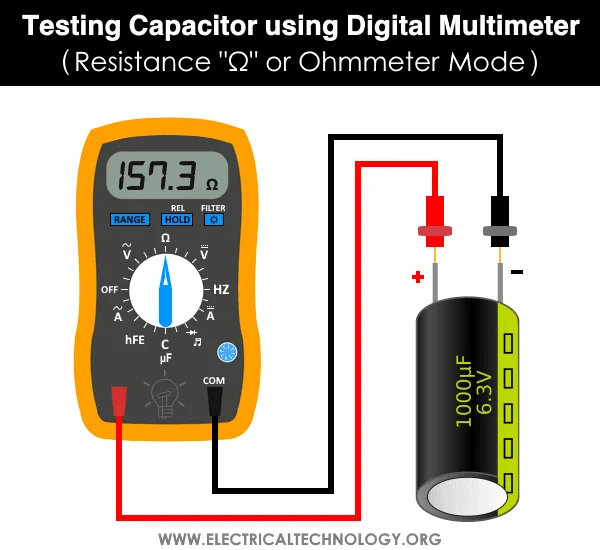
Using Ohms Mode For Testing
Using the ohms mode on a multimeter offers a simple way to check a capacitor’s condition. This method helps identify if the capacitor is shorted or open without needing advanced tools. It works by measuring the resistance across the capacitor terminals.
This test is useful for beginners and quick checks. The readings give clues about the capacitor’s health, especially if it cannot hold a charge or if it leaks current.
Preparing The Capacitor And Multimeter
First, ensure the capacitor is fully discharged. Use a screwdriver with an insulated handle to short the terminals carefully. This step prevents damage to the multimeter and avoids electric shock.
Set the multimeter to the highest ohms range. This setting allows you to observe how resistance changes as the capacitor charges.
Connecting The Multimeter Leads
Attach the multimeter probes to the capacitor terminals. Polarity does not matter for this test. Watch the meter’s display closely after connecting the leads.
Interpreting The Resistance Readings
A good capacitor shows resistance starting low and increasing towards infinity. This change happens because the capacitor charges through the meter.
If the resistance stays low or zero, the capacitor is shorted. If the resistance remains very high or shows no change, the capacitor may be open or damaged.
Understanding Limitations Of Ohms Mode Testing
This method cannot measure the exact capacitance value. It only detects major faults like shorts or opens. For precise measurements, a capacitance meter is needed.
Still, ohms mode testing is a quick and easy way to assess basic capacitor health before deeper testing.
Credit: www.electricaltechnology.org
Interpreting Results
Interpreting the results after testing a capacitor with a multimeter is crucial. It tells you if the capacitor works or needs replacement. Understanding these readings saves time and prevents device damage.
Each type of reading reveals a different aspect of the capacitor’s health. Correct interpretation helps in making the right repair decisions. Below are key points to understand your multimeter results clearly.
Reading The Resistance Value
Start by checking the resistance reading on your multimeter. A good capacitor shows increasing resistance until it reaches a high or infinite value. This happens because the capacitor charges slowly. If resistance stays low or zero, the capacitor may be shorted or damaged.
Checking The Capacitance Measurement
Use the capacitance mode if your multimeter has one. The reading should be close to the capacitor’s rated value. A lower or zero reading means the capacitor lost its ability to store charge. A much higher reading could indicate an internal fault.
Observing The Voltage Behavior
When testing with a multimeter set to measure voltage, watch how the voltage changes. A charging capacitor will show a gradual increase in voltage. If the voltage does not change or drops quickly, the capacitor might be faulty or leaking charge.
Related testing guides: A weak capacitor can affect motors and other electrical parts. If you are troubleshooting a larger circuit, also check our guides on testing a fuse with a multimeter and using a voltage tester.
Frequently Asked Questions
How Do You Tell If A Capacitor Is Bad With A Multimeter?
Set the multimeter to resistance mode and connect leads to capacitor terminals. A good capacitor shows low resistance rising to infinite. A constant low or zero reading indicates a bad capacitor. Always discharge the capacitor before testing to avoid damage.
What Is The Symbol For Capacitor Testing On A Multimeter?
The symbol for capacitor testing on a multimeter is often “—|(—” or a small parallel line icon. It represents capacitance measurement mode.
How To Test A Capacitor With An Ohmmeter?
Discharge the capacitor first. Set the ohmmeter to a high resistance range. Connect leads to capacitor terminals. Observe the reading; it should start low and rise toward infinity. A steady low or zero reading indicates a faulty capacitor.
What Is The Symbol For Microfarad On A Multimeter?
The symbol for microfarad on a multimeter is “µF. ” It represents capacitance measurement units.
How Do I Test A Capacitor With A Digital Multimeter?
Set your multimeter to capacitance mode, connect the leads to capacitor terminals, and read the value displayed.
What Does A Bad Capacitor Reading Look Like?
A bad capacitor shows zero, infinite, or unstable capacitance readings on the multimeter.
Conclusion
Testing a capacitor with a multimeter is simple and effective. Follow the steps carefully to get accurate results. Always ensure the capacitor is fully discharged before testing. Use the correct multimeter setting for capacitance or resistance. Watch the readings closely to identify if the capacitor works well or needs replacement.
Regular testing helps maintain your electronic devices. With practice, this skill becomes easy and useful. Keep your tools ready and stay safe while working.
Read also: How to Test a Motor With a Multimeter
Read also: How to Test a Battery With a Multimeter
