Last Updated: March 20, 2026
If you’ve ever felt intimidated by electric nail drills, you’re not alone. But here’s the truth: once you know the simple steps, using an electric nail drill becomes easy, safe, and even fun.
Whether you want to shape your nails, remove gel polish, or prep for a fresh manicure, this tool can save you time and give you professional results right at home. In this guide, you’ll discover exactly how to use your electric nail drill with confidence, avoid common mistakes, and choose the right bits for every task.
Keep reading, and you’ll unlock the secret to flawless nails that turn heads wherever you go.
Credit: www.dipwell.co
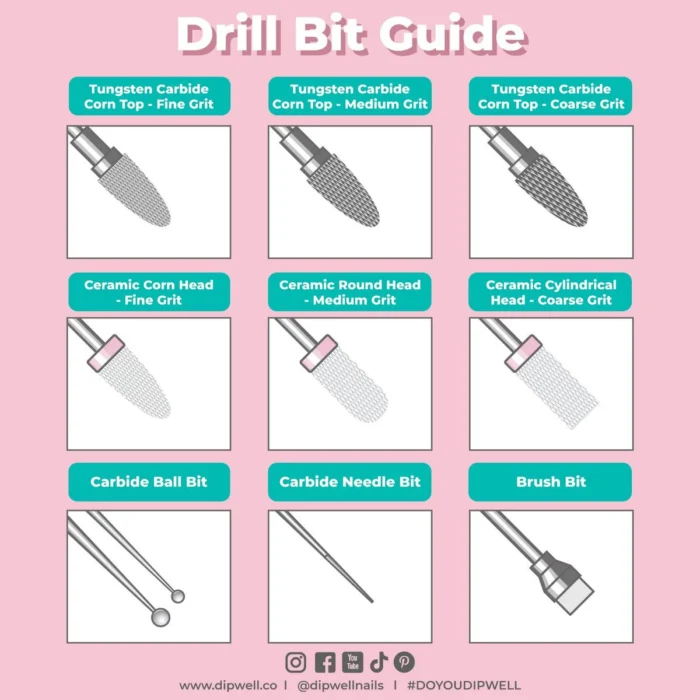
Choosing The Right Drill Bits
Choosing the right drill bits is key to using an electric nail drill safely and effectively. Different bits serve different purposes. Picking the correct bit helps protect natural nails and ensures smooth results. Understanding the types of bits makes nail care easier and faster.
Carbide Bits For Shaping
Carbide bits are strong and sharp. They work well for shaping gel and acrylic nails. These bits easily shave off layers of product. They cut quickly but need careful handling to avoid nail damage. Carbide bits last long and stay sharp after many uses.
Diamond Bits For Surface Work
Diamond bits are great for surface work on nails. They help remove product build-up and smooth rough areas. The textured surface of diamond bits scratches off old polish or dead skin. They offer good control and reduce the risk of over-filing. Diamond bits are gentle on natural nails.
Ceramic Bits For Heat Control
Ceramic bits are designed to create less heat during use. They reduce friction, which keeps nails cooler and more comfortable. These bits are ideal for long sessions and sensitive nails. Ceramic bits work well for both shaping and surface filing. They provide smooth, even results without overheating.
Preparing Your Nails
Preparing your nails properly ensures better results when using an electric nail drill. Clean, dry, and well-maintained nails help the drill work smoothly. This step protects your natural nails and enhances the finish of your manicure. Follow these simple steps to get your nails ready before using the drill.
Cleaning And Drying
Start by washing your hands with warm water and soap. Remove any old nail polish with a gentle remover. Dry your nails completely with a clean towel. Moisture can cause slipping or uneven drilling. Make sure your nails are free from dirt and oils for the best results.
Cuticle Care
Soft cuticles are easier to manage with the drill. Soak your fingertips in warm water for a few minutes. Use a cuticle pusher to gently push back the cuticles. Avoid cutting them to prevent infections. Well-prepared cuticles help you avoid damage during drilling.
Buffing Basics
Buffing smooths the nail surface for better product adhesion. Use a fine-grit buffer or the correct drill bit on low speed. Lightly buff the nail surface in a gentle, circular motion. Do not over-buff to avoid thinning your nails. This step creates a clean canvas for your nail art or polish.
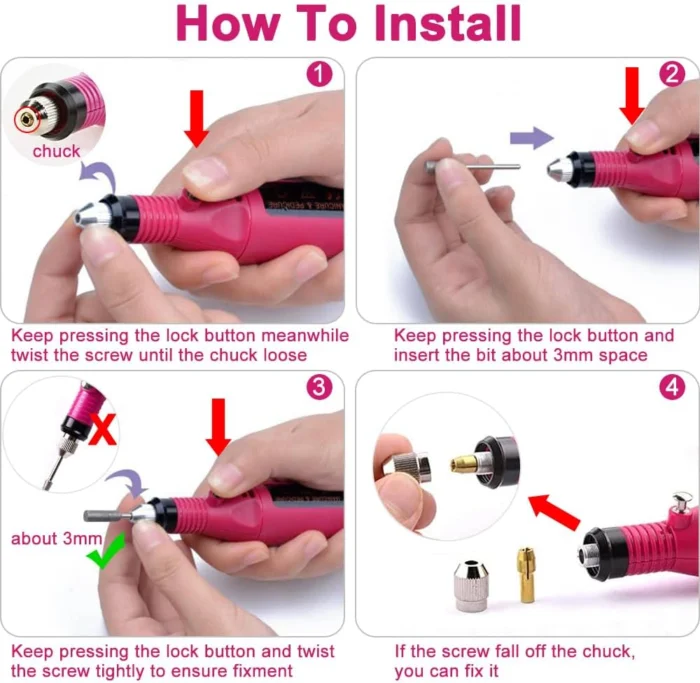
Setting Up The Electric Nail Drill
Setting up your electric nail drill correctly is essential for safe and effective nail work. Proper setup ensures comfort and precision during use. Follow these simple steps to prepare your drill for the best results.
Inserting And Securing Bits
Choose the right bit for your task. Hold the drill firmly and open the chuck or collet by twisting it. Insert the bit straight into the hole until it fits tightly. Close the chuck securely to hold the bit in place. Double-check the bit is stable before turning on the drill.
Adjusting Speed Settings
Locate the speed control dial or buttons on the drill. Start with a low speed to avoid mistakes. Increase the speed slowly as you get comfortable. Use slower speeds for delicate work and higher speeds for shaping or removing product. Always adjust speed according to the nail type and task.
Changing Rotation Direction
Find the direction switch on your drill. Use clockwise rotation for filing the right hand and counterclockwise for the left hand. Changing direction helps maintain control and prevents damage. Make sure the drill is off before switching the rotation. Test the direction with the drill on low speed first.
Credit: www.amazon.ca
Techniques For Safe Use
Using an electric nail drill requires care and the right techniques. Safety protects your nails and skin from damage. Learning safe methods helps you achieve smooth and clean results. Below are key techniques to use your drill safely and effectively.
Proper Hand And Finger Positioning
Hold the drill like a pen. This gives better control and accuracy. Keep your fingers relaxed but firm. Rest your hand on a flat surface to reduce shaking. Position your fingers to guide the drill gently. Avoid pressing too hard on the nail surface. Proper positioning prevents slips and uneven filing.
Maintaining A Steady Grip
Grip the drill steadily without squeezing too tight. A loose grip causes wobbling and less control. Too much pressure tires your hand quickly. Keep your wrist stable and move the drill with your fingers. A steady grip ensures smooth, even filing. Take breaks to avoid hand fatigue during long sessions.
Avoiding Heat Spikes
Heat spikes can harm your natural nails and skin. Use the drill at low or medium speed. Move the drill continuously over the nail surface. Do not stay in one spot for too long. Use bits designed to reduce friction and heat. If nails feel warm, pause and let them cool. Avoiding heat spikes keeps nails healthy and prevents discomfort.
Step-by-step Nail Drilling Process
Using an electric nail drill can simplify nail care and art. Follow each step carefully to avoid damage. The process varies slightly for natural nails and enhancements. This guide breaks down the steps into clear parts. It helps beginners and nail enthusiasts work safely and efficiently.
Starting With Natural Nails
Begin by cleaning your nails thoroughly. Use a gentle nail cleanser to remove oils and dirt. Attach a fine sanding band or a small diamond bit to the drill. Set the drill speed low to medium. Gently buff the nail surface to remove shine. Keep the drill moving to avoid heat build-up. Focus on the cuticle area lightly to clean dead skin. Avoid pressing too hard on the nail plate. This prepares the natural nail for polish or enhancements.
Working On Enhancements
Choose the right bit based on the enhancement type. Carbide bits work well for acrylics and gels. Start by shaping the nail edges to the desired style. Use the drill to thin thick layers of product. Work slowly to avoid removing too much material. Hold the drill at a slight angle for better control. Clean around the cuticle gently to smooth the surface. Check your work often to keep the nails even and smooth. Proper technique prevents damage to the natural nail beneath.
Finishing Touches
Switch to a finer bit or buffing pad for a smooth finish. Buff the entire nail surface to remove any roughness. Use the drill at low speed for better control. Clean the nails of any dust with a soft brush or cloth. Apply cuticle oil to nourish the skin around nails. This step hydrates and soothes the cuticle area. Finish with your favorite polish or top coat. Proper finishing ensures a long-lasting and neat look.
Cleaning And Maintaining Your Drill
Cleaning and maintaining your electric nail drill keeps it working well and safe to use. Dirt and dust can harm the motor and reduce its life. Regular care helps the drill run smoothly and prevents infections.
Removing Dust And Debris
Turn off and unplug the drill before cleaning. Use a small brush to remove dust from the vents and surface. Avoid using water to clean the motor area. Compressed air can help blow out hard-to-reach dust. Clean the drill after every use to avoid buildup.
Bit Sterilization
Remove the drill bit and clean it with a brush to remove nail dust. Soak bits in a disinfectant solution to kill germs. Use an autoclave if available for full sterilization. Dry bits completely before storing or using again. Clean bits prevent infections and extend their life.
Storing Your Drill Safely
Keep the drill in a dry, cool place away from direct sunlight. Store bits in a closed container to keep them clean. Avoid tangled cords by wrapping them gently. Use a protective case if you travel with the drill. Proper storage protects your drill and bits from damage.
Credit: modelones.com
Frequently Asked Questions
How Do You Use An Electric Nail Drill?
Start with a suitable drill bit and set low speed. Hold the drill at a slight angle. Gently file nails, moving steadily. Change rotation direction when switching nail sides. Keep the drill moving to avoid heat and damage. Clean bits after use.
How To Use An Electric Drill Step By Step?
Insert the drill bit securely. Set appropriate speed and direction. Hold the drill steadily. Gently apply the bit to the surface. Move smoothly for even results. Turn off and clean after use.
How To Use An Electric Nail File On Natural Nails?
Hold the drill steadily and use a fine bit on low speed. Gently file the nail surface, avoiding cuticles. Move in one direction to prevent damage. Keep the drill bit angled slightly and finish by buffing for a smooth finish.
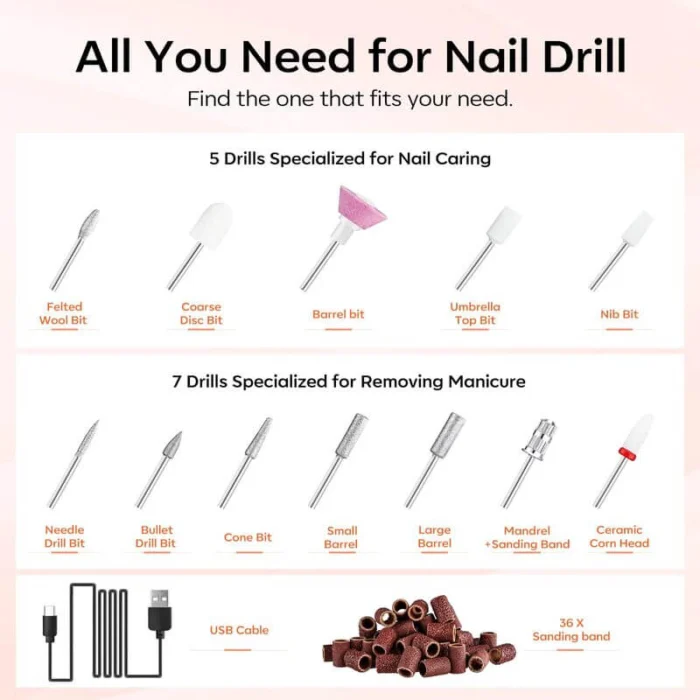
What To Use Each Nail Drill Bit For?
Carbide bits shape and cut gel or acrylic nails. Diamond bits remove product buildup. Ceramic bits reduce friction and heat during filing. Mandrel bits hold sanding bands for surface smoothing. Use each bit for precise nail prep, shaping, and removal tasks.
What Is An Electric Nail Drill Used For?
An electric nail drill shapes, smooths, and removes nail enhancements quickly.
How Do I Start Using An Electric Nail Drill?
Choose the right bit, set a low speed, and test on a practice nail.
Conclusion
Using an electric nail drill can save time and improve nail care. Start slow and practice often to build confidence. Choose the right drill bit for each task. Keep your nails clean and avoid too much pressure. Always follow safety steps to prevent injury.
With patience, your skills will grow. Enjoy smoother, well-shaped nails every time.
{ “@context”: “https://schema.org”, “@type”: “Article”, “headline”: “How to Use Electric Nail Drill: Expert Tips for Perfect Nails”, “description”: “Learn how to use electric nail drill to safely shape and smooth nails with precise control, enhancing nail care and professional manicures at home or in salons.”, “url”: “https://www.powertoolstoday.com/how-to-use-electric-nail-drill/”, “datePublished”: “2025-11-10”, “dateModified”: “2026-03-18”, “author”: { “@type”: “Organization”, “name”: “Power Tools Today”, “url”: “https://www.powertoolstoday.com” }, “publisher”: { “@type”: “Organization”, “name”: “Power Tools Today”, “url”: “https://www.powertoolstoday.com” }, “mainEntityOfPage”: { “@type”: “WebPage”, “@id”: “https://www.powertoolstoday.com/how-to-use-electric-nail-drill/” }, “image”: { “@type”: “ImageObject”, “url”: “https://www.powertoolstoday.com/wp-content/uploads/2025/11/How-to-Use-Electric-Nail-Drill-1024×576.webp” } }nn