Last Updated: March 20, 2026
If you’ve ever felt intimidated by nail drills and all those tiny bits, you’re not alone. But here’s the truth: mastering how to use nail drill bits can transform your nail care routine and save you time and money.
Whether you want to remove gel polish, shape acrylics, or refine your natural nails, choosing the right bit and using it correctly is key. In this guide, you’ll discover exactly which nail drill bits to use for every task, how to handle them safely, and tips that professionals swear by.
Get ready to boost your nail game with confidence—your perfect manicure starts here!

Credit: modelones.com
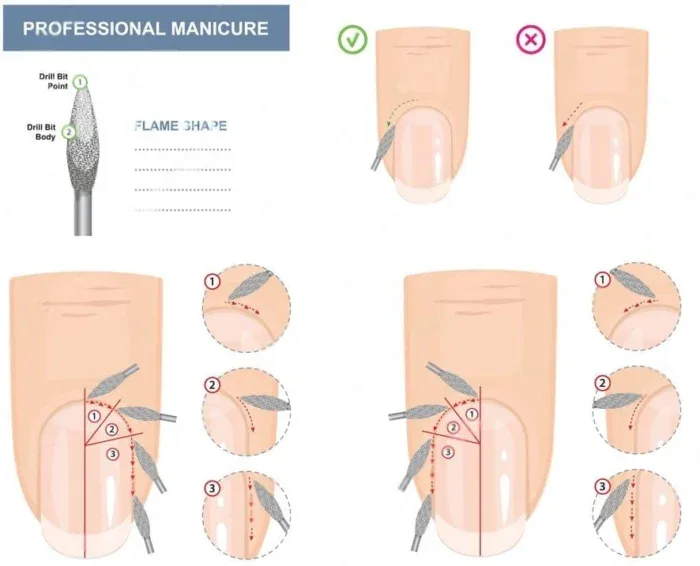
Types Of Nail Drill Bits
Nail drill bits come in various types, each designed for a specific purpose. Understanding these types helps achieve better nail care and styling results. Using the right bit improves efficiency and safety during nail treatments.
The main types include cuticle bits, product removal bits, and surface refinement bits. Each type has unique features and functions. Knowing these differences is key to using your nail drill effectively.
Cuticle Bits
Cuticle bits help clean and shape the nail bed area. They remove dead skin and lift cuticles gently. Common shapes include cone and flame bits.
These bits work around the eponychium and sidewalls. They prepare the nail for polish or enhancements. Using cuticle bits keeps nails neat and healthy.
Product Removal Bits
Product removal bits remove acrylic, gel, or other nail enhancements. Barrel and cylinder bits are popular for this purpose. They shorten nail length and smooth the surface.
Tapered barrel bits shape nails and define curves. Tornado bits handle tough, thick products quickly. Carbide bits efficiently shave off layers without damaging the natural nail.
Surface Refinement Bits
Surface refinement bits smooth and buff the nail surface. Ball and silicone bits polish nails softly. They remove ridges and prepare nails for polish application.
Sanding bands also help in natural nail preparation. These bits create a smooth finish and improve polish adhesion. Using surface refinement bits gives nails a clean, shiny look.
Choosing The Right Bit
Choosing the right nail drill bit is essential for safe and effective nail care. Each bit serves a specific purpose, and selecting the correct one helps achieve smooth results without damage. Understanding the differences in material, grit, shape, and size makes your nail work easier and more precise.
Material And Grit
Nail drill bits come in various materials such as carbide, diamond, and ceramic. Carbide bits are strong and remove products quickly. Diamond bits are gentle and perfect for delicate work around the cuticle. Ceramic bits stay cool and last long, reducing heat on nails.
The grit of a bit affects how rough or smooth it feels. Coarse grit removes material fast but can be harsh on nails. Fine grit is gentler and used for finishing and smoothing. Choose grit based on the nail type and the work you need to do.
Bit Shape And Size
Bit shapes vary to fit different nail tasks. Cone and flame shapes work well for cuticle cleaning and sidewall trimming. Barrel and cylinder shapes are ideal for shortening nail length and shaping.
Small bits reach tight areas like under the nail or near the sidewalls. Larger bits cover more surface and remove product faster. Pick a size that suits the nail area and the detail required for the job.
Preparing Your Nail Drill
Preparing your nail drill is the first step before using any nail drill bits. This process ensures smooth operation and avoids damage to your nails or the drill itself. Proper setup helps you work efficiently and safely. Follow these tips to get your nail drill ready.
Setting Speed And Torque
Adjust the speed control knob to the lowest setting at first. Start slow to avoid slipping or overheating. Increase speed gradually as you gain control. Torque setting controls the drill’s power and resistance. Use low torque for delicate tasks like cuticle work. Higher torque is suitable for removing thick acrylic or gel. Always match speed and torque with the type of nail work you do. This balance protects your natural nails from damage.
Safety Precautions
Wear protective eyewear to shield your eyes from dust. Use a dust mask to avoid inhaling nail particles. Keep your work area clean and well-lit. Never force the drill on the nail surface. Hold the drill firmly but gently to maintain control. Avoid touching the drill bits while they spin. Turn off the drill before changing bits. Regularly check bits for wear and replace if needed to maintain safety and performance.
Credit: www.burdental.com
Using Bits For Cuticle Care
Using nail drill bits for cuticle care improves the overall nail appearance. Proper use keeps the cuticles neat and healthy. It also helps prepare the nail bed for polish or enhancements. The right bits gently lift and clean the cuticle area without causing harm.
Choosing the correct bit is important. Cone and flame bits work well for cuticle cleaning. These bits reach under the cuticle and around the sidewalls. They remove dead skin and smooth the nail edges. Using drill bits carefully leads to better nail health and appearance.
Cleaning And Lifting Cuticles
Select a cone or flame bit for cleaning cuticles. Turn on the drill at a low speed. Gently place the bit at the base of the nail. Lift the cuticle by moving the bit softly along the edge. This action removes dead skin and dirt.
Work around the sidewalls to clear any buildup. Avoid pressing too hard to prevent nail damage. Regular cleaning keeps cuticles soft and nails looking fresh. Always clean the bits after use to maintain hygiene.
Avoiding Skin Damage
Use low drill speed to protect the skin. High speed can cause burns or cuts. Keep the bit moving; do not hold it in one spot. Avoid using too much pressure on the cuticle area. Stop immediately if you feel pain or discomfort.
Wear safety glasses to protect your eyes from dust. Use a dust collector or work in a ventilated space. Replace worn bits to ensure smooth operation. Proper care prevents infections and keeps nails healthy.
Removing Acrylic And Gel
Removing acrylic and gel nails requires skill and the right tools to keep natural nails healthy. Nail drill bits make this job faster and easier. They carefully grind down the artificial layers without hurting the nail underneath. This process saves time compared to manual filing and soaking.
Using the correct technique is important for safe and effective removal. It helps prevent pain, nail damage, and uneven surfaces. Understanding how to use nail drill bits correctly can improve your nail care routine and keep nails strong after removal.
Techniques For Effective Removal
Start by choosing a drill bit made for product removal, like a barrel or carbide bit. Use a slow speed to avoid heat and discomfort. Gently move the drill over the acrylic or gel surface. Avoid staying in one spot too long.
Remove the top layers first, then work deeper until the product thins out. Keep the drill bit flat against the nail to avoid digging into the skin. Stop often to check progress and avoid over-filing natural nails.
Preventing Nail Damage
Always use a gentle touch and low drill speed. Keep the drill bit clean and sharp to reduce friction. Avoid pressing hard, which can cause nail thinning or pain.
Use a safety bit around the cuticle area to protect the skin. After removal, buff nails lightly to smooth rough edges. Apply cuticle oil and moisturizer to help nails recover and stay strong.
Finishing And Polishing
Finishing and polishing are crucial steps in using nail drill bits. These steps give nails a smooth, shiny look. Proper finishing removes rough edges and imperfections. Polishing enhances the nail’s natural beauty and extends the manicure’s life. Using the right drill bits and techniques ensures a professional result every time.
Smoothing Surfaces
Use a fine grit sanding band or a soft silicone bit for smoothing. Move the drill bit gently over the nail surface. Avoid pressing too hard to prevent damage. Smooth the entire nail, including edges, for an even finish. This step prepares the nail for polishing and makes it look neat.
Final Buffing Tips
Switch to a soft buffing bit for the last polish. Buff the nail in slow, circular motions to add shine. Keep the drill speed low to avoid heat build-up. Check the nail often to ensure a glossy finish. Finish by wiping the nail with a clean cloth to remove dust.

Credit: www.amazon.com
Conclusion
Using nail drill bits correctly makes nail care easier and safer. Choose the right bit for each task. Always work gently to avoid damage. Clean your bits after each use to keep them effective. Practice regularly to improve your technique.
Remember, patience helps you achieve better results. Enjoy creating beautiful nails with confidence and care.
Frequently Asked Questions
Nail drill bits serve distinct purposes: cone and flame bits clean cuticles; barrel and cylinder bits remove and shape products; ball and silicone bits refine surfaces; sanding bands prep natural nails. Each bit targets cuticle work, product removal, or surface smoothing for effective nail care.
Use your nail drill in forward (clockwise) rotation for right-handed users and reverse (counterclockwise) for left-handed users. Adjust direction based on drill bit type and task. Always maintain control to avoid damage or injury.
Hold the nail file at a slight angle. File nails in one direction to avoid splitting. Start with coarse grit, then smooth with fine grit. Use gentle pressure and shape nails evenly. Finish by buffing for a smooth surface. Clean the file after use.
Use cone or flame drill bits to lift and clean cuticles and sidewalls safely. Needle bits reach tight areas effectively. Ball bits remove dead skin gently around the cuticle. These bits ensure precise and safe cuticle care during nail treatments.
Nail drill bits shape, remove, and refine acrylic, gel, and natural nails safely.
Pick bits based on the task: cuticle work, product removal, or surface refining.
