Last Updated: March 21, 2026
If you’re diving into woodworking or any project involving wood shaping, knowing how to use router bits can transform your work from ordinary to professional-looking. Router bits are your secret weapon for creating smooth edges, precise grooves, and strong joints.
But if you’ve ever felt unsure about which bit to use or how to handle them safely, you’re not alone. This guide breaks down everything you need to know—step by step—so you can confidently pick the right router bit and get perfect results every time.
Ready to unlock your full woodworking potential? Let’s get started!
Types Of Router Bits
Router bits come in many shapes and sizes. Each type serves a special purpose in woodworking. Choosing the right bit helps create clean, precise cuts. Understanding common types makes your projects easier and better.
Straight Bits
Straight bits cut straight grooves and dados. They are simple and versatile. Use them for making slots, mortises, and hollowing out areas.
Round-over Bits
Round-over bits create smooth, curved edges. These bits soften sharp corners for a finished look. Perfect for tabletops and shelves.
Rabbet Bits
Rabbet bits cut a step-shaped edge called a rabbet. They help join pieces of wood together. Common in door frames and cabinet making.
Dovetail Bits
Dovetail bits cut angled joints that lock pieces together. Ideal for drawers and boxes. They make strong, decorative joints.
Chamfer Bits
Chamfer bits cut a beveled edge at an angle. Use them to create decorative edges or ease sharp corners. They add style and safety.
Flush Trim Bits
Flush trim bits follow a guide or template to trim edges. They help copy shapes or smooth rough edges. Great for pattern work.
Ogee Bits
Ogee bits cut an elegant S-shaped edge. Use them for decorative molding and furniture details. They add a classic touch.
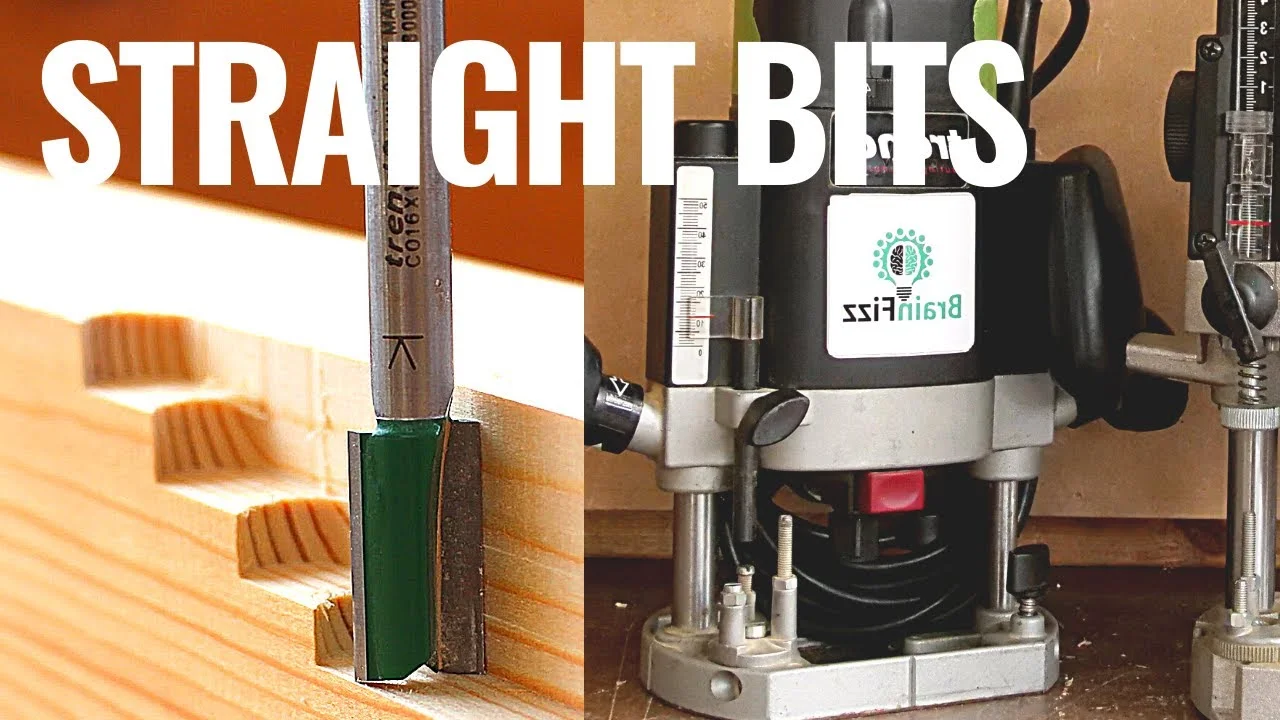
Credit: www.youtube.com
Choosing The Right Bit
Choosing the right router bit is key for good results. Each bit has a special shape and use. Picking the correct bit saves time and improves your work’s quality.
Start by knowing the project’s needs. Different bits create different edges and cuts. A clear idea helps match the bit to your task.
Understanding Router Bit Types
Router bits come in many types. Straight bits make clean, straight cuts. Roundover bits create smooth, curved edges. Ogee bits add decorative shapes to edges. Rabbet bits cut notches for joining pieces. Dovetail bits help make strong wood joints.
Material Compatibility
Check if the bit suits your material. Wood, MDF, and plastics need different bits. Some bits are designed for soft wood only. Others work well on hard or engineered wood. Using the right bit protects the tool and material.
Bit Size And Shank Diameter
Bit size affects the cut depth and width. Choose a bit size that fits your router. Most routers use 1/4-inch or 1/2-inch shank bits. Larger shanks offer better stability and less vibration. Always match the shank size to your router collet.
Quality And Material Of Bits
High-quality bits last longer and cut better. Carbide-tipped bits hold sharp edges well. Steel bits may dull faster but cost less. Investing in quality bits improves your project’s finish and safety.
Setting Up Your Router
Setting up your router correctly is the first step to using router bits safely and effectively. Proper setup ensures precise cuts and protects both the tool and your workpiece. Take your time during this stage to prepare for smooth operation.
Preparing The Work Area
Clear your workspace of dust and clutter. A clean area helps you focus and move freely. Make sure the surface is stable and well-lit. Safety glasses and ear protection should be ready for use.
Choosing The Right Router Bit
Select a router bit suitable for your project needs. Check the bit’s size and shape carefully. Make sure the bit is sharp and undamaged for best results. Using the correct bit reduces mistakes and tool wear.
Installing The Router Bit
Unplug the router before installing the bit. Insert the bit into the collet fully and tighten it securely. Use the proper wrench to avoid slipping. Loose bits can cause poor cuts and may be dangerous.
Adjusting The Cutting Depth
Set the bit’s depth to match your cutting needs. Start with a shallow cut to test the setup. Adjust the depth gradually for cleaner results. Precise depth control prevents damaging your workpiece.
Securing The Workpiece
Clamp your workpiece firmly to prevent movement. A moving piece can cause uneven cuts or injury. Use non-slip pads if necessary to hold the wood steady. Stable workpieces allow for better control of the router.
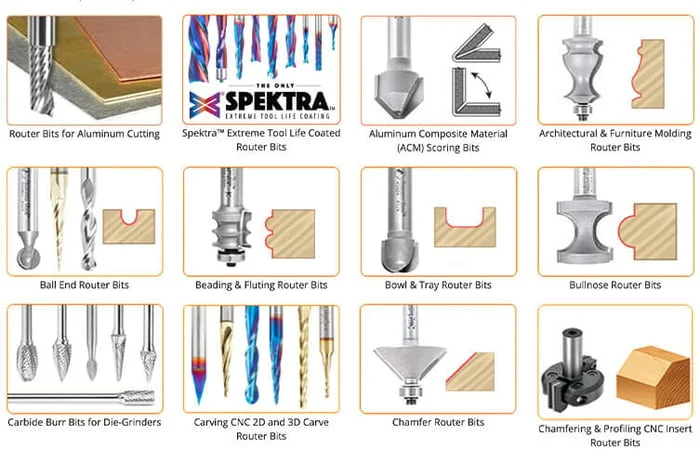
Credit: toolstoday.com
Shaping And Edging Techniques
Shaping and edging techniques give wood projects a polished look. Router bits help create smooth, decorative shapes on wood edges. These techniques add style and detail to furniture, frames, and shelves.
Using the right router bit shapes edges cleanly and safely. Practice steady movements for even cuts. Different bits offer varied effects, from rounded edges to sharp grooves.
Choosing The Right Router Bit For Edging
Select a router bit based on the edge style you want. Roundover bits create soft, curved edges. Cove bits carve concave shapes along the wood. Ogee bits add elegant, S-shaped profiles. Each bit shapes wood differently and suits certain projects.
Setting Up Your Router For Shaping
Secure your wood piece before starting. Adjust the router depth to match the desired cut. Use a guide or fence for straight edges. Test the bit on scrap wood first to check the shape and depth. Move the router smoothly along the edge to avoid uneven cuts.
Techniques For Smooth, Decorative Edges
Hold the router firmly and keep a steady pace. Feed the router against the bit’s rotation for control. Avoid rushing; slow cuts produce cleaner edges. For complex shapes, make several shallow passes instead of one deep cut. Sand edges lightly after routing to remove any rough spots.
Cutting Grooves And Joints
Cutting grooves and joints is a common task in woodworking that requires precision and the right tools. Router bits make this process easier and more accurate. They help create clean cuts and tight-fitting joints for strong wood connections.
Using router bits for grooves allows you to shape channels in wood. These grooves can serve as slots for panels or decorative lines. For joints, router bits can carve shapes like dovetails or rabbets to join pieces securely.
Choosing The Right Router Bit For Grooves
Straight bits are the best choice for cutting grooves. They come in different widths and lengths. Select a bit size that matches the groove width you need. A sharp bit ensures smooth cuts without tear-out.
Setting Up The Router For Groove Cutting
Fix a guide fence on your router table or workbench. This keeps the wood steady and guides the cut. Adjust the bit height to control groove depth. Make shallow passes and deepen the groove gradually for safety and precision.
Using Router Bits To Cut Joints
Dovetail and rabbeting bits are popular for joint making. Dovetail bits cut angled pins and tails for drawer or box joints. Rabbeting bits trim edges and create lips for strong corner joints. Use a router table or jig for better control.
Tips For Clean And Accurate Cuts
Always secure the wood piece firmly. Move the router steadily without forcing it. Check the cut depth often. Test on scrap wood before working on your project. Keep your bits sharp for smooth finishes and less burning.
Creating Decorative Inlays
Creating decorative inlays adds beauty and detail to woodworking projects. Router bits help carve precise shapes for inlays. These shapes fit perfectly into a carved recess on the wood surface. This technique highlights contrast between different wood types or colors.
Using router bits for inlays requires steady hands and careful planning. Choosing the right bit ensures clean cuts and smooth edges. The process starts with marking the design on the wood. Then, the router bit removes material inside the marked area.
Choosing The Right Router Bit For Inlays
Select small straight or core box bits for detailed inlay work. Straight bits create flat-bottomed grooves. Core box bits make rounded grooves, good for curved designs. Choose bit size based on inlay thickness and design depth.
Preparing Wood For Inlay Work
Start with a flat, smooth wood surface. Mark the inlay pattern clearly with a pencil or stencil. Clamp the wood firmly to avoid movement during routing. Practice on scrap wood to get comfortable with the bit and speed.
Routing The Inlay Recess
Set router depth to match inlay thickness. Use a guide or template for steady cuts. Move the router slowly to avoid chip-out or tear. Make multiple shallow passes instead of one deep cut. Clean out the recess with sandpaper or a chisel.
Fitting And Gluing The Inlay
Cut the inlay piece to match the routed recess shape. Test fit the inlay before gluing. Apply wood glue evenly on the recess and inlay piece. Press the inlay firmly into place. Remove excess glue quickly with a damp cloth.
Using Templates And Patterns
Using templates and patterns with router bits helps create precise and repeatable shapes. Templates guide the router, ensuring uniform cuts every time. Patterns allow beginners and pros to copy complex designs easily.
Templates are usually made from wood or plastic. They attach to the workpiece or router base. The router bit follows the template edge, shaping the material accurately. This technique saves time and reduces errors.
Choosing The Right Template Material
Pick a template material that is durable and smooth. Plastic templates work well for detailed shapes. Wood templates suit larger, simpler patterns. Avoid soft materials that may wear quickly.
Securing Templates And Patterns
Clamp the template firmly to the workpiece. Movement during routing causes mistakes. Double-check the clamps before starting. Use double-sided tape for small or delicate projects.
Selecting Router Bits For Template Use
Use a bearing-guided router bit with templates. The bearing rides along the template edge. Straight bits without bearings need a guide fence. Make sure the bit size matches the template thickness.
Routing Techniques With Templates
Move the router slowly and steadily. Keep the bearing tight against the template edge. Do not force the router; let the bit cut naturally. Make multiple shallow passes for cleaner cuts.
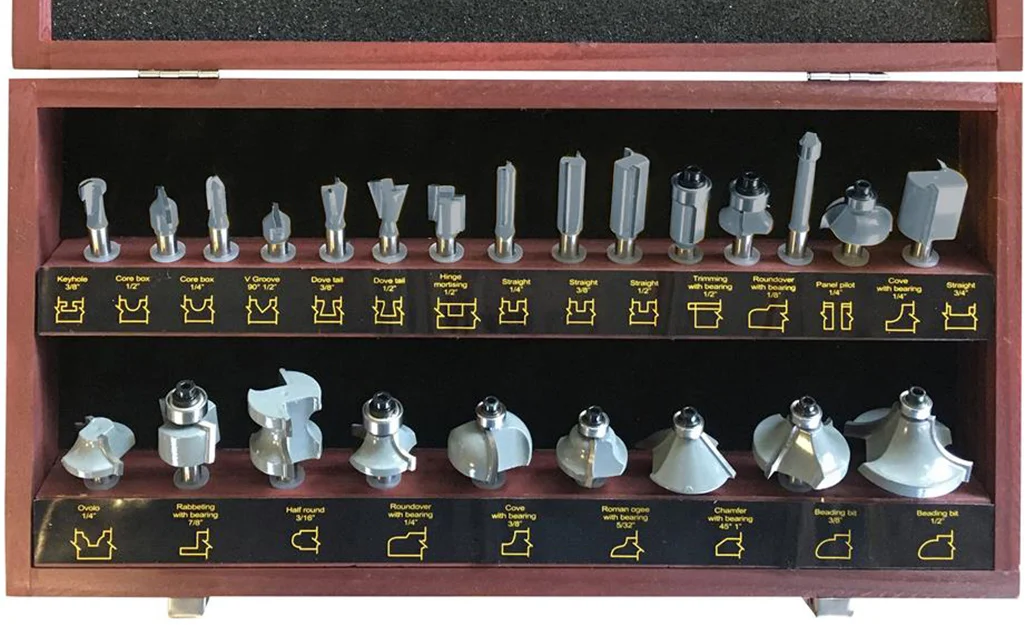
Credit: www.homedepot.com
Maintaining And Organizing Bits
Maintaining and organizing router bits is key to getting clean cuts and extending their life. Sharp bits cut better and reduce burn marks on wood. Keeping bits clean and stored properly prevents damage and saves money.
Organized bits help you find the right one fast. A tidy workspace makes your projects flow smoothly. Spending a few minutes on care and order pays off in quality and speed.
Cleaning Router Bits After Use
Remove dust and resin from bits after each use. Use a soft brush or cloth to wipe them clean. Avoid water as it can cause rust. For sticky buildup, try a bit cleaner made for tools. Clean bits stay sharp and safe to use.
Sharpening And Inspecting Bits
Check bits for dull edges or chips regularly. Dull bits cause rough cuts and strain your router. Use a diamond hone or take bits to a professional sharpener. Replace bits that are damaged or too worn. Sharp bits give smooth, precise cuts every time.
Storing Router Bits Properly
Store bits in a dedicated case or rack. Keep them upright and separated to avoid hitting each other. Label storage spots to find bits quickly. Avoid tossing bits in a drawer where they can get damaged. Proper storage keeps bits ready for use and extends their life.
Frequently Asked Questions
How To Use A Routing Bit?
Secure the routing bit in the router collet. Adjust depth and use a guide fence if needed. Power on and steadily move the router along the wood, repeating passes to reach the desired depth. Always wear safety gear and keep hands clear of the bit.
What Do You Use Router Bits For?
Router bits shape, edge, and join wood, MDF, and solid surfaces. Use them for decorative edges, grooves, joints, and patterns.
Do You Push Or Pull When Using A Router?
Push the wood against the router bit’s rotation direction for better control and safer cuts. Always feed wood steadily.
How Far Should A Router Bit Be Inserted?
Insert the router bit at least 3/4 of the shank length into the collet. Secure it tightly to prevent wobbling. Avoid inserting too deep to allow proper cutting and prevent damage.
What Are The Main Types Of Router Bits?
Router bits come in types like straight, roundover, flush trim, rabbeting, and chamfer bits.
Conclusion
Using router bits opens many creative woodworking options. Choose the right bit for your project needs. Always work slowly and carefully for safe cuts. Practice on scrap wood before starting your main piece. Keep your bits sharp and clean for best results.
With patience, your skills will steadily improve. Enjoy crafting smooth edges and precise joints easily. Router bits make woodworking more fun and rewarding.
{ “@context”: “https://schema.org”, “@type”: “Article”, “headline”: “How to Use Router Bits: Expert Tips for Perfect Woodworking”, “description”: “Learn how to use router bits to shape, trim, and create decorative edges in woodworking by selecting the right type and technique for each project.”, “url”: “https://www.powertoolstoday.com/how-to-use-router-bits/”, “datePublished”: “2025-12-16”, “dateModified”: “2026-03-18”, “author”: { “@type”: “Organization”, “name”: “Power Tools Today”, “url”: “https://www.powertoolstoday.com” }, “publisher”: { “@type”: “Organization”, “name”: “Power Tools Today”, “url”: “https://www.powertoolstoday.com” }, “mainEntityOfPage”: { “@type”: “WebPage”, “@id”: “https://www.powertoolstoday.com/how-to-use-router-bits/” }, “image”: { “@type”: “ImageObject”, “url”: “https://www.powertoolstoday.com/wp-content/uploads/2025/11/how-to-use-router-bits.jpg” } }{ “@context”: “https://schema.org”, “@type”: “Article”, “headline”: “How to Use Router Bits: Expert Tips for Perfect Woodworking”, “description”: “Learn how to use router bits to shape, trim, and create decorative edges in woodworking by selecting the right type and technique for each project.”, “url”: “https://www.powertoolstoday.com/how-to-use-router-bits/”, “datePublished”: “2025-12-16”, “dateModified”: “2026-03-19”, “author”: { “@type”: “Organization”, “name”: “Power Tools Today”, “url”: “https://www.powertoolstoday.com” }, “publisher”: { “@type”: “Organization”, “name”: “Power Tools Today”, “url”: “https://www.powertoolstoday.com” }, “mainEntityOfPage”: { “@type”: “WebPage”, “@id”: “https://www.powertoolstoday.com/how-to-use-router-bits/” }, “image”: { “@type”: “ImageObject”, “url”: “https://www.powertoolstoday.com/wp-content/uploads/2025/11/how-to-use-router-bits.jpg” } }nnnn