Last Updated: March 20, 2026
Cutting a perfect circle with a jigsaw might seem tricky at first, but with the right approach, you can achieve smooth, accurate results every time. Whether you’re working on a DIY project, crafting furniture, or just adding a unique touch to your woodwork, knowing how to cut circles confidently will save you time and frustration.
In this guide, you’ll discover simple techniques and helpful tips that make the process straightforward—even if you’ve never tried it before. Ready to master circle cutting with your jigsaw and impress with your woodworking skills? Let’s dive in and get started!
Credit: www.youtube.com
Tools And Materials Needed
Gathering the right tools and materials is the first step in cutting a circle with a jigsaw. Each item plays a key role in making the cut clean and precise. Prepare everything before starting to save time and avoid mistakes.
Jigsaw
A jigsaw is essential for cutting curves and shapes. Choose one with variable speed control for better handling. Ensure it has a comfortable grip to guide it smoothly along the circle.
Circle-cutting Jig Or Diy Guide
A circle-cutting jig helps keep the blade steady and accurate. You can buy one or make a simple guide using wood, screws, and string. This tool acts as a pivot point for cutting perfect circles.
Appropriate Jigsaw Blade
Select a blade designed for curves and fine cuts. Blades with fine teeth reduce splintering and give smoother edges. Use blades suitable for the material you are cutting.
Measuring Tools
Use a compass, ruler, or tape measure to mark the circle’s radius. Accurate measurements help draw a perfect circle on your material. Mark the center point clearly for the jig pivot.
Material To Cut
Choose the wood, plywood, or plastic sheet you want to cut. Make sure the material is flat and securely clamped before cutting. This prevents movement and ensures a clean circle.
Clamps
Clamps hold the material firmly on the work surface. This stops slipping while cutting. Use enough clamps to secure the piece evenly and safely.
Safety Gear
Wear safety glasses to protect your eyes from dust and debris. Use ear protection if the jigsaw is loud. Gloves can protect your hands but avoid loose ones that may catch in the blade.
Marking The Circle
Start by drawing a clear circle on your material using a compass or round object. Secure a pivot point at the circle’s center to guide the jigsaw smoothly around the curve. This careful marking ensures a clean, even cut when using your jigsaw.
Marking the circle clearly is the first step to a clean cut. A well-marked circle guides your jigsaw and prevents mistakes. Take your time to create a precise outline.
Use simple tools to draw the circle. A compass, string, or a circle-cutting jig helps. Make sure the circle is the right size for your project.
Choosing The Right Tools
Pick a pencil with a sharp tip for clear lines. A thin, dark line is easier to follow. Avoid thick lines that can cause cutting errors.
If a compass is unavailable, use a string tied to a pencil. Fix the other end at the center point. This homemade compass works well for large circles.
Drawing The Circle
Find the center point on your material carefully. Mark it with a small dot. Attach the compass or string here.
Hold the pencil firmly and rotate it around the center point. Keep the string tight for a smooth, even circle. Check the line for gaps or bumps.
Double-check The Circle
Review your circle before cutting. Use a ruler to measure the radius from the center to the edge. Confirm it matches your desired size.
Make corrections as needed. A precise circle line saves time and effort during cutting.
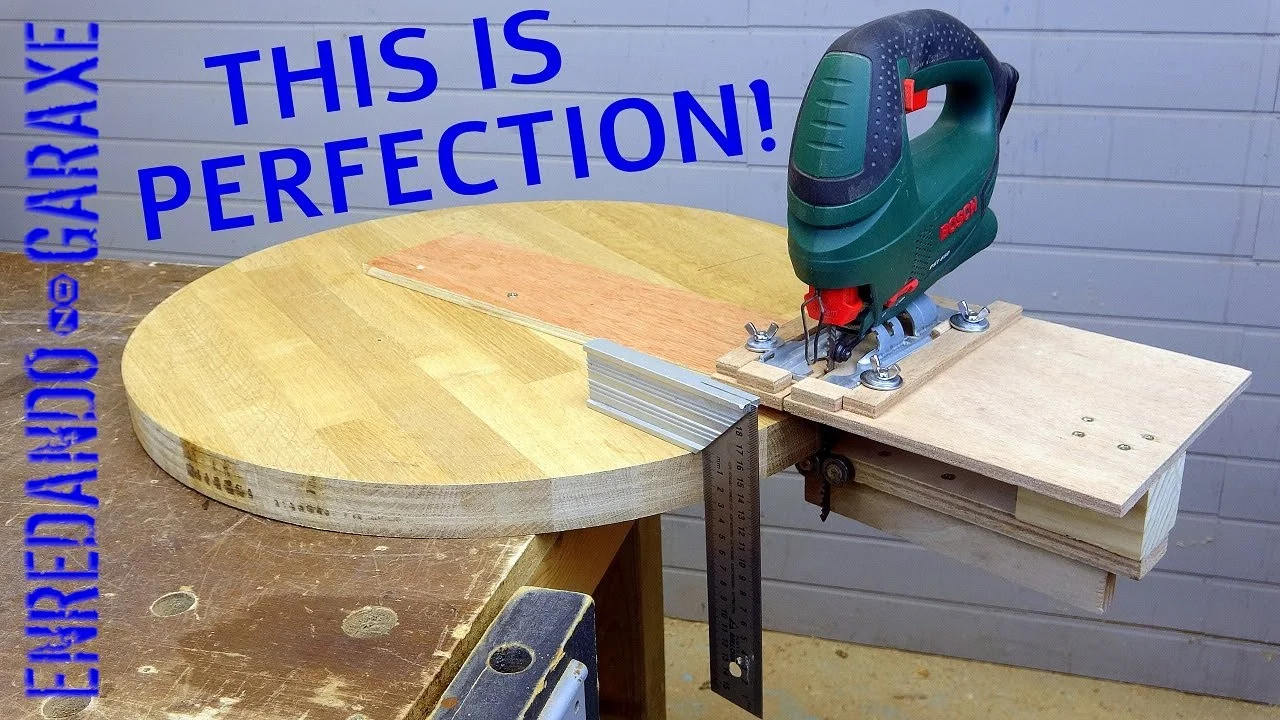
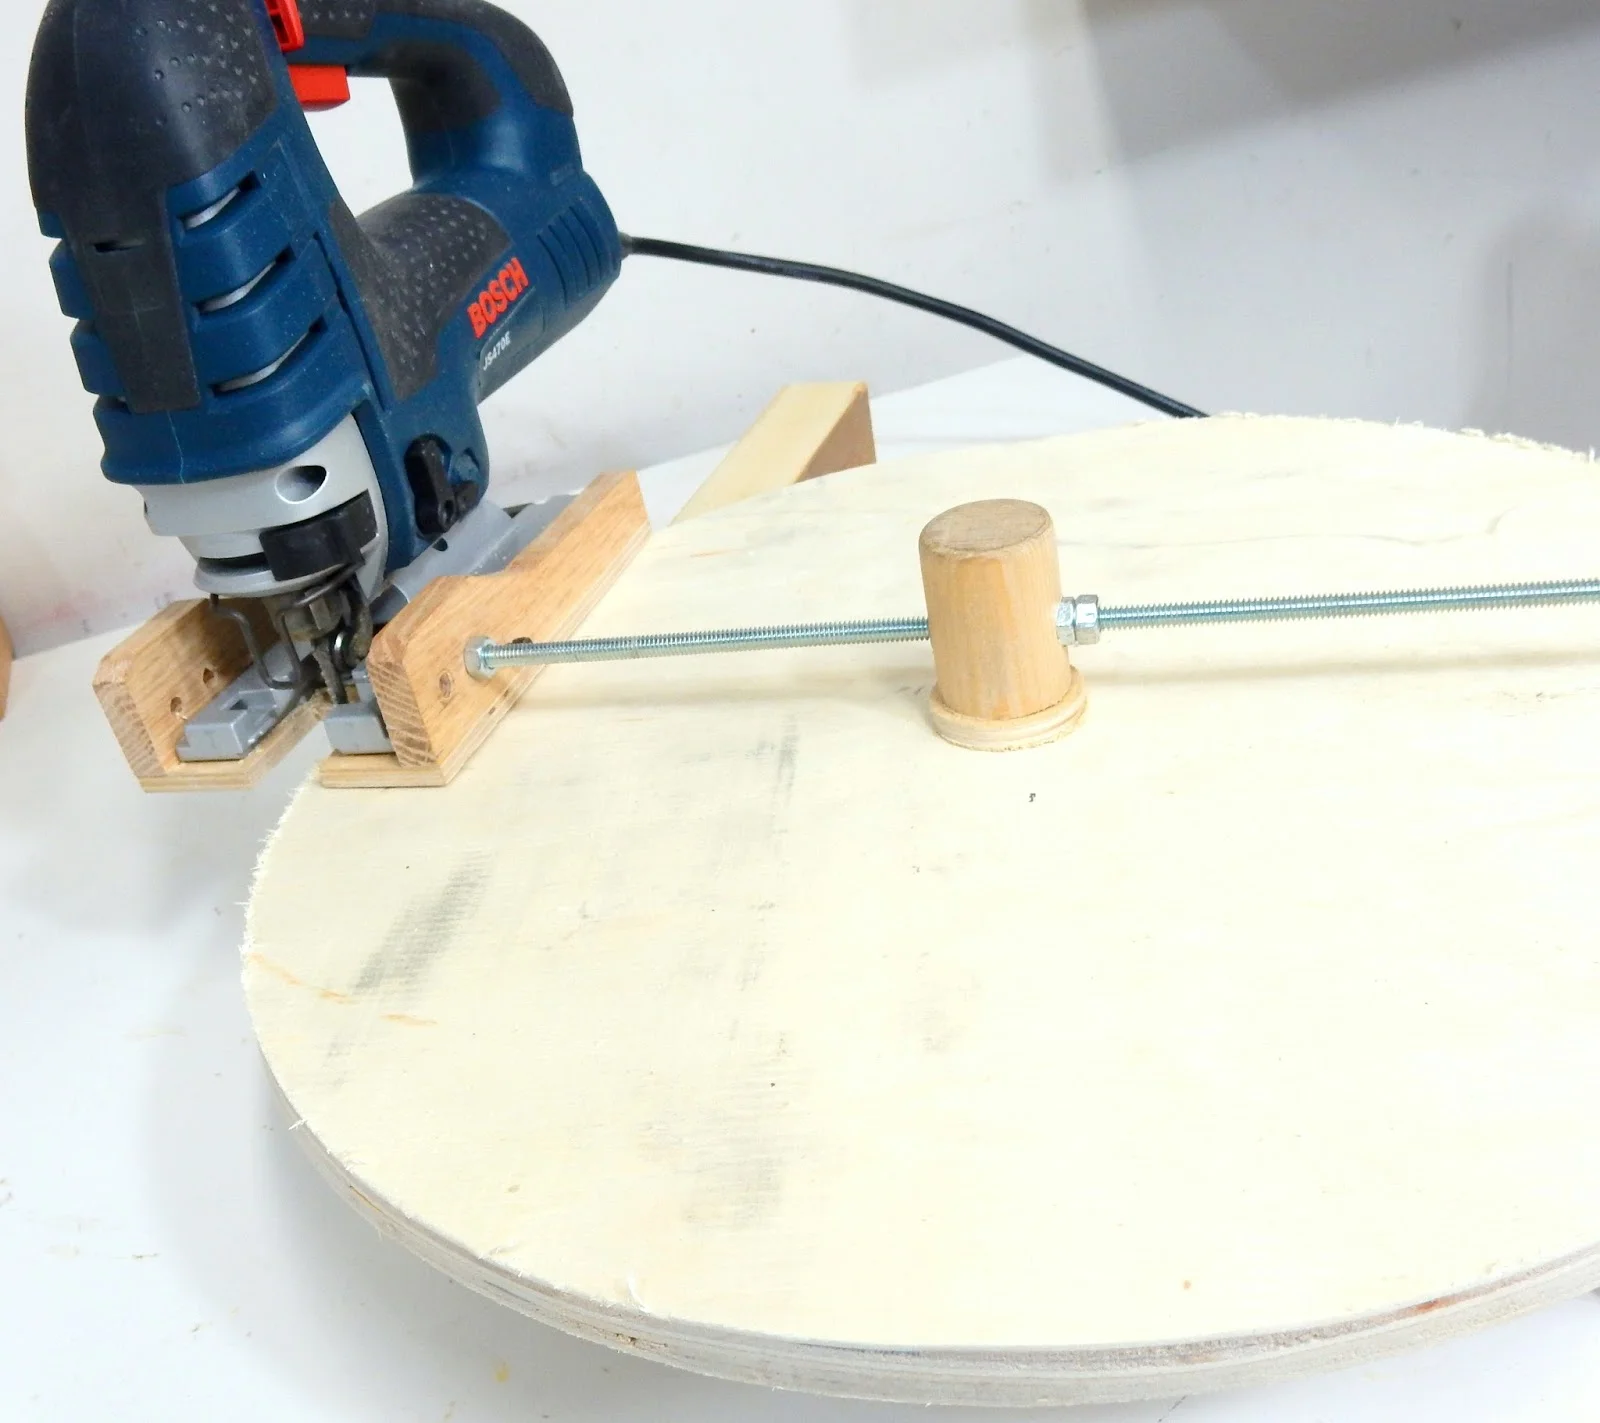
Creating A Circle-cutting Jig
Cutting a perfect circle with a jigsaw is easier with the right jig. A circle-cutting jig acts as a guide to keep your blade steady. It helps you cut smooth and accurate circles every time. Building your own jig is simple and saves money.
This jig attaches to your jigsaw and has a pivot point. The pivot stays fixed while the jigsaw moves around it. This motion guides the blade in a perfect circle. You can set the radius by adjusting the pivot point’s distance from the blade.
What You Need To Build A Circle-cutting Jig
Gather these items before starting your jig:
- A flat piece of wood or plywood for the jig base
- A bolt or screw to serve as the pivot point
- A wing nut or knob to tighten the pivot
- A ruler or measuring tape to set the radius
- A drill to make holes for the pivot and attachment
Step-by-step Guide To Making The Jig
First, cut the wood base to a size that fits your jigsaw. Drill a hole near one end for the pivot bolt. Attach the bolt so it sticks out below the jig. Next, drill holes on the jig to bolt it to your jigsaw’s shoe. Make sure it is secure but can pivot around the bolt.
Set the pivot bolt on your workpiece where the circle’s center will be. Adjust the jig’s length to match the circle radius you want. Tighten the wing nut to lock the jig in place. Now, the jigsaw blade will cut a perfect circle as you move it around the pivot.
Tips For Using Your Circle-cutting Jig
- Draw the circle outline lightly before cutting.
- Use a slow, steady speed on your jigsaw.
- Keep the pivot point tight to avoid wobbling.
- Practice on scrap wood first to gain confidence.
- Wear safety glasses and follow all tool safety rules.
Credit: www.youtube.com
Setting Up The Jigsaw
Setting up the jigsaw correctly is crucial for cutting a perfect circle. Proper setup ensures safety and precision. It prepares the tool to follow the circle’s curve smoothly. Take time to adjust the jigsaw before starting your cut.
Choose The Right Blade
Select a blade designed for curved cuts. Fine-toothed blades work best on wood. Avoid blades meant for straight cuts or metal. A sharp blade prevents rough edges and splintering.
Adjust The Speed Settings
Set the jigsaw to a moderate speed. Too fast can cause the blade to bend or break. Too slow may result in uneven cuts. A steady speed helps maintain control around curves.
Secure The Material
Clamp your workpiece firmly to a stable surface. Movement during cutting affects accuracy and safety. Use clamps that do not block your cutting path. Keep the material steady to guide the jigsaw easily.
Check The Shoe Plate
Ensure the shoe plate lies flat on the material. The shoe plate stabilizes the jigsaw during cutting. Tighten any loose screws before starting. A stable base improves cutting accuracy and reduces blade vibration.
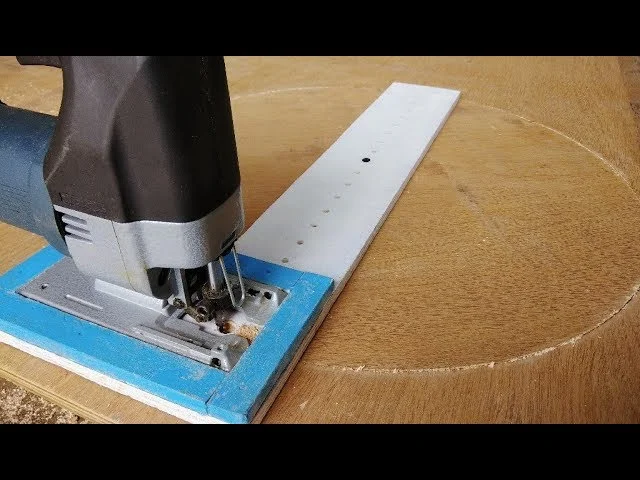
Cutting The Circle
Cutting a circle with a jigsaw takes focus and steady hands. The jigsaw blade moves quickly and follows your guide. Keeping control ensures a smooth, clean cut.
Start by preparing your workspace. Clear any clutter and secure your material firmly. This prevents movement and helps make an even cut.
Starting The Cut
Begin by drilling a starter hole inside the circle. This hole should be just big enough for the jigsaw blade. Insert the blade carefully into this hole to start cutting.
Turn on the jigsaw and move it slowly along the circle line. Avoid pushing too hard. Let the blade do the work to keep the edge clean.
Maintaining A Steady Path
Keep the jigsaw base flat on the material. Follow the circle line closely. Move the jigsaw in a smooth, steady motion around the curve.
Adjust your speed to match the curve. Slow down on tight bends. This prevents the blade from bending or breaking.
Finishing The Cut
Cut all the way around until you meet the starting point. Turn off the jigsaw before lifting it from the material. Check the circle edges for any rough spots.
Use sandpaper or a file to smooth out the edges. This step improves the look and feel of your circle. Take your time for best results.
Finishing Touches
After cutting your circle with a jigsaw, the job is not quite done. Finishing touches give your project a clean and professional look. These steps help smooth rough edges and improve appearance. They also prepare the wood for painting or staining.
Sanding The Edges
Use sandpaper or a sanding sponge to smooth the cut edges. Start with medium grit (around 120) and finish with fine grit (220). Sand gently along the curve to keep the circle shape. This removes splinters and rough spots. It also helps to create a soft, even edge.
Cleaning The Surface
Remove dust and debris from sanding using a brush or a vacuum. Wipe the surface with a damp cloth to pick up remaining dust. Clean surfaces hold paint and finishes better. Make sure the material is dry before the next step.
Applying Finish Or Paint
Choose paint, stain, or clear finish based on your project needs. Apply thin, even coats with a brush or spray. Let each coat dry fully before adding the next. Finishes protect the wood and enhance its look. They also help the circle last longer.
Checking For Imperfections
After finishing, look closely for any rough spots or uneven areas. Lightly sand these spots and reapply finish if needed. Small fixes improve the overall quality. Take your time for the best results.
Credit: www.jax-design.net
Frequently Asked Questions
Can I Cut A Circle With A Jigsaw?
Yes, you can cut a circle with a jigsaw using a circle-cutting jig or a DIY pivot guide. Draw the circle, drill a starter hole, use a narrow blade, and cut slowly outside the line for best results.
What Is The Easiest Way To Cut A Circle Out Of Wood?
The easiest way to cut a circle in wood is using a jigsaw with a circle-cutting jig. Attach the jig’s pivot, set the radius, and guide the saw slowly around the center point for a smooth, precise cut.
Can You Cut A Round Hole With A Jigsaw?
Yes, you can cut a round hole with a jigsaw using a circle-cutting jig or a DIY pivot guide. Draw the circle, drill a starter hole, use a narrow blade, and cut slowly outside the line for best results.
Can A Jigsaw Make Curved Cuts?
Yes, a jigsaw can make curved cuts. Use a narrow blade and move slowly for smooth curves. A circle-cutting jig or DIY pivot guide improves accuracy. Drill a pilot hole inside the curve to start cutting easily. Cut slightly outside the line and sand edges for a clean finish.
Can I Cut A Perfect Circle With A Jigsaw?
Yes, a jigsaw can cut perfect circles using a circle-cutting jig or a DIY pivot guide.
What Is The Best Way To Guide A Jigsaw For Circles?
Use a circle-cutting jig or a string-and-screw pivot to keep the blade steady and accurate.
Conclusion
Cutting a circle with a jigsaw takes patience and practice. Use a proper jig or guide to keep the cut smooth and even. Always mark your circle clearly before starting. Choose the right blade and move the jigsaw slowly for best results.
With steady hands, you can create clean, precise circles easily. Keep safety in mind and enjoy your woodworking project.
{ “@context”: “https://schema.org”, “@type”: “Article”, “headline”: “How to Cut a Circle With a Jigsaw: Easy Step-by-Step Guide”, “description”: “Learn how to cut a circle with a jigsaw by following step-by-step techniques that ensure smooth, accurate curves for woodworking and DIY projects.”, “url”: “https://www.powertoolstoday.com/how-to-cut-a-circle-with-a-jigsaw/”, “datePublished”: “2025-11-16”, “dateModified”: “2026-03-18”, “author”: { “@type”: “Organization”, “name”: “Power Tools Today”, “url”: “https://www.powertoolstoday.com” }, “publisher”: { “@type”: “Organization”, “name”: “Power Tools Today”, “url”: “https://www.powertoolstoday.com” }, “mainEntityOfPage”: { “@type”: “WebPage”, “@id”: “https://www.powertoolstoday.com/how-to-cut-a-circle-with-a-jigsaw/” }, “image”: { “@type”: “ImageObject”, “url”: “https://www.powertoolstoday.com/wp-content/uploads/2025/11/How-to-Cut-a-Circle-With-a-Jigsaw-1024×576.webp” } }{ “@context”: “https://schema.org”, “@type”: “Article”, “headline”: “How to Cut a Circle With a Jigsaw: Easy Step-by-Step Guide”, “description”: “Learn how to cut a circle with a jigsaw by following step-by-step techniques that ensure smooth, accurate curves for woodworking and DIY projects.”, “url”: “https://www.powertoolstoday.com/how-to-cut-a-circle-with-a-jigsaw/”, “datePublished”: “2025-11-16”, “dateModified”: “2026-03-19”, “author”: { “@type”: “Organization”, “name”: “Power Tools Today”, “url”: “https://www.powertoolstoday.com” }, “publisher”: { “@type”: “Organization”, “name”: “Power Tools Today”, “url”: “https://www.powertoolstoday.com” }, “mainEntityOfPage”: { “@type”: “WebPage”, “@id”: “https://www.powertoolstoday.com/how-to-cut-a-circle-with-a-jigsaw/” }, “image”: { “@type”: “ImageObject”, “url”: “https://www.powertoolstoday.com/wp-content/uploads/2025/11/How-to-Cut-a-Circle-With-a-Jigsaw-1024×576.webp” } }nnnn