Cutting a perfect circle with a router might seem tricky at first, but with the right approach, you can achieve smooth, precise results every time. Whether you’re working on a woodworking project or crafting a custom piece, knowing how to cut a circle with your router opens up new possibilities.
In this guide, you’ll discover simple steps and tips that make the process easier than you think. Ready to take your skills to the next level and create flawless circles that impress? Keep reading, and let’s get started!
Credit: www.youtube.com
Choosing The Right Router And Bit
Choosing the right router and bit is essential for cutting a perfect circle. The router must be powerful enough to handle the material. The bit should match the shape and size of the circle you want to cut. Picking the correct tools ensures smooth, clean edges and reduces mistakes.
Choosing The Right Router
Select a router with enough power for your project. A router with variable speed control offers more precision. A plunge router allows for better control when starting the cut. Fixed-base routers work well for simple cuts but may limit depth control. Consider the weight and size for comfortable handling.
Selecting The Best Router Bit
Use a straight bit or a spiral bit for clean cuts. Spiral bits reduce tear-out and provide smoother edges. The diameter of the bit affects the finish and ease of cutting. Smaller bits are better for tight curves, larger bits for straight sections. Always choose bits made from high-quality carbide for durability.
Bit Size And Material
Match the bit size to the thickness of your material. A bit too small can cause burning or slow cutting. A bit too large may remove too much material quickly. Use bits designed for wood if cutting softwood or plywood. For hardwood, use bits made for tougher materials to avoid dulling.
Preparing The Wood Surface
Preparing the wood surface is the first step in cutting a perfect circle with a router. A smooth and clean surface ensures accuracy and safety. Proper preparation reduces mistakes and gives a professional finish to your project.
Start by choosing the right wood piece. The wood should be flat, free of cracks, and large enough for the circle size you want to cut. Remove any dirt or dust with a clean cloth.
Checking The Wood For Defects
Look closely for knots, splits, or warps. These can cause the router bit to catch or break the wood. Mark any problem areas and avoid cutting through them. Use wood that is solid and stable for best results.
Sanding The Surface Smooth
Sand the wood surface lightly with fine-grit sandpaper. This removes rough spots and helps the router move smoothly. A smooth surface also helps the circle jig stay steady during cutting. Wipe off sanding dust before starting.
Marking The Circle Center
Find and mark the exact center where you want the circle. Use a ruler and pencil for accuracy. This center point will guide the pivot for the router circle jig. Clear and precise marking is key to a perfect circle.
Building A Circle Cutting Jig
Building a circle cutting jig is an important step for accurate cuts. This jig holds your router steady and guides it in a perfect circle. It makes cutting circles easier and safer, even for beginners.
You can make a jig with simple materials like plywood and a few screws. The jig attaches to the router and pivots around a fixed point. This point acts as the center of your circle, ensuring consistency.
Gathering Materials For The Jig
Start by collecting basic tools and materials. You need a flat piece of plywood, screws, a ruler, and a drill. Choose wood thick enough to hold the router firmly without bending.
Cutting The Base And The Arm
Cut a square or rectangular base from plywood. Then cut a straight arm that will hold the router. The arm should be long enough to reach the size of the circle you want to cut.
Marking The Pivot Point
Decide the circle size before marking the pivot. Measure the distance from the router bit to the pivot point on the arm. Mark this point clearly for drilling.
Assembling The Jig
Attach the arm to the base using a screw or bolt at the pivot point. The arm should rotate smoothly around this point. Secure the router to the other end of the arm.
Adjusting For Different Circle Sizes
Make multiple holes along the arm to allow size changes. Move the pivot screw to different holes to change the circle radius. This feature adds versatility to your jig.
Setting The Pivot Point And Radius
Setting the pivot point and radius is a key step to cut a perfect circle with a router. The pivot point acts as the center of your circle. The radius determines how big the circle will be. Correctly marking these points ensures smooth and accurate cuts.
Start by measuring the radius from the center to the edge of the circle you want. This radius will guide the router’s path. The pivot point should be firmly fixed to prevent any movement during cutting. A stable pivot helps the router move in a precise arc.
Choosing The Right Pivot Point Location
Pick a flat surface to place your pivot point. The spot must be exactly where the circle’s center will be. Use a nail or a screw as the pivot pin. It should be strong enough to hold the router steady. Make sure it does not shift while cutting.
Adjusting The Router For The Desired Radius
Attach the router to a circle cutting jig or guide arm. Set the distance from the router bit to the pivot point. This distance is the radius of your circle. Double-check the measurement before starting the cut. Tighten all adjustments so they do not move.
Securing The Pivot Point For Stability
Press the pivot point firmly into the workpiece or baseboard. Use clamps if needed to keep it in place. The pivot must not wobble during routing. A loose pivot causes uneven or jagged cuts. Test the stability by gently moving the router around the pivot.
Securing The Workpiece
Securing the workpiece is essential before cutting a circle with a router. A firmly held piece ensures accuracy and safety. Loose wood can shift and cause mistakes or injuries. Take time to stabilize your material well.
Choose The Right Surface
Use a flat, stable workbench or table. The surface must not wobble or move during routing. A steady base helps maintain control over the router’s path.
Use Clamps To Hold The Wood
Apply strong clamps to fasten the wood to the table. Place them around the edges, away from the router path. This prevents the wood from sliding or spinning as you cut.
Check For Movement Before Starting
Push lightly on the wood to test its grip. If it moves, tighten the clamps or add more. Confirm the piece stays still from all sides before switching on the router.
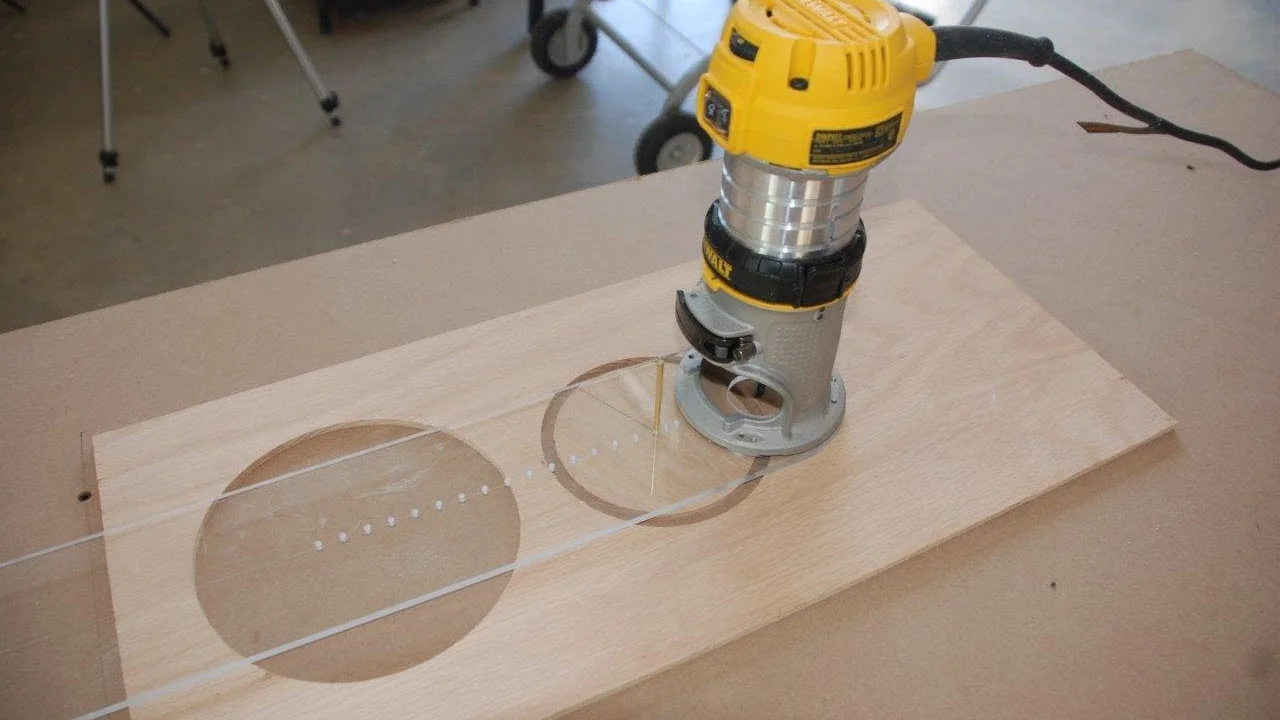
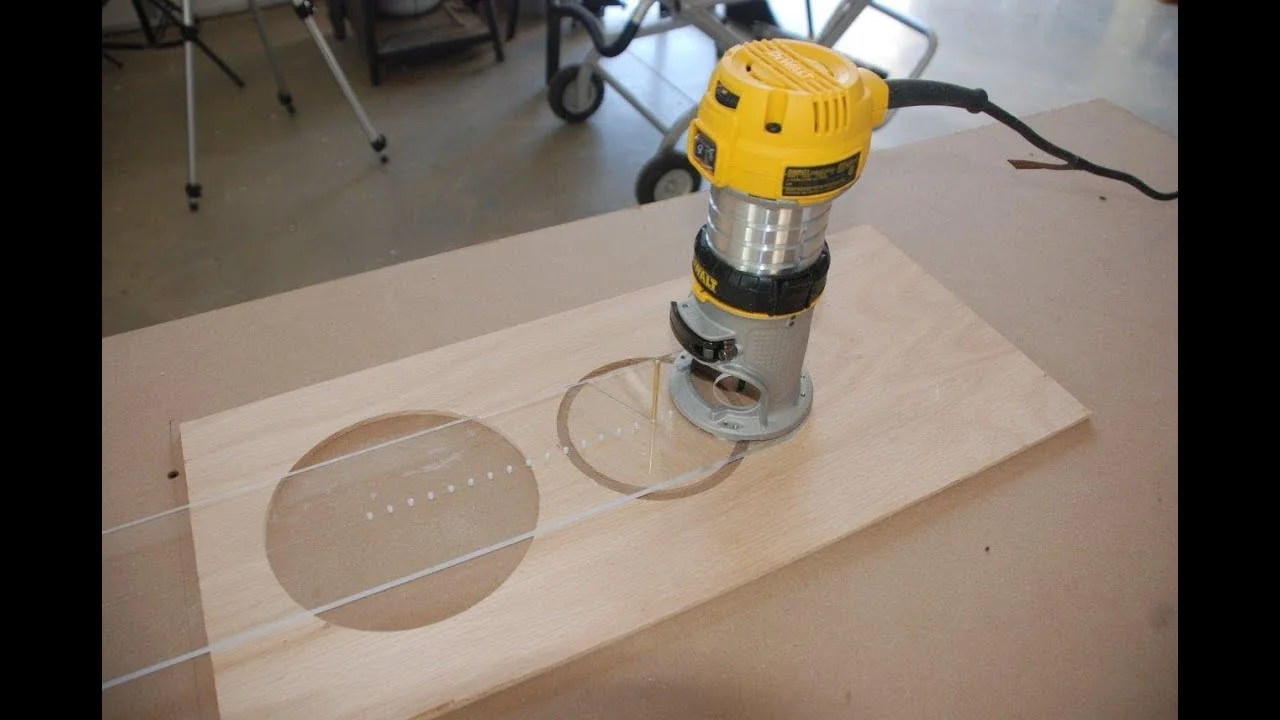
Routing The Circle Step-by-step
Routing a circle with a router requires careful steps for a clean and precise cut. This section breaks down the process into simple actions. Follow each step closely for best results.
Prepare Your Workspace And Materials
Clear your work area of dust and debris. Secure the wood piece firmly to prevent movement. Choose the right router bit for smooth cutting. Make sure the router is unplugged before setting up.
Set Up The Circle Cutting Jig
Attach the circle cutting jig to your router base. Adjust the pivot point to match the circle radius you want. Tighten all screws to avoid slipping during routing. Double-check the radius measurement before starting.
Mark The Center Point On Wood
Find and mark the exact center of your circle on the wood. Use a pencil and ruler or compass for accuracy. This mark will guide the pivot point of your jig.
Position The Router And Start Routing
Place the pivot pin of the jig on the center mark. Hold the router steady and switch it on. Move the router slowly and evenly around the pivot point. Keep the base flat on the wood surface.
Complete The Cut And Check The Circle
Route all around until you meet the starting point. Turn off the router and lift it carefully. Inspect the circle edge for smoothness and completeness. Sand lightly if needed to perfect the edge.
Finishing Touches And Sanding
After cutting a circle with a router, the finishing touches and sanding are vital. They smooth the edges and enhance the circle’s look. Proper sanding removes rough spots and sharp edges. This step also prepares the surface for painting or staining.
Preparing The Surface For Sanding
Start by cleaning the circle’s edge to remove dust and debris. Use a brush or cloth for this. Check the edge for any large splinters or rough areas. Trim these parts carefully with a sharp knife or chisel. This makes sanding easier and safer.
Sanding Techniques For A Smooth Edge
Use medium-grit sandpaper (around 120 grit) to begin sanding the circle’s edge. Move the sandpaper in a circular motion that follows the curve. This keeps the edge even and smooth. Afterward, switch to fine-grit sandpaper (220 grit) for a polished finish. Sand lightly to avoid rounding the edge too much.
Using A Sanding Block Or Sponge
A sanding block or sponge helps maintain an even pressure on the wood. It also protects your fingers from fatigue. Wrap the sandpaper around the block or use a sanding sponge shaped to fit curves. This method works well on both flat and curved surfaces.
Checking For Imperfections
After sanding, run your fingers along the edge to feel for rough spots. Look closely for uneven areas or flat spots. Mark these areas with a pencil. Sand them again gently until the edge feels smooth and round.
Final Cleaning And Inspection
Use a tack cloth or damp rag to remove all sanding dust from the circle. Let the wood dry completely before applying any finish. Check the circle’s edge under good light to ensure a uniform smoothness. This step ensures the best result for painting or staining.
Credit: www.youtube.com
Common Mistakes To Avoid
Cutting a circle with a router is a skill that needs focus and care. Many beginners make avoidable mistakes that affect the result. Knowing these common errors helps you work safely and get a smooth, perfect circle every time.
Learn what to watch out for. Avoid these mistakes to save time and materials. Get better results with less effort and frustration.
Improper Setup Of The Circle Jig
Setting up the circle jig incorrectly causes uneven cuts. Double-check the pivot point and radius before starting. A loose jig can shift during cutting and ruin the circle shape.
Using The Wrong Router Bit
Choosing an unsuitable bit leads to rough edges or burning. Use a sharp, straight bit designed for clean cuts. Avoid dull or chipped bits that tear the wood fibers.
Cutting Too Fast
Moving the router too quickly causes chipping and a rough finish. Slow, steady movements keep the cut smooth and controlled. Patience pays off in cleaner edges and safer operation.
Skipping Safety Measures
Not wearing protective gear or ignoring safety rules risks injury. Always wear safety glasses and hearing protection. Secure your workpiece firmly to prevent slips.
Failing To Test On Scrap Wood
Jumping straight to the final piece can waste materials. Practice on scrap wood to check settings and technique. Testing helps avoid mistakes on the actual workpiece.
:max_bytes(150000):strip_icc()/largecircle-fe271616be074b67b4ca63f3cc8da4ba.jpg)
Credit: www.woodmagazine.com
Frequently Asked Questions
What Router Bit To Use To Cut A Circle?
Use a straight or spiral upcut router bit with a circle cutting jig to cut clean, precise circles.
What Is The Easiest Way To Cut A Circle In Wood?
Use a circle cutting jig with a router for easy, precise circle cuts in wood. Secure the jig and guide the router steadily.
How To Cut A Curve With A Router?
Attach a circle-cutting jig to the router. Secure the pivot point. Set the radius. Route slowly, moving counterclockwise along the curve.
Can You Use A Router To Cut Shapes?
Yes, you can use a router to cut shapes by attaching a circle cutting jig or template. It ensures precise, smooth cuts.
What Router Bit Is Best For Cutting Circles In Wood?
A straight or spiral bit with a sharp edge works best for clean circle cuts.
Conclusion
Cutting a circle with a router becomes simple with the right tools and steps. Use a circle cutting jig to guide your router smoothly. Take your time and follow safety tips closely. Practice on scrap wood to build confidence. Soon, you will create clean, precise circles for your projects.
Enjoy the satisfaction of a well-cut circle every time.
Related reading: how to cut plexiglass with a jigsaw.
Read also: How to Cut a Dado With a Router
