Last Updated: March 21, 2026
If you’ve got an IKEA pegboard waiting to be hung, you might be wondering how to get it up quickly and securely without hassle. Whether you want a sleek, drill-free option or a solid screw-mounted setup, you’re in the right place.
Imagine turning your wall into a neat, organized space where everything has its place—tools, craft supplies, or kitchen essentials—all easily accessible and beautifully displayed. In this guide, you’ll discover simple, step-by-step methods to hang your IKEA pegboard perfectly, so you can transform your space with confidence and ease.
Ready to get started? Let’s dive in.
Credit: www.youtube.com
Choosing The Right Location
Choosing the right spot for your Ikea pegboard is key for both function and style. A well-placed pegboard keeps tools and items within easy reach. It also enhances your room’s look by adding organized wall space.
Consider what you want to store on the pegboard. Pick a location near your work area or where you often use those items. This helps save time and effort when grabbing tools or supplies.
Assess Wall Space And Size
Measure the available wall space to fit the pegboard properly. Avoid areas with too many obstructions like light switches or vents. Ensure the wall area is large enough for the pegboard size you want.
Check Wall Material
Identify the type of wall you will mount the pegboard on. Drywall, plaster, or wood walls need different mounting tools. Knowing the wall material helps pick the right screws and anchors for a secure hold.
Consider Height And Accessibility
Mount the pegboard at a height that is easy to reach. Avoid placing it too high or too low to prevent strain. Think about all users who may need access and adjust the height accordingly.
Evaluate Lighting Conditions
Place the pegboard where there is good lighting. Natural or bright artificial light makes it easier to see your tools. Avoid dark corners or spots with glare from windows or lamps.
Avoid Moist Or Humid Areas
Keep the pegboard away from places with moisture or humidity. Bathrooms or near sinks may cause damage over time. A dry, stable environment helps the pegboard last longer.
Gathering Necessary Tools
Before starting to hang your Ikea pegboard, gathering the right tools is crucial. The right tools make the job easier and ensure a secure fit. Prepare all items first to avoid interruptions during installation. This saves time and reduces frustration.
Basic Tools Needed
You will need a drill for making holes in the wall. A screwdriver helps tighten screws and secure brackets. A level ensures the pegboard hangs straight and looks neat.
Measuring And Marking Tools
A tape measure helps find the right height and width for the pegboard. Use a pencil to mark the spots where you will drill. Marking keeps the pegboard aligned and balanced on the wall.
Anchors And Screws
Wall anchors are needed if you do not drill into studs. Anchors hold screws firmly in drywall. Use screws that fit your pegboard’s mounting brackets for strong support.
Optional Tools For Screw-free Method
Heavy-duty adhesive strips like Command Strips can replace screws. Spacers and a mounting bar help attach the pegboard securely. These tools allow for damage-free hanging on smooth walls.
Preparing The Wall
Preparing the wall is a crucial step before hanging your Ikea pegboard. A well-prepared wall ensures the pegboard stays secure and supports your items safely. Taking time to find the right spots and mark them correctly makes installation easier and more effective.
Finding Wall Studs
Wall studs provide strong support for heavy items. Use a stud finder to locate these wooden beams behind your drywall. Slowly move the stud finder across the wall until it signals a stud. Mark the edges of the stud to find its center. This center point is the best place to drill holes.
Marking Drill Points
Hold the pegboard where you want to install it. Use a level to keep it straight. Mark the spots on the wall through the pegboard holes. Make sure marks line up with the wall studs. If no studs are available, mark where the anchors will go. Double-check all marks before drilling to avoid mistakes.

Credit: www.reddit.com
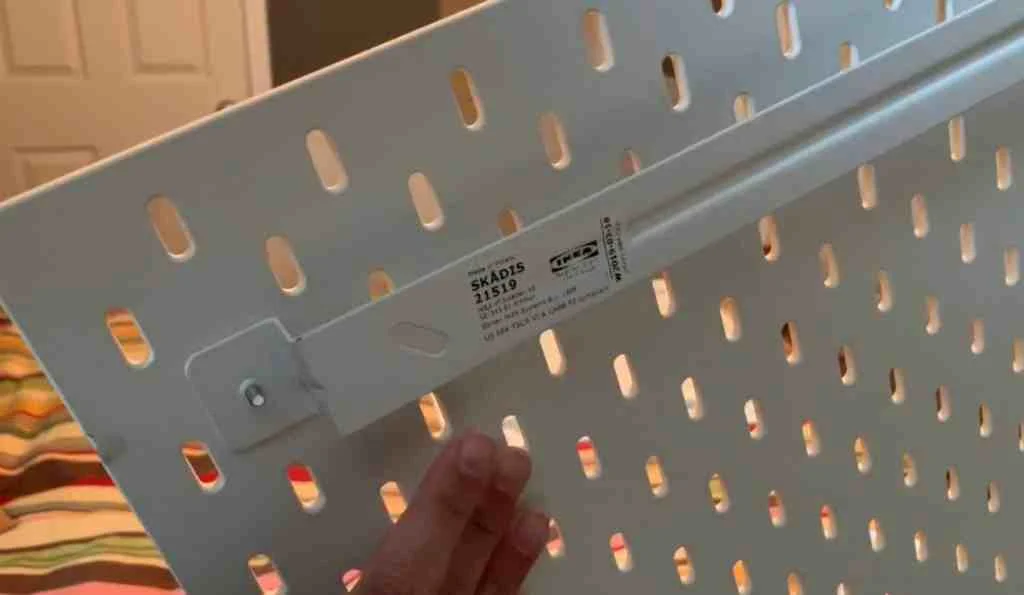
Attaching Mounting Bar And Spacers
Attaching the mounting bar and spacers is a key step in hanging your IKEA pegboard securely. This process creates the right distance between the pegboard and the wall. Spacers help the hooks and accessories fit properly. The mounting bar supports the pegboard and keeps it stable.
Follow the instructions carefully. Use the screws provided with your pegboard for best results. Proper attachment ensures your pegboard stays safe and looks great on the wall.
Preparing The Mounting Bar
Start by locating the mounting bar that came with your pegboard. Hold it against the back of the pegboard. Align it with the pre-drilled holes. Make sure it sits flat without gaps. This will provide strong support.
Attaching Spacers To The Pegboard
Next, attach the spacers to the pegboard. Use the screws to fix each spacer in place. Spacers keep the pegboard away from the wall. This space allows hooks to fit easily. Tighten screws just enough to hold firmly. Avoid over-tightening to prevent damage.
Securing The Mounting Bar
Once spacers are fixed, position the mounting bar over them. Align the screw holes on the bar with the spacers. Insert screws and tighten carefully. Check that the bar feels strong and steady. This step ensures the pegboard will hold weight safely.
Drilling And Installing Wall Anchors
Drilling and installing wall anchors is a crucial step for a secure pegboard setup. It ensures the board stays firmly attached to your wall. Wall anchors provide extra support, especially when you cannot drill directly into a stud. This step helps your pegboard hold weight without damage.
Using the right tools and anchors makes the process easier and safer. Follow each step carefully to avoid mistakes. Proper installation keeps your pegboard stable for daily use.
Choosing The Correct Wall Anchors
Select wall anchors based on your wall type. Drywall needs plastic or metal anchors. Concrete or brick requires masonry anchors. Match the anchor size with your screws for a tight fit. Proper anchors prevent the pegboard from falling.
Marking Drill Points On The Wall
Hold the pegboard against the wall. Use a level to keep it straight. Mark the drill points through the pegboard holes. Double-check marks to ensure even spacing. Accurate marks make drilling easier and more precise.
Drilling Holes For Wall Anchors
Use a drill bit matching your anchor size. Drill slowly to avoid wall damage. Clean dust from holes before inserting anchors. Insert anchors flush with the wall surface. Proper holes help anchors hold firmly.
Installing Wall Anchors And Securing The Pegboard
Push the anchors gently into the drilled holes. Use a hammer if needed but avoid forceful hits. Align the pegboard holes with the anchors. Insert screws through the pegboard into anchors. Tighten screws until the pegboard feels secure.
Credit: myinspirationcorner.com
Securing Pegboard With Screws
Securing your Ikea pegboard with screws ensures a strong and reliable hold. Screws keep the pegboard stable, especially if you plan to hang heavy items. This method requires basic tools and a bit of care to avoid wall damage.
Follow these simple steps to attach your pegboard safely and securely. Proper screw placement and using the right anchors make all the difference. Read on to learn how to mount your pegboard perfectly.
Prepare The Wall For Screwing
Start by choosing the right spot on your wall. Use a level to mark where the top edge of the pegboard will sit. Look for a wall stud to drill into for the best support.
If no stud is available, use drywall anchors to hold the screws firmly. Drill holes at the marked spots carefully. This prevents cracking or damage to the wall surface.
Attach Spacers And Mounting Bar
Attach spacers to the back of the pegboard. Spacers create space between the board and the wall. This makes hanging hooks fit easily.
Next, screw a mounting bar onto the pegboard’s back. The bar provides extra stability and helps distribute the weight evenly.
Secure The Pegboard To The Wall
Hold the pegboard against the wall, aligning it with your marks. Insert screws through the mounting bar and spacers into the wall holes.
Tighten the screws until the pegboard is flush against the wall but avoid over-tightening. Over-tightening can damage the board or wall.
Screw-free Installation With Adhesive Strips
Hanging an Ikea pegboard without screws is simple and clean. Using adhesive strips keeps your walls damage-free. This method suits renters and anyone avoiding drills.
Adhesive strips hold the pegboard firmly while allowing easy removal later. Follow each step carefully for best results.
Attaching Command Strips
Start with a clean, dry wall surface. Remove any dust or grease for better grip.
Attach heavy-duty Command Strips to the back of the pegboard’s mounting bar and spacers. Press each strip firmly for 30 seconds. This activates the adhesive for a stronger hold.
Make sure to use enough strips to support the pegboard’s weight. Spread them evenly along the bar and spacers.
Waiting For Adhesive To Bond
After pressing the strips on the wall, do not hang the pegboard immediately. Wait at least one hour for the adhesive to bond fully.
This waiting time ensures the strips stick tightly and hold the pegboard safely. Avoid touching or moving the strips during this period.
Once the adhesive sets, carefully reattach the pegboard by pressing it against the strips. This completes your screw-free installation.
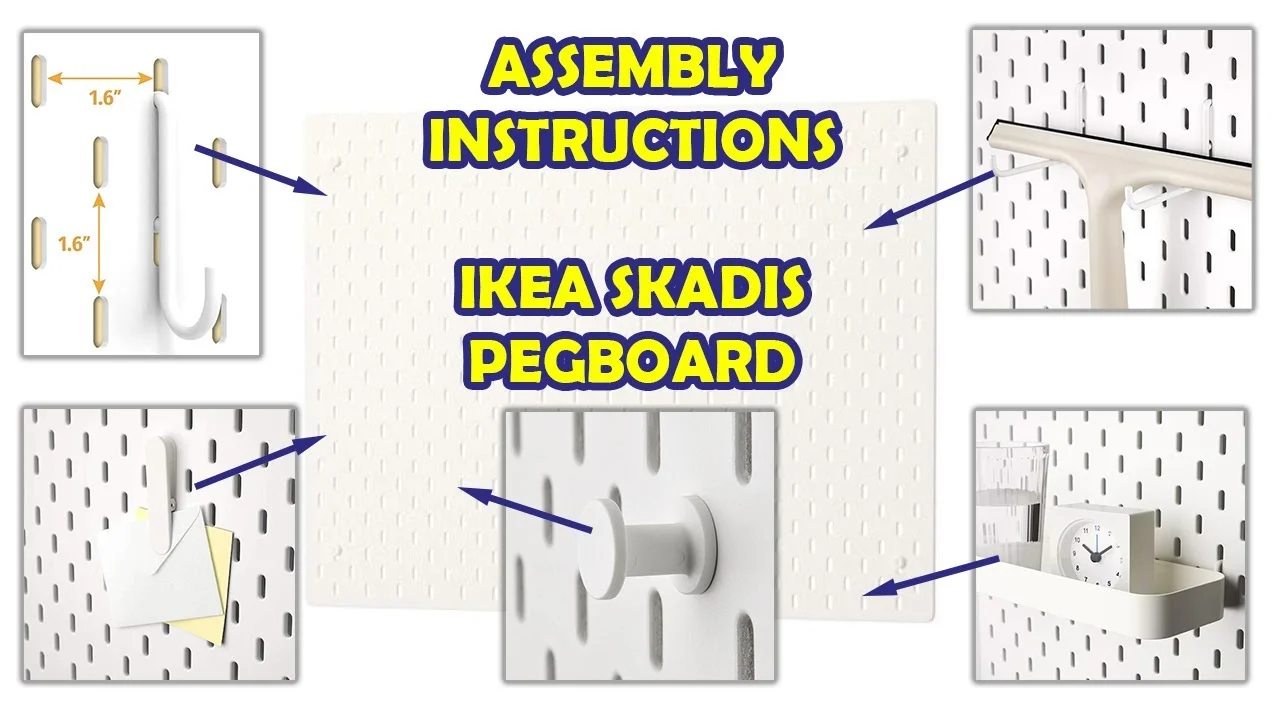
Organizing Items On Pegboard
Organizing items on your Ikea pegboard helps keep your space tidy and efficient. A well-arranged pegboard makes tools and supplies easy to find. It also maximizes available wall space, reducing clutter on desks or counters.
Start by grouping similar items together. Hang frequently used items at eye level for quick access. Use hooks, baskets, and shelves designed for Ikea pegboards to hold different objects.
Choosing The Right Pegboard Accessories
Select accessories that match your storage needs. Hooks are perfect for hanging small tools or scissors. Baskets hold loose items like markers or tape. Shelves can support heavier objects such as jars or boxes.
Arranging Items By Frequency Of Use
Place items you use daily in the most accessible spots. Less-used tools can go higher or lower on the board. This arrangement saves time and effort during your work or craft sessions.
Creating Zones For Different Item Types
Divide the pegboard into zones for categories like crafting, office supplies, or kitchen tools. Label each section if needed. This method keeps your space organized and makes items easier to locate.
Maintaining A Clutter-free Pegboard
Regularly check your pegboard for unused or broken items. Remove what you don’t need to keep the board neat. Rotate items seasonally to keep the setup relevant and functional.
Frequently Asked Questions
How To Attach Ikea Pegboard To Wall?
Mark the wall using a level. Drill holes into studs or drywall. Attach spacers and mounting bar to the pegboard. Secure pegboard with screws onto the wall bracket. Alternatively, use heavy-duty adhesive strips on the mounting bar for a screw-free installation.
How To Hang Up Ikea Pegboard Without Screws?
Use heavy-duty adhesive strips like Command Strips on the back of the pegboard’s mounting bar. Press firmly on a clean wall and wait one hour before hanging. This avoids drilling and holds the IKEA pegboard securely without screws.
Does Ikea Pegboard Require Drilling?
Ikea pegboard usually requires drilling to mount securely using screws and anchors. Alternatively, use strong adhesive strips for a drill-free option.
How To Hang Ikea Pegboard Without Screws Reddit?
Use heavy-duty adhesive strips like Command Strips on the pegboard’s mounting bar and spacers. Press firmly on a clean wall and wait one hour before hanging.
How Do I Mount An Ikea Pegboard On Drywall?
Locate a stud or use drywall anchors, drill holes, then screw the mounting bar to secure the pegboard.
Conclusion
Hanging an Ikea pegboard is simple with the right steps. Choose between screws or adhesive strips based on your wall type. Make sure the wall is clean and level before starting. Attach spacers and mounting bars securely for stability. Allow adhesive to set fully if using strips.
Press the pegboard firmly onto the wall for a strong hold. This setup helps organize your space efficiently and looks neat. Enjoy customizing your pegboard with hooks and shelves. A well-hung pegboard makes tools and supplies easy to reach. Start your project confidently and keep things tidy.
{ “@context”: “https://schema.org”, “@type”: “Article”, “headline”: “How to Hang Ikea Pegboard: Easy Steps for Perfect Wall Storage”, “description”: “Learn how to hang Ikea pegboard by understanding its design, mounting options, and practical uses for organizing tools and accessories efficiently.”, “url”: “https://www.powertoolstoday.com/how-to-hang-ikea-pegboard/”, “datePublished”: “2025-12-12”, “dateModified”: “2026-03-18”, “author”: { “@type”: “Organization”, “name”: “Power Tools Today”, “url”: “https://www.powertoolstoday.com” }, “publisher”: { “@type”: “Organization”, “name”: “Power Tools Today”, “url”: “https://www.powertoolstoday.com” }, “mainEntityOfPage”: { “@type”: “WebPage”, “@id”: “https://www.powertoolstoday.com/how-to-hang-ikea-pegboard/” }, “image”: { “@type”: “ImageObject”, “url”: “https://www.powertoolstoday.com/wp-content/uploads/2025/11/how-to-hang-ikea-pegboard.jpg” } }{ “@context”: “https://schema.org”, “@type”: “Article”, “headline”: “How to Hang Ikea Pegboard: Easy Steps for Perfect Wall Storage”, “description”: “Learn how to hang Ikea pegboard by understanding its design, mounting options, and practical uses for organizing tools and accessories efficiently.”, “url”: “https://www.powertoolstoday.com/how-to-hang-ikea-pegboard/”, “datePublished”: “2025-12-12”, “dateModified”: “2026-03-19”, “author”: { “@type”: “Organization”, “name”: “Power Tools Today”, “url”: “https://www.powertoolstoday.com” }, “publisher”: { “@type”: “Organization”, “name”: “Power Tools Today”, “url”: “https://www.powertoolstoday.com” }, “mainEntityOfPage”: { “@type”: “WebPage”, “@id”: “https://www.powertoolstoday.com/how-to-hang-ikea-pegboard/” }, “image”: { “@type”: “ImageObject”, “url”: “https://www.powertoolstoday.com/wp-content/uploads/2025/11/how-to-hang-ikea-pegboard.jpg” } }nnnn