If you’ve ever struggled to keep your tools or craft supplies organized, hanging a pegboard might be the perfect solution for you. Pegboards give you easy access, clear visibility, and customizable storage right where you need it.
But if you’re wondering how to hang pegboard the right way, you’re in the right place. In this guide, you’ll learn simple, step-by-step tips to mount your pegboard securely and create the perfect space for your hooks and tools. Whether you want to organize your garage, workshop, or craft room, getting this right will save you time and frustration.
Keep reading to discover how to hang your pegboard quickly, neatly, and so it lasts for years to come.
:max_bytes(150000):strip_icc()/how-to-hang-a-pegboard-5214870-hero-01-45e4392f1f2046ab86a6aeb896dc21c2.jpg)
Credit: www.thespruce.com
Choose The Right Pegboard
Choosing the right pegboard is the first step to a successful pegboard project. The right pegboard ensures durability and ease of use. Selecting the proper material, size, and hole pattern matches your needs perfectly. This section helps you understand what to look for in a pegboard.
Material Options For Pegboard
Pegboards come in different materials like wood, metal, and hardboard. Wood pegboards offer strength and a natural look. Metal pegboards provide extra durability and can hold heavier tools. Hardboard pegboards are lightweight and affordable but may not support heavy items well.
Choosing The Right Size
Measure the wall space before buying a pegboard. Pick a size that fits your available area. Larger pegboards offer more space for tools and supplies. Smaller pegboards work well for limited spaces or specific tasks.
Hole Size And Pattern
Standard pegboards have holes spaced 1 inch apart. This spacing fits most hooks and accessories. Some pegboards have smaller or larger holes for special hooks. Choose a hole size that matches your pegboard hooks. A uniform hole pattern helps keep your tools organized.
/how-to-hang-a-pegboard-5214870-hero-01-45e4392f1f2046ab86a6aeb896dc21c2.jpg)
Credit: www.thespruce.com
Gather Tools And Materials
Gathering the right tools and materials sets the stage for a smooth pegboard installation. Prepare everything before starting. This saves time and avoids interruptions.
Collecting materials ensures the pegboard hangs securely and functions well. Tools must be suitable for your wall type and pegboard size.
Tools Needed For Hanging Pegboard
Start with a drill to make holes for screws. Use a level to keep the pegboard straight. A tape measure helps mark exact spots on the wall.
Screwdrivers are essential for tightening screws. A stud finder locates wall studs for strong support. Don’t forget a pencil for marking measurements.
Materials Required For Pegboard Installation
Choose the pegboard size that fits your space. Furring strips or spacers create a gap behind the pegboard. This gap allows hooks to fit and stay secure.
Get screws and wall anchors to hold the pegboard firmly. Wall anchors work well on drywall without studs. Hooks and hangers complete your pegboard setup.
Safety Gear To Protect Yourself
Wear safety glasses to protect your eyes from dust. Use work gloves to avoid splinters and sharp edges. Ear protection is useful when drilling into hard surfaces.
Keep your workspace tidy to prevent trips or accidents. Safety matters as much as the tools and materials.
Measure And Mark Wall Space
Measuring and marking the wall space is the first crucial step to hang a pegboard correctly. Accurate measurements help ensure the pegboard fits well and looks neat. Taking time in this phase saves effort later and avoids mistakes.
Start by choosing the exact spot on the wall where the pegboard will hang. Consider the height and width carefully. Mark the area lightly with a pencil to guide the installation process.
Gather Necessary Tools
Use a tape measure for precise measurements. A pencil is helpful for marking points on the wall. A level ensures the pegboard will hang straight. Prepare these tools before starting.
Measure The Pegboard Dimensions
Check the pegboard’s height and width. Write down these numbers. Confirm the wall space is large enough to hold the pegboard. Leave a small margin for adjustments.
Mark The Wall For Mounting Points
Find the studs in the wall using a stud finder. Mark their locations lightly. These points will support the pegboard securely. Space the marks evenly to hold the pegboard firmly.
Check Level And Alignment
Place the level on the marks to check alignment. Adjust the marks if needed to keep the pegboard straight. A straight pegboard is easier to use and looks better.
Install Spacers Or Furring Strips
Installing spacers or furring strips is a key step in hanging pegboard properly. This creates a gap between the pegboard and the wall. The space allows peg hooks to fit and hold tools securely. Without spacers, hooks cannot grip well and pegboard use becomes limited.
Spacers or furring strips also help with ventilation. This prevents moisture buildup behind the pegboard. It adds durability and keeps your tools safe from rust. The extra depth makes your pegboard more functional and long-lasting.
What Are Furring Strips?
Furring strips are thin wooden strips. They attach to the wall first. Pegboard then mounts on these strips. This raises the pegboard a few inches from the wall. It creates a perfect gap for hooks and accessories.
Furring strips are easy to cut and install. They provide strong support for heavy tools. Use untreated wood to avoid damage over time. Ensure strips are level and evenly spaced for best results.
Using Spacers For Pegboard Installation
Spacers are small blocks or standoffs. They come in wood, plastic, or metal. Attach spacers directly to the wall. Then screw pegboard onto them. Spacers hold the board firmly while keeping the gap.
Spacers are simple and quick to use. They work well for uneven walls. Choose spacer size based on the length of your peg hooks. Typically, 3/4-inch spacers are enough for most setups.
How To Attach Furring Strips Or Spacers
Start by marking the wall studs. Use a level to ensure strips or spacers are straight. Screw furring strips or spacers into the studs. Space them about 16 inches apart for strong support.
Check that the strips or spacers are secure. Then align the pegboard over them. Fasten the pegboard using screws long enough to go through the board and into the strips or spacers. Make sure the board is flush and stable.
Mount Pegboard To Wall
Mounting a pegboard to the wall is a simple way to organize tools and supplies. A properly mounted pegboard stays sturdy and holds hooks well. This section explains how to mount your pegboard step-by-step for best results.
Start by collecting all tools and materials needed. You will need a drill, screws, a level, a stud finder, and spacers or furring strips. Also, have a pencil to mark the wall.
Find Wall Studs
Use a stud finder to locate wall studs behind drywall. Mark the stud positions with a pencil. Mounting the pegboard on studs ensures strong support and prevents damage.
Attach Spacers Or Furring Strips
Attach spacers or furring strips to the wall where you marked the studs. These create a gap between the wall and pegboard. The gap allows hooks to fit and hold tools properly.
Align Pegboard And Secure
Hold the pegboard against the spacers or strips. Use a level to make sure it is straight. Then, drill screws through the pegboard into the spacers and wall studs. Tighten screws firmly to keep the board stable.
Check Stability And Adjust
Test the pegboard by gently pulling and pushing it. If it feels loose, tighten the screws more. Make sure the board does not wobble before hanging items on it.
Secure Pegboard With Screws
Securing pegboard with screws is a reliable way to mount it firmly on your wall. Screws hold the pegboard steady, allowing you to hang tools and accessories safely. This method works well on drywall, wood, and studs behind the wall.
Proper screw placement and using the right hardware are key to a strong hold. It also creates space behind the pegboard for hooks to fit easily. This space is important for pegboard functionality.
Choose The Right Screws And Anchors
Select screws that fit the thickness of your pegboard and wall type. Use wall anchors if you are not drilling into studs. Anchors prevent screws from pulling out and add strength.
Mark Screw Positions On The Pegboard
Measure and mark where the screws will go. Place marks near the edges and center for even support. Spacing screws about 12 inches apart keeps the pegboard stable.
Pre-drill Holes For Easy Installation
Drill pilot holes through the pegboard at the marks. This helps screws go in straight and avoids cracking the board. Use a drill bit slightly smaller than the screw diameter.
Attach The Pegboard To The Wall
Hold the pegboard in place and align the holes with wall marks. Drive screws through the pegboard into the wall anchors or studs. Tighten screws until the board is secure but avoid over-tightening.
Create Space Behind The Pegboard
Use furring strips or spacers between the wall and pegboard. This gap allows hooks to fit properly behind the board. Attach strips to the wall before securing the pegboard with screws.
Test Pegboard Stability
Testing the stability of your pegboard is essential for safety and usability. A stable pegboard holds tools firmly and prevents damage. It also ensures hooks and accessories stay secure during use.
After mounting the pegboard, check if it feels loose or wobbly. Stability issues can cause tools to fall or pegboard to detach from the wall.
Apply Gentle Pressure
Push the pegboard gently with your hands in different spots. This helps detect any weak points or loose screws. A solid pegboard should not move or flex easily.
Check Screw Tightness
Use a screwdriver to tighten all screws securing the pegboard. Loose screws reduce stability and can cause the board to sag. Tighten each screw until the board feels firmly attached.
Inspect Mounting Surface
Look behind the pegboard to ensure it is mounted on solid wall studs or furring strips. Drywall alone may not support heavy loads. Proper mounting surfaces improve stability and durability.
Test With Weight
Hang a few tools or hooks on the pegboard. Observe if the board holds the weight without bending or pulling away from the wall. This simulates real use and confirms stability.
Organize Tools And Accessories
Organizing tools and accessories on a pegboard keeps your workspace tidy and efficient. A well-arranged pegboard helps you find items quickly and saves space. It also protects tools from damage by keeping them off surfaces. Using the pegboard correctly turns clutter into order.
Sort Tools By Type And Size
Group similar tools together. Hang screwdrivers in one area and pliers in another. Arrange tools from smallest to largest for easy access. This makes it simple to spot what you need fast. Sorting reduces time spent searching for tools.
Use Pegboard Hooks And Holders
Select hooks that fit your tools well. Use hooks for hanging wrenches, hammers, and scissors. Add holders for drills, tape measures, and screw sets. Proper hooks keep tools secure and prevent falling. Change hooks as your tool collection grows or shifts.
Label Tool Locations
Label each spot on the pegboard. Use clear, readable labels for each tool type. This helps you return tools to the right place every time. Labels also guide others who use your workspace. A labeled pegboard stays organized longer.
Keep Frequently Used Tools Accessible
Place tools you use most often at eye level. Keep them within arm’s reach to save time. Store less-used tools higher or lower on the board. This setup supports smooth workflow and reduces clutter in busy areas.
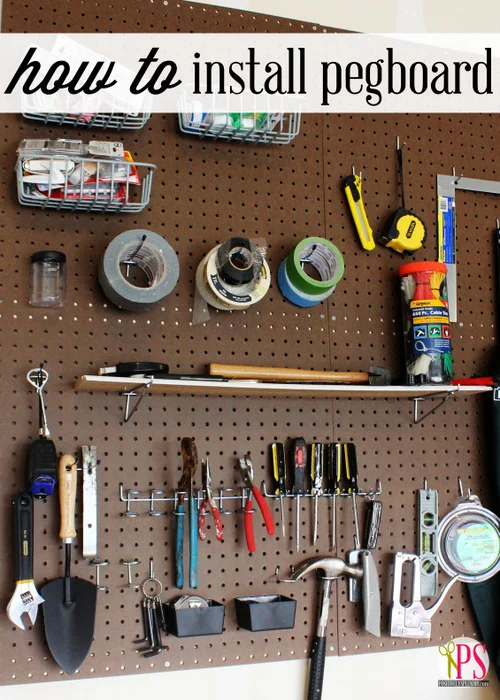
Credit: www.positivelysplendid.com
Frequently Asked Questions
What Is The Best Way To Hang Pegboard?
The best way to hang pegboard is by mounting it on furring strips or spacers. This creates space for hooks to fit securely. Attach strips to studs, then screw the pegboard onto them. Ensure screws are tight and the board is level for durability and easy tool access.
How Much Space Is Needed Behind A Pegboard?
Leave ¾ to 1 inch of space behind the pegboard. This gap allows hooks to securely latch and hold tools effectively. Use furring strips or spacers to create this clearance for better functionality and easy hook placement.
Do You Put Spacers Behind Pegboard?
Yes, spacers go behind pegboard to create gap for hooks to hang properly. Use wood or plastic spacers for secure mounting.
Can I Hang A Pegboard On Drywall?
Yes, you can hang a pegboard on drywall by securing it to wall studs or using anchors. Use spacers to create a gap for hooks.
How Do I Hang A Pegboard Without Drilling Into Walls?
Use adhesive strips or hooks designed for pegboards on smooth, clean surfaces for a drill-free option.
Conclusion
Hanging pegboard is a simple way to organize your space. Follow steps carefully for a strong, secure fit. Use furring strips or spacers to create needed clearance behind the board. This space allows hooks to hold tools or items properly.
Check your work by testing hook stability once installed. Keep screws tight but avoid over-tightening to prevent damage. With these tips, your pegboard will be both functional and neat. Enjoy a tidy, accessible area for all your tools and supplies.
