A level tool is a simple but powerful device that helps you check if a surface is perfectly horizontal (level) or vertical (plumb). Whether you are hanging a picture, installing shelves, or building furniture, using a level tool can make your work look professional and last longer.
Many beginners believe using a level is easy, but there are details that make a big difference in accuracy. In this article, you will learn not only how to use a level tool, but also tips, common mistakes, and what to do in tricky situations.
What Is A Level Tool?
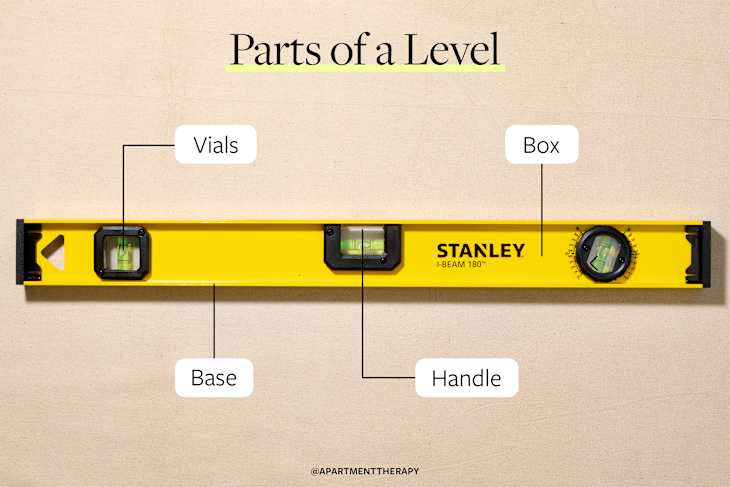
A level tool is usually a straight bar or frame with one or more small tubes, called vials, filled with liquid and a bubble. These vials are carefully set so when the bubble is centered, the tool is perfectly level or plumb. Levels come in many shapes and sizes, from small torpedo levels to long carpenter’s levels and even digital models.
Main Types Of Level Tools
Understanding the main types helps you choose the right one for your project. Here is a comparison:
| Type | Best Use | Typical Length | Special Features |
|---|---|---|---|
| Carpenter’s Level | Framing, shelving, general construction | 24–48 inches | Multiple vials, sturdy frame |
| Torpedo Level | Small spaces, home DIY, plumbing | 6–12 inches | Compact, magnetic base |
| Line Level | Masonry, landscaping | 2–4 inches | Hangs on a string |
| Digital Level | Precision work, cabinetry | 6–24 inches | Digital readout, audio alerts |
| Laser Level | Large spaces, laying tile | N/A | Projects a laser line |
How A Level Tool Works
Each level tool contains one or more vials with a bubble inside. The vials are slightly curved, so the bubble always moves to the highest point. When the bubble is exactly between the two marked lines, the surface is level (horizontal) or plumb (vertical). The accuracy of a level depends on the quality of the vial and the tool’s construction.
Many professionals check both the top and bottom vials when working. This double-check helps catch small errors, especially if the level has been dropped or damaged.
Step-by-step: How To Use A Level Tool
Using a level tool is simple if you follow clear steps. Let’s go through the process:
1. Select The Right Level
Pick a level that matches your project size. For hanging a picture, a torpedo level is enough. For building a deck, use a longer carpenter’s level. Digital and laser levels are best for precision or large projects.
2. Inspect The Level
Check the level for cracks, dirt, or damage. A bent or cracked frame can give false readings. Make sure the vials are clean and the bubble moves freely.
3. Place The Level On The Surface
Put the level flat against the surface you want to check. For a horizontal surface, lay it on top. For a vertical surface, hold it against the side.
- The tool should touch the surface along its whole length.
- Do not press too hard—this can bend the level and affect the reading.
4. Read The Bubble
Look straight at the vial, not from the side. The bubble should be exactly between the two lines for a level or plumb surface.
- If the bubble is off to one side, the surface is not level.
- Adjust the surface until the bubble is centered.
5. Double-check
For best results, rotate the level 180 degrees and check again. This helps spot errors if the vial is not perfectly set in the tool.
6. Mark Or Adjust
Once the bubble is centered, mark the spot or make your adjustments. For shelves, you may need to check both ends to make sure the whole shelf is level.
Using A Level Tool For Different Tasks
Not every job is the same. Here’s how to use a level in common situations:
Hanging A Picture Frame
- Hold the frame where you want it.
- Place the level on top of the frame.
- Move the frame until the bubble is centered.
- Mark the spot for your nails or hooks.
- Hang the frame and check again.
Installing Shelves
- Measure and mark one end of the shelf.
- Use the level to find the correct height for the other end.
- Mark the second spot.
- Install brackets or anchors.
- Place the shelf and check with the level before tightening screws.
Checking A Floor
- Lay the level on the floor.
- Check the bubble.
- Move the level to different spots to check for high or low areas.
Plumbing A Wall Stud
- Hold the level vertically against the stud.
- Make sure the bubble in the vertical vial is centered.
- Adjust the stud position as needed.
Using A Laser Level
- Set up the laser level on a tripod or flat surface.
- Turn it on to project a straight line.
- Use the line as a guide for tile, framing, or hanging objects.
Key Tips For Accurate Results
Many people miss small details that make a big difference. Here are two insights that most beginners overlook:
- Check for warping: Even a good level can give wrong readings if the surface you place it on is warped or dirty. Clean both the level and the work surface before using.
- Temperature matters: Extreme heat or cold can change the shape of both the level and the materials you’re working on. For best accuracy, use the tool at room temperature.
Other practical tips:
- Use both hands to steady the level, especially for long tools.
- Always check the level at more than one spot.
- For wall work, draw a light pencil line using the top edge of the level as a guide.
Common Mistakes And How To Avoid Them
Mistakes with a level tool are easy to make, but also easy to avoid:
- Not checking both directions: Always check horizontal and vertical when installing objects.
- Trusting a dropped level: If your level has fallen, test its accuracy by placing it on a flat surface, noting the bubble position, then flipping it 180 degrees. The bubble should stay in the same place.
- Using a level that’s too short: Short levels are less accurate over longer distances. Use the longest level that fits your job.
- Looking from the side: Reading the bubble from an angle can fool your eyes. Always look straight at the vial.
- Ignoring calibration: Some digital and laser levels need regular calibration. Follow the manufacturer’s instructions.
When To Use Each Type Of Level Tool
With so many level tools on the market, it’s easy to pick the wrong one. Here’s a side-by-side comparison to help you decide:
| Project | Best Level Tool | Why |
|---|---|---|
| Hanging a picture | Torpedo Level | Small, easy to handle |
| Building a deck | Carpenter’s Level | Long, checks wider areas |
| Laying tile | Laser Level | Projects straight, long lines |
| Checking a wall | Digital Level | Precise angle measurement |
| Outdoor landscaping | Line Level | Works with strings for slopes |
Caring For Your Level Tool
A level tool will last for years if you take care of it:
- Store flat and away from heat or sunlight.
- Clean the vials and frame after every use.
- Avoid dropping the level.
- Check calibration from time to time, especially if the tool is used a lot.
If you notice any cracks, leaks, or a bubble that does not move, it is time to replace your level.
Credit: www.apartmenttherapy.com
Advanced Uses And Pro Tips
Some tasks require a bit more skill. For example, when leveling across a long distance (like a long shelf or a row of tiles), use a chalk line or a laser level for best accuracy. If you need to level many objects at the same height, measure up from the floor, mark the spots, and then double-check with the level.
A less-known trick is to use a shim (a thin, wedge-shaped piece of material) to make small adjustments under objects until the bubble is centered. This is useful when leveling furniture or appliances on uneven floors.
For digital levels, learn how to switch between units (degrees, percent, mm/m) for the best results in your type of work. Reading the manual carefully can save time and mistakes.
Why Accuracy Matters
A shelf that looks level to the eye can be off by a few degrees—enough to make objects slide off, doors not close properly, or water not drain as it should. Professional builders use level tools because they know even a small error can cause big problems later.
For home DIY, using a level shows care and skill, and avoids having to redo work.
Credit: www.youtube.com
Level Tool Alternatives
While the level tool is the best choice, there are a few alternatives:
- Smartphone apps: Many phones have built-in leveling apps. They can be helpful in a pinch but are less accurate than a real tool.
- Water level: A simple hose filled with water can help level over long distances, but it’s slow and messy.
- Square and measuring tape: For checking right angles, a square is useful, but it won’t check for level.
Still, nothing matches the precision and speed of a good quality level tool.
Safety Precautions
Using a level is generally safe, but in construction settings, always:
- Avoid working on unstable ladders.
- Wear gloves when working with sharp edges.
- Store your level tool securely so it doesn’t become a trip hazard.

Credit: www.youtube.com
Where To Learn More
For detailed guides and advanced techniques, visit the official Wikipedia page on spirit levels.
Frequently Asked Questions
What Is The Difference Between A Level And A Plumb Line?
A level checks if a surface is horizontal, while a plumb line checks for vertical. Both are used in construction, but a level is faster and easier for most jobs.
Can I Use My Smartphone As A Level Tool?
Yes, most smartphones have built-in sensors and apps that mimic a level. However, for best accuracy, use a real level tool, especially for important projects.
How Often Should I Check My Level Tool’s Accuracy?
Check your level’s accuracy every few months, or after you drop it. Place it on a flat surface, read the bubble, flip it 180 degrees, and read again. The bubble should be in the same spot.
Is A Longer Level Always Better?
A longer level is more accurate for big surfaces but can be harder to use in small spaces. Choose the right length for your project.
What Does It Mean If The Bubble Is Stuck?
If the bubble in the vial is stuck, the level tool might be damaged or dirty. Try cleaning it, but if the bubble does not move freely, replace the tool.
Using a level tool well is a skill that improves with practice. It’s a simple device, but the results show in every straight, even project you finish. Take care of your level, use it wisely, and your work will always stand out.
