Last Updated: March 21, 2026
If you’re looking for a simple way to bring order to your workspace, craft room, or garage, pegboards might just be your new best friend. Imagine having all your tools and supplies neatly displayed, easy to find, and right where you need them.
You don’t have to waste time digging through drawers or boxes anymore. By learning how to use a pegboard effectively, you can customize your storage to fit your exact needs, making your daily tasks smoother and more enjoyable. Ready to transform your clutter into a clean, organized space?
Keep reading, and you’ll discover step-by-step tips to set up and make the most out of your pegboard.
/how-to-hang-a-pegboard-5214870-hero-01-45e4392f1f2046ab86a6aeb896dc21c2.jpg)
Credit: www.thespruce.com
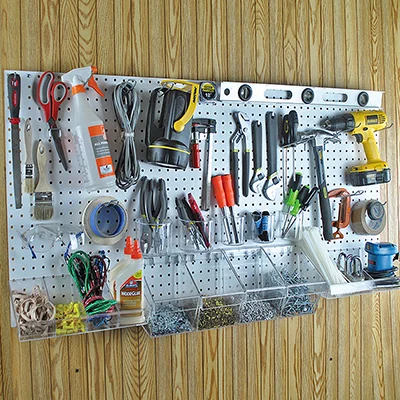
Pegboard Basics
Pegboard basics help you organize tools and supplies neatly. Pegboards have many small holes in a grid pattern. These holes hold hooks, shelves, and baskets. You can arrange your items in any way that fits your needs.
The pegboard must be mounted with space behind it. This space allows hooks to fit securely in the holes. It keeps items stable and easy to access. The system is flexible and easy to change anytime.
What Is A Pegboard?
A pegboard is a board with evenly spaced holes. It is often made from wood, metal, or hard plastic. These holes let you insert different types of hooks and holders. The pegboard turns a wall into a storage area.
How To Mount A Pegboard
Mount the pegboard on a wall with a small gap behind it. Use wooden strips or spacers to create this gap. The gap allows hooks to fit fully into the holes. Secure the board with screws to keep it sturdy.
Choosing Accessories
Pick hooks, shelves, or baskets that fit your items. Hooks hold tools like hammers and screwdrivers. Shelves carry heavier or flat items. Baskets store small objects like nails or screws. Mix and match accessories for best use.
Organizing On The Pegboard
Place heavier items lower on the board for safety. Keep frequently used tools within easy reach. Group similar items together for quick finding. Change the layout as your needs change. The pegboard adapts to your workspace.
:max_bytes(150000):strip_icc()/how-to-hang-a-pegboard-5214870-hero-01-45e4392f1f2046ab86a6aeb896dc21c2.jpg)
Credit: www.thespruce.com
Choosing The Right Pegboard
Choosing the right pegboard is key to a neat and useful space. The right pegboard holds your tools safely and keeps your area tidy. Different pegboards suit different needs and locations. Selecting the proper size, material, and hole pattern improves your pegboard’s function and look.
Consider where you will place the pegboard and what you want to store. This helps pick a pegboard that fits your space and items. A well-chosen pegboard makes organizing simple and efficient.
Size And Shape
Measure the wall or area for your pegboard first. Choose a size that fits well without crowding the space. Square or rectangular pegboards are common. Pick a shape that matches your wall and storage needs. Bigger pegboards offer more space but need more wall room.
Material Types
Pegboards come in wood, metal, and hardboard materials. Wood pegboards look natural and are sturdy. Metal pegboards resist rust and last long in damp areas. Hardboard pegboards are affordable and easy to paint. Pick a material that matches your style and use conditions.
Hole Size And Pattern
Standard pegboard holes are 1/4 inch or 1/8 inch wide. Larger holes hold heavier tools with strong hooks. Smaller holes fit light accessories and small hooks. The hole pattern is usually a square grid. Check that holes line up with your hooks and baskets for easy fitting.
Tools And Materials Needed
Gathering the right tools and materials is the first step to using a pegboard effectively. Proper preparation makes installation smooth and ensures your pegboard holds your items securely. This section lists all essentials to start your pegboard project with confidence.
Pegboard Panel
Choose a pegboard panel that fits your space. Most panels are made of wood, metal, or hardboard. Ensure it has evenly spaced holes for hooks and accessories. Standard sizes simplify mounting and accessory fitting.
Mounting Hardware
You need screws, anchors, and spacers to mount the pegboard. Anchors hold the screws firmly in drywall. Spacers create a gap between the wall and pegboard. This gap allows hooks to fit properly behind the board.
Hooks And Accessories
Select hooks that match the items you want to hang. Common types include L-hooks, straight hooks, and baskets. Shelves also work for larger items. Pick accessories based on your storage needs.
Tools For Installation
Gather a drill, screwdriver, level, and tape measure. A drill makes screw holes quickly. The screwdriver tightens screws securely. Use a level to keep the pegboard straight. Measure carefully for precise placement.
Protective Gear
Wear safety goggles and gloves during installation. Goggles protect your eyes from dust and debris. Gloves shield your hands from sharp edges and splinters. Safety gear prevents accidents and keeps you comfortable.
Mounting The Pegboard
Mounting the pegboard correctly is key for efficient use. It ensures accessories fit well and the board holds securely. Proper installation keeps tools organized and easy to reach. This section explains essential steps for mounting your pegboard.
Spacing For Accessories
Leave a small gap between the pegboard and the wall. This space allows hooks and baskets to fit easily. Without this gap, accessories will not slide in or lock properly. Use wooden furring strips or spacers to create this gap. The ideal distance is about ¼ to ½ inch. This spacing ensures your tools hang straight and stay stable.
Securing To Wall Studs
Attach the pegboard to wall studs for strong support. Studs hold the board and heavy tools safely. Use a stud finder to locate them behind drywall. Drill pilot holes through the pegboard and into the studs. Use screws long enough to go through the board and firmly into the studs. Avoid screwing only into drywall; it won’t hold weight well. Secure the board at multiple points for even support and stability.
Selecting Accessories
Selecting the right accessories is key to making your pegboard practical and neat. Accessories turn a simple pegboard into a customized storage system. They help hold tools, supplies, and other items securely and visibly. Choosing wisely can save space and improve your workflow.
Hooks And Hangers
Hooks and hangers are the most common pegboard accessories. They come in various shapes and sizes. Use simple hooks for hanging tools like hammers or screwdrivers. Double hooks hold larger items such as wrenches or pliers. S-hooks are flexible and easy to move around. Pick hooks that fit your items well and support their weight safely.
Baskets And Shelves
Baskets add storage for small or loose items. They keep screws, nails, and craft supplies organized. Mesh or wire baskets allow you to see contents easily. Shelves provide flat surfaces for boxes or heavier tools. Choose baskets and shelves based on what you plan to store. They help keep your workspace tidy and accessible.
Specialty Holders
Specialty holders are designed for specific tools or items. Examples include drill holders, tape dispensers, or scissors holders. These accessories keep frequently used tools within easy reach. Specialty holders increase efficiency and protect your tools from damage. Find holders that match the tools you use most often.
Organizing Items Efficiently
Organizing items efficiently on a pegboard transforms clutter into order. This system keeps tools and supplies visible and easy to access. It saves time and space, especially in busy work areas. Proper organization also protects your items and extends their life. The key is to arrange everything logically and neatly. Below are simple ways to organize your pegboard for the best use.
Grouping Similar Tools
Place tools of the same type together for quick access. For example, hang all screwdrivers in one area. Keep wrenches, pliers, and hammers in their own sections. This grouping reduces the time spent searching for items. Use hooks or small baskets to hold smaller tools. Labeling each group can help maintain order over time.
Maximizing Vertical Space
Use the full height of your pegboard to save room. Hang longer tools like saws or levels vertically. Place frequently used tools at eye level for easy reach. Use baskets or shelves for small items that can’t hang. Stacking vertically frees up bench and drawer space. This method keeps your workspace clear and efficient.
Customizing And Rearranging
Customizing and rearranging your pegboard lets you keep your workspace tidy and efficient. You can change the layout anytime to fit new tools or supplies. This flexibility saves time and makes your work easier. Each pegboard accessory can be moved or swapped quickly without tools. This section explains how to adjust layouts and add locks for security.
Adjusting Layouts
Start by removing accessories from the pegboard holes. Plan where each tool or item fits best. Move hooks, shelves, and baskets to new positions. This helps maximize space and accessibility. Keep frequently used tools within easy reach. Group similar items together for faster work. Adjusting layouts is simple and helps keep order.
Adding Locks For Security
Some pegboard accessories come with locking features. Use locks to secure valuable or sharp tools. Locks prevent items from falling or being taken. Choose locks that fit your pegboard hooks or shelves. Install locks by clipping them onto accessories. This adds safety and peace of mind to your setup.
Credit: www.homedepot.com
Maintenance And Upkeep
Maintaining your pegboard keeps it functional and looking good. Regular care helps avoid damage and extends its life. Simple upkeep ensures your tools stay organized and easy to find.
Cleaning The Pegboard Surface
Dust and dirt can build up on the pegboard. Use a soft cloth to wipe it down regularly. For tougher grime, a damp cloth with mild soap works well. Avoid soaking the board to prevent warping.
Inspecting Hooks And Accessories
Check hooks and holders for rust or bending. Replace any damaged parts quickly to keep items secure. Tighten loose accessories to prevent accidents and maintain stability.
Preventing Moisture Damage
Keep the pegboard in a dry area to avoid moisture issues. If your space is humid, consider using a dehumidifier. Moisture can cause wooden pegboards to swell and metal hooks to rust.
Rearranging For Efficiency
Periodically rearrange hooks and baskets for better access. This also helps spot any wear or damage early. Adjusting the layout keeps your workspace neat and functional.
Frequently Asked Questions
How Does A Pegboard Work?
A pegboard works by mounting on a wall with a gap behind it. Hooks and accessories fit into holes, holding tools vertically. You can easily rearrange items for flexible, customizable storage and keep tools within reach. Locks secure accessories to prevent slipping or falling.
How To Hang Things On A Pegboard?
Mount the pegboard on the wall with spacers to create a gap. Insert hooks or baskets into holes. Hang items on accessories and rearrange as needed. Use clips to secure accessories for stability.
Do You Need Space Behind A Pegboard?
Yes, leave a small gap behind pegboard to allow hooks and accessories to fit securely. This space ensures easy attachment and removal of items.
What Do People Put On Pegboards?
People put tools, craft supplies, kitchen utensils, gardening equipment, and small hardware on pegboards using hooks, baskets, or shelves for easy access and organization.
What Is A Pegboard And How Does It Work?
A pegboard is a perforated board used to hang hooks and shelves for easy organization.
Conclusion
Using a pegboard makes organizing tools and supplies simple. You can easily move hooks and baskets to fit your needs. The small gap behind the board helps accessories stay secure. This setup saves space and keeps items visible and reachable.
Try arranging your pegboard to match your work style. Pegboards offer a flexible, neat solution for any workspace.
{ “@context”: “https://schema.org”, “@type”: “Article”, “headline”: “How to Use Pegboard: Ultimate Guide to Organize Like a Pro”, “description”: “Learn how to use pegboard to organize tools and supplies efficiently by understanding its setup, hooks, and versatile storage options for various spaces.”, “url”: “https://www.powertoolstoday.com/how-to-use-pegboard/”, “datePublished”: “2025-12-02”, “dateModified”: “2026-03-18”, “author”: { “@type”: “Organization”, “name”: “Power Tools Today”, “url”: “https://www.powertoolstoday.com” }, “publisher”: { “@type”: “Organization”, “name”: “Power Tools Today”, “url”: “https://www.powertoolstoday.com” }, “mainEntityOfPage”: { “@type”: “WebPage”, “@id”: “https://www.powertoolstoday.com/how-to-use-pegboard/” }, “image”: { “@type”: “ImageObject”, “url”: “https://www.powertoolstoday.com/wp-content/uploads/2025/11/how-to-use-pegboard.webp” } }{ “@context”: “https://schema.org”, “@type”: “Article”, “headline”: “How to Use Pegboard: Ultimate Guide to Organize Like a Pro”, “description”: “Learn how to use pegboard to organize tools and supplies efficiently by understanding its setup, hooks, and versatile storage options for various spaces.”, “url”: “https://www.powertoolstoday.com/how-to-use-pegboard/”, “datePublished”: “2025-12-02”, “dateModified”: “2026-03-19”, “author”: { “@type”: “Organization”, “name”: “Power Tools Today”, “url”: “https://www.powertoolstoday.com” }, “publisher”: { “@type”: “Organization”, “name”: “Power Tools Today”, “url”: “https://www.powertoolstoday.com” }, “mainEntityOfPage”: { “@type”: “WebPage”, “@id”: “https://www.powertoolstoday.com/how-to-use-pegboard/” }, “image”: { “@type”: “ImageObject”, “url”: “https://www.powertoolstoday.com/wp-content/uploads/2025/11/how-to-use-pegboard.webp” } }nnnn