Are you tired of digging through cluttered drawers or boxes every time you need a tool? Organizing your tools on a pegboard can transform your workspace into a neat, efficient area where everything is easy to find.
Imagine grabbing the right screwdriver or wrench at a glance, saving you time and frustration. In this guide, you’ll discover simple, practical steps to arrange your tools by size and use, choose the right hooks and accessories, and mount your pegboard securely.
Ready to turn chaos into order and make your projects smoother? Keep reading to learn how to set up the perfect tool pegboard that works for you.

Credit: www.homedepot.com
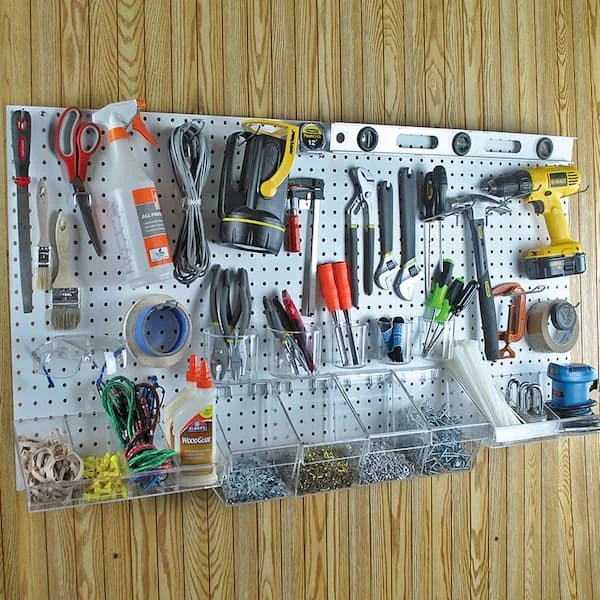
Sort Tools By Category
Sorting tools by category is the first step to an organized pegboard. It makes finding and storing tools easier. Grouping similar tools together creates a neat and efficient workspace.
Start by sorting your tools into broad categories. This helps you see what you have and plan the layout better. Categories can include hand tools, power tools, and fasteners.
Sort Tools
Separate all your tools into clear categories. For example, put all screwdrivers in one group. Keep wrenches, pliers, and hammers in their own groups too. Sorting first saves time later.
Group By Size
Arrange tools by size within each category. Place larger, heavier tools lower on the pegboard. This keeps the pegboard balanced and safe. Smaller tools go higher for easy reach.
Consider Frequency Of Use
Put your most-used tools at eye level. These tools should be easy to grab quickly. Less-used tools can go higher or lower on the pegboard. This setup speeds up your work process.
Draw A Plan
Lay tools on the floor before hanging them. Try different layouts to see what fits best. This planning step prevents holes and helps maximize space. Think of it as a tool puzzle.
Group Tools By Size
Grouping tools by size on your pegboard improves both order and access. It keeps your workspace neat and safe.
Tools of similar size fit together better and look more organized. You can find what you need faster.
Sort Tools By Size
Start by measuring your tools or estimating their size. Separate them into small, medium, and large groups. This helps you decide where each tool should go on the pegboard.
Place Larger Tools At The Bottom
Large, heavy tools belong near the bottom of the pegboard. This placement prevents the pegboard from tipping and makes heavier tools easier to grab safely.
Arrange Smaller Tools At Eye Level
Keep small and medium tools at or near eye level. This makes them easy to see and reach quickly. It also saves space for larger tools below.
Use Pegboard Accessories For Size Variation
Hooks, baskets, and shelves come in different sizes to hold various tools. Choose accessories that fit each tool’s size for secure storage and a clean look.
Prioritize Frequent Use
Prioritizing frequent use is key when organizing tools on a pegboard. It saves time and effort by keeping your most-needed tools within easy reach. This way, you avoid searching through clutter or moving other tools out of the way. Positioning tools based on how often you use them improves your workflow and keeps your workspace tidy.
Sort Tools By Frequency
Start by separating your tools into groups based on how often you use them. Daily use tools go into one group. Weekly or occasional tools go into another. This helps you decide which tools deserve prime spots on the pegboard.
Place Frequent Tools At Eye Level
Put your most-used tools at eye level. This makes grabbing them quick and easy. Avoid bending or stretching to reach these tools. Less-used tools can go higher or lower on the board.
Use Clear Labels And Outlines
Mark spots for your frequent tools with labels or outlines. This keeps them organized and easy to find. It also helps you return tools to their proper place after use, maintaining order.
Keep Heavy Tools Lower
Heavy tools should be placed on the lower part of the pegboard. This prevents accidents and makes lifting safer. Lighter, frequently used tools belong higher, close to your hands.
Credit: www.homedepot.com
Plan Layout On Floor
Planning your tool layout on the floor is a smart first step before mounting anything on the pegboard. It helps you visualize where each tool will go. This step saves time and prevents cluttered pegboards. You get a clear idea of the space each tool needs. It also shows how to group tools by category and size efficiently.
Arrange all your tools on the floor near the pegboard area. This setup lets you move items around freely. You can try different layouts until you find the best one. This approach makes the pegboard neat and functional.
Group your tools into categories such as hand tools, electrical tools, and hardware. Sorting makes it easier to find tools later. Keep similar items together for quick access. This step is key for an organized pegboard.
Arrange tools by size within each category. Place large and heavy tools at the bottom. Smaller and lighter tools go higher up. This method keeps the pegboard safe and balanced.
Consider Tool Frequency
Put your most-used tools at eye level. This placement makes grabbing tools fast and easy. Less-used tools can go in harder-to-reach spots. This setup improves your workflow.
Draw A Floor Plan
Lay out your tools on the floor like a puzzle. Move them around to find the best fit. This trial helps avoid mistakes on the pegboard. Think of it as creating a visual map of your workspace.
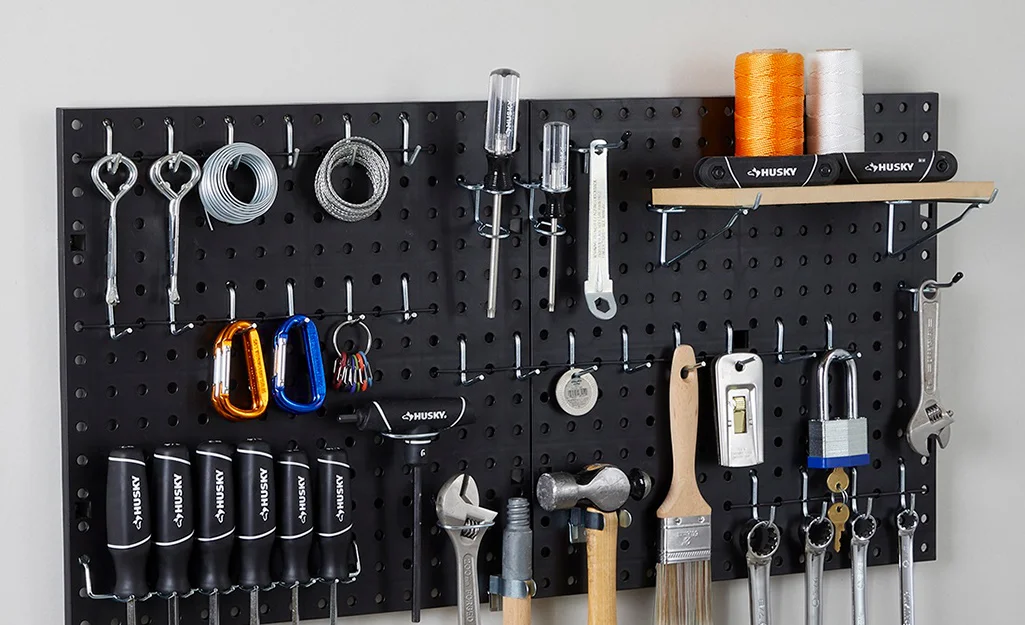
Choose Right Hooks
Choosing the right hooks is key to a well-organized pegboard. Hooks hold your tools firmly and keep them easy to reach. Picking hooks that fit your tools saves space and prevents damage.
Different hooks serve different purposes. Some hold heavy tools, while others work best for small items. Using the correct hook type keeps your pegboard tidy and safe.
Types Of Pegboard Hooks
There are many hook types for pegboards. Straight hooks hold hammers and wrenches. Curved hooks secure pliers and scissors. Loop hooks are perfect for tape measures and cords. Specialty hooks fit unique tools like screwdrivers or drills.
Match Hooks To Tool Weight
Heavy tools need strong hooks. Look for hooks made of thick metal. Light tools work well on thinner hooks. Using the right hook strength stops tools from falling.
Consider Hook Size And Shape
Hooks come in many sizes. Small hooks fit tiny tools like screwdrivers. Large hooks hold big items like saws. Choose hooks that match your tool shape. This prevents tools from slipping off.
Use Multi-prong Hooks For Better Support
Multi-prong hooks offer more grip. They spread the tool’s weight evenly. Use these for bulky or heavy tools. They keep tools steady and prevent wobbling.
Test Hook Placement Before Hanging
Try hooks on your pegboard before hanging tools. Move hooks around for best fit. This helps avoid overcrowding and makes tools easy to grab. Adjust hook positions until the layout feels right.
Credit: www.homedepot.com
Add Bins And Shelves
Adding bins and shelves to your pegboard boosts its storage power. They create extra space for small parts and tools that hooks cannot hold well.
Bins help keep screws, nails, and other tiny items organized and easy to reach. Shelves provide a flat surface for heavier tools or containers.
Add Small Bins For Loose Items
Use small plastic bins that hang directly on the pegboard. These bins hold screws, washers, and bits neatly. Label each bin to find items quickly.
Bins prevent small pieces from getting lost on your workbench or floor. Choose bins with clear sides to see the contents easily.
Install Shelves For Larger Tools
Attach sturdy shelves to the pegboard for bulky tools like drills or paint cans. Shelves keep these tools off the floor and within arm’s reach.
Pick shelves that fit your pegboard holes and can carry the weight needed. Secure shelves firmly to avoid accidents.
Combine Bins And Shelves For Maximum Use
Place bins below shelves to create a layered storage system. This setup uses vertical space smartly and keeps everything visible.
Mixing bins and shelves helps organize tools of all sizes. It also makes your workspace tidy and efficient.
Secure Hooks And Tools
Securing hooks and tools on a pegboard keeps your workspace tidy and safe. Properly fixed hooks prevent tools from falling or shifting. This protection extends the life of your tools and avoids accidents. Tools that stay in place also help you find what you need faster. Use the right hooks and fasteners for each tool’s weight and size. Adjust hook positions carefully to balance stability and accessibility.
Choose The Right Hooks For Each Tool
Select hooks that fit the tool’s shape and weight. Heavy tools need strong, thick hooks to hold them securely. Small hooks work well for light tools like screwdrivers or pliers. Specialty hooks exist for items like hammers or tape measures. Using the correct hook type prevents tools from slipping or falling.
Test Hook Stability Before Hanging Tools
Press hooks firmly into the pegboard holes to ensure a tight fit. Wiggle hooks gently to check for looseness. Loose hooks can cause tools to drop unexpectedly. Use pegboard anchors or locking clips for extra security on heavier items. Testing hook stability avoids damage and keeps the pegboard neat.
Arrange Tools To Avoid Overcrowding
Space hooks evenly to give each tool room to hang freely. Avoid placing hooks too close together; it makes tools hard to grab. Leave some empty holes between hooks for future tool additions. Proper spacing helps prevent tools from bumping or falling off. A well-arranged pegboard looks clean and works better.
Secure Tools With Additional Supports
Use tool holders, clips, or bins for items that don’t hang well. Shelves or trays can hold small parts or loose tools safely. Velcro straps or rubber bands keep cords and hoses tidy on the pegboard. Extra supports improve organization and stop tools from shifting or falling. Combine hooks and supports for a versatile storage system.
Mount Pegboard Properly
Mounting your pegboard correctly ensures it stays secure and supports your tools safely. A well-mounted pegboard prevents wobbling and damage to your wall. It also makes hanging and removing tools easier.
Start with choosing the right location, preferably a sturdy wall. Avoid drywall without studs behind it. Solid backing will hold the weight of your tools better.
Choose The Right Wall And Height
Find a wall with wooden studs behind it. Use a stud finder to locate them. Mount the pegboard on studs for strong support. Pick a height that suits your reach for easy access.
Use Spacers To Create Gap
Attach spacers between the wall and pegboard. This gap allows hooks to fit properly. It also prevents your tools from scratching the wall. Spacers can be made from wood or plastic.
Secure The Pegboard With Screws
Use screws long enough to go through the pegboard and into studs. Space screws about every 12 inches for stability. Make sure the pegboard is level before tightening screws.
Check For Stability Before Use
After mounting, test the pegboard’s strength. Push and pull gently to check for movement. Tighten screws if it feels loose. A stable pegboard keeps your tools safe and organized.
Frequently Asked Questions
What Tools Work Best For Pegboard Organization?
Hand tools, screwdrivers, pliers, and small power tools fit well on pegboards.
How Do I Arrange Tools On A Pegboard?
Group tools by type and size; place frequent-use tools at eye level.
What Accessories Help Organize Tools On Pegboard?
Use hooks, bins, shelves, and spacers to hold and protect your tools.
How Can I Plan My Pegboard Layout Effectively?
Lay tools on the floor first to try different arrangements before hanging.
How To Keep Heavy Tools Safe On A Pegboard?
Place heavy tools like drills on lower hooks to prevent accidents.
Conclusion
Organizing tools on a pegboard keeps your workspace neat and efficient. Group tools by type and size for easy access. Place frequently used tools at eye level for convenience. Plan your layout on the floor before hanging anything. Use hooks, bins, and shelves to hold everything securely.
This simple method saves time and reduces clutter. A well-organized pegboard helps you work faster and with less frustration. Try these tips to create a tidy and functional tool area today.
Related reading: what needle nose pliers are used for.
Related reading: what slip joint pliers are used for.
Related reading: how to use hog ring pliers.
Related reading: torque-wrench/”>how to use a torque wrench.
