If you’re serious about woodworking or tackling home projects, having a sturdy, well-designed miter saw table can change the way you work. Imagine making precise cuts with ease, keeping your workspace organized, and moving your saw wherever you need it.
Building your own miter saw table might sound complicated, but it’s easier than you think—and it saves you money while giving you a custom setup tailored to your needs. In this guide, you’ll discover simple steps, practical tips, and smart design ideas that will help you build the perfect miter saw table for your workshop.
Ready to take control of your cutting projects and boost your efficiency? Let’s get started!
Materials And Tools
Building a sturdy miter saw table starts with gathering the right materials and tools. Choosing quality wood and strong hardware ensures your table will last. The tools you use make the assembly easier and more precise.
Focus on materials that balance strength and weight. The right tools help you cut, drill, and join parts accurately. Preparing everything before you start saves time and reduces mistakes.
Wood And Building Materials
Use plywood or MDF boards for the tabletop. These materials provide a smooth, flat surface. Select 2×4 lumber for the frame to give solid support. Choose wood that is free from cracks or warping.
Fasteners And Hardware
Get wood screws that fit your lumber thickness. Use bolts and washers for attaching heavy parts. Hinges may be needed if your table has foldable sections. Sandpaper helps smooth edges and surfaces.
Power Tools
A circular saw or miter saw is essential for cutting wood pieces. A drill with screwdriver bits speeds up fastening. A sander or sanding block prepares surfaces for finishing. Clamps hold pieces steady during assembly.
Measuring And Marking Tools
A tape measure ensures accurate dimensions. Use a carpenter’s square to check right angles. A pencil marks cutting and drilling points clearly. Level tools keep the table even and flat.
Choosing The Right Location
Choosing the right location for your miter saw table is crucial for safety and efficiency. A well-placed table makes your work easier and more comfortable. The right spot helps you move and cut materials without struggle.
Consider space, lighting, and accessibility when selecting the place. The area should fit your saw and allow room for long boards. Good lighting helps you see cuts clearly and avoid mistakes.
Space Requirements For Your Miter Saw Table
Ensure enough space around the table to handle large pieces of wood. Leave at least two feet on each side for support. This space prevents accidents and keeps your work smooth.
Think about the room for your tools and accessories too. A clutter-free area helps keep your work organized and safe.
Lighting Considerations
Natural light is best but not always available. Use bright, white LED lights above your workspace. Good lighting reduces eye strain and improves cutting accuracy.
Avoid shadows on the cutting area. Position lights so they shine directly on the saw blade and table surface.
Accessibility And Workflow
Place the table near your main workbench or tool storage. This setup saves time moving materials back and forth. A clear path to the table avoids tripping hazards.
Think about where you stand when cutting. You should have a stable, comfortable position without bending or stretching too much.
Building The Frame
Building the frame forms the foundation of your miter saw table. A strong frame supports the saw and workpieces. It keeps the table stable and safe during cutting. Focus on durability and proper dimensions to fit your saw perfectly.
Using quality wood or metal ensures lasting strength. Measure twice and cut once for precise assembly. A well-built frame makes the rest of the project easier and more reliable.
Choosing Materials For The Frame
Select sturdy materials like plywood, hardwood, or metal tubing. Plywood is affordable and easy to work with. Hardwood offers extra strength but costs more. Metal frames provide excellent durability but need welding skills. Consider what tools you have and your budget.
Cutting The Frame Pieces
Measure all parts carefully before cutting. Cut the legs and supports to the right lengths. Use a saw that gives clean, straight cuts. Label each piece to avoid confusion during assembly. Smooth rough edges with sandpaper to prevent splinters.
Assembling The Frame
Arrange the cut pieces on a flat surface. Join the legs and horizontal supports using screws or bolts. Drill pilot holes to prevent wood from splitting. Check for squareness with a carpenter’s square. Tighten all fasteners firmly for a sturdy frame.
Adding Reinforcements
Reinforce corners with brackets or additional blocks. This boosts stability and reduces wobbling. Add cross braces between legs for extra support. Secure all reinforcements tightly. A solid frame prevents movement during precise cuts.
Credit: www.familyhandyman.com
Adding The Saw Mount
Adding the saw mount is a critical step in building your miter saw table. It ensures the saw stays secure and stable during use. Proper mounting improves safety and cutting accuracy.
Focus on creating a strong, flat base where the saw will sit. The mount must fit the saw model perfectly to avoid wobbling or movement.
Choosing The Right Mounting Surface
Select a thick, sturdy piece of plywood or MDF for the mounting surface. It should be at least 3/4 inch thick to support the saw’s weight.
Ensure the surface is smooth and level. Sand any rough spots to avoid uneven mounting.
Marking The Saw Base Holes
Place the saw upside down on the mounting surface. Align it where you want it fixed.
Use a pencil to mark the screw holes on the wood. Double-check the marks before drilling.
Drilling Pilot Holes
Drill small pilot holes on the marked spots. These holes prevent the wood from splitting.
Use a drill bit slightly smaller than the screws you will use.
Attaching The Saw To The Mount
Use screws recommended by the saw manufacturer. Drive the screws into the pilot holes slowly.
Ensure the saw sits flush and tight against the mounting surface. Avoid overtightening to prevent damage.
Checking Stability And Alignment
After mounting, check the saw for any movement. Tighten screws if needed.
Use a carpenter’s square to verify the saw blade aligns properly with the table edges.
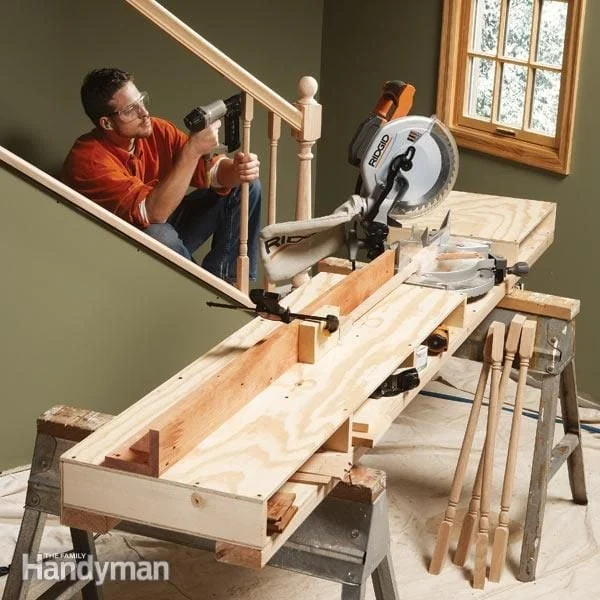
Installing Extensions And Supports
Installing extensions and supports is a key step in building a miter saw table. It increases the workspace and stabilizes your cuts. Extensions help hold longer pieces of wood, making your work easier and safer.
Supports provide strength to the extensions, so they do not wobble or sag. Proper installation ensures smooth and accurate cuts every time. Let’s explore how to install these parts effectively.
Choosing The Right Materials For Extensions
Select sturdy plywood or hardwood for extensions. Avoid soft or thin wood that may bend under weight. The surface should be smooth for easy sliding of wood pieces. Use materials that match your main table for a uniform look.
Measuring And Cutting The Extensions
Measure the length needed for your workspace carefully. Cut the extensions to the exact size to fit your table. Use a straight edge and sharp saw for clean cuts. Proper sizing ensures stability and comfort during work.
Attaching The Extensions To The Table
Secure extensions using screws or bolts for a strong hold. Place them flush with the table surface to avoid gaps. Use brackets or angle irons underneath for extra support. Check that the extensions are level before tightening.
Installing Support Legs Or Braces
Add legs or braces under the extensions to prevent sagging. Use adjustable legs for height customization if possible. Secure supports firmly to the table and floor for stability. Position supports evenly along the extension’s length.
Finishing Touches For Stability And Safety
Sand all edges to remove splinters or rough spots. Apply a finish or sealant to protect wood from moisture. Test the extensions by placing heavy wood on them. Adjust supports if you notice any wobbling or instability.
Credit: www.shanty-2-chic.com
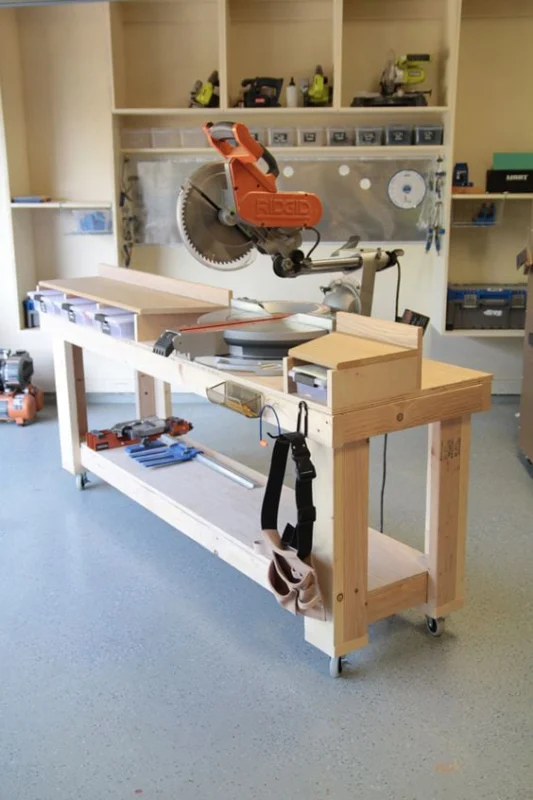
Finishing Touches And Mobility
Finishing touches and mobility transform a basic miter saw table into a highly practical workspace. These details improve usability, safety, and convenience. A well-finished table surface allows smooth material movement and prevents damage to your wood pieces. Mobility makes it easier to move the table around your workshop or job site.
Simple enhancements can greatly improve your cutting experience. Careful attention to finishes and mobility options ensures your table meets your daily needs.
Adding A Smooth, Durable Surface
Apply a clear coat or laminate to the table surface. This finish resists scratches and stains. It also helps wood slide easily during cuts. Sand the surface smooth before applying any finish. A smooth surface saves time and reduces effort when cutting.
Consider using melamine or hardboard sheets for a low-friction surface. These materials protect the table and improve cutting accuracy.
Installing Stops And Clamps
Add adjustable stops to hold wood securely in place. Stops help make repeatable cuts with accuracy. Use clamps or quick-release holders for larger pieces. These devices improve safety by preventing wood from shifting. Proper support reduces mistakes and frustration.
Adding Casters For Easy Movement
Attach heavy-duty casters to the table legs. Casters make it easy to roll the table around your workshop. Use locking casters to keep the table steady while cutting. Choose casters that can handle the table’s weight plus your miter saw. Mobility lets you position the table for better lighting and space use.
Building A Foldable Or Collapsible Design
Consider a foldable table design for small workshops. Hinged legs or drop-leaf sides save space when not in use. A collapsible table is easy to store or transport to job sites. This design adds flexibility without sacrificing stability.

Credit: tylynnm.com
Frequently Asked Questions
How To Make A Mitre Table?
Cut lumber to size, build a sturdy frame, attach legs, secure the miter saw, and add support wings. Ensure precise measurements and stable construction.
How Much Does It Cost To Build A Miter Saw Station?
Building a miter saw station costs between $100 and $500. Prices vary by materials, features, and complexity. Basic stations cost around $100, mid-range about $200, and high-end can reach $500. Costs exclude the miter saw itself.
How Wide Should A Miter Saw Table Be?
A miter saw table should be at least 24 to 30 inches wide. This width provides stable support and workspace for cutting materials safely and accurately.
What Tools Do I Need To Build A Miter Saw Station?
You need a miter saw, plywood, screws, drill, measuring tape, clamps, and a saw blade to build a miter saw station.
What Materials Are Best For Building A Miter Saw Table?
Plywood and MDF are commonly used for durability and smooth surface. Choose high-quality wood for strength.
How Big Should A Miter Saw Table Be?
A width of 24 to 30 inches and depth of 36 to 48 inches works well for stability and workspace.
Conclusion
Building a miter saw table improves your woodworking projects. It provides stability and accuracy for cuts. You save money by creating your own table. Use quality materials for a long-lasting build. Keep the design simple to match your workspace. Add features like storage or wheels for convenience.
Follow safety steps to avoid accidents during use. With patience and care, your table will serve well. Enjoy better control and cleaner cuts every time. Start your project today and enhance your workshop!
