If you need to hang a mirror, towel bar, shower shelf, or toilet paper holder, knowing how to drill into tile is the difference between a clean install and a cracked wall. The job is not hard, but tile punishes rushed mistakes.
The safe method is simple: use the right bit, keep the drill slow, cool the bit, and stop forcing it. Once you know what kind of tile you have and what sits behind it, you can make neat holes that look professional and hold securely for years.
How to drill into tile without cracking it starts with the setup
Most failures happen before the bit even cuts the surface. The first thing to check is the tile itself. Wall tile is often ceramic or porcelain, while some bathrooms and backsplashes use glass tile. Porcelain is usually denser and harder than ceramic, so it needs more patience and a better bit.
Next, look at the drilling location. Stay at least 1/2 inch from the edge of the tile when possible. Corners and thin edges chip faster because they have less support. If the tile sounds hollow when you tap it lightly, use even less pressure. Hollow spots crack more easily than fully bonded areas.
Also check what sits behind the tile. After you get through the tile face, you may hit drywall, cement board, wood, or masonry. That matters because the best tile bit is often the wrong bit for the material behind it. Many beginners keep using the tile bit too long, overheat it, and ruin the hole. Another common mistake is assuming grout is always the safer place to drill. Sometimes it is, but old or narrow grout lines can break out faster than the tile itself and leave an ugly finish.
Tools and bits that make the job easier
You do not need a big kit, but the right few items make a huge difference. A standard drill or cordless drill works well as long as you can keep the speed low and turn hammer mode off until you are completely through the tile.
- Tile drill bit: Use a diamond bit for porcelain, glass, or very hard tile. A carbide-tipped spear-point bit works well for many ceramic tiles.
- Variable-speed drill: Low gear gives better control. If you are unsure which speed range makes sense for your tool, this guide to drill torque settings, clutch, and RPM helps.
- Painter’s tape: Put two short strips in an X over the mark. It gives the bit more grip on glossy glaze.
- Marker and tape measure: A hole that is off by even 1/8 inch can make a fixture sit crooked.
- Spray bottle or wet sponge: Cooling the bit every 5 to 10 seconds helps prevent heat damage.
- Anchor and screw set: Match the anchor to the wall behind the tile, not just the tile itself.
- Safety gear: Safety glasses are a must. Gloves help, and hearing protection is smart for multiple holes.
If you are not sure which hole size matches your anchor, review common drill bit sizes before you start. That one step prevents a lot of loose mounts and oversized holes.
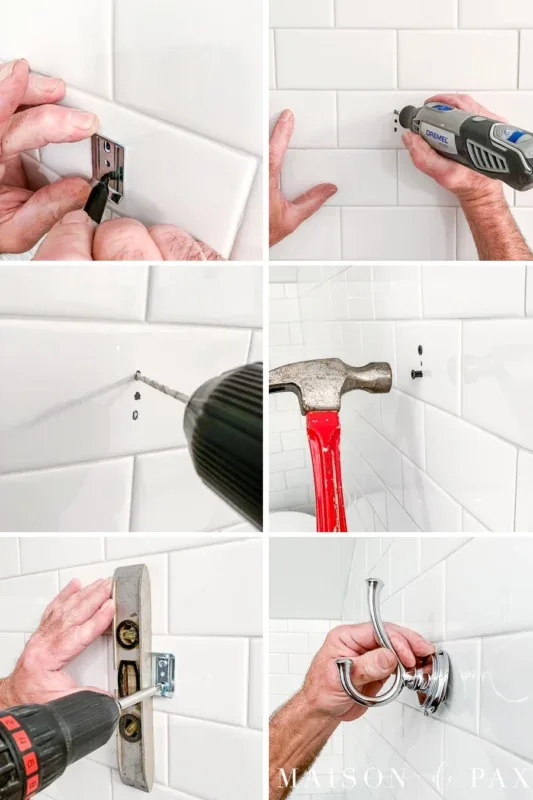
Step by step: drilling a clean hole in tile
The cleanest results come from a slow, controlled routine. Do the same thing every time instead of improvising halfway through.
- Mark the exact spot. Measure carefully and place painter’s tape over the area. Mark the center on the tape, not directly on the tile. The tape helps the bit stay put on slick glaze.
- Set the drill to low speed. For most small tile holes, low gear or roughly 400 to 600 RPM is a good starting point. High speed creates heat quickly, and heat is what kills bits and stresses tile.
- Start gently. Hold the drill square to the wall. On very slippery glazed tile, some installers lightly spin the bit in reverse for a second or two to scratch the surface before drilling forward. That small trick can stop the bit from skating across the tile.
- Let the bit grind, not punch. Use light pressure. If you have to lean hard, something is wrong. A good tile bit should slowly cut its way in without brute force.
- Cool the bit as you go. Stop every few seconds and add water with a sponge or spray bottle. The goal is to keep the bit warm, not smoking hot.
- Stop as soon as you break through the tile. This is where many people get sloppy. Change to the correct bit for the backing material, then continue to the final depth.
- Clean the hole and install the anchor carefully. Blow out dust, tap the anchor in gently, and tighten the screw only until snug. Over-tightening can crack the tile after the drilling is done.
If keeping the drill perfectly straight is the hard part, these tips on how to drill straight holes are worth a quick read. Straight entry matters more on tile than most people think because crooked pressure chips the rim of the hole.
What changes with ceramic, porcelain, glass, and stone
The basic method stays the same, but the bit and pace should match the surface. That is where many DIY jobs go wrong. People hear that a drill bit is “for tile” and assume it will work equally well on every tile. It will not.
Ceramic tile
Ceramic is usually the easiest to drill. A good carbide-tipped tile bit often handles it well, especially for small holes for hooks, brackets, and light bathroom hardware. You still want low speed and steady pressure, but ceramic forgives minor technique errors better than porcelain does.
Porcelain and glass tile
Porcelain is harder and denser, so a diamond bit is usually the better choice. Glass tile also benefits from diamond bits because the surface is brittle and chips easily. Use extra patience here. If the bit squeals, glows, or throws fine powder aggressively, it is getting too hot. Add water, ease off, and slow down.
Natural stone or larger openings
Travertine, marble, and granite can behave very differently depending on density and finish. For larger pipe openings, shower valves, or bigger penetrations, a diamond hole saw is often the right tool. This hole saw guide for beginners helps with bigger cuts, and if you are working on harder stone, this guide to drilling into granite without cracking it covers the extra care natural stone needs.
Mistakes that crack tile or leave a weak mount
A neat hole is only half the job. The hole also needs to stay strong after the screw and anchor go in. These are the mistakes that cause most failures.
- Using hammer mode too early: Hammer action can shatter tile fast. Do not use it on the tile face.
- Drilling too close to an edge: Edges and corners chip first. Leave space whenever the fixture allows it.
- Skipping cooling: Heat destroys diamond grit and dulls carbide tips. One overheated bit can make the next hole much harder.
- Pushing too hard: More pressure does not mean faster cutting. It usually means more heat and more slipping.
- Using the same bit for everything: A tile bit is for the tile. A wood, masonry, or standard drill bit may be needed after that, depending on the substrate.
- Ignoring anchor depth: If the anchor is too short or loose in the backing material, the hardware may wobble even if the tile hole looks perfect.
- Over-tightening the screw: This is a sneaky one. The tile survives the drilling, then cracks later when the screw expands the anchor too aggressively.
Heavy items need extra thought. A shower caddy is one thing. A large floating shelf, grab bar, or heavy mirror is another. When the load is serious, try to land in solid backing or a stud instead of relying only on the tile surface and a light plastic anchor.
Troubleshooting a bad hole before it becomes a bigger problem
If the bit keeps sliding, add fresh painter’s tape and start slower. On glossy tile, the first few seconds matter most. A small starter groove gives you control. If the hole starts to chip around the rim, reduce pressure and make sure the bit is not wobbling.
If the bit gets hot after one hole, stop and cool both the bit and the drill. Repeated heat buildup can shorten the life of the tool, especially on dense porcelain. If your tool often runs too hot, this article on drill overheating and how to prevent it explains what to watch for.
If you hit something unexpected behind the tile, do not force it. A metal plate, pipe, or very hard backer can turn a simple job into a repair. When you are drilling multiple holes or creating dust in mortar, grout, or cement-based backing, basic respiratory protection matters too. OSHA’s page on crystalline silica in construction is a useful reference if you want to understand the dust risk.
Call a professional if the tile is expensive, the layout leaves no margin for error, or you suspect plumbing or electrical lines behind the wall. A service call is cheaper than replacing a cracked shower wall.
The bottom line on how to drill into tile
The safest way to drill into tile is also the least dramatic way: slow speed, light pressure, the correct bit, and frequent cooling. That sounds basic, but it is exactly why experienced installers get clean holes while rushed DIY jobs end with chips, burns, and broken anchors.
Start with the right setup, stay away from fragile edges, and stop the moment you break through the tile face. Then switch bits for the material behind it and tighten hardware carefully. Those two habits alone prevent a surprising number of cracked tiles.
If you remember only one thing, remember this: tile should be ground through, not forced through. Follow that rule and how to drill into tile becomes a controlled, repeatable job instead of a risky one.
Frequently asked questions
For most porcelain and glass tile, a diamond bit is the safest choice. For many ceramic wall tiles, a carbide-tipped spear-point tile bit works well. The harder the tile, the more important bit quality and cooling become.
No. Keep hammer mode off while you are drilling through the tile itself. If the backing material behind the tile is masonry, you may switch to hammer mode only after you are fully through the tile face.
Only drill through grout if the fixture still lines up correctly and the grout line is sound. Weak, narrow, or older grout can break out faster than the tile surface, so it is not automatically the safer choice.
Use painter’s tape over the mark, start at low speed, and apply very light pressure. On very slick glazed tile, lightly spinning the bit in reverse for a second or two can help scratch the surface before drilling forward.
Stop drilling, check the backing material, and switch to the proper bit for what is behind the tile. Then finish the hole, clean out dust, insert the right anchor, and tighten the screw only until snug.
