Last Updated: March 27, 2026
Are you tired of digging through clutter every time you need a tool in your garage? Hanging a pegboard can completely transform your space, making organization simple and tools easy to find.
But you might wonder—how do you hang a pegboard securely, especially on different wall types? Whether your garage walls are drywall, concrete, or studs, this guide will walk you through step-by-step, so you can create a neat, efficient workspace that works for you.
Keep reading to discover easy tips and tricks that will have your pegboard up and ready in no time!
Choose The Right Pegboard
Choosing the right pegboard is the first step to a well-organized garage. The pegboard must be strong enough to hold your tools. It should fit your garage space perfectly. Different materials offer different benefits. Picking the right size and type saves time and effort later.
Material Options For Pegboards
Pegboards come in wood, metal, and hardboard. Wood pegboards are sturdy and can hold heavy tools. Metal pegboards resist moisture and last longer. Hardboard pegboards are affordable and easy to cut. Choose a material that matches your garage conditions.
Size And Thickness Considerations
Measure your wall space before buying pegboard. Standard pegboards are 4 feet by 8 feet. Thickness varies from 1/8 inch to 1/4 inch. Thicker pegboards hold heavier items better. Pick a size that covers your storage needs without waste.
Hole Size And Spacing
Standard pegboards have 1/4 inch holes spaced 1 inch apart. This size fits most hooks and accessories. Some pegboards offer larger holes for heavy-duty tools. Check hole size and spacing to match your tool hangers. Proper spacing keeps tools organized and easy to reach.
Surface Finish And Color
Pegboards come in plain or painted finishes. Painted surfaces resist stains and moisture better. Light colors brighten the garage and make tools easier to see. Choose a finish that suits your garage style and maintenance preferences.
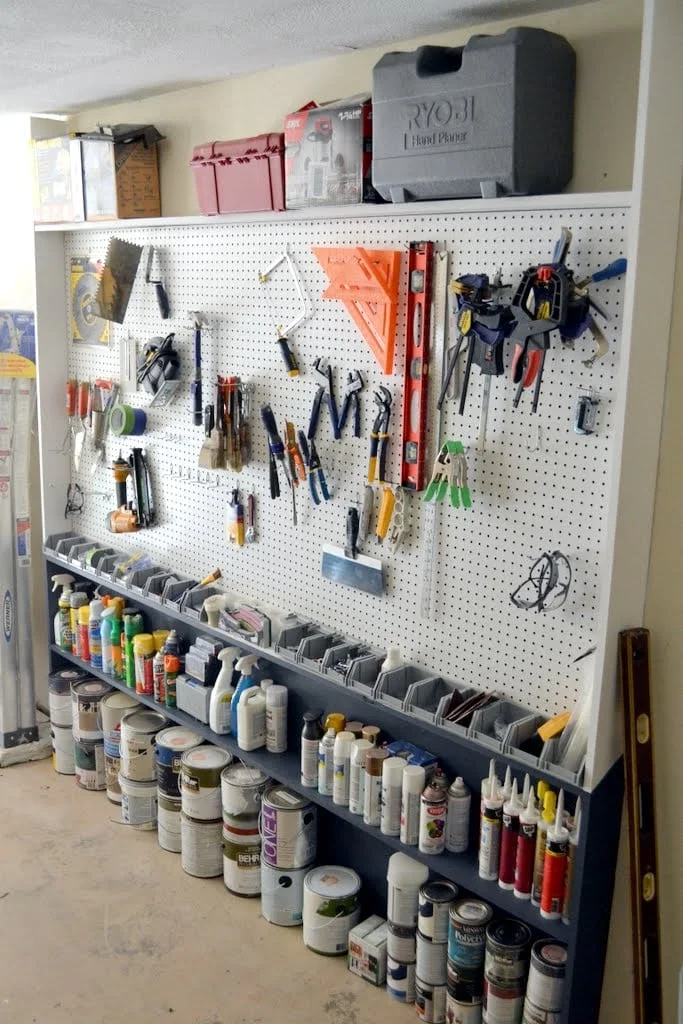
Credit: www.uglyducklinghouse.com
Gather Tools And Materials
Gathering the right tools and materials is the first step to hang pegboard in your garage. Preparing ahead saves time and ensures a smooth installation. This step helps you avoid interruptions during the project. Keep everything within reach before starting.
Essential Tools For Hanging Pegboard
Use a drill with drill bits to make holes for screws. A screwdriver or power driver is needed to secure the pegboard. A level helps keep the pegboard straight on the wall. Measuring tape ensures accurate placement and spacing. A stud finder locates studs behind drywall for solid support. A pencil marks spots for drilling. Safety glasses protect your eyes during work.
Materials Needed For Pegboard Installation
Choose pegboard panels sized to fit your wall space. Furring strips create a gap behind the pegboard for hooks. Use screws long enough to go through the pegboard and furring strips into studs. Drywall anchors work if no studs are available. Wall anchors and washers add extra support. Sandpaper smooths rough pegboard edges after cutting. Paint or primer is optional to protect and style the pegboard.
Additional Supplies To Consider
Get pegboard hooks and hangers to organize your tools. Zip ties help secure small items to hooks. A utility knife and saw can cut pegboard or furring strips if needed. A vacuum or brush cleans dust after drilling and cutting. Gloves protect your hands from splinters and sharp edges.
Measure And Mark Wall Space
Start by measuring the wall space where the pegboard will hang. Mark the dimensions clearly to ensure a perfect fit. Accurate measurements help avoid mistakes during installation.
Measure Your Wall Space
Start by measuring the wall area where you want to hang the pegboard. Use a tape measure to get the width and height. Write down these numbers for easy reference. Check for any obstacles like outlets or switches on the wall. Avoid placing the pegboard over these spots.
Mark The Wall
Use a pencil to mark the wall where the pegboard edges will be. Draw light lines to guide your pegboard placement. Mark the locations of wall studs as well. Studs provide strong support for mounting the pegboard securely. Use a stud finder to locate them.
Plan For Spacing
Leave a small gap between the pegboard and the wall. This space allows hooks to fit behind the board easily. Mark where spacers or furring strips will go. Proper spacing helps prevent damage and makes hanging tools simple.
Cut Pegboard To Size
Cutting pegboard to the right size is a key step in setting up your garage pegboard wall. A correctly sized pegboard fits your space perfectly and makes organizing easier. This step needs careful measuring and simple cutting tools.
Start by measuring the wall area where you want to hang the pegboard. Note the width and height. Write down these numbers to avoid mistakes. Then transfer these measurements onto the pegboard surface using a pencil or marker.
Gather The Right Tools
Use a tape measure, pencil, straightedge, and a saw. A circular saw or a jigsaw works best for cutting pegboard. Make sure the blade is sharp for clean cuts. Wear safety goggles to protect your eyes from dust and debris.
Mark Your Cut Lines
Draw straight lines on the pegboard where you want to cut. Use a ruler or a straightedge to keep lines even. Double-check your measurements before cutting to prevent errors. Mark both length and width clearly.
Cut The Pegboard
Place the pegboard on a flat surface. Secure it with clamps to avoid movement. Slowly and carefully follow your marked lines with the saw. Keep your hands away from the blade. Smooth the edges with sandpaper after cutting to avoid splinters.
Check The Fit
Place the cut pegboard against the wall space. Make sure it fits well without gaps. Adjust or trim if needed. A snug fit ensures the pegboard will hold tools securely and look neat.
Install Furring Strips
Installing furring strips is a key step to hang pegboard in your garage properly. These wooden strips create space between the wall and pegboard. This space allows hooks to fit behind the pegboard easily. It also helps the pegboard stay flat and stable.
Furring strips prevent the pegboard from sitting directly on the wall. This avoids damage to both the wall and pegboard. It also improves the pegboard’s strength for holding tools and items.
Choose The Right Furring Strips
Select strips that are straight and free of warps. Common sizes are 1×2 or 1×3 inches. The length should match the height of your pegboard. Use untreated wood to avoid damage from moisture.
Mark The Wall Studs
Use a stud finder to locate wall studs behind drywall. Mark each stud with a pencil. Furring strips should be attached to these studs for strong support. Space the strips evenly, usually 16 inches apart.
Attach The Furring Strips
Hold each strip against the wall over the stud marks. Use a drill to drive screws through the strips into the studs. Make sure the strips sit flat and level. Countersink screws so they do not stick out.
Check For Level And Spacing
Use a level to ensure all strips are straight. The strips should be spaced enough to fit the pegboard behind them. Usually, 1/4 inch to 1/2 inch gap works well. This gap allows hooks to slide in easily.
Prepare For Pegboard Installation
After furring strips are secured, clean the wall surface. The pegboard can now be screwed into the strips. This setup ensures a sturdy and functional pegboard wall.
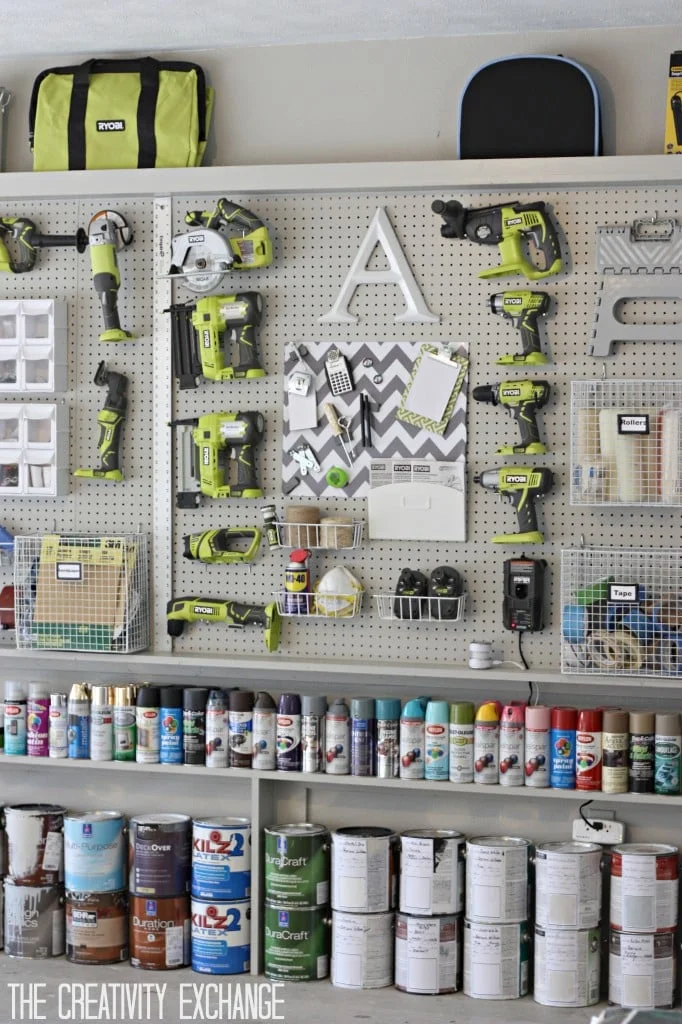
Credit: www.thecreativityexchange.com
Mount Pegboard On Wall
Mounting pegboard on your garage wall creates a neat and accessible storage space. It keeps tools visible and easy to grab. Proper installation ensures the pegboard stays strong and stable. Follow simple steps for a secure mount.
Start with the right tools. You will need a drill, screws, a level, a stud finder, and a measuring tape. Also, get furring strips to create space behind the pegboard. Choose drywall anchors if you don’t have studs.
Find And Mark Wall Studs
Use the stud finder to locate studs in the wall. Mark each stud with a pencil. Studs provide a firm base to hold the pegboard weight. If no studs appear, plan to use anchors for support.
Attach Furring Strips To Wall
Cut furring strips to fit vertically between studs. Attach them to the wall using screws into the studs. These strips create a gap, allowing hooks to fit behind the pegboard. Check the strips with a level to keep them straight.
Cut And Prepare Pegboard
Measure the area where you want the pegboard. Cut the pegboard to size using a saw. Sand any rough edges to avoid splinters. Drill pilot holes in the pegboard for screws to prevent cracking.
Mount Pegboard On Furring Strips
Align the pegboard with the furring strips. Use a level to keep it straight. Screw the pegboard into the furring strips through the pilot holes. Tighten screws but avoid over-tightening to prevent damage.
Add Spacers For Clearance
Adding spacers behind your pegboard is a key step for proper installation. Spacers create space between the wall and pegboard. This clearance makes hanging tools easier and prevents damage.
Without spacers, hooks and pegs cannot fit well. The board needs enough gap for peg hooks to slide in smoothly. Spacers also improve air circulation, reducing moisture buildup behind the board.
Use wooden furring strips or small blocks as spacers. Attach them to the wall studs before mounting the pegboard. Spacers should be about 1/2 inch thick to provide enough room.
Place spacers evenly across the area. This keeps the pegboard stable and flat. Secure spacers with screws directly into the wall studs for strong support.
Choose The Right Spacer Material
Wood strips are common and easy to work with. They hold screws well and provide solid clearance. Plastic or metal spacers can work but are less common.
Make sure spacers are straight and level. Uneven spacers cause the pegboard to bow or lean. Measure carefully before installation.
How To Attach Spacers
Mark stud locations on the wall. Screw spacers into each stud using long screws. Use a level to keep spacers straight.
Check that all spacers are aligned at the same height. This alignment ensures the pegboard sits evenly and securely.
Benefits Of Using Spacers
Spacers allow peg hooks to fit easily behind the board. They protect the wall from damage by tools or hooks.
The gap helps air flow behind the pegboard. This reduces moisture and prevents mold or mildew in your garage.
Spacers also make pegboard removal easier if needed. You can unscrew the board without damaging the wall surface.
Credit: www.homedepot.com
Organize Tools And Accessories
Organizing tools and accessories in your garage improves efficiency and saves time. A pegboard creates a neat, visible storage system. It helps keep every tool in its place. This makes finding items faster and tidier. Using a pegboard also protects your tools from damage and clutter. Let’s explore how to arrange your tools and accessories on a pegboard effectively.
Choose The Right Pegboard Hooks And Holders
Select hooks and holders that fit your tools’ shapes and sizes. Use sturdy metal hooks for heavy tools like hammers and wrenches. Small plastic or wire hooks work well for light accessories. Specialized holders can keep screwdrivers, pliers, and drills in place. Organizing by tool type makes your workspace user-friendly.
Group Similar Tools Together
Arrange tools by function or frequency of use. Keep frequently used tools within easy reach. Group hand tools in one section and power tools in another. This organization helps reduce search time. It also makes your garage look clean and purposeful. Clear grouping improves workflow during projects.
Label Tool Spots For Easy Identification
Labels on the pegboard help you quickly identify where tools belong. Use simple tags or stickers next to hooks and holders. Labeling avoids confusion and misplaced tools. It also encourages everyone to return items after use. A labeled pegboard keeps your garage organized long-term.
Use Bins And Small Containers For Accessories
Small parts like screws, nails, and bolts need special storage. Attach bins or containers to the pegboard for these items. Clear containers help you see contents at a glance. Group similar accessories together in labeled bins. This system prevents small parts from getting lost or mixed up.
Frequently Asked Questions
How Much Space Is Needed Behind A Pegboard?
Leave ¾ to 1 inch of space behind pegboard for hooks to fit and wall air circulation. Use furring strips for proper spacing.
What To Put Behind A Pegboard?
Attach furring strips or spacers behind pegboard for stability and airflow. This prevents warping and allows hooks to hold securely.
Do You Put Spacers Behind Pegboard?
Yes, spacers go behind pegboard to create space for hooks and allow easy hanging. Use furring strips or wooden blocks as spacers.
Can I Hang A Pegboard On Drywall?
Yes, you can hang a pegboard on drywall by securing furring strips to studs first. Then, attach the pegboard using drywall anchors and screws for strong support.
How Do I Prepare The Wall For Hanging A Pegboard?
Clean and smooth the wall. Use furring strips to create space behind the pegboard.
Conclusion
Hanging a pegboard in your garage makes tool storage simple and neat. Use the right tools and follow safe steps carefully. Spacers help create space behind the board for hooks. Always measure twice and drill holes precisely. This method keeps your garage tidy and tools easy to find.
Enjoy your organized workspace and spend less time searching for tools. A well-installed pegboard adds value and functionality to any garage. Try it today and see the difference a pegboard makes.
{ “@context”: “https://schema.org”, “@type”: “Article”, “headline”: “How to Hang Pegboard in Garage: Easy Steps for Perfect Organization”, “description”: “Learn how to hang pegboard in garage to organize tools efficiently by securely mounting panels and using hooks for versatile storage solutions.”, “url”: “https://www.powertoolstoday.com/how-to-hang-pegboard-in-garage/”, “datePublished”: “2025-12-17”, “dateModified”: “2026-03-18”, “author”: { “@type”: “Organization”, “name”: “Power Tools Today”, “url”: “https://www.powertoolstoday.com” }, “publisher”: { “@type”: “Organization”, “name”: “Power Tools Today”, “url”: “https://www.powertoolstoday.com” }, “mainEntityOfPage”: { “@type”: “WebPage”, “@id”: “https://www.powertoolstoday.com/how-to-hang-pegboard-in-garage/” }, “image”: { “@type”: “ImageObject”, “url”: “https://www.powertoolstoday.com/wp-content/uploads/2025/12/aih2-how-to-hang-pegboard-in-garage-featured.webp” } }{ “@context”: “https://schema.org”, “@type”: “Article”, “headline”: “How to Hang Pegboard in Garage: Easy Steps for Perfect Organization”, “description”: “Learn how to hang pegboard in garage to organize tools efficiently by securely mounting panels and using hooks for versatile storage solutions.”, “url”: “https://www.powertoolstoday.com/how-to-hang-pegboard-in-garage/”, “datePublished”: “2025-12-17”, “dateModified”: “2026-03-19”, “author”: { “@type”: “Organization”, “name”: “Power Tools Today”, “url”: “https://www.powertoolstoday.com” }, “publisher”: { “@type”: “Organization”, “name”: “Power Tools Today”, “url”: “https://www.powertoolstoday.com” }, “mainEntityOfPage”: { “@type”: “WebPage”, “@id”: “https://www.powertoolstoday.com/how-to-hang-pegboard-in-garage/” }, “image”: { “@type”: “ImageObject”, “url”: “https://www.powertoolstoday.com/wp-content/uploads/2025/12/aih2-how-to-hang-pegboard-in-garage-featured.webp” } }nnnn