Last Updated: March 20, 2026
Are your pliers always slipping off your workbench or lost in a cluttered drawer? Hanging your pliers on a pegboard is the simple, space-saving solution you need.
Imagine having every pair of pliers right where you can see and grab them instantly—no more wasting time searching. In this guide, you’ll learn easy, practical steps to hang your pliers securely on a pegboard, using the right hooks and holders designed to keep your tools organized and within reach.
Whether you’re a DIY enthusiast or just want a tidier workspace, this article will help you transform your pegboard into a perfectly arranged tool station. Keep reading to discover how to make your plier storage effortless and efficient!

Credit: www.printables.com
Choosing The Right Pegboard
Choosing the right pegboard is key to hanging pliers properly. The pegboard must be strong enough to hold the weight of your tools. It should also have holes spaced to fit common hooks and holders. This makes organizing easier and keeps your workspace tidy.
Many pegboards come in different materials and sizes. Picking one that suits your workspace and tool collection helps with durability and convenience. Below are important factors to consider when selecting a pegboard.
Material Options For Pegboards
Common pegboard materials include metal, wood, and hardboard. Metal pegboards are very durable and can hold heavy tools. Wood pegboards look nice but may need extra support. Hardboard pegboards are affordable and easy to cut to size.
Choose a material that fits your budget and the weight of your pliers. Metal is best for heavy-duty tools. Hardboard works well for light to medium tools.
Hole Size And Spacing
Standard pegboards have holes spaced 1 inch apart. This size fits most hooks and holders. Some pegboards have smaller or larger holes. Stick to 1-inch spacing for the best compatibility. Smaller holes limit hook choices. Larger holes may cause hooks to wobble.
Size And Mounting Options
Measure your workspace before buying a pegboard. Pick a size that fits your wall or workbench area. Some pegboards come with mounting kits. Check if the kit includes screws and anchors. Proper mounting keeps the pegboard stable and safe.
Planning Tool Layout
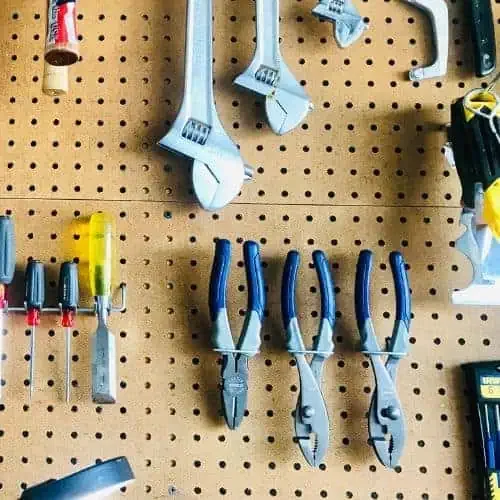
Hanging pliers on a pegboard saves space and keeps tools easy to find. Arrange pliers by size and use sturdy hooks or specialized holders for secure storage. Place frequently used pliers within reach to improve your workspace efficiency.
Planning the layout of your tools on a pegboard saves time and effort. Organize your pliers and other tools for quick access and neat storage. A well-thought-out layout helps keep your workspace clean and efficient.
Start by grouping tools by type and frequency of use. Place the pliers you use most often within easy reach. Less-used tools can go higher or toward the edges of the board.
Arrange Tools On A Flat Surface
Lay all your pliers and tools on a table or the floor. This visual helps you decide where each tool should hang. You can move them around easily until the best spots are found.
Think about the size and shape of each tool. Leave enough space between tools to prevent overlap. This makes grabbing and replacing each tool simple and fast.
Choose The Right Hooks And Holders
Select hooks that match the weight and shape of your pliers. Short hooks work for small, light pliers. Longer, sturdier hooks support heavy or large pliers securely.
Consider specialized holders like loops or magnetic strips for unique tools. These holders keep your pliers stable and prevent slipping. Baskets and bins are great for small parts or loose accessories.
Mark Tool Positions On The Pegboard
Use a pencil or removable tape to mark where each hook or holder will go. This step avoids mistakes and saves re-hanging later. Test the layout by placing tools on the marked spots before installing hooks.
Adjust spacing as needed to allow easy access and visibility. Good planning now makes your pegboard more user-friendly and tidy.
Selecting Suitable Hooks
Selecting the right hooks is crucial to hang pliers securely on a pegboard. The hooks must hold the weight and size of the pliers. Using unsuitable hooks can lead to tools falling and damage.
Different types of hooks fit different pliers. Choose hooks that fit the handle size and shape well. This ensures easy access and prevents slipping.
Standard Pegboard Hooks
Standard hooks come in many lengths and thicknesses. Use shorter hooks for small or lightweight pliers. Longer, thicker hooks work best for heavy pliers. These hooks are easy to install and remove.
Specialized Pliers Hooks
Specialized hooks fit pliers perfectly. They include loops, cradles, or holders shaped for pliers. These hooks keep pliers stable and organized. They reduce clutter and make tools visible at a glance.
Magnetic Hooks
Magnetic hooks hold pliers with metal parts firmly. They are ideal for quick tool access. Magnets work well for lightweight to medium pliers. Avoid heavy pliers on magnets alone to prevent falls.
D-i-y Hook Options
Create custom hooks using wire or metal strips. Bend heavy-gauge wire into plier-shaped holders. Use lag bolts or screws as simple hangers. These options save money and fit unique pliers shapes.
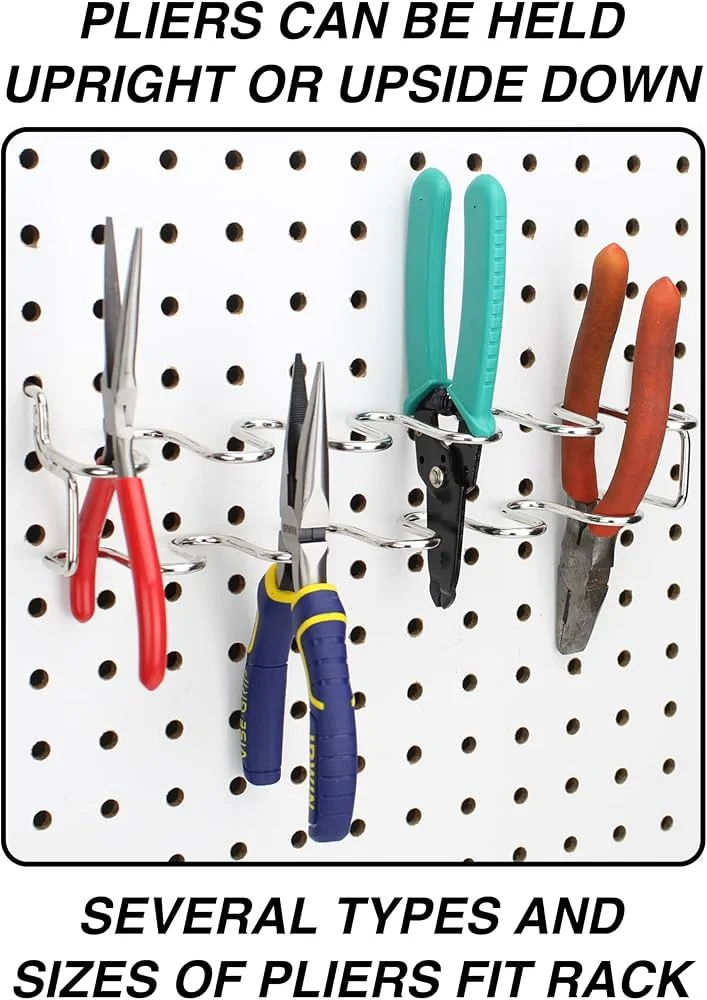
Using Specialized Holders
Using specialized holders is a smart way to hang pliers on a pegboard. These holders keep tools secure and easy to reach. They fit the shape of pliers well, preventing them from slipping off. Specialized holders save space and help organize your workspace neatly.
Types Of Specialized Holders For Pliers
Different specialized holders suit different plier styles. Loop holders hold the handles firmly. Cradle holders support the whole tool, keeping it stable. Magnetic holders offer quick access by holding metal parts directly. Choose a holder that fits your pliers’ size and weight.
How To Install Specialized Holders On Pegboard
Start by selecting the right holder for your pliers. Align the holder with the pegboard holes. Insert the holder’s hooks into the holes firmly. Press it until it locks in place. Test the holder by hanging a pair of pliers to ensure stability.
Benefits Of Using Specialized Holders
Specialized holders keep pliers organized and easy to find. They protect tool handles from damage by reducing movement. These holders also make your pegboard look tidy and professional. They save time by making pliers accessible quickly.
Diy Pliers Holders
DIY pliers holders offer a smart way to organize your pegboard. They keep pliers easy to reach and prevent clutter. Making your own holders saves money and lets you customize the fit for your pliers.
Simple materials like wood, wire, or plastic can be used. You can create holders that match your workspace style and tool sizes. This section covers easy ideas to build effective pliers holders at home.
Wooden Pliers Holders
Wooden holders are sturdy and easy to make. Cut small blocks of wood to fit your pliers’ handles. Drill holes or cut notches to hold each pair securely.
Attach these blocks to your pegboard with hooks or screws. You can paint or stain the wood to match your workshop decor. Wooden holders keep pliers stable and look neat.
Wire Loop Holders
Bend heavy-gauge wire into loops that fit your pliers. Shape each loop so pliers slide in but do not fall out. Secure the loops to the pegboard hooks for easy hanging.
Wire holders are flexible and lightweight. They work well for different plier sizes. You can adjust the loops or add more for extra tools.
Plastic Clip Holders
Plastic clips or clamps hold pliers by their handles. Use strong clips that open wide enough for your pliers. Attach clips to pegboard hooks or mounts for quick access.
Plastic holders are affordable and easy to install. They protect plier handles from scratches and keep tools visible. Choose clips that match your plier shapes for best results.
Credit: www.amazon.com
Securing Hooks Properly
Securing hooks properly ensures your pliers stay safe and organized on the pegboard. A well-secured hook prevents tools from slipping or falling. This keeps your workspace tidy and reduces tool damage.
Hooks must fit tightly into the pegboard holes. Loose hooks can easily dislodge when you remove a tool. Tight hooks hold weight better and keep pliers stable.
Choose The Right Hook Size
Select hooks that match your pliers’ size and weight. Small pliers need shorter hooks. Heavy pliers require longer, thicker hooks. This balance prevents the hooks from bending or breaking.
Insert Hooks Firmly Into Pegboard
Push hooks fully into the pegboard holes. Check that the hook’s back clip or stopper locks behind the board. This stops the hook from pulling out when you hang pliers.
Test Hook Stability Before Hanging Tools
After inserting hooks, give them a gentle tug. Stable hooks stay fixed. If a hook moves, reposition or replace it. Secure hooks hold pliers safely and avoid accidents.
Use Specialized Holders For Extra Security
Consider loops or cradles designed for pliers. These accessories grip tools better than simple hooks. They reduce slipping and keep pliers in place during removal.
Organizing By Tool Weight
Organizing pliers by tool weight on a pegboard helps keep your workspace safe and efficient. Heavy pliers need stronger support to avoid falling or bending hooks. Lighter pliers require less sturdy hooks and can be placed in less reinforced areas. Proper weight organization prevents damage to both tools and pegboard.
Sorting tools by weight also makes it easier to find and grab the right plier quickly. This method reduces clutter and maximizes your pegboard space. You can arrange heavy pliers at the bottom and lighter ones higher up for balance and ease of access.
Choosing The Right Hooks For Heavy Pliers
Heavy pliers need hooks made from thick metal or strong plastic. Longer hooks give better support and hold the tool securely. Avoid thin or short hooks that can bend or pull out under weight. Look for hooks that attach firmly to the pegboard holes.
Using Lighter Hooks For Small Pliers
Small or light pliers work well with short, thin hooks. These take less space and keep the pegboard tidy. Hooks with curved ends stop tools from slipping off. Place these hooks higher or on less sturdy parts of the pegboard.
Balancing Tool Placement By Weight
Put heavy pliers near the bottom to lower the center of gravity. Place lighter pliers above to prevent the pegboard from leaning forward. Spread out heavy tools evenly to avoid bending the pegboard. This method keeps your tools stable and your pegboard in good shape.
Credit: organizenvy.com
Maintaining Pegboard Order
Keeping your pegboard neat helps find pliers quickly. Order saves time and avoids frustration. A well-maintained pegboard looks tidy and professional. It also protects tools from damage and loss.
Regular care prevents clutter and keeps everything in place. Simple habits make maintenance easy and effective. Follow these steps to maintain pegboard order with ease.
Organize Tools By Frequency Of Use
Place the most used pliers at eye level for fast access. Less used tools go higher or lower on the pegboard. Group similar tools together for easy recognition. This reduces search time and improves workflow.
Use Labels And Color Codes
Label each hook or section clearly with tool names. Use colored tags or stickers to highlight tool types or sizes. Labels help everyone find the right pliers quickly. Colors add visual cues that improve organization.
Inspect Pegboard Hooks Regularly
Check hooks for wear or damage often. Replace bent or weak hooks to avoid tool falls. Secure hooks tightly so they don’t loosen over time. Proper hooks keep pliers safe and stable.
Clean The Pegboard Frequently
Dust and dirt reduce pegboard life and tool grip. Wipe the surface and hooks with a damp cloth regularly. Dry the board completely to prevent rust on metal parts. Clean boards look better and function well.
Rearrange Tools When Needed
Adjust tool positions as your collection grows or changes. Keep the layout flexible to accommodate new pliers and accessories. Rearranging keeps the pegboard efficient and personalized. Adapt to your needs for long-term success.
Frequently Asked Questions
How To Put Tools On Pegboard?
Plan your pegboard layout, then insert appropriate hooks or holders into the holes. Use longer hooks for heavy tools and smaller ones for light items. Secure hooks with clips or tabs to prevent falling. Arrange tools by frequency of use and mark outlines for easy organization.
How To Hang Things On A Pegboard?
Plan your layout and choose suitable pegboard hooks or holders. Insert hooks into holes securely. Use longer hooks for heavy tools and smaller ones for light items. Add clips or tabs to prevent hooks from falling. Arrange tools for easy access and mark outlines for organization.
How To Secure Hooks On Pegboard?
Secure hooks on pegboard by inserting their back tabs into peg holes firmly. Use hooks with clips or clasps for extra hold. For heavy tools, choose longer, thicker hooks. Ensure hooks sit flush against the board to prevent wobbling. Add clips if there’s a gap between board and wall.
What To Use Instead Of Pegboard Hooks?
Use wire loops, magnetic strips, baskets, or DIY holders made from bent wire or lag bolts instead of pegboard hooks. Choose thicker hooks or specialized mounts for heavy tools. Secure hooks with clips or tabs to prevent falling.
What Pegboard Hooks Work Best For Hanging Pliers?
Sturdy, long hooks or specialized plier holders provide secure support on pegboards.
Conclusion
Hanging pliers on a pegboard keeps your workspace tidy and tools easy to find. Choose the right hooks or holders for your pliers’ size and weight. Plan your pegboard layout to place pliers where you reach them quickly. Secure hooks well to avoid any slipping or falling.
This simple method saves time and protects your tools. With a neat pegboard, your work feels smoother and more organized every day. Try it today and enjoy a clutter-free tool area.
{ “@context”: “https://schema.org”, “@type”: “Article”, “headline”: “How to Hang Pliers on Pegboard: Easy Tips for Perfect Organization”, “description”: “Learn how to hang pliers on pegboard by using hooks or holders to organize tools efficiently and keep your workspace neat and accessible.”, “url”: “https://www.powertoolstoday.com/how-to-hang-pliers-on-pegboard/”, “datePublished”: “2025-11-23”, “dateModified”: “2026-03-18”, “author”: { “@type”: “Organization”, “name”: “Power Tools Today”, “url”: “https://www.powertoolstoday.com” }, “publisher”: { “@type”: “Organization”, “name”: “Power Tools Today”, “url”: “https://www.powertoolstoday.com” }, “mainEntityOfPage”: { “@type”: “WebPage”, “@id”: “https://www.powertoolstoday.com/how-to-hang-pliers-on-pegboard/” }, “image”: { “@type”: “ImageObject”, “url”: “https://www.powertoolstoday.com/wp-content/uploads/2025/11/How-to-Hang-Pliers-on-Pegboard-1024×576.webp” } }nnnn