Last Updated: March 20, 2026
If your car won’t start, the problem might be your starter. But how can you be sure before spending money on repairs?
You can quickly find out by testing your starter with a multimeter—a simple tool that helps you check if your starter motor is working properly. In this guide, you’ll learn step-by-step how to use a multimeter to test your starter safely and accurately.
Whether you’re a beginner or just want to save time and money, this easy method puts the power in your hands. Keep reading, and you’ll know exactly what to do to get your car back on the road.
Starter Motor Basics
Testing a starter with a multimeter checks its electrical flow and resistance. Connect the meter to the starter terminals to measure voltage and continuity. This helps find faults without removing the starter from the vehicle.
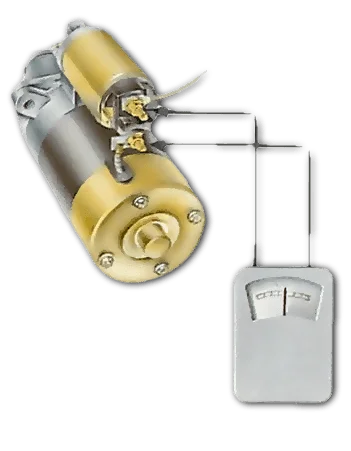
The starter motor is a small electric motor. It helps start your car’s engine by turning it over. Without it, the engine cannot begin to run.
The starter motor gets power from the car battery. When you turn the key, the starter motor spins the engine’s flywheel. This action starts the engine’s combustion process.
The starter motor has two main parts: the motor itself and the solenoid. The solenoid acts like a switch. It allows a large current to flow to the motor.
Understanding these basics helps you test the starter motor properly. It also helps you know when the starter needs repair or replacement.
How The Starter Motor Works
When you turn the ignition key, the solenoid receives a small electric current. The solenoid then closes a high-current circuit to the starter motor. This powers the motor to spin.
The spinning motor turns the engine’s flywheel. The flywheel is connected to the engine’s crankshaft. This starts the engine moving and firing fuel in the cylinders.
Once the engine starts, the starter motor stops running. It disengages to prevent damage from the running engine.
Common Starter Motor Problems
Starters can fail due to worn brushes or a bad solenoid. Dirt, corrosion, or loose wires can also cause failure. Symptoms include clicking sounds or no sound at all when starting.
A starter that does not spin or spins slowly may have electrical issues. Testing with a multimeter can help find voltage or resistance problems.
Knowing these problems helps you diagnose starter issues quickly and accurately.
Credit: www.howacarworks.com
Essential Multimeter Settings
Understanding the essential multimeter settings is key to accurately testing a starter. The multimeter must be set correctly to measure voltage, resistance, and continuity. These settings help detect faults in the starter motor or its wiring. Using wrong settings can give false readings or damage the multimeter.
Familiarize yourself with the main functions on your multimeter. Learn how to switch between AC and DC voltage, set the correct range, and test resistance. These basics make the testing process smooth and reliable.
Setting The Multimeter To Dc Voltage
Start by setting the multimeter to measure DC voltage. Starters use direct current from the battery, so this setting is necessary. Choose a voltage range higher than the battery’s voltage, usually 20V DC. This prevents overloading the meter and ensures accurate readings.
Using The Ohm Setting For Resistance
The ohm setting measures resistance and checks wiring or starter coils. Turn the dial to the lowest resistance range for precise results. Before testing, disconnect the starter from the battery to avoid damage. Resistance readings help spot broken wires or bad connections.
Testing Continuity With The Multimeter
Continuity testing checks if electrical paths are complete. Set the multimeter to the continuity mode, often marked with a sound wave symbol. Touch the probes together to hear a beep, confirming the function works. Use this setting to test switches or solenoids inside the starter.
Adjusting The Range For Accurate Measurement
Selecting the right range is crucial for accuracy. If unsure, start with the highest range and move down. Automatic ranging multimeters adjust the range themselves, making this easier. Proper range selection prevents errors and protects the multimeter.
Safety Tips Before Testing
Always disconnect the car battery before testing to avoid electric shock. Wear safety glasses and gloves to protect your eyes and hands. Ensure the vehicle is in park and the parking brake is engaged for extra safety.
Disconnect The Battery
Always disconnect the battery before testing the starter. This stops electric shocks and short circuits. Use a wrench to remove the negative cable first. Then remove the positive cable. This step protects you and the vehicle’s electrical system.
Wear Protective Gear
Put on safety goggles and gloves. Goggles protect your eyes from sparks or debris. Gloves shield your hands from sharp parts and electric shock. Safety gear reduces the risk of injury during testing.
Work In A Well-ventilated Area
Test the starter in a space with fresh air. Avoid closed or small rooms. Battery gases can build up and cause harm. Good ventilation keeps the air clean and safe for breathing.
Use The Right Tools
Choose a multimeter that suits automotive testing. Check the tool for damage before use. Faulty tools can give wrong readings or cause accidents. Proper tools make testing easier and safer.
Keep The Vehicle Stable
Ensure the vehicle is parked on a flat surface. Apply the parking brake firmly. This stops the car from rolling or moving. A stable vehicle creates a safer work environment.
Follow Manufacturer’s Instructions
Read the vehicle and multimeter manuals carefully. Follow all safety instructions and testing procedures. Manufacturer guidelines help avoid damage and ensure accurate results.
Checking Battery Voltage
Start by setting your multimeter to measure DC voltage. Connect the leads to the battery terminals and read the voltage. A healthy battery usually shows around 12. 6 volts before starting the engine.
Why Check Battery Voltage First?
Checking battery voltage is the first step to test a starter with a multimeter. The starter needs enough power from the battery to work properly. A weak or dead battery can cause starter problems.
Measuring voltage shows if the battery can deliver the right power. It helps avoid unnecessary starter testing if the battery is the real issue.
How To Measure Battery Voltage
Set your multimeter to DC volts. Use the 20V range for car batteries. Turn off the car and all accessories before testing.
Connect the red probe to the battery’s positive terminal. Connect the black probe to the negative terminal. Read the voltage on the multimeter screen.
What Battery Voltage Numbers Mean
A healthy, fully charged battery reads about 12.6 volts. Numbers between 12.4 and 12.6 volts show good charge. Below 12.4 volts means the battery is partly discharged.
If voltage is under 12 volts, the battery is weak or dead. You should charge or replace the battery before testing the starter.
Testing Starter Solenoid
The starter solenoid plays a key role in starting your engine. It acts as a switch that sends power from the battery to the starter motor. Testing the starter solenoid ensures the electrical flow is working correctly.
Using a multimeter helps check if the solenoid is functioning well. It measures voltage and continuity in the solenoid circuit. A faulty solenoid can cause your car not to start or produce clicking sounds.
Preparation For Testing The Starter Solenoid
First, gather necessary tools: a multimeter, safety gloves, and eye protection. Make sure the car’s ignition is off and the keys are removed. Locate the starter solenoid, usually near the starter motor.
Disconnect the battery’s negative terminal to avoid short circuits. This step is important for safety during the test.
Measuring Voltage At The Solenoid
Reconnect the battery and set the multimeter to measure DC voltage. Place the positive lead on the solenoid’s battery terminal. Connect the negative lead to a good ground point on the engine.
Ask someone to turn the ignition key to the start position. Look for a voltage reading close to the battery’s voltage. No voltage or a very low reading indicates a problem with the wiring or battery.
Checking Continuity Of The Solenoid Coil
Turn off the ignition and disconnect the battery again. Set the multimeter to the continuity or resistance mode. Remove the wires from the solenoid coil terminals.
Touch the multimeter leads to the two solenoid coil terminals. A reading showing low resistance means the coil is good. Infinite resistance or no continuity means the coil is broken and the solenoid needs replacement.
Testing The Solenoid Activation
Reconnect the battery and keep the multimeter on voltage mode. Place the positive lead on the solenoid’s output terminal to the starter. Connect the negative lead to ground.
Turn the ignition key to the start position. The multimeter should show voltage at the output terminal. No voltage means the solenoid is not activating and may be faulty.

Credit: www.youtube.com
Measuring Voltage Drop
Measuring voltage drop helps find electrical problems in a starter circuit. It shows how much voltage is lost across wires or connections. A high voltage drop means bad wiring or loose connections. This can prevent the starter from working well.
Using a multimeter to measure voltage drop is simple. It tells if the starter gets enough power. Testing voltage drop saves time and money on repairs.
What You Need To Measure Voltage Drop
Prepare a digital multimeter with voltage drop settings. Have safety gloves and eye protection. Make sure the car battery is fully charged. Set the multimeter to the correct voltage range, usually 20 volts DC.
How To Connect The Multimeter For Voltage Drop
Connect the multimeter’s red lead to the positive battery terminal. Attach the black lead to the starter terminal where the cable connects. Make sure the connections are tight and clean. This setup measures voltage lost from battery to starter.
Reading And Understanding Voltage Drop Results
Turn the ignition key to start the engine. Watch the multimeter display carefully. A voltage drop under 0.5 volts is good. Above 0.5 volts means resistance is too high. Check wires and connections if voltage drop is high.
Common Voltage Drop Issues To Check
Look for corroded battery terminals or loose cables. Inspect starter motor connections for dirt or damage. Check the ground wire from the starter to the chassis. Fix or replace any faulty parts to reduce voltage drop.
Bench Testing The Starter
Bench testing a starter is a simple way to check its condition outside the vehicle. This process helps find faults before installation. It saves time and prevents unnecessary work.
Testing on a bench requires a few tools and safety care. The starter motor will be connected to a power source. A multimeter measures the electrical response during the test.
Prepare The Starter For Testing
Remove the starter from the vehicle carefully. Clean any dirt or grease on the starter body. Place the starter on a stable surface for testing.
Check the starter terminals for corrosion or damage. Use a wire brush if needed. Make sure all connections are tight before testing.
Connect The Starter To Power
Use jumper cables to connect the starter to a 12V battery. Attach the positive cable to the starter’s main terminal. Connect the negative cable to the starter housing for grounding.
Be cautious with the cables to avoid sparks. Hold the starter firmly as it may move during testing.
Test The Starter With A Multimeter
Set the multimeter to measure voltage or continuity. Touch the probes to the starter terminals. Watch the multimeter reading while activating the starter.
The multimeter should show a voltage drop when the starter spins. No voltage or unusual readings indicate a problem with the starter.
Observe The Starter Operation
Press the starter solenoid or use a remote switch. The starter gear should extend and spin quickly. Listen for smooth and strong motor sound.
Slow or no movement means the starter is faulty. Check for mechanical damage or electrical failure inside the starter.

Credit: www.youtube.com
Interpreting Multimeter Results
Interpreting the results from your multimeter is a crucial step in testing a starter. The readings help you decide if the starter is working properly or needs replacement. Understanding these numbers can prevent costly mistakes and save time.
Each value you get tells a part of the story. Voltage, resistance, and continuity measurements show the condition of the starter’s internal parts. Knowing what is normal versus faulty guides your next actions.
Reading Voltage Measurements
Voltage tests show if the starter receives enough power. A healthy starter usually reads close to the battery voltage, around 12.6 volts. Readings significantly lower than this indicate power loss or a bad connection.
If the voltage drops sharply when you try to start, the starter may be drawing too much current. This could mean internal damage or a worn-out motor.
Understanding Resistance Values
Resistance tests check the starter’s coils and windings. Low or zero resistance suggests a short circuit inside the starter. Very high or infinite resistance means the circuit is broken or open.
Compare your resistance reading with the starter’s specifications. Deviations usually point to faults inside the starter motor or solenoid.
Checking Continuity
Continuity tests confirm if the circuit inside the starter is complete. A beep or low resistance reading means the path is good. No beep or infinite resistance means the circuit is broken.
Use the continuity test on the starter terminals and solenoid contacts. This helps identify disconnected or damaged parts.
Frequently Asked Questions
How Do You Test A Starter With A Multimeter?
Set your multimeter to DC voltage. Connect the positive lead to the starter terminal and the negative lead to the ground. Turn the ignition key and check for voltage; 12 volts indicates power. Next, measure resistance across the starter’s terminals; low resistance shows a good starter coil.
How Do I Check If My Starter Is Bad?
Listen for clicking or grinding sounds when starting. Check if the engine doesn’t crank but lights work. Test voltage with a multimeter for proper current flow.
How To Tell If A Starter Is Bad Or A Solenoid?
Test the solenoid by jumping it; if the starter spins, the solenoid is bad. If you hear a click but no spin, the starter is faulty.
How To Test If A Starter Is Active?
Use a multimeter to check voltage at the starter terminals while turning the key. Voltage near 12V means the starter is active.
How Do You Test A Starter With A Multimeter?
Set the multimeter to voltage mode, check battery voltage, then test voltage at the starter terminals while cranking.
What Voltage Should A Starter Show When Tested?
A healthy starter shows battery voltage (around 12 volts) at its main terminal during testing.
Conclusion
Testing a starter with a multimeter helps find electrical issues quickly. Follow each step carefully for accurate results. This simple method saves time and money on repairs. Regular checks keep your vehicle running smoothly and avoid unexpected breakdowns. Practice these steps to build confidence in car maintenance.
Keep your multimeter ready for easy starter testing anytime.
{ “@context”: “https://schema.org”, “@type”: “Article”, “headline”: “How to Test a Starter With a Multimeter: Quick & Easy Guide”, “description”: “Learn how to test a starter with a multimeter by measuring voltage and continuity to diagnose its condition and ensure proper engine function.”, “url”: “https://www.powertoolstoday.com/how-to-test-a-starter-with-a-multimeter/”, “datePublished”: “2025-11-22”, “dateModified”: “2026-03-18”, “author”: { “@type”: “Organization”, “name”: “Power Tools Today”, “url”: “https://www.powertoolstoday.com” }, “publisher”: { “@type”: “Organization”, “name”: “Power Tools Today”, “url”: “https://www.powertoolstoday.com” }, “mainEntityOfPage”: { “@type”: “WebPage”, “@id”: “https://www.powertoolstoday.com/how-to-test-a-starter-with-a-multimeter/” }, “image”: { “@type”: “ImageObject”, “url”: “https://www.powertoolstoday.com/wp-content/uploads/2025/11/How-to-Test-a-Starter-With-a-Multimeter-1024×576.webp” } }nnnn