If you’ve ever wondered how to quickly check if a battery is still good or diagnose why a light won’t turn on, learning how to use a multimeter is your secret weapon. This handy tool lets you measure voltage, current, and resistance with ease — but only if you know the right steps.
In this guide, you’ll discover simple instructions to use a multimeter safely and effectively, even if you’re a complete beginner. By the end, you’ll feel confident testing circuits, troubleshooting electronics, and saving time and money on repairs. Ready to unlock the power of your multimeter?
Let’s dive in.
Multimeter Basics
A multimeter is a handy tool for measuring electrical values. It helps you check voltage, current, and resistance in circuits. Understanding the basics of a multimeter makes it easier to use. This section covers the types of multimeters and their main parts. Knowing these will prepare you to handle the device safely and effectively.
Types Of Multimeters
There are two common types of multimeters: analog and digital. Analog multimeters use a needle to show readings. Digital multimeters display numbers on a screen. Digital versions are more popular due to their accuracy and ease of use. Some multimeters are basic, while others have extra features like measuring temperature or frequency.
Key Components
A multimeter has several important parts. The display shows the measurement results clearly. The dial or selector switch sets the type of measurement and range. Probes are metal tips connected by wires; they touch the circuit points. The black probe usually goes into the “COM” port. The red probe plugs into the “VΩmA” port for most tests. Buttons or switches may control functions like hold, backlight, or mode selection.
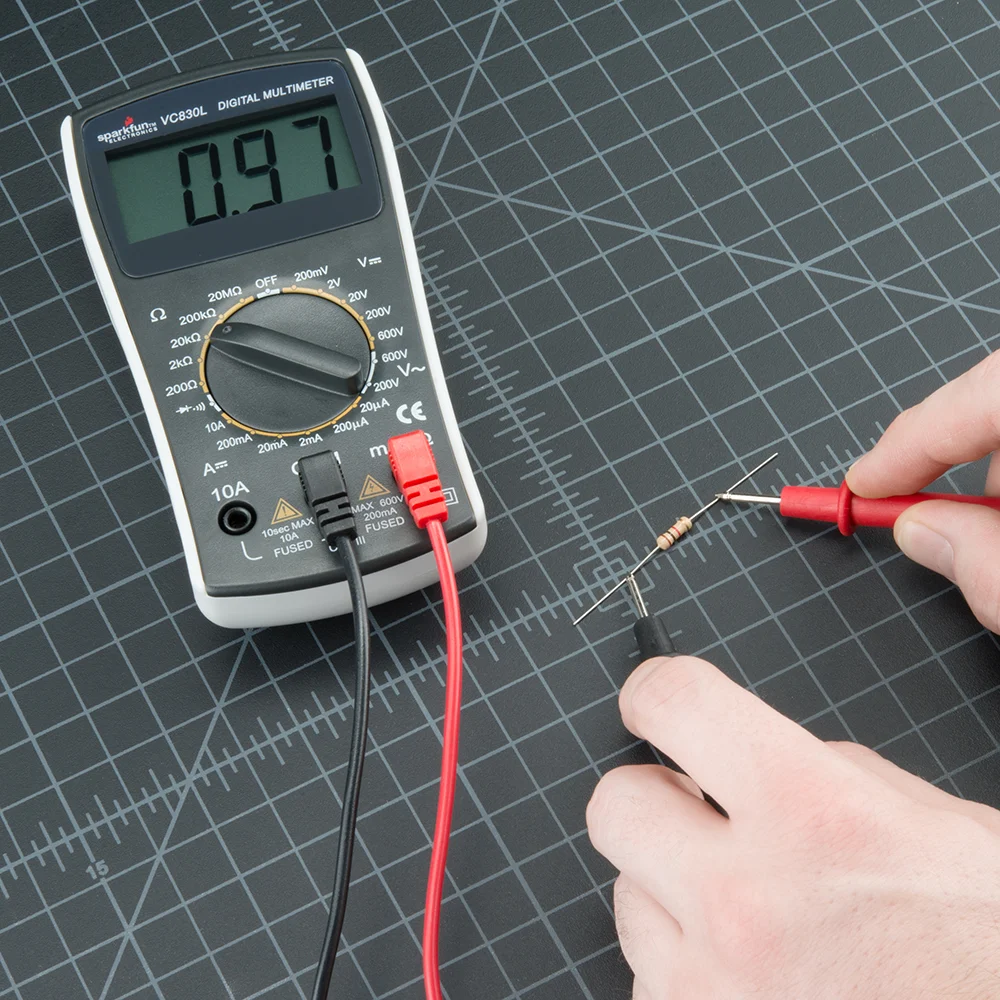
Credit: sparkfuneducation.com
Safety Tips
Using a multimeter involves working with electrical circuits. Safety should always be your top priority. Taking simple precautions can prevent accidents and injuries. Follow these essential safety tips to handle your multimeter correctly and protect yourself from electrical hazards.
Handling Probes
Always hold the probes by their insulated handles. Avoid touching the metal tips during testing. Check probes for any damage before use. Damaged probes can cause electric shocks. Keep your fingers behind the finger guards. This reduces the risk of accidental contact with live parts. Store probes safely after use to prevent wear and tear.
Avoiding Electrical Hazards
Turn off power before connecting the multimeter whenever possible. Never touch exposed wires or terminals during testing. Use the correct settings on the multimeter for the measurement you want. Wrong settings can cause damage or injury. Stand on a dry surface and avoid wet conditions. Water increases the risk of electric shock. Use caution when testing high voltage circuits. If unsure, get help from a professional electrician.
Setting Up Your Multimeter
Setting up your multimeter correctly is the first step to accurate readings. This process involves connecting the probes properly and choosing the right measurement mode. Taking care at this stage saves time and avoids mistakes. Follow these simple steps to prepare your multimeter for use.
Inserting Probes Correctly
Start by identifying the probe jacks on your multimeter. The black probe goes into the “COM” port. This stands for common and is the ground connection. The red probe fits into the jack labeled with a “V”, “Ω”, or “mA”. This jack measures voltage, resistance, or current.
Push the probes firmly into the correct ports. Loose connections cause wrong readings or no readings at all. Always hold the probes by the insulated handles to avoid electric shock.
Selecting Measurement Modes
Turn the dial on your multimeter to select the measurement type. Choose “V” for voltage, “Ω” for resistance, or “A” for current. Be sure to match the mode with what you want to measure.
For voltage, pick “V~” for AC and “V—” for DC. This is important because AC and DC use different settings. Start with the highest range if your meter is not auto-ranging. Adjust down for a more precise reading.
Measuring Voltage
Measuring voltage is one of the most common tasks when using a multimeter. Voltage tells you how much electric potential exists between two points in a circuit. It helps you check batteries, outlets, and many electrical devices. Understanding how to measure voltage safely and correctly is essential for any beginner.
Before measuring, always ensure the multimeter is set to the correct voltage type. There are two main types of voltage: alternating current (AC) and direct current (DC). Each requires a different setting on your multimeter. Use the right mode to get an accurate reading and to protect yourself and the device.
Ac Voltage Measurement
AC voltage is common in household power supplies. To measure AC voltage, turn the dial on your multimeter to the “V~” or “ACV” setting. Insert the black probe into the “COM” port and the red probe into the “VΩmA” port.
Touch the probes to the two points where you want to measure voltage. Usually, this means placing the probes across the live and neutral wires of an outlet. The multimeter will display the voltage value. Make sure to hold the probes by their insulated handles to avoid electric shock.
Dc Voltage Measurement
DC voltage is found in batteries and electronic devices. Set your multimeter dial to the “V–” or “DCV” setting. Connect the black probe to the “COM” port and the red probe to the “VΩmA” port.
Touch the black probe to the negative side and the red probe to the positive side of the battery or circuit. The display shows the voltage level. If the reading is negative, the probes are reversed. Switch their positions to get a positive reading.
Checking Current
Checking current with a multimeter helps you understand how much electricity flows through a circuit. This measurement is important for testing batteries, motors, and other devices. Before measuring, set the multimeter to the correct current range. Start with the highest setting to protect the meter and then adjust down for accuracy.
Measuring current requires breaking the circuit and connecting the multimeter in series. This allows the current to flow through the meter for an accurate reading. Always follow safety steps to avoid electric shock or damage to the multimeter.
Understanding Current Types
There are two main types of current: direct current (DC) and alternating current (AC). DC flows in one direction only, like in batteries. AC changes direction rapidly, like in household outlets.
Set the multimeter to the matching current type. Use “A” or “mA” for amps or milliamps. For DC, select the straight line symbol. For AC, select the wavy line symbol. Using the wrong setting can give wrong readings or harm the device.
Proper Probe Placement
Turn off power before breaking the circuit. Disconnect the wire where you want to measure current. Connect the red probe to the side coming from the power source. Connect the black probe to the wire leading to the load.
Ensure the probes make firm contact with the wires. Keep your fingers away from the metal tips. After placing probes, turn the power back on. Read the current value on the multimeter display carefully.
Do not try to measure current by placing probes across a power source. This can cause a short circuit and damage the meter or circuit. Always connect the multimeter in series for current checks.
Testing Resistance
Testing resistance is a key skill when using a multimeter. Resistance shows how much a material slows electrical current. It helps find broken wires, bad connections, or damaged parts. A multimeter measures resistance in ohms, marked by the Greek letter omega (Ω). Learning to test resistance can save time and money on repairs.
Follow safety tips. Always turn off power to the device before testing resistance. Touch only the insulated parts of the probes. This prevents shock and protects the multimeter from damage.
Choosing The Right Range
Set the multimeter to the resistance mode, often marked as “Ω”. Most multimeters have manual or auto-ranging. Manual range means selecting a scale before testing. Choose the highest range first to avoid overload. If the reading is low, switch to lower ranges for more detail.
Auto-ranging multimeters pick the best range automatically. This makes testing easier for beginners. If the multimeter shows “OL” or “1”, the resistance is too high for the range. Change to a higher range to get a correct reading.
Interpreting Readings
When the probes touch a resistor or wire, the multimeter shows the resistance value. A low number means low resistance and good conductivity. A high number means high resistance or a possible break in the circuit. Infinite or very high resistance suggests an open circuit.
Compare your reading to the component’s specifications. A resistor will have a color code to show its resistance value. If the reading is far off, the resistor may be damaged. Testing resistance helps identify faulty parts quickly.
Continuity Testing
Continuity testing is a simple and useful function on a multimeter. It helps check if an electrical path is complete. This test tells you if wires or connections are broken or intact. The multimeter beeps or shows a reading if the circuit is continuous.
This test is quick and does not require power from the circuit. It is a great way to find faults in wires, switches, and fuses. Continuity testing saves time and helps avoid bigger problems later.
When To Use Continuity Mode
Use continuity mode to check wires for breaks. It also tests switches to see if they open and close properly. Continuity mode helps verify fuses are still good. It can confirm connections in circuit boards and wiring harnesses. This mode is handy during repairs and new installations.
Reading The Results
When you touch the probes to the circuit, listen for a beep. A beep means the path is complete, or continuous. No beep means the circuit is open or broken. Some multimeters show a low resistance number for continuity. A high or infinite reading means no continuity. Always double-check your connections before concluding the test.
Tips For Accurate Readings
Getting accurate readings from your multimeter is key to any electrical task. Small errors can lead to wrong results and wasted time. Follow clear tips to improve your measurement accuracy. Proper handling and care of your multimeter help ensure reliable readings every time.
Avoiding Common Mistakes
Always check the dial setting before testing. Using the wrong mode causes false readings or damages the meter. Connect the black probe to the common (COM) port. The red probe goes into the port marked with V, Ω, or mA depending on the test.
Hold the probes steadily and make good contact with the test points. Avoid touching the metal parts of the probes during testing. Do not test live circuits if you are unsure about safety. Double-check connections and settings before turning on the meter.
Maintaining Your Multimeter
Keep the multimeter clean and dry. Wipe the screen and body with a soft cloth after use. Replace the battery regularly to avoid low power affecting readings. Store the device in a protective case to prevent damage.
Inspect the test leads for cracks or exposed wires. Damaged leads reduce accuracy and can be dangerous. Calibrate your multimeter yearly if you use it often. This keeps measurements precise and trustworthy.
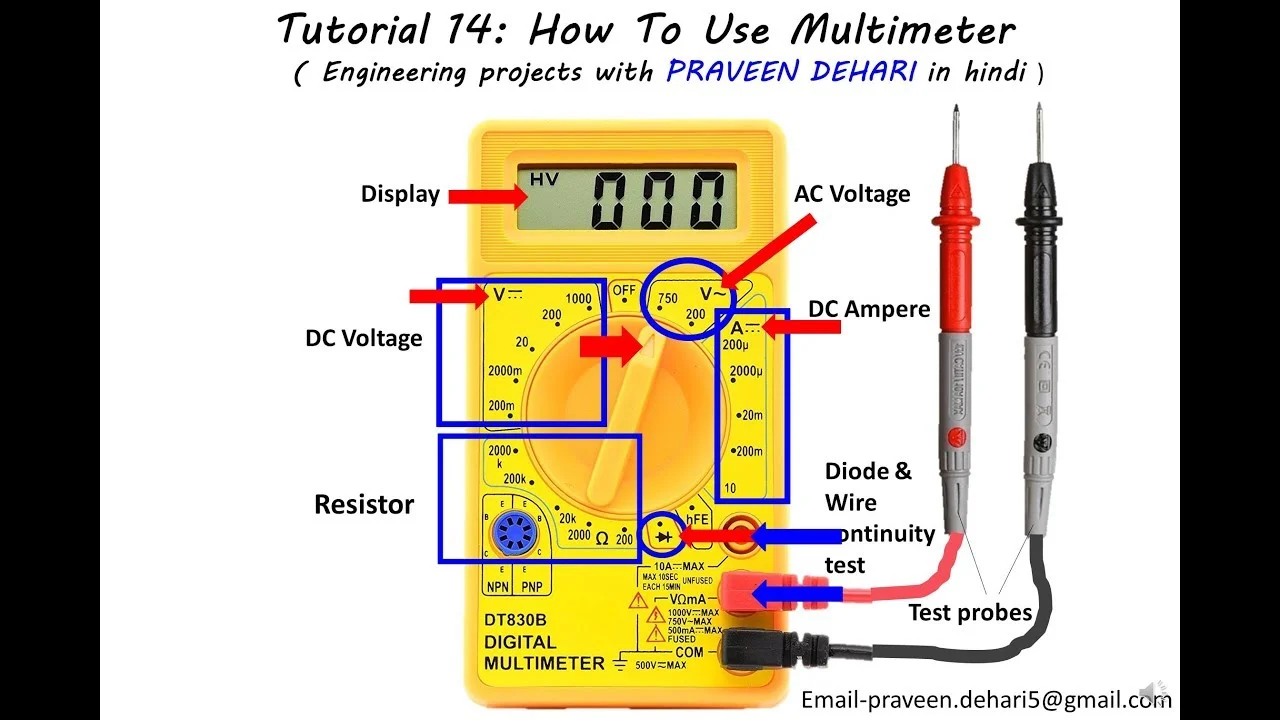
Credit: www.youtube.com
Frequently Asked Questions
How Do You Use A Multimeter For Beginners?
Start by plugging the black probe into the “COM” jack and the red probe into the “VΩmA” jack. Turn the dial to the correct measurement type: voltage, current, or resistance. Touch probes to the circuit or component carefully. Read the display for the measurement result.
How Do I Use A Multimeter To Check Voltage?
Set the dial to AC or DC voltage, plug black probe into “COM,” red into “VΩmA. ” Touch probes in parallel to the source. Read the voltage on the display. Handle probes by insulated parts and select a range above expected voltage to protect the multimeter.
How To Use A Multimeter To Test Wires?
Set the multimeter to continuity or resistance mode. Connect black probe to COM, red to VΩ. Touch probes to each wire end. A beep or low resistance means the wire is good; no beep or high resistance indicates a break.
Always ensure power is off before testing.
What Do The Symbols On A Multimeter Mean?
Multimeter symbols show measurement types: V~ for AC voltage, V– for DC voltage, Ω for resistance, and a diode or continuity icon. They guide correct function and range selection.
What Is A Multimeter Used For?
A multimeter measures voltage, current, and resistance in electrical circuits safely and accurately.
How Do I Set Up A Multimeter For Voltage?
Turn the dial to AC or DC voltage, plug probes in correct ports, then test the circuit.
Authoritative External References
- Fluke Learning Center — Professional guidance on multimeter functions, measurement basics, and electrical troubleshooting.
- OSHA Electrical Safety Standards — Official workplace electrical safety guidance, hazard awareness, and safe work practices.
- NFPA 70 National Electrical Code — Core electrical code reference for safe electrical practices and installations.
Conclusion
Using a multimeter helps you test electrical values safely and accurately. Practice reading voltage, current, and resistance to gain confidence. Always double-check your settings before measuring. Keep the probes steady and avoid touching metal parts. Regular use makes these steps easier over time.
A multimeter is a useful tool for many home and hobby projects. Start simple, and build your skills step by step. Safety and patience matter most when working with electricity.
