Using a plunger doesn’t always fix a stubborn toilet clog. Sometimes, you need something stronger and more precise. That’s where the toilet auger comes in—a special tool made to break up tough clogs deep in your toilet’s drain. If you’ve never used one before, don’t worry. With the right steps and a little patience, you can clear most toilet clogs on your own. This guide will show you exactly how to use a toilet auger safely, efficiently, and with confidence, even if you’re a complete beginner.
What Is A Toilet Auger?
A toilet auger is a plumbing tool designed to clear blockages inside toilets. It has a flexible metal cable, usually 3 to 6 feet long, with a coiled end for grabbing or breaking up clogs. The cable is housed in a plastic or metal tube with a crank handle. Unlike regular drain snakes, the auger is specially shaped to fit the toilet’s curve without scratching the porcelain.
Why is this tool so effective? The auger’s design lets you reach and break apart clogs that are too far for a plunger, but not deep enough for a plumber’s full drain snake. This makes it ideal for toilet-specific blockages—things like too much toilet paper, small toys, or hygiene products accidentally flushed down.
When Should You Use A Toilet Auger?
Before reaching for a toilet auger, it helps to know when it’s truly needed. Here are signs that an auger is the right choice:
- The toilet is clogged and plunging does not work — see how to unclog a toilet when a plunger fails for more options.
- Water rises but drains very slowly.
- The clog seems deep, past the trap bend.
- You hear gurgling or see bubbles when other drains in the house are used.
Remember, if the toilet is overflowing and won’t stop, turn off the water supply before you do anything else. If you suspect a non-flushable object like a child’s toy, an auger is often the only tool that can help without calling a professional. Don’t have one handy? Try how to unclog a toilet without a plunger for at-home alternatives.
:max_bytes(150000):strip_icc()/how-to-use-a-toilet-auger-2719038-Hero-9fed37f3e59042cab0f9d7b7cc372ac0.jpg)
Credit: www.thespruce.com
What You’ll Need Before You Start
Being prepared saves time and mess. Here’s a quick checklist:
- Toilet auger (ensure it’s clean and working)
- Rubber gloves (protect your hands)
- Old towels or rags (for drips and splashes)
- Bucket (optional, for dirty water)
- Cleaning spray and disinfectant (clean up after)
- Protective eyewear (if you’re worried about splashes)
Most people forget one thing: clearing space around the toilet. Move bath mats, trash cans, or anything that could get wet or dirty. Also, keep a trash bag nearby for any debris you may pull out.
How To Use A Toilet Auger: Step-by-step Instructions
1. Prepare The Area
Lay old towels or rags around the toilet base. Put on your gloves. Make sure the toilet bowl isn’t too full—if it is, remove some water with a cup and bucket to avoid spills. This small step can prevent a big mess.
2. Position The Auger
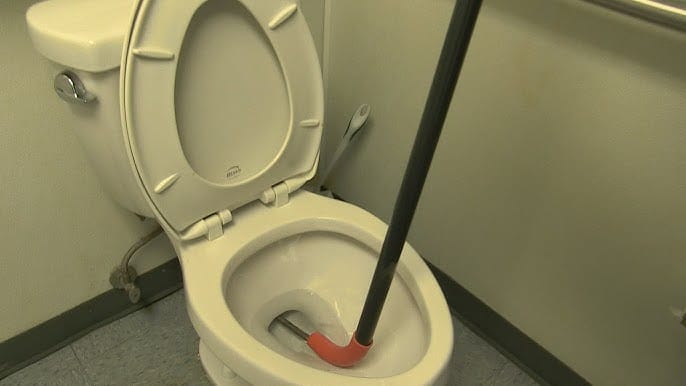
Hold the auger by the handle and guide the curved tube end into the toilet bowl. The curved part of the tube should point down the drain hole. Carefully insert the end until the rubber or plastic sleeve rests against the bowl’s opening.
Tip: The rubber sleeve protects your toilet from scratches. Never force the auger, or you could damage the porcelain.
3. Feed The Cable
Slowly turn the crank handle clockwise. This pushes the cable through the tube and into the toilet’s trap. Keep a steady, gentle pressure—if you feel resistance, stop and wiggle the handle back and forth. Forcing the cable can kink it or damage the toilet.
You’ll know you’ve hit the clog when turning the crank becomes harder or you feel a “bump. ”
4. Break Up Or Hook The Clog
Once you reach the blockage, keep gently cranking and pushing. The auger’s coiled end is designed to break apart soft clogs or hook onto objects. If you feel the cable push through, turn the handle a few more times to make sure the clog is cleared.
If you think the auger has hooked onto something solid (like a toy), carefully pull back the cable while keeping tension on the handle.
5. Retract The Auger
Slowly reverse the crank to pull the cable back into the tube. Go slow to avoid splashing. Keep a towel handy to wipe the auger as you pull it out—there may be debris or waste attached.
Tip: If you retrieve a solid object, dispose of it safely in a trash bag, not back down the toilet.
6. Test The Toilet
Once the auger is fully out, flush the toilet. If the water drains quickly and smoothly, the clog is gone. If not, repeat the process once or twice. Most blockages clear within one or two tries.
If the toilet remains clogged after several attempts, the blockage may be deeper in the pipes. In that case, it’s time to call a professional plumber.
7. Clean Up
Wash the auger thoroughly with hot water and disinfectant before storing it. Clean the toilet area with disinfectant spray, and wash your hands thoroughly—even if you wore gloves.
Common Mistakes To Avoid
A toilet auger is simple to use, but beginners often make these mistakes:
- Forcing the cable: This can scratch the toilet or kink the cable.
- Not using enough protective covering: Splashes happen, so protect the floor and yourself.
- Skipping a test flush: Always check the result before putting everything away.
- Using the wrong tool: Never use a regular drain snake or coat hanger; it can damage the toilet.
- Not cleaning the tool afterward: Germs and bacteria can linger. Disinfect your auger every time.
One non-obvious mistake: Many people don’t check the auger’s length. Most home augers are 3 feet long, which is enough for standard toilets. For commercial or older toilets, you may need a 6-foot auger.
Types Of Toilet Augers And How They Differ
There are several types of toilet augers. Knowing the difference helps you choose the right one for your situation.
| Type | Length | Best For | Pros | Cons |
|---|---|---|---|---|
| Manual Toilet Auger | 3-6 feet | Home toilets | Affordable, easy to use | Requires physical effort |
| Power Auger (Drill-Operated) | 6+ feet | Commercial/large toilets | More power, less effort | Expensive, risk of damage |
| Flexible Cable Auger | 3-6 feet | Curved or older toilets | Easy in tight bends | Less durable |
Most homes do well with a basic manual auger, but if you have frequent clogs or unusual plumbing, consider a powered model.
Credit: www.youtube.com
Toilet Auger Vs. Plunger: Which Should You Use?
Many people wonder if a plunger or auger is better for toilet clogs. Here’s a comparison to help you decide:
| Feature | Plunger | Toilet Auger |
|---|---|---|
| Best for | Shallow clogs | Deep or tough clogs |
| Skill level | Beginner | Beginner/Intermediate |
| Damage risk | Very low | Low if used correctly |
| Cost | Low | Medium |
| Success rate | 60-70% | 80-90% |
If the plunger fails after a few tries, use a toilet auger. It’s designed to reach clogs a plunger can’t.
Safety And Hygiene Tips
Toilet augers are safe when used correctly, but always follow these hygiene and safety rules:
- Always wear rubber gloves.
- Avoid splashing water or waste.
- Disinfect the auger after each use.
- Keep children and pets away during the process.
- Never use harsh chemicals before or after augering (they can splash and cause burns).
Pro tip: If you’re sensitive to odors, a small mask can help. Ventilate the bathroom by opening a window or running a fan.
Credit: drainage-plumbing.co.uk
When To Call A Professional
Most clogs can be cleared with a toilet auger. However, contact a plumber if:
- The clog does not clear after several attempts.
- Multiple drains in your house are blocked.
- You hear gurgling in other pipes.
- Water backs up into sinks or tubs when you flush.
These signs suggest a bigger problem in your main drain line.
Maintenance: Keeping Your Auger Ready
Taking care of your toilet auger will make it last for years:
- Rinse the cable and handle after every use.
- Dry completely to prevent rust.
- Store in a dry, cool place.
- Oil the cable lightly if you use it often.
Some augers come with a storage bag—use it to keep germs away from other tools.
Real-world Example
Maria, a mother of two, faced a toilet clog after her child flushed a small action figure. Plunging failed, so she used a 3-foot toilet auger. By carefully feeding the cable and turning the handle, she hooked the toy and pulled it out.
After cleaning the area, the toilet worked perfectly again. This shows how a toilet auger can save time and money compared to calling a plumber.
Non-obvious Insights For Beginners
- Cable kinks are avoidable: If your auger cable kinks, you’re turning too hard or too fast. Slow, steady pressure works best.
- Check for double bends: Some toilets have a second bend in the trap. If you feel resistance sooner than expected, the auger may be catching on the bend, not the clog. Gently adjust the angle before pushing further.
Frequently Asked Questions
What If The Auger Gets Stuck In The Toilet?
Stay calm. Gently wiggle and rotate the handle while slowly pulling back. Don’t force it—this can damage the toilet or the tool. If it’s truly stuck, call a plumber for help.
Can I Use A Regular Drain Snake Instead Of A Toilet Auger?
No. Regular drain snakes are not designed for toilets and can scratch or crack the porcelain. Always use a toilet-specific auger.
How Often Should I Clean My Toilet Auger?
After every use. Rinse with hot, soapy water and disinfect. This prevents bacteria buildup and rust.
What Should I Do If The Clog Keeps Returning?
Frequent clogs may mean something is stuck further down the drain or there’s a plumbing issue. If a toilet auger only fixes the problem for a short time, call a professional to inspect your pipes.
Where Can I Buy A Good Toilet Auger?
You can find them at hardware stores, home centers, or online. For more buying tips and reviews, check sites like Home Depot.
Using a toilet auger isn’t difficult, but it does require care and patience. With the right preparation, you can clear most clogs yourself and avoid expensive plumbing bills. Just remember to go slow, protect your hands and home, and always clean up thoroughly. Over time, you’ll gain confidence and skill—and your toilet will thank you.
