
When it comes to woodworking or home improvement, choosing the right nailer can make a huge difference. Two of the most common options are the 23 gauge pin nailer and the 18 gauge brad nailer. At first, they might look similar, but each tool serves a unique purpose. If you’re unsure which one is best for your project, this comparison will break down everything you need to know. We’ll look at 23 important aspects to help you decide with confidence.
1. Nail Size And Thickness
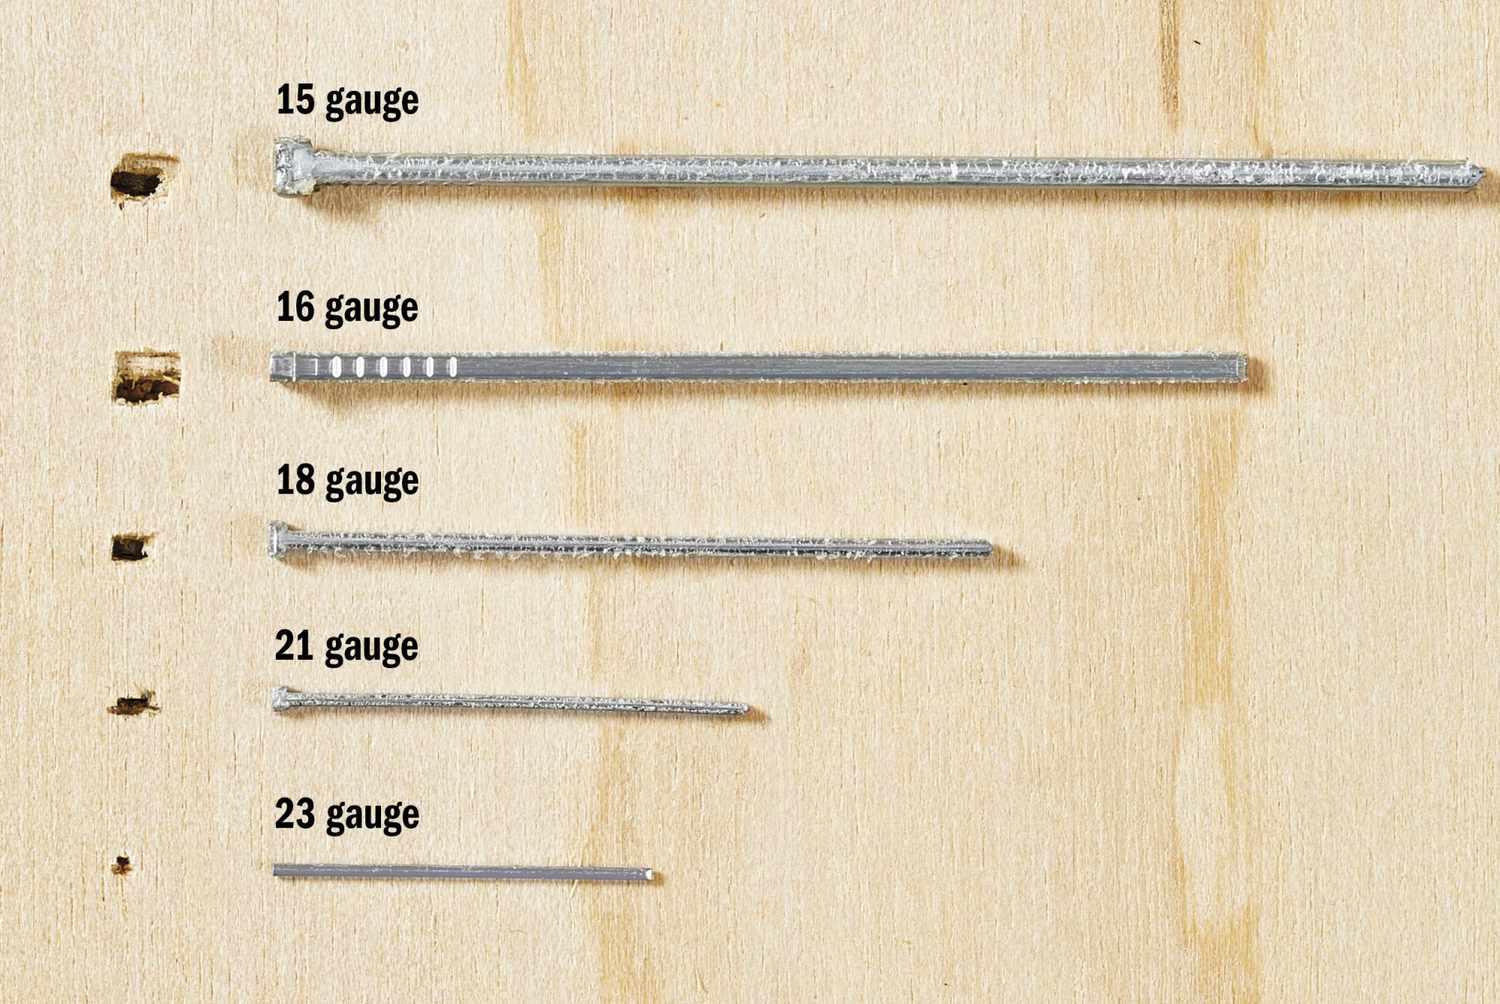
The 23 gauge pin nailer uses very thin pins, almost like needles. These pins are about 0.025 inches in diameter. In contrast, the 18 gauge brad nailer shoots brads that are thicker, measuring around 0.0475 inches. This difference in thickness affects holding strength and the size of the hole left in your workpiece.
2. Fastener Length Range
Pin nailers usually accept pins from 1/2 inch up to 1-3/8 inches long. Some advanced models can handle 2-inch pins. Brad nailers, however, typically use brads from 5/8 inch to 2 inches. If you need to fasten thicker materials, the brad nailer’s longer range is an advantage.
3. Holding Strength
Because pin nails are so thin, they have less holding power. They’re great for delicate trim, but not for anything that needs to support weight. Brad nails are stronger and can hold heavier pieces together, making them better for small molding or light furniture assembly.
4. Hole Visibility
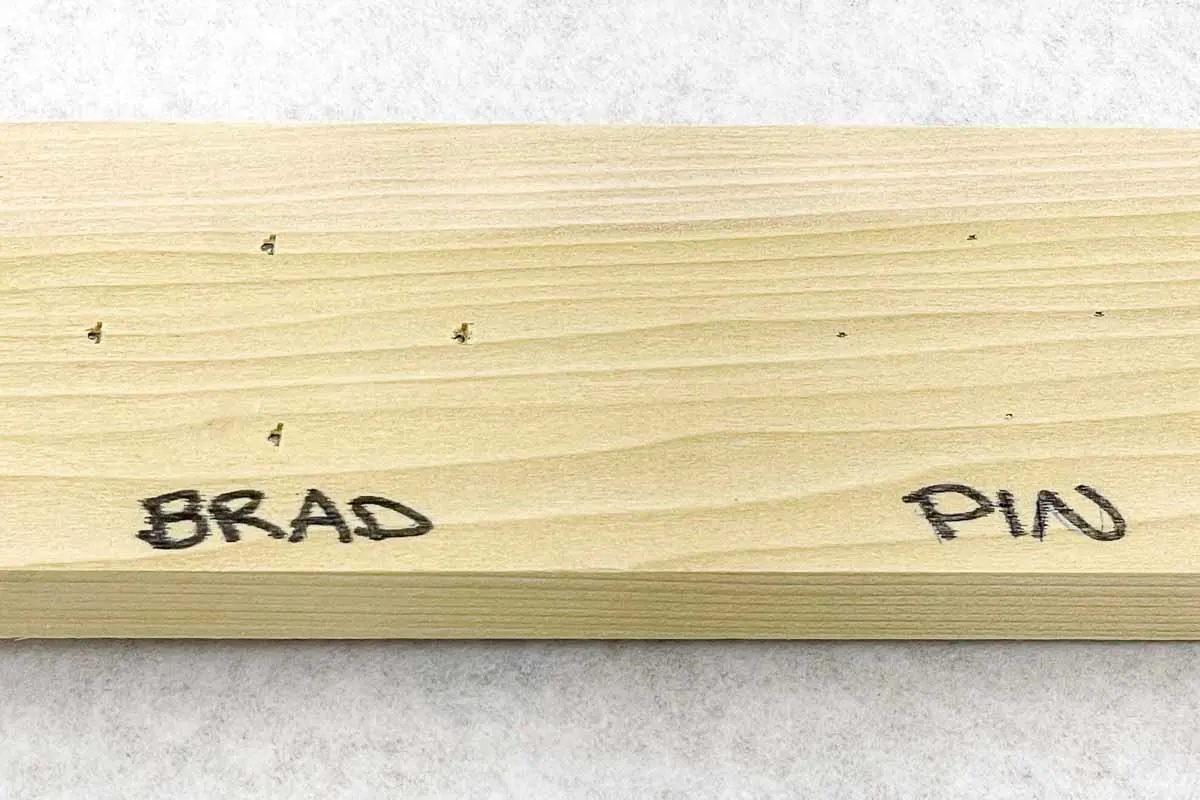
Pin nails leave such a tiny hole that it’s almost invisible, even up close. Brad nails, being thicker, leave a slightly larger hole that may need to be filled with wood putty if you want a flawless finish. If appearance is your top concern, the 23 gauge pin nailer is the winner.

Credit: www.forums.woodnet.net
5. Surface Splitting
Thin pin nails are less likely to split delicate trim or moldings. Brad nails, while still thin, can sometimes split smaller pieces, especially in fragile woods. For fine work, pin nailers are safer.
6. Wood Types Supported
Pin nailers are best for softwoods and delicate hardwoods. They’re great for attaching thin pieces without damage. Brad nailers can handle both softwoods and hardwoods, but may struggle with extremely hard woods or very thin trim.
7. Glue Assistance
Pin nailers are often used with glue. The pins hold pieces in place while the glue dries, acting as invisible clamps. Brad nails can also be used with glue, but their larger size means they provide more strength even without glue.
8. Types Of Projects
Pin nailers shine in cabinetmaking, small trim, and finishing work where appearance matters. Brad nailers are more versatile for tasks like attaching baseboards, crown molding, or building small furniture.
9. Material Thickness
With their delicate pins, pin nailers are best for materials under 1/2 inch thick. Brad nailers, with their greater holding power, can secure pieces up to 3/4 inch or more.
10. Jamb Clearance
Pin nailers are usually more compact, letting you work in tight spaces like cabinet corners. Brad nailers are bulkier, so they might not fit as easily into small spaces.
Credit: www.thehandymansdaughter.com
11. Magazine Capacity
Most pin nailers hold around 100 pins. Brad nailers typically hold about 100 brads as well. The difference is minor, but some brad nailers can take larger magazines for heavy-duty work.
12. Power Source Options
Both tools are available in pneumatic (air-powered) and cordless models. Pneumatic versions are lighter, but cordless models give you more freedom. The choice depends on your workspace and preference.
13. Jam Frequency
Because pin nails are so thin and headless, jams are rare. Brad nailers can jam more often, especially with bent brads or improper loading. Modern brad nailers often include tool-free jam release to make fixes easier.
14. Loading Mechanism
Pin nailers typically have a simple side-loading magazine. Brad nailers may use either side-load or bottom-load magazines. Both are quick to reload, but it’s important to use the right size fasteners to prevent jams.
15. Trigger Safety
Brad nailers usually feature a safety tip that must be pressed against the work surface before firing. Pin nailers sometimes lack this, so extra care is needed to prevent accidental firing.
16. Firing Modes
Most pin nailers offer a single-fire mode for precise control. Brad nailers often have both single-fire and bump-fire modes, allowing for faster work in repetitive tasks.
17. Cost
Pin nailers are generally less expensive, with basic models starting around $60. Brad nailers, especially cordless or advanced models, can cost $80 or more. Over time, brad nails are slightly more expensive than pins.
18. Maintenance Needs
Both tools require regular oiling if pneumatic, and occasional cleaning. Pin nailers, having fewer moving parts and less jamming, are a bit simpler to maintain.
19. Brand And Model Variety
Brad nailers are more popular and have more options from different brands. Pin nailers are more specialized, so you’ll find fewer choices, but top brands like Makita, DeWalt, and Bostitch make both.
20. Noise Level
Pin nailers are quieter because of their smaller pins and less forceful firing mechanism. Brad nailers make a louder “pop,” which can matter if you’re working indoors or in noise-sensitive areas.
Credit: www.livowalny.com
21. Safety Concerns
Pin nails are so thin they may actually go through fingers or be hard to see if misfired, making them surprisingly hazardous. Brad nails are more visible, but both tools require eye protection and careful handling.
22. Availability Of Fasteners
Brad nails are easy to find at most hardware stores in many lengths and finishes. Pin nails are less common, but still available at major outlets. Always check your local supply before choosing a tool.
23. Common Mistakes By Beginners
A frequent mistake is using a pin nailer for tasks needing strength. Pins are not for heavy-duty jobs. Another is underestimating how invisible pin holes can be—some users end up overfilling with putty. With brad nailers, beginners sometimes split wood by using brads that are too long or thick for the material.
Below is a summary table comparing the two tools on the key points mentioned:
| Feature | 23 Gauge Pin Nailer | 18 Gauge Brad Nailer |
|---|---|---|
| Nail Size | Very thin (0.025″) | Thicker (0.0475″) |
| Holding Strength | Low | Medium |
| Hole Visibility | Almost invisible | Visible, may need filling |
| Best For | Delicate trim, finishing | Baseboards, molding, small furniture |
| Cost | Lower | Higher |
Side-by-side Example: Installing Trim
Let’s say you want to attach a thin piece of decorative molding to a cabinet. If you use a 23 gauge pin nailer, the molding will stay in place and there will be almost no visible holes, but you’ll need glue to provide strength. If you use an 18 gauge brad nailer, the trim will be held more securely, but you’ll need to fill small holes for a perfect look.
Advanced Features Worth Considering
Some newer models of both tools include LED lights, dry-fire lockout (which prevents firing with no nails loaded), and adjustable depth settings. These features help you work more precisely and avoid mistakes.
Here’s a quick look at common advanced features:
| Advanced Feature | Pin Nailer | Brad Nailer |
|---|---|---|
| LED Light | Sometimes | Common |
| Depth Adjustment | Rare | Common |
| Dry-Fire Lockout | Rare | Common |
When To Choose Each Tool
If your project involves tiny, delicate pieces and you want a nearly invisible finish, go for the 23 gauge pin nailer. For most home trim, baseboards, and small furniture, the 18 gauge brad nailer is more practical. Many professional woodworkers own both, switching based on the job.
Non-obvious Insights
- Pin nails have no head, so they can slide out under stress—never use them where fastener withdrawal is a risk.
- Pin nailers can shoot nails so thin they’re hard to see if stuck in your project, which can dull your saw blade if you cut through them later. Always mark pinned areas if you plan to cut them.
Real-world Example
A cabinetmaker building custom bookshelves uses a pin nailer to hold thin edge banding in place while the glue sets. The pins disappear and don’t require putty. For attaching thicker shelf supports, they switch to a brad nailer for a stronger hold.
Practical Tips For Best Results
- Test nailers on scrap wood first to check depth and appearance.
- Always wear safety glasses—pin nails can bounce or travel through wood unexpectedly.
- Choose the shortest nail that will do the job to avoid splits or blowouts.
- Keep extra fasteners on hand; running out mid-project slows you down.
For more on the differences and safe use of each tool, you can check this in-depth guide from Wikipedia.
Frequently Asked Questions
Can I Use A 23 Gauge Pin Nailer Instead Of An 18 Gauge Brad Nailer?
No, you shouldn’t. Pin nailers do not have the holding strength of brad nailers. Use pin nailers for delicate, decorative trim and brad nailers for tasks that need more grip, like baseboards or frames.
Do I Need To Fill Holes Made By A 23 Gauge Pin Nailer?
Usually not. The holes are so tiny they’re almost invisible on painted or stained surfaces. Only fill them if you want a perfectly smooth finish or if the wood is very light.
Are Pin Nails Strong Enough To Hold Cabinets?
No. Pin nails are for holding pieces while glue dries, not for structural support. For cabinets or anything load-bearing, use brad nails, finish nails, or screws.
Which Tool Is Better For Beginners?
An 18 gauge brad nailer is more versatile and easier for beginners. It works for more projects and is less likely to cause problems if used correctly.
What Safety Gear Should I Use With These Nailers?
Always wear safety glasses and keep your hands clear of the firing path. Consider hearing protection with brad nailers, as they are louder.
Choosing between a 23 gauge pin nailer and an 18 gauge brad nailer depends on your project’s needs. Both have a special place in woodworking and home improvement. Understand their strengths and limitations, and you’ll get cleaner, stronger, and safer results every time.
