Last Updated: March 20, 2026
Drilling into brick is one of those tasks that looks intimidating but becomes straightforward once you understand the right approach. Whether you’re mounting a TV, hanging heavy shelves, installing outdoor lighting, or securing a deck ledger board, this step-by-step guide covers everything you need — from choosing between brick and mortar, to selecting the right drill and bits, to finishing with anchors that actually hold.
By the end of this guide, you’ll have the confidence to tackle any masonry drilling project safely and correctly, without cracking your brick or burning out your drill.
Should You Drill Into Brick or Mortar?
Before you pick up a drill, you need to decide whether to go through the brick itself or through the mortar joints between the bricks. This single decision has a major impact on how well your fastener holds — and how easy repairs will be if you ever need to remove it.
Drill Into Mortar for Light Items (Under 10 lbs)
Mortar is softer than brick, making it faster and easier to drill into. For lightweight items — small picture frames, decorative plaques, or a mailbox — the mortar joint is a perfectly acceptable target. It’s also much easier to patch. A tube of pre-mixed mortar repair compound can fill a mortar hole almost invisibly, whereas filling a hole in a brick face requires color-matching and more effort.
However, mortar has real limitations. It degrades faster than brick, especially in older homes where the mortar may already be crumbly or have hidden voids. If an anchor lands in a void, it won’t grip. For anything weighing more than 10 lbs, mortar is not reliable enough.
Drill Into Brick for Heavy Items (Over 10 lbs)
For heavier items — large mirrors, floating shelves, TV mounts, coat racks, or wall-mounted cabinetry — you must drill directly into the brick. Brick is a kiln-fired ceramic, making it far denser and stronger than mortar. A properly seated expansion anchor in solid brick will hold 20–50 lbs or more without loosening over time.
One caution: avoid drilling near the very edge of a brick (stay at least 1 inch from any edge). The edges are the weakest structural point and can chip or crack under pressure. Also, if your brick shows signs of spalling, cracking, or crumbling, find a sound section or consider distributing the load across multiple anchor points using a mounting plate or French cleat.
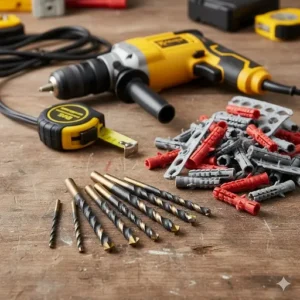
Tools and Safety Gear You’ll Need
Using the correct tools is the single biggest factor in drilling clean, accurate holes in brick. The wrong drill or bit will either fail to penetrate or damage your wall and equipment.
The Right Drill for the Job
A hammer drill is the standard choice for most homeowners and DIYers. Unlike a regular rotary drill, a hammer drill combines spinning with a rapid percussive hammering motion — this pulverizes the brick material as the bit rotates, dramatically reducing the time and effort needed. A corded hammer drill with at least 600–700 watts (or a cordless model at 18V–20V with a hammer setting) handles most residential brick drilling tasks. For small holes in softer brick, a quality cordless hammer drill works well.
A rotary hammer (SDS drill) is the professional-grade upgrade. It uses a piston mechanism to deliver a much harder blow than a standard hammer drill, making it ideal for holes larger than ½ inch, extremely hard concrete bricks, or when you need to drill many holes quickly. If you have a one-time large project, consider renting a rotary hammer — it will save you significant time and effort. Not sure which to use? Read our guide on whether you need a hammer drill for concrete and masonry.
A regular rotary drill can technically work on very soft brick for very small holes, but it will take much longer, generate excessive heat, and wear out your bits quickly. It is not recommended for standard brick drilling.
Masonry Drill Bits
Understanding the different types of drill bits makes it easier to choose the right one. Masonry drill bits are essential — never attempt to use wood or metal bits on brick. Learn more about the difference between wood and metal drill bits. They will dull almost instantly. Masonry bits feature a wide, carbide-tipped head designed to crush and grind through stone rather than cut through it. For best results, use tungsten carbide-tipped bits. If you’re also working on metal, consider reading our cobalt vs titanium drill bit comparison for those projects. You’ll want at least two sizes: a smaller bit (around ⅛ inch) for the pilot hole, and a larger bit sized to match your wall anchor diameter for the final hole.
Bits do wear out with use. Keep spare bits on hand, especially for larger projects. A dull bit not only slows you down, it generates more heat and increases the risk of cracking the brick.
Essential Safety Equipment
Brick dust contains crystalline silica, a serious lung hazard — inhaling even a small amount repeatedly can cause permanent lung damage over time. This is not optional safety advice. Always wear an N95 respirator (not just a dust mask) throughout the entire drilling and cleanup process. Beyond respiratory protection, you should also wear safety goggles (to protect from flying stone chips), hearing protection (hammer drills are extremely loud), and work gloves for grip and hand protection from hot bits and sharp debris.
Full Tool and Supply List
- Hammer drill (corded or 18V–20V cordless with hammer mode)
- Masonry drill bits — carbide-tipped (pilot size + anchor size)
- Tape measure and pencil
- Center punch or large nail and hammer
- Painter’s tape or masking tape (for depth marking)
- N95 respirator
- Safety goggles
- Hearing protection
- Work gloves
- Drop cloth or tarp
- Canned compressed air or shop vacuum
- Wall anchors (plastic plug, sleeve anchor, wedge anchor, or masonry screws)
- Bubble level
How to Drill Into Brick: Step-by-Step
Follow these steps carefully and you’ll drill a clean, accurately placed hole every time.
Step 1: Measure and Mark Your Drill Points
Use a tape measure to find the correct location for your hole and mark it clearly with a pencil. If you’re hanging an item with multiple mounting points (like a shelf bracket or TV mount), hold the bracket or a paper template against the wall and mark through the mounting holes to ensure perfect alignment. Use a bubble level to confirm your marks are level or plumb if you’re placing multiple holes.
Keep all marks at least 1 inch away from the edge of any brick to prevent cracking. Avoid drilling near existing cracks or areas of spalling.
Step 2: Create a Starting Divot
Masonry bits are blunt by design — they don’t have a sharp point like wood bits. When you first place the bit on the smooth brick surface, it can “walk” or skate away from your mark before it bites in. To prevent this, use a center punch (or a large nail) and a hammer to tap a small dimple into the brick at your pencil mark. This divot gives the drill bit a seat to start from, ensuring your hole ends up exactly where you want it.
Step 3: Set Your Drilling Depth
Before drilling, determine how deep your hole needs to be. Check the packaging on your wall anchors or masonry screws for the recommended hole depth. As a general rule, drill approximately ¼ inch deeper than your anchor’s length to allow full seating.
To mark the depth on your drill bit, hold the anchor up alongside the bit and wrap a piece of painter’s tape around the bit at the correct depth point. This tape flag acts as a visual stop guide — when the tape touches the wall surface, you’ve reached your target depth. If your hammer drill has a built-in depth stop, set that instead.
Step 4: Drill the Pilot Hole
Insert your smaller masonry bit (around ⅛ inch). Set your drill to a low speed and, if it has a hammer mode switch, you can initially leave it in standard drill mode just to get the hole started — this reduces the chance of surface cracking from the hammer action before the bit has seated. Place the bit tip into the divot you created in Step 2.
Hold the drill firmly with both hands, keeping it perfectly perpendicular (90 degrees) to the wall. Drilling at an angle will misalign your anchor and significantly reduce holding power. Apply firm, steady pressure and squeeze the trigger. Once the bit has created a small depression and is no longer at risk of wandering, engage the hammer mode and gradually increase speed.
Every 10–15 seconds, pull the spinning bit out slightly to allow brick dust to escape and to let the bit cool. Continue until the tape depth marker reaches the wall surface.
Step 5: Drill the Final Hole
Swap in the larger masonry bit sized to match your wall anchor diameter. Place its tip into the pilot hole and repeat the drilling process — perpendicular to the wall, steady pressure, periodic withdrawal to clear dust. Drill until your depth marker indicates you’ve reached the required depth.
If the bit gets very hot (especially when drilling multiple holes), allow it to air cool. Do not plunge a hot carbide bit into water — the sudden temperature shock can shatter the tip.
Step 6: Clear the Dust from the Hole
This is the most commonly skipped step, and it’s one of the most important. Your drilled hole will be packed with fine brick dust. If you insert an anchor into a dusty hole, the anchor grips the loose dust instead of the brick — resulting in a weak hold that can fail under load.
Use a can of compressed air to blow the dust out of the hole (aim the nozzle in and blast several times), or use a shop vacuum with a crevice attachment to suck it out. A turkey baster also works in a pinch. The hole should be clean and clear before you insert anything.
Step 7: Install the Anchor
Choose the right anchor for your load and insert it into the clean hole. For plastic expansion anchors, simply push it in flush with the wall surface — you may need to tap it gently with a hammer to seat it fully. For sleeve anchors or wedge anchors for heavier loads, follow the manufacturer’s instructions precisely for correct insertion and tightening. Do not overtighten screws into plastic anchors, as this can split the anchor and strip the hole.
Step 8: Attach Your Fixture and Verify Level
Drive your screw into the seated anchor using a drill with a driver bit, a manual screwdriver, or (for hex-head masonry screws) a socket and ratchet. An impact driver can also be used carefully at low torque for faster fastening. Hand-tighten the final turns to avoid over-stressing the anchor. Hang your item, then use a bubble level or smartphone level app to make any final alignment adjustments before fully tightening.
Choosing the Right Anchor for Brick
Not all wall anchors are created equal. Using the wrong anchor for your load or brick type is one of the most common reasons fixtures fail. Here’s how to match the anchor to the job:
Plastic or nylon expansion anchors are suitable for lightweight items under 10 lbs. They expand inside the hole when a screw is driven in, gripping the brick walls of the hole. They are the most common and least expensive option for small tasks like hanging picture frames or small hooks.
Masonry screws (e.g., Tapcon screws) are an excellent choice for medium-weight items. These hardened screws thread directly into the brick without requiring a separate plastic anchor — the threads cut into the masonry itself. They’re fast to install, easy to remove, and very reliable. The hole size must be precise (follow the manufacturer’s bit size recommendation).
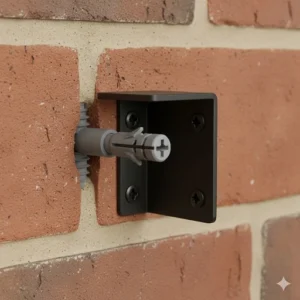
Sleeve anchors are designed for heavier loads. They consist of a bolt with an expandable sleeve — as you tighten the bolt, the sleeve expands and grips the sides of the hole. Ideal for shelving, heavy artwork, or outdoor fixtures.
Wedge anchors are the strongest option, designed for very heavy permanent fixtures like wall-mounted shelving systems, structural brackets, or large TV mounts. They require precise hole sizing and are very difficult to remove once installed.
For extremely heavy loads distributed across a large area — like a heavy wall-mounted entertainment unit — consider using a mounting plate or French cleat system to spread the weight across multiple anchor points in multiple bricks, rather than relying on a few heavily stressed anchors.
Alternatives to Drilling Into Brick
If you’re a renter, working with historically significant brick you don’t want to damage, or simply want to avoid making permanent holes, there are a few alternatives worth considering. Heavy-duty adhesive strips or construction-grade adhesive hooks can support picture frames, small mirrors, and decorative items on clean, smooth brick surfaces. These are not suitable for heavy loads but work well for items under 5 lbs on a smooth face.
Freestanding furniture — bookcases, display stands, shelving units with feet — eliminates the need to attach anything to the wall entirely. If you’re looking to organize a masonry space without drilling multiple holes, see our guide on how to hang pegboard on a concrete wall. For renters in particular, this is often the most practical solution.
How to Drill Into Brick Without Cracking It
Cracking brick is the most common concern beginners have, and it’s a legitimate one. Here’s how to prevent it:
Always start at a low speed without the hammer function engaged until the bit has created a stable starting hole. Drilling near the edge of a brick (within 1 inch of any edge) dramatically increases crack risk — stay well clear of edges. Use sharp, fresh masonry bits; dull bits require more pressure and more heat, both of which stress the brick. Apply steady, consistent pressure rather than forcing or jamming the drill forward. Let the hammer mechanism do the work — excessive manual force is usually counterproductive. If you feel the drill struggling or vibrating unusually, stop, clear the dust, and check that your bit is still sharp.
What to Do If You Hit Rebar or Metal
If you’re drilling through a brick wall and suddenly hear a metallic grinding sound or feel unusually hard resistance, stop immediately. You may have hit a metal reinforcement bar (rebar), a metal tie, or an electrical conduit. Do not force the drill further. Try repositioning your hole a few inches in any direction. If you consistently hit metal in multiple spots, consult a structural professional before proceeding — there may be load-bearing reinforcement you must not damage.
Drilling Through Brick for Wires or Pipes
When you need to drill all the way through a brick wall for wiring, pipes, or through-wall air conditioning units, always start drilling from the visible side — the side that will show when the project is finished. As a drill bit exits the far side of the brick, it can cause blow-out chipping on that face. By starting on the visible side, any blow-out occurs on the hidden side.
For large-diameter holes (over 1 inch) required for drain pipes or thick conduit, a standard hammer drill will not be sufficient. These jobs require a core drill or a large rotary hammer, which are best handled by a professional.
Cleaning Up After Drilling
Brick and masonry dust is abrasive. Left on finished floors — especially hardwood or polished tile — it can scratch the surface badly. Once drilling is complete, use a shop vacuum to collect large chips, then mop the floor. Don’t mop while the drill is still running — a wet floor while operating power tools is a hazard. Remove your shoes outside and rinse off any dust before walking on clean flooring, and wash your work clothes separately to avoid spreading silica dust through your home.
Maintaining Your Masonry Drill Bits
After a drilling session, clean your masonry bits by brushing off debris with a wire brush. Apply a very light coating of machine oil to the shank to prevent rust. Store bits in a dry location, ideally in a protective case or roll to prevent tip damage. Check the carbide tip before each use — a chipped or rounded tip means it’s time for a new bit. You can also learn how to sharpen drill bits to extend their lifespan. Dull bits not only slow you down, they increase the risk of overheating and cracking your brick.
Repairing Holes in Brick
Made a mistake? Drilled in the wrong spot? Moved a fixture? Most small holes in brick are straightforward to repair. For holes in mortar joints, use a tube of pre-mixed mortar repair compound. Clean out any loose debris, fill the hole, and smooth the surface with a putty knife or damp sponge. Once dry, it blends in reasonably well.
For holes directly in the brick face, the repair is more challenging because matching the brick color and texture is difficult. Use a masonry filler or color-matched mortar compound and smooth it carefully. The patch will likely be slightly visible up close. For holes in a prominent, visible location, a professional mason can do a cleaner restoration job.
Conclusion
Drilling into brick is a completely manageable DIY task when you approach it with the right tools and the right technique. Use a hammer drill with carbide-tipped masonry bits, decide wisely between drilling into brick versus mortar based on your load requirements, create a starting divot to prevent bit walk, control your speed and pressure, clear the dust before inserting anchors, and choose the anchor type matched to your weight requirement. With these steps, you’ll achieve professional-quality results on every masonry project. For drilling into other hard surfaces, check out our guides on how to drill into tile and how to drill into stainless steel.
Frequently Asked Questions
You need a hammer drill, carbide-tipped masonry drill bits, an N95 respirator, safety goggles, hearing protection, work gloves, and wall anchors. A center punch, painter’s tape for depth marking, and a shop vacuum or compressed air for clearing dust are also highly recommended.
Drill into the mortar for lightweight items under 10 lbs — it’s easier to drill and easier to repair. For anything heavier, drill directly into the brick itself. Brick is much stronger than mortar and provides a far more secure hold for expansion anchors and heavy fixtures.
Yes. Start with a low drill speed without hammer mode engaged until the bit is seated. Stay at least 1 inch from any brick edge. Use sharp carbide-tipped masonry bits. Apply steady, even pressure and let the hammer mechanism do the work — don’t force the drill. A pilot hole first reduces stress on the brick.
Technically yes, but it is not recommended for most brick. A regular drill will take much longer, generate significantly more heat, wear out masonry bits faster, and may fail to penetrate harder bricks altogether. For one or two very small holes in soft brick, it can work in a pinch — but a hammer drill is always the better choice.
Drill approximately ¼ inch deeper than the length of your anchor. For example, if your wall anchor is 1.5 inches long, drill to about 1.75 inches deep. Always check the manufacturer’s instructions on your anchor packaging for the specific recommended hole depth for that product.
If drilling is progressing very slowly, you likely have one or more of these issues: a dull or worn masonry bit, using a standard rotary drill instead of a hammer drill, not applying enough forward pressure to fully engage the hammer mechanism, or the hole is clogged with dust preventing the bit from cutting. Try a fresh bit, clear the dust from the hole, and ensure your drill is set to hammer mode.
