A 1/4-inch hole in concrete should take about 30 seconds. If you have been drilling for five minutes and the bit is barely moving, something is wrong — usually the wrong drill, the wrong bit, or pushing way too hard.
Concrete is not like wood or drywall. You cannot just press a regular drill against the wall and expect a clean hole. The bit will heat up, smoke, and dull within minutes. To drill concrete the right way, you need a hammer drill, a carbide-tipped masonry bit, and a slow, steady technique that lets the tool do the work.
This guide walks you through every step — from picking the right tools to clearing dust before you set the anchor. You will also see the small mistakes that crack concrete or ruin anchor strength, so you can avoid them on your first try.
Tools And Equipment Needed
Drilling a hole in concrete requires specific tools and equipment. Using the right gear makes the job easier and safer. Concrete is tough, so a regular drill and bit will not work well. Prepare with the correct tools to get clean, precise holes without damage.
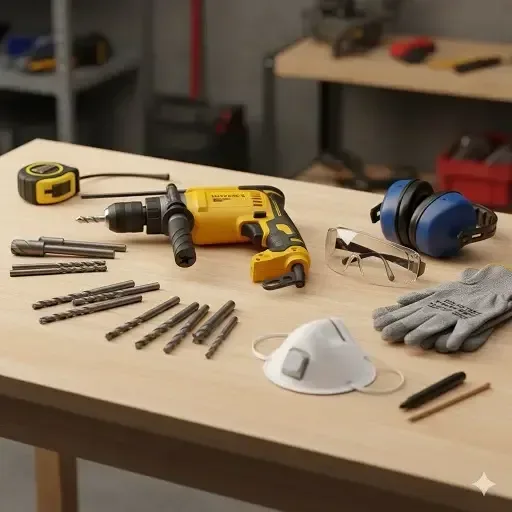
Before you start, gather these four essentials:
- A hammer drill or rotary hammer — A hammer drill works fine for small to medium holes. For deep holes or heavy-duty work, use a rotary hammer. Avoid standard drills — they lack the power and pounding action needed for concrete.
- Carbide-tipped masonry bits — These bits stay sharp longer and resist wear. Match the bit size to your anchor or screw. The wrong size means a loose anchor or a wasted hole.
- Safety gear — Safety goggles for flying chips, a dust mask for fine concrete particles (which can cause silicosis over time, per OSHA guidance), ear protection for the noise, and gloves for grip and vibration control.
- Marking and depth tools — A pencil or marker, a tape measure, and a depth stop or piece of tape on the bit to control how deep you drill.
Choosing The Right Drill Bit
Choosing the right drill bit is key to drilling into concrete successfully. Concrete is a tough material. It needs a bit made to handle its hardness and rough texture. Using the wrong bit can cause damage and slow your work.
Concrete drill bits have special tips. These tips are often made from carbide or diamond materials. They cut through concrete better than regular bits. Picking the correct size bit is also important. It should match the size of the hole or anchor you need.
What Makes A Concrete Drill Bit Different?
Concrete bits have strong tips that resist wear. Their tips are often shaped like a spear or a chisel. This shape helps break up the concrete. The shaft of the bit is sturdy and made for hammer drills. These bits clear dust out of the hole as they drill.
Types Of Concrete Drill Bits
Carbide-tipped bits are common and affordable. They work well for most household projects. Diamond-tipped bits are stronger and last longer. They are best for heavy-duty or professional work. Masonry bits can also drill through brick and stone.
How To Choose The Right Size Bit
Measure the anchor, bolt, or screw first. Match the bit diameter to the item’s size. Too small and the anchor won’t fit. Too large and the anchor won’t hold. Always check the product instructions for size details.
Using The Bit With Your Drill
Use a hammer drill for concrete. It combines rotation with a pounding action. This helps the bit chip away the hard surface. Start drilling at a low speed. Apply steady, light pressure. Pull the bit out now and then to clear dust.
Marking The Drilling Spot
Marking the drilling spot is the first step in drilling into concrete. This step ensures accuracy and prevents mistakes. Without a clear mark, the drill bit may slip or miss the target. Proper marking helps save time and reduces damage to the surface.
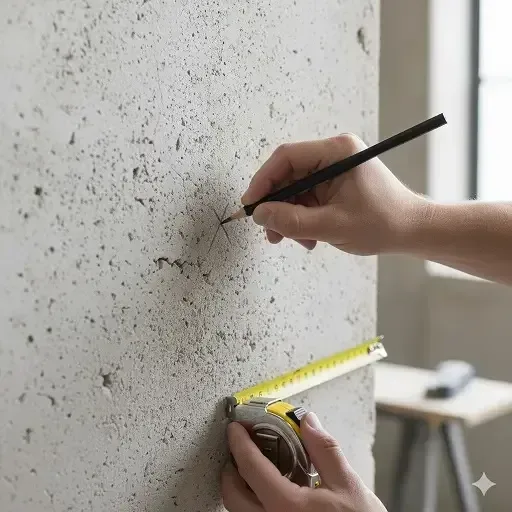
Take your time to measure and find the exact point where the hole is needed. Use simple tools like a tape measure or level to confirm the spot. A precise mark guides the drill and keeps the hole straight.
Using A Pencil Or Marker
Choose a pencil or marker with a dark color. This makes the mark easy to see on concrete. Draw a clear dot or cross on the drilling spot. Avoid thick lines that may cause confusion. Keep the mark small but visible.
Confirming The Spot With Measurements
Measure twice before marking once. Use a tape measure to check distance from edges or corners. A level can help align the mark horizontally or vertically. Double-check the spot to avoid errors. Accurate marks lead to better drilling results.
Making The Mark Visible
If the concrete surface is rough or dusty, clean it first. Use a brush or cloth to remove dirt. The mark will stick better on a clean surface. For extra visibility, use a bright color marker. This helps see the spot during drilling.
Safety Precautions
Drilling into concrete can be tough and risky without safety measures. Concrete dust and flying debris can cause injuries. Power tools need careful handling to avoid accidents. Follow safety precautions to protect yourself and work efficiently.
Wear Protective Gear
Always wear safety goggles to protect your eyes. Use a dust mask to avoid breathing in concrete dust. Wear ear protection to reduce noise from the drill. Gloves can protect your hands from rough surfaces and vibrations.
Check Your Equipment
Inspect the drill and bits before use. Ensure the drill cord is not damaged. Use a hammer drill with a carbide masonry bit. Avoid using dull or worn-out bits to prevent slips and breakage.
Secure The Work Area
Clear the area of obstacles and tripping hazards. Keep children and pets away from the drilling site. Use clamps or a vice to hold small workpieces steady. Work in a well-lit space to see clearly.
Mark And Measure Carefully
Mark the drilling spot with a pencil or marker. Measure twice to avoid mistakes. Use a depth stop on your drill to control hole depth. Avoid drilling too deep, which can damage structures.
Maintain Proper Drill Handling
Hold the drill firmly with both hands. Keep the drill straight and steady to prevent bit breakage. Start drilling at a low speed to create a pilot hole. Pull the drill back occasionally to clear dust and debris.
Setting Up The Hammer Drill
Setting up the hammer drill is the first step in drilling a hole in concrete. Proper setup ensures safety and precision. It also helps the drill work efficiently without damage. Follow these simple steps to prepare your hammer drill before you start drilling.
Mark The Drilling Spot
Use a pencil or marker to mark the exact spot. This ensures you drill in the right place. A clear mark helps guide the drill bit accurately.
Wear Safety Gear
Put on safety goggles to protect your eyes from dust. Wear a dust mask to avoid inhaling particles. Use ear protection to guard against loud noise.
Choose The Right Drill And Bit
Use a hammer drill, not a regular drill. The hammer drill’s action breaks the concrete better. Select a carbide masonry bit made for concrete. The bit size should match your anchor or screw.
Set The Depth Stop
Adjust the depth stop to control how deep you drill. This prevents drilling too far into the concrete. Setting the right depth keeps your work safe and clean.
Start The Drill Slowly
Begin drilling at the lowest speed to create a pilot hole. Apply light, steady pressure without forcing the drill. Pull the drill back occasionally to clear dust and debris.
Drilling Techniques: Step-By-Step
Once your tools are ready and the spot is marked, follow these steps in order. The right sequence keeps the bit cool, the hole straight, and your anchor strong.
- Start at low speed. Begin with a slow trigger pull to create a shallow pilot hole. Low speed helps the bit grip the mark and reduces heat that dulls carbide tips.
- Apply steady, moderate pressure. Press firmly but do not lean on the drill. Too much force snaps the bit; too little wastes time and overheats the motor. Let the tool do the work.
- Engage the hammer function. Once the pilot hole is set, switch the drill to hammer mode. The pounding action chips the concrete forward as the bit spins, which is the only way to drill concrete efficiently.
- Pull the bit out every few seconds. Concrete dust packs into the hole and slows drilling fast. Pull the bit fully out, let dust fall, then continue. Repeat every 1–2 cm of depth.
- Stop when you reach target depth. Use a depth stop or a wrap of tape on the bit as a visual guide. Stop drilling the moment your mark reaches the wall.
- Blow out the dust before inserting the anchor. Use a hand pump, vacuum, or compressed air. A clean hole holds an anchor up to twice as well as a dusty one.
Managing Hole Depth
Managing hole depth is crucial when drilling into concrete. Drilling too deep wastes time and effort. Drilling too shallow may fail to secure anchors or screws properly. Controlling depth ensures a clean, precise hole that fits your needs.
Use tools and techniques that help measure and limit the depth. This avoids mistakes and protects the drill bit from damage. Setting the correct depth makes the job easier and safer.
Using A Depth Stop On Your Drill
A depth stop attaches to the drill bit. It blocks the bit from going deeper than desired. Many hammer drills come with adjustable depth stops. Set the stop to the exact depth you need before drilling.
This tool prevents drilling too far into the concrete. It also helps maintain consistent hole depth for multiple holes. Adjust the stop carefully for each job.
Marking The Drill Bit
Mark the drill bit with tape or a marker. Measure the required depth on the bit. Wrap tape around the bit at that point.
Stop drilling once the tape reaches the concrete surface. This simple method works well without extra tools. It provides a clear visual cue during drilling.
Checking Depth During Drilling
Pause drilling periodically to check the hole depth. Use a ruler or tape measure to verify.
Clear out dust and debris from the hole before measuring. This gives an accurate reading. Adjust drilling speed and pressure based on depth checks.
Cleaning And Inserting Anchors
Cleaning and inserting anchors is a vital step after drilling a hole in concrete. Proper cleaning removes dust and debris, ensuring the anchor fits tightly. This process improves the holding strength and prevents loosening over time.
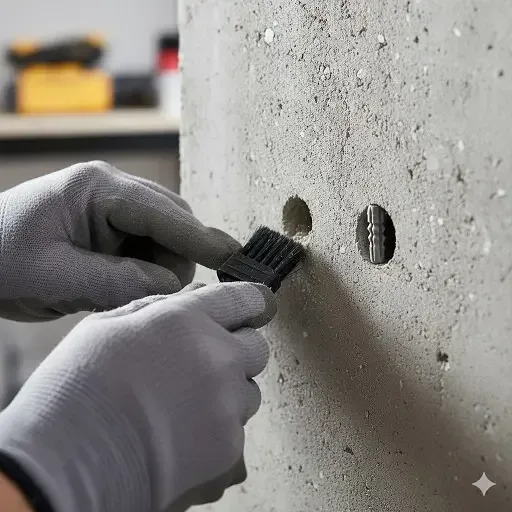
Inserting anchors correctly secures fixtures firmly to the concrete surface. Follow simple steps to clean the hole thoroughly and place the anchor with precision for best results.
Cleaning The Hole
Remove dust and debris using a wire brush or compressed air. Tap the drill bit out gently to loosen stuck particles. Repeat cleaning until the hole is completely clear. A clean hole allows the anchor to grip the concrete firmly.
Choosing The Right Anchor
Select an anchor type based on the fixture and load requirements. Common anchors include plastic expansion, sleeve, and wedge anchors. Match the anchor size to the drilled hole diameter for a secure fit.
Inserting The Anchor
Insert the anchor slowly into the cleaned hole. Use a hammer to tap it gently until it sits flush with the surface. Avoid forcing the anchor, which can damage the concrete or anchor.
Securing The Anchor
Once inserted, tighten the anchor bolt or screw as needed. This action expands the anchor inside the hole, creating a strong hold. Check for stability before attaching fixtures to ensure safety.
Mistakes Most Beginners Don’t See Coming
Even with the right tools, a few hidden problems can ruin a good hole. Here are the small things that catch first-timers off guard.
Hitting Rebar Mid-Hole
Most concrete walls and slabs have steel rebar inside. If your bit suddenly stops moving forward and starts buzzing hard, you have hit rebar. Do not push harder — a masonry bit cannot cut steel and will snap. Either move the hole 1–2 inches sideways or switch to a rebar cutter bit made for steel-in-concrete.
Drilling Too Close To An Edge
Drilling within 2 inches of a corner or slab edge often cracks the concrete because there is not enough mass to absorb the hammer force. Plan anchor locations at least 3–4 inches from any edge, especially on outdoor steps and ledges.
Skipping The Dust Removal Step
This is the silent failure. Anchor manufacturers report that dust left in the hole can cut anchor holding power by up to 50%. The hole may look clean, but fine dust at the bottom acts like a cushion that keeps the anchor from setting properly. Always blow it out before inserting anything.
Using A New Bit At Full Speed
A fresh carbide bit needs a slow start to seat properly into the concrete. Cranking the trigger to maximum on the first hole can chip the carbide tip on day one. Start every new bit slowly until you have drilled the first 1 cm.
Conclusion
Drilling concrete is not about strength — it is about the right tool, the right speed, and patience. Here is the short version to remember:
- Tool: Hammer drill or rotary hammer with a carbide-tipped masonry bit.
- Technique: Mark, start slow, switch to hammer mode, pull out the bit often to clear dust.
- Safety: Goggles, dust mask, ear protection — every time, even for one small hole.
- Finish: Blow the hole clean before inserting any anchor or screw.
Your next step: Match your bit size to the anchor you plan to use, set the drill to a low speed, and make your first hole on a hidden spot if you want to practice. Once you feel the hammer action working with you instead of against you, the rest of the job becomes simple.
Frequently Asked Questions
Use a hammer drill with a carbide masonry bit. Start slow to create a pilot hole, apply steady light pressure, and engage the hammer function. Pull the bit back periodically to clear debris and set a depth stop to avoid over-drilling. Wear safety gear throughout.
Mark the spot and wear safety gear. Use a carbide masonry bit with a regular drill. Drill slowly with steady pressure, pulling the bit out occasionally to clear debris. Avoid forcing the drill to prevent overheating.
The best tool for drilling a hole in concrete is a hammer drill with a carbide masonry bit. Use steady, light pressure and start at low speed to create a pilot hole. Engage the hammer function and clear debris periodically for efficient drilling.
No, a normal drill bit is not suitable for concrete. Use a hammer drill with a carbide masonry bit for best results.
A hammer drill with a carbide masonry bit works best for drilling into concrete.
Read also: How to Drill a Hole in Glass
Read also: How Do You Mix Concrete in a Mixer
