
Framing is one of the most important parts of building a house or any structure with wood. If you use the wrong size nails for framing, your structure may not be safe or strong. But choosing the right nails is not always easy.
There are many sizes and types, and each has its own purpose. This guide will help you understand which size nails you need for framing, why size matters, and the best choices for different situations. By the end, you’ll feel confident picking the right nails for your next framing project.
Why Nail Size Matters In Framing
When you build a wall, floor, or roof, the nails hold everything together. If the nail is too short, it won’t hold the wood tightly. If it’s too long, it can split the wood or come out the other side.
Using the wrong size can cause the structure to be weak, noisy, or even unsafe.
Nail size affects:
- Holding power: Longer and thicker nails hold wood better.
- Wood splitting: Large nails can split thin boards.
- Building codes: Many places have rules for what size nails to use for safety.
Most framing work uses dimensional lumber like 2x4s and 2x6s. These are thick boards, so you need nails that are long and strong enough to go deep into both pieces of wood.
Understanding Nail Sizing
Nails are labeled by length (in inches) and by a number called “penny” size, written as “d” (like 16d). The penny system is old, but still common in construction.
Here’s a quick look at common framing nail sizes:
| Penny Size (d) | Length (inches) | Diameter (inches) | Common Use |
|---|---|---|---|
| 8d | 2 1/2″ | 0.131″ | Wall sheathing, subfloor |
| 10d | 3″ | 0.148″ | General framing |
| 12d | 3 1/4″ | 0.148″ | Framing, trusses |
| 16d | 3 1/2″ | 0.162″ | Heavy framing, studs |
The 16d nail is the classic choice for framing with 2x4s. Smaller nails like 8d are used for thinner boards or attaching plywood.
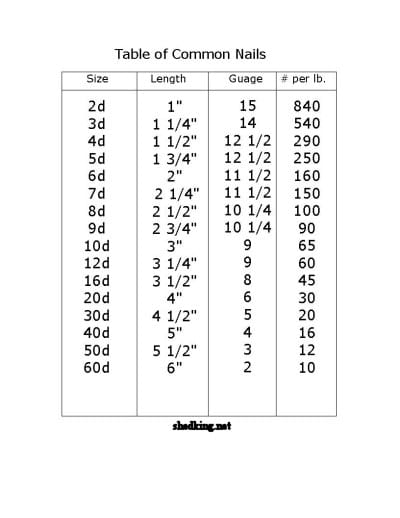
Credit: www.shedking.net
Best Nail Sizes For Different Framing Tasks
You don’t need just one nail size for all framing jobs. Here’s how to match the right size to the job:
1. Framing Walls (studs)
For connecting 2×4 wall studs to top and bottom plates, use 16d nails. These nails are 3.5 inches long and have enough strength to hold the studs in place.
- Why 16d? They’re long enough to go through one 2×4 and deep into the next without splitting.
- Tip: If you use a nail gun, choose 3.25″ nails (often called 16d framing nails for nailers).
2. Floor Joists And Rim Joists
Floor joists and rim joists also use 16d nails. You need the extra length for the thicker lumber and to meet building codes.
- Spacing: Place two or three nails per connection, depending on the local code.
3. Attaching Sheathing (plywood Or Osb)
For attaching plywood or OSB sheathing to wall frames, use 8d nails. These are 2.5 inches long.
- Reason: Sheathing is thinner than studs, so a shorter nail reduces the chance of splitting.
- Spacing: Follow the manufacturer’s instructions, but usually 6″ apart on edges and 12″ in the middle.
4. Double Top Plates
When securing double top plates (where two 2x4s run along the top of the wall), stick with 16d nails. They provide the strength needed for this important connection.
5. Trusses And Rafters
For trusses, rafters, or other roof framing, 10d or 12d nails are often used. These nails are slightly shorter (3″ to 3.25″), which helps avoid splitting the ends of boards.
- Important: Roof framing often follows strict code, so always check your local requirements.
6. Blocking And Bridging
Blocking (short pieces of wood between joists or studs) can use 8d or 10d nails, depending on the thickness.
- Tip: For 2×4 blocking, 10d nails are a safe choice.
Common Nail Types For Framing
Not all nails are the same, even at the right size. The type of nail affects how well it holds and how easy it is to use.
Here are the most common nail types for framing:
- Common nails: Thick, strong, and have a flat head. The go-to for most framing.
- Box nails: Thinner than common nails. Less likely to split wood, but not as strong.
- Sinker nails: Slightly shorter than common nails, often have a textured head and coating for easier driving.
- Galvanized nails: Coated to resist rust. Use these where moisture is a risk (like basements or exterior framing).
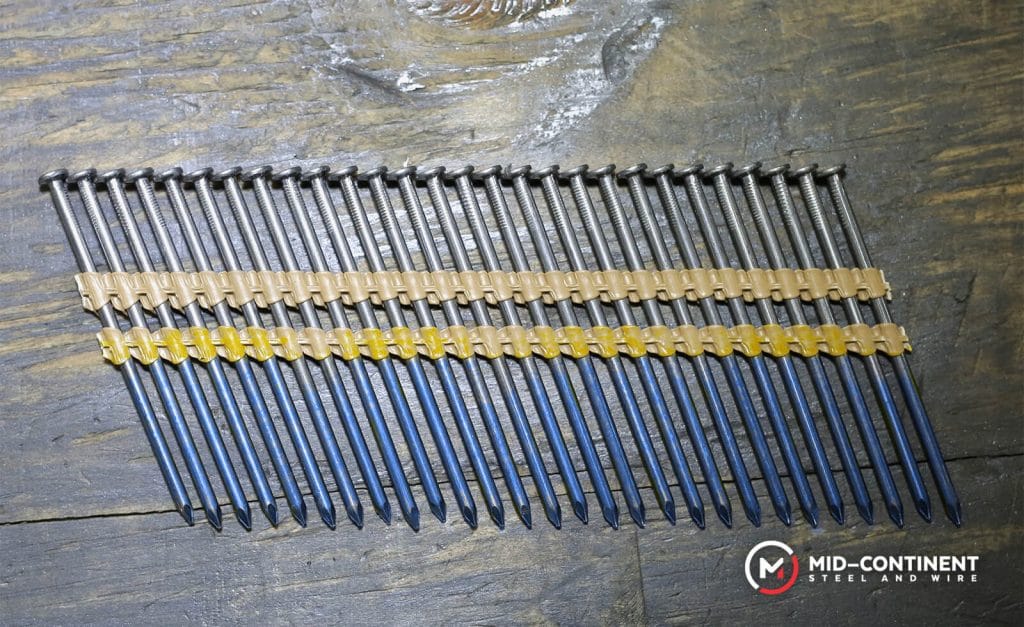
If you use a nail gun, you’ll need special nails called “framing nails” or “gun nails.” These come in strips or coils and are sized for the tool.
Credit: mcswusa.com
Nail Guns Vs. Hand Nailing
Framing can be done with a hammer or a nail gun. Each method affects the nails you choose.
Hand Nailing
- Best for: Small projects or where precision is needed.
- Nails used: Loose common or sinker nails (like 16d, 10d).
- Pros: More control; no need for expensive tools.
Nail Guns
- Best for: Large projects, fast work, or when using engineered lumber.
- Nails used: Collated nails (held together in strips or coils).
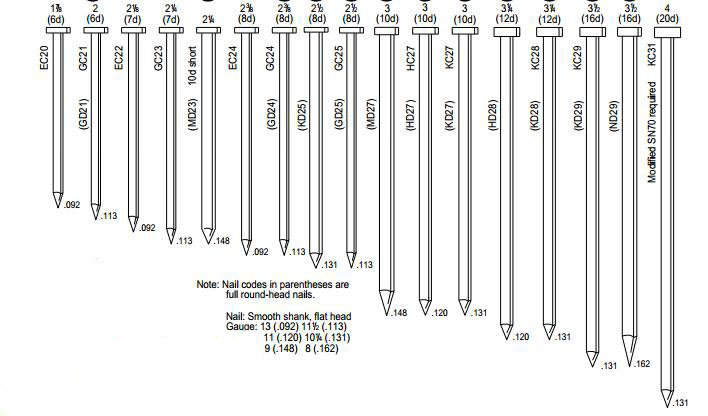
- Sizes: Usually 3″ to 3.25″ for “16d” framing nails.
- Pros: Faster, consistent depth, less physical effort.
Important insight: Most nail guns use nails that are slightly shorter than true hand-driven 16d nails. For example, a “16d” nail for a gun is often 3.25″ long, not 3.5″. This is usually fine, but always check with your local building code.
Framing Nail Size Chart
To help you remember which nail to use for each job, here’s a simple chart:
| Framing Job | Recommended Nail Size | Typical Nail Type |
|---|---|---|
| Wall Studs | 16d (3.5″) | Common, Sinker |
| Sheathing | 8d (2.5″) | Box, Sinker |
| Floor Joists | 16d (3.5″) | Common |
| Trusses/Rafters | 10d-12d (3″-3.25″) | Common, Galvanized |
| Blocking | 8d-10d (2.5″-3″) | Common, Box |
How To Choose The Right Nail Size
Choosing nail size is not just about following a chart. Here are some smart steps to help you decide:
- Know your wood thickness. For 2×4 framing, 16d is almost always right.
- Check local building codes. Some areas have specific rules. These are for safety and must be followed.
- Think about splitting. If you’re working near the edge of a board, or with older, dry wood, use a slightly thinner nail.
- Consider the environment. For outdoor or wet areas, use galvanized or coated nails.
- Use the right tool. If you’re using a nail gun, match the nail size to your gun and project.
Non-obvious tip: If you’re worried about splitting, try “toe-nailing” (driving nails at an angle). This gives strong holding power with less risk of splitting the wood.
Common Mistakes When Choosing Framing Nails
Many beginners make the same mistakes when picking nails for framing:
- Using nails that are too short: This leads to weak connections. Always use at least 2.5 times the thickness of the thinner board.
- Ignoring nail diameter: Thin nails may bend or pull out. For heavy framing, stick to common nails.
- Not checking nail gun compatibility: Nails for guns come in different angles and collation types (paper, plastic, wire). Always get the right type for your tool.
- Forgetting about corrosion: Regular nails can rust in wet areas, weakening the structure.
Examples From Real Projects
Let’s look at a real-world example. When framing a 10×12 shed, most builders use:
- 16d common nails for 2×4 wall studs and top plates
- 8d nails for attaching 1/2″ plywood sheathing
- Galvanized nails for any part exposed to weather
For a large house, professional framers often use nail guns with 3.25″ clipped-head nails, but always double-check that the nails meet code.
Another insight: Some engineered wood products (like LVL or LSL beams) require special nails or screws. Always follow the manufacturer’s guide for these materials.
Building Codes And Standards
In the US, the International Residential Code (IRC) gives clear rules about nail sizes for different framing jobs. For example, it calls for 16d nails for most wall framing. Local codes may be stricter, so always check with your city or county before starting work.
Why follow the code? It’s not just about passing inspection. Using the right size nail means your building will be safe during storms, earthquakes, or heavy use.
If you want more details, you can see the full code rules at the International Code Council.
Tips For Better Framing Results
- Pre-drill near edges: If you must nail close to the end of a board, drill a small pilot hole first to prevent splitting.
- Use the right nail pattern: Don’t bunch nails together. Spread them out as shown in framing diagrams.
- Don’t overdrive with a nail gun: If the nail head sinks too deep, it can weaken the connection.
- Mix nails and screws where needed: Some connections, like hangers or special brackets, require screws instead of nails for maximum strength.
- Store nails dry: Wet nails can rust before you even use them.
Frequently Asked Questions
What Is The Best Size Nail For Framing With 2x4s?
The best size is the 16d common nail, which is 3.5 inches long. This size gives a strong hold without splitting the wood.
Can I Use Screws Instead Of Nails For Framing?
Nails are standard for most framing because they are flexible and can handle movement better than screws. Screws are sometimes used for special connections, but usually not for main framing.
Do I Need Galvanized Nails For Interior Framing?
Galvanized nails are not required for dry, indoor framing. Use them in areas exposed to moisture, like basements, bathrooms, or any exterior framing.
What Happens If I Use Nails That Are Too Long?
Very long nails can split the wood or stick out the other side, making the connection weak and possibly unsafe. Always use the recommended size for your project.
Are Nail Gun Nails As Strong As Hand-driven Nails?
Nail gun nails are usually as strong as hand-driven nails if you use the right size and type. Just remember that “16d” nails for guns are often 3. 25″ long, not 3. 5″. Check your local code to be sure they are allowed.
Choosing the right size nails for framing is not just about following a rule—it’s about making sure your structure is safe, strong, and built to last. With the right knowledge, you can frame with confidence and avoid common mistakes. Whether you use a hammer or a nail gun, always match the nail to the job, and your work will stand the test of time.
Credit: www.coil-framing-nails.com
