
Learning to grind lathe tools is a skill that sets apart a beginner machinist from a confident operator. Well-ground tools make turning jobs faster, smoother, and more accurate. But if you’re new to the workshop, the process can seem confusing and even a bit intimidating.
This guide breaks down every step, explains why each detail matters, and shares insights that many books miss. If you want to produce clean, precise work on a lathe, it all starts with your tools—and the way you grind them.
Why Proper Tool Grinding Matters
A lathe tool is only as good as its edge. Even the best steel will perform poorly if the shape is wrong or the angles are off. Properly ground tools cut cleaner, last longer, and reduce wear on your machine.
Badly ground tools can cause chatter, poor finishes, and even dangerous situations. Understanding the basics of tool geometry, grinding angles, and finishing techniques ensures safety and quality in every project.
Understanding Lathe Tool Geometry
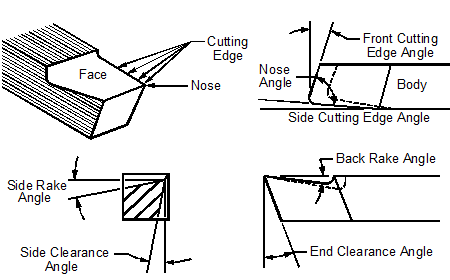
Before you start grinding, you need to know the parts and angles that make up a lathe tool bit. Each part serves a specific purpose in cutting metal.
| Feature | Function |
|---|---|
| Side Cutting Edge | Performs most of the cutting action |
| End Cutting Edge | Helps in facing and clearing work |
| Nose (Point) | Forms the finish on the work surface |
| Side Relief Angle | Prevents rubbing against the workpiece |
| End Relief Angle | Allows tool to feed into work |
| Back Rake Angle | Controls chip flow and cutting force |
| Side Rake Angle | Helps chips move away from the cutting edge |
Each angle is important. If you change one too much, it can weaken the tool or make it cut poorly. Most general-purpose tools use angles between 8° and 15°, but the exact numbers depend on the material you are cutting.
Choosing The Right Grinding Wheel
Not all grinding wheels are equal. The type of wheel you use affects the finish and the speed of grinding. For typical high-speed steel (HSS) lathe tools, an aluminum oxide wheel is best. If you are grinding carbide tools, a silicon carbide or diamond wheel is needed.
| Wheel Type | Best For | Typical Color |
|---|---|---|
| Aluminum Oxide | High-Speed Steel | White, Pink, Brown |
| Silicon Carbide | Carbide Tools | Green |
| Diamond | Carbide, Ceramics | Varies |
A 6-inch or 8-inch bench grinder is most common in small workshops. Choose a wheel with medium hardness and a grit size between 46 and 60 for general grinding. Soft wheels grind cooler but wear faster; hard wheels last longer but can burn the tool if you’re not careful.
Essential Safety Tips
Grinding can be hazardous if you’re not careful. Here are rules every machinist should follow:
- Wear safety goggles—eye injuries are common with grinders.
- Use a face shield if possible.
- Keep the tool rest close to the wheel (1/8 inch or less).
- Never grind on the side of the wheel.
- Check that the wheel is balanced and free from cracks.
- Don’t wear loose clothing or gloves that could catch.
- Cool the tool in water often to avoid overheating.
A burned tool edge loses hardness and will dull quickly. If you see blue colors at the edge, the steel has overheated.
Preparing The Lathe Tool Blank
Start with a clean, straight piece of high-speed steel. Tool blanks are usually 1/4″ or 3/8″ square and 2-4 inches long. Remove any oil or rust with a rag. Hold the blank so you have enough length to grip, but not so much that it’s hard to control.
If you are re-grinding an old tool, check for cracks or deep nicks. It’s better to start fresh than waste time on a damaged blank.
Setting Up The Grinder
Adjust the tool rest so it is just below the center of the grinding wheel. This gives you better control and helps keep the correct angles. The rest should be as close as possible to the wheel, but not touching.
Make sure there’s enough space to slide the tool smoothly.
Some machinists add a protractor guide to the rest for more accurate angles, but with practice, you’ll learn to judge by eye. Keep a cup of water nearby for cooling.
Grinding The Side Relief Angle
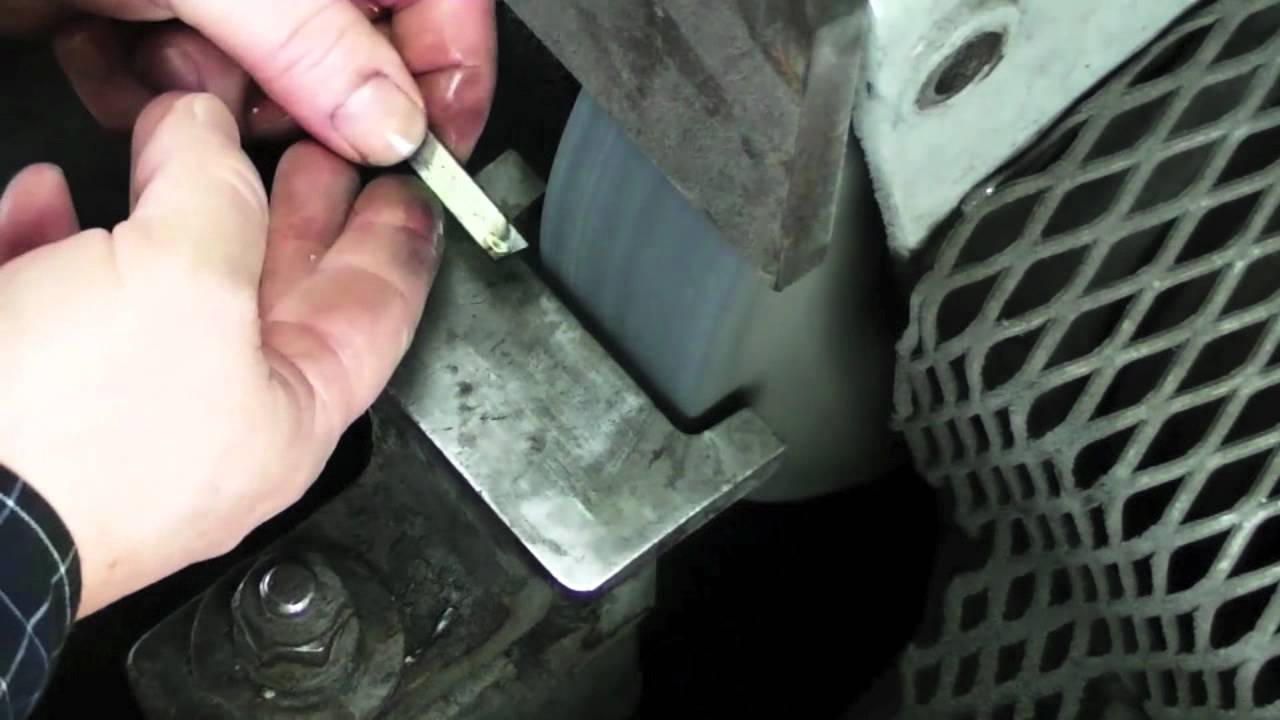
This is often the first angle ground. Hold the tool blank at about 10°-15° to the wheel, with the intended cutting edge facing up. Move the tool smoothly back and forth across the wheel, keeping the angle steady.
- Pro tip: Use both hands for better control.
- Don’t press too hard—the wheel should do the work.
- Dip the tool in water every few seconds to avoid overheating.
Grind until you have a flat that covers about one-third of the tool’s side width. This relief prevents the tool from rubbing on the workpiece.
Grinding The End Relief Angle
Rotate the tool so the end faces the wheel. Set the angle to about 8°-12°. As before, use a smooth, even motion. The end relief allows the tool to cut into the work without dragging.
Check that the end relief flat meets the side relief cleanly—this forms the tool’s point. Avoid making the point too sharp, as it may chip.
Forming The Side Rake Angle
The side rake angle helps chips move away from the work. Set the tool at about a 10°-15° angle, tilting the blank slightly upward. Grind a flat that slopes from the cutting edge back toward the shank.
- Be gentle as you approach the edge—don’t overheat it.
- The rake flat should blend smoothly with the rest of the tool.
Many beginners skip this angle, but it makes cutting softer metals easier and produces a better finish.
Creating The Back Rake Angle
Back rake directs chips away from the tool and improves cutting action. Place the tool with the cutting edge facing away from you. Tilt the tool so the face slopes down from the edge at about 10°.
Grind a flat that meets the side rake. This area should not be too large; it only needs to cover the part of the tool that contacts the work.
Insight: On some lathes or for tough materials, you may want less back rake to make the tool stronger. For aluminum, more rake helps chip flow.
Shaping The Nose Radius
The nose is the tiny tip where the side and end cutting edges meet. A sharp point gives a crisp corner but wears fast and can leave a rough finish. Most machinists round the nose slightly to increase tool life and improve surface finish.
Hold the tool at a slight angle and gently blend the point with a soft touch. The radius should be small—about 1/64″ (0. 4 mm) is standard for general turning. For finishing tools, a larger radius (up to 1/16″) may be used.
Checking And Comparing Tool Angles
It’s easy to lose track of angles while grinding. Use a small protractor or a template to check your work. Some machinists make angle gauges from thin sheet metal for quick checks.
Here is a quick comparison of recommended angles for different materials:
| Material | Side Relief | End Relief | Side Rake | Back Rake | Nose Radius |
|---|---|---|---|---|---|
| Mild Steel | 12° | 8° | 14° | 12° | 1/64″ |
| Aluminum | 15° | 10° | 20° | 18° | 1/32″ |
| Cast Iron | 8° | 6° | 6° | 6° | 1/64″ |
Checking angles helps prevent mistakes, especially when grinding several tools at once.
Credit: www.metalartspress.com
Finishing The Cutting Edge
A rough edge can break or chip quickly. After grinding, hone the cutting edge with a fine oil stone or diamond file. Lay the tool flat on the stone and move it in small circles to remove burrs. Work both the top and sides.
Insight: Honing is often skipped by beginners, but it greatly improves tool life and finish quality. Even a few strokes can make a big difference.
For very fine work, you can polish the tool edge with a strip of emery cloth. This step is optional but helps with tricky materials like brass or plastics.
Common Mistakes To Avoid
Grinding lathe tools takes practice. Here are mistakes that even experienced machinists sometimes make:
- Overheating the edge: Always cool often in water.
- Wrong angles: Measure and check often.
- Too sharp a nose: Chips easily and gives rough finish.
- Overly large flats: Weakens the tool and causes chatter.
- Skipping the hone: Leaves a ragged edge that dulls quickly.
Take your time. A well-ground tool will repay you with hours of good service.
Special Tool Shapes And Uses
Not all lathe tools are the same. Here are a few common shapes and their main uses:
- Right-Hand Tool: For general turning from right to left.
- Left-Hand Tool: Cuts from left to right.
- Parting Tool: Thin blade used to cut off parts.
- Threading Tool: Special point for cutting screw threads.
- Boring Tool: Thin, long tool for internal holes.
Each tool shape has unique grinding needs. For example, a threading tool needs a very sharp V-point, while a parting tool must be thin and straight.
Tip: Always label your tools or keep them in a rack so you don’t mix up shapes and angles.
Care And Maintenance Of Lathe Tools
A good tool is an investment. Store your tools in a dry place, away from moisture and oil. Wipe them clean after use. If a tool becomes chipped or dull, re-grind it before using it again.
Regular inspection saves time and materials. A dull tool will produce poor work and may even damage your lathe.
Credit: www.youtube.com
When To Replace Or Regrind
Even the best-ground tool won’t last forever. Watch for these signs:
- Tool won’t cut cleanly or produces a rough finish.
- You see blue or dark coloring on the tip.
- The tool chatters or makes noise during cutting.
- Chips are not forming well or stick to the tool.
When in doubt, regrind the edge. It’s better to spend a few minutes at the grinder than to ruin a workpiece.
Advanced Tips For Better Results
- Use a magnifier to check the edge for chips or cracks.
- Try grinding a small bevel on the trailing edge to reduce chatter in tough materials.
- For very fine work, polish the edge with a leather strop.
These little extras can turn a good job into a great one.
Credit: www.youtube.com
Learning From The Experts
Grinding lathe tools is a skill learned by doing. Watch experienced machinists, ask questions, and practice often. Each tool you grind will teach you something new. For in-depth resources, consider checking out guides from the Wikipedia Lathe page.
Frequently Asked Questions
How Do I Know If My Lathe Tool Is Sharp Enough?
A sharp tool will cut metal easily and leave a smooth, shiny finish. You should see small, curled chips forming. If the tool skips, chatters, or leaves a rough surface, it may need regrinding.
What Is The Best Angle For General-purpose Lathe Tools?
For most work on mild steel, a side relief of 12°, end relief of 8°, side rake of 14°, and back rake of 12° with a 1/64″ nose radius works well. Adjust these as needed for different materials.
Can I Grind Carbide Lathe Tools On A Regular Wheel?
No. Carbide needs a silicon carbide or diamond wheel. Regular aluminum oxide wheels are too soft and will wear quickly, possibly damaging the tool.
How Often Should I Hone My Tools?
Hone the cutting edge every time you finish grinding. For the best results, touch up the edge with a stone after every use, especially for finishing passes.
What Should I Do If I Overheat The Tool Edge?
If you see blue coloring, the steel has lost hardness. Grind back past the blue area to fresh metal, then finish as usual. Prevent overheating by cooling often and using light pressure.
Mastering the art of grinding lathe tools gives you control over your work and confidence at the machine. With patience and attention to detail, you’ll soon produce tools that make every turning job smoother and more satisfying.
