
Metal polishing starts with identifying the metal or coating, the defects you need to remove, and the finish you want. The safest and most predictable method is progressive: clean first, remove only the scratches or oxidation that actually need correction, then move to finer abrasives or polishing compounds as required.
Do not use one universal grit sequence or compound color chart for every metal. Aluminum, stainless steel, brass, copper, plated surfaces, and soft decorative metals respond differently, and compounds are not standardized by color across every manufacturer.
Identify the Surface Before You Polish
Before sanding or buffing, determine whether the part is bare metal, plated, coated, anodized, painted, or clear-coated. Aggressive polishing can permanently remove plating, anodizing, protective coatings, markings, or crisp edges.
Clean Before Abrading
Remove oil, dirt, grit, and loose contamination before sanding or buffing. Embedded debris can create new scratches. Use a cleaner compatible with the metal and any coating.
Choose the Starting Abrasive From the Defect
Start with the least aggressive abrasive that removes the defect efficiently. Deep corrosion or tooling marks may need coarser abrasion; a mostly smooth surface may only need a fine finishing step or polishing compound.
After each stage, remove residue and inspect under good light. Move finer only after the previous scratch pattern has been adequately refined.
Credit: eternaltools.com
Hand Polishing vs Machine Polishing
Hand polishing gives more control on small, delicate, plated, or detailed parts. Machine polishing is faster on larger areas but adds heat, edge-rounding risk, wheel-grab risk, and faster material removal.
When using a powered wheel, secure the work appropriately, keep loose clothing and jewelry away, and use the wheel and compound within their rated speed and material limits.
Polishing Compounds
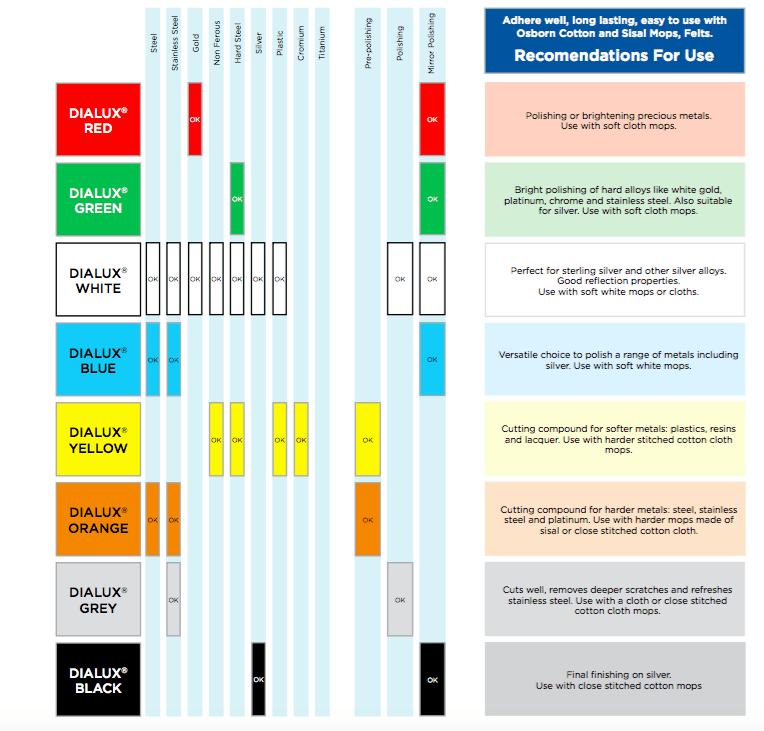
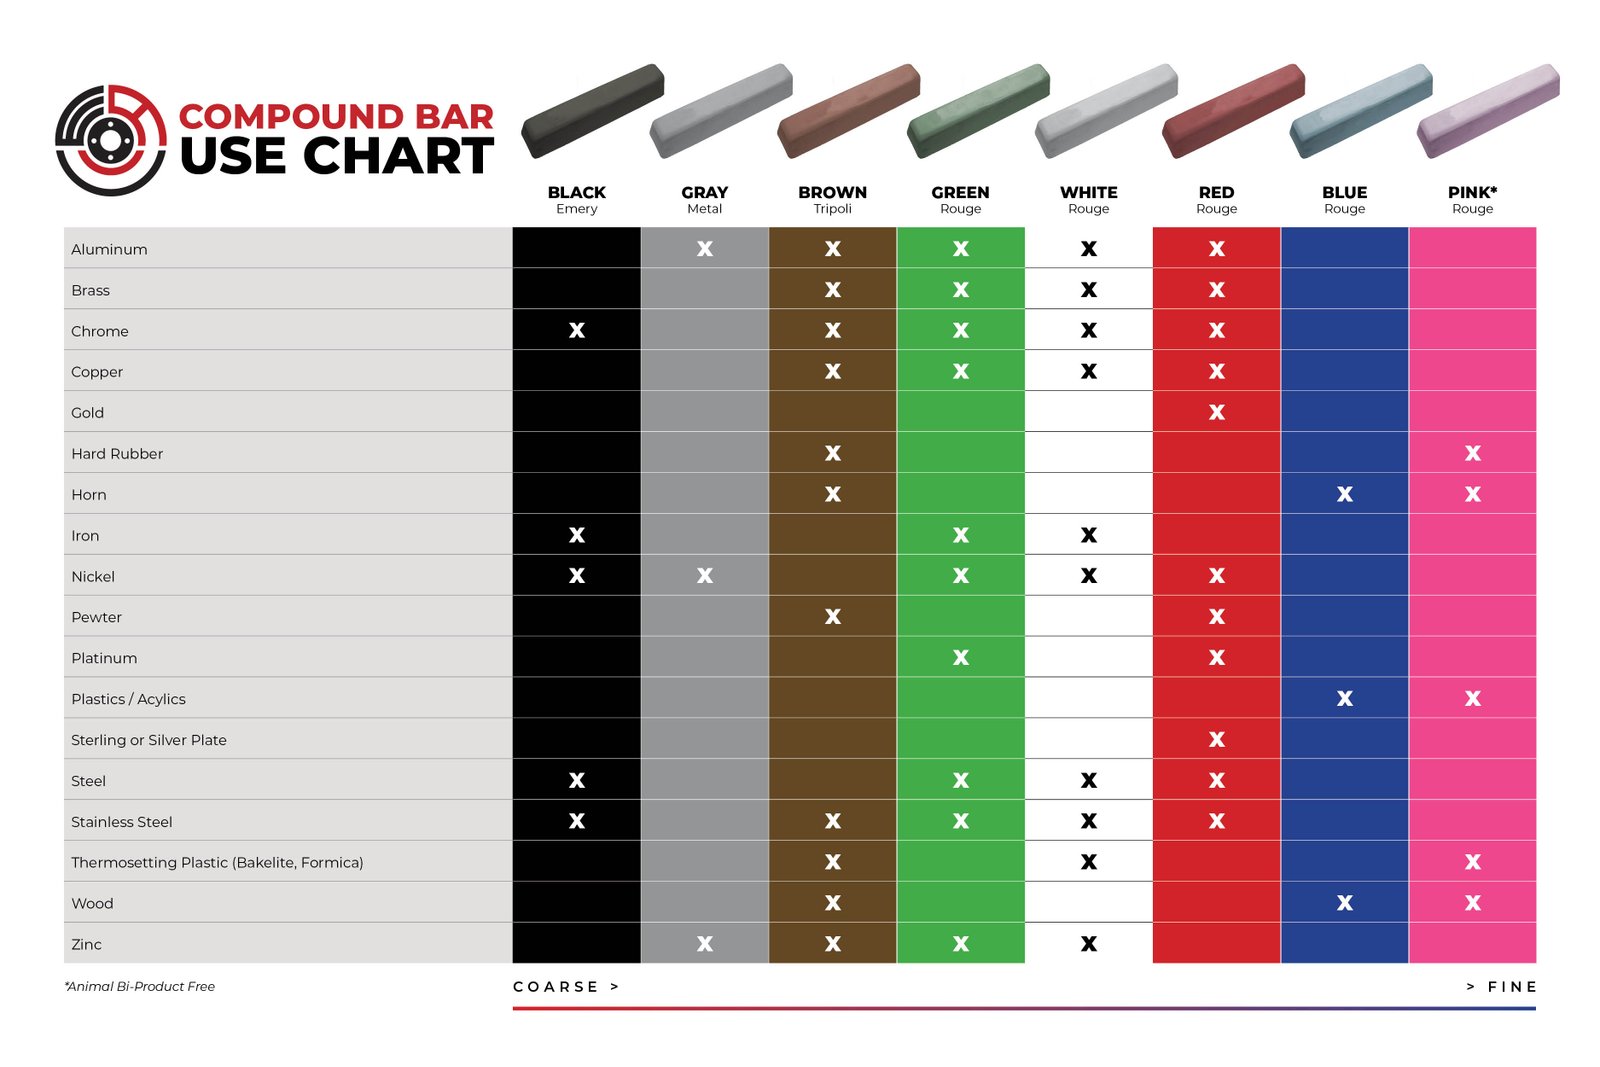
Compound selection depends on abrasive type, binder, cut rate, metal, wheel, and desired finish. “Green,” “white,” “brown,” and “red” are common labels, but color alone is not a reliable technical specification. Follow the compound manufacturer’s metal and finish recommendations.
Credit: kramerindustriesonline.com
Stainless Steel
On stainless, keep tools and abrasives clean to reduce cross-contamination from carbon steel. Match the final scratch direction to the original finish when restoring brushed stainless. A mirror finish requires progressively removing the prior scratch pattern rather than simply applying more compound.
Aluminum
Aluminum can load abrasives and heat quickly. Use products intended for aluminum and avoid assuming a very fine grit is always necessary. A separate aluminum-specific guide can go deeper on alloy and finish differences.
Brass and Copper
These softer metals can polish quickly but also lose sharp detail quickly. Check whether the patina is intentional before removing it, especially on antiques and decorative pieces.
Chrome and Other Plated Surfaces
Plating may be thin. If you see pitting, flaking, or exposed base metal, aggressive polishing can worsen the damage. Use mild, coating-compatible products and stop if the plating begins to change.
Control Heat and Contamination
- Use clean cloths and dedicated wheels for different compound stages when practical.
- Do not overload a wheel with compound.
- Use suitable temperature and handling precautions, stop before the part overheats, and let it cool safely before inspection.
- Keep abrasives used on carbon steel away from stainless finishing work.
- Secure small parts so a wheel cannot throw them.
Mirror Finishes
A mirror finish is not created by one magic grit or compound. You need a flat enough surface, progressively finer scratch patterns, compatible compounds, and careful buffing. The exact sequence depends on the starting condition and metal.
Credit: www.empireabrasives.com
Protection After Polishing
Whether a polished surface needs wax, oil, clear coat, passivation, or no coating depends on the metal, environment, and use. Do not apply a generic sealant to food-contact, electrical, high-temperature, or precision surfaces without checking compatibility.
Prepare the Surface Before Buffing
A mirror-like polish begins with controlled surface preparation, not with a more aggressive buffing compound. If scratches remain from the previous abrasive stage, a buffing wheel may make the surrounding metal shiny while leaving those marks visible. Inspect under angled light, remove defects with a compatible abrasive progression, and clean away loose grit before switching to a finer compound.
The correct abrasive sequence depends on the metal, coating, part geometry, and target finish. Avoid removing protective plating or dimensional material from functional surfaces. For a separate explanation of controlled scratch removal before polishing, see our guide to sanding metal smooth.
Keep polishing compounds and wheels separated by material and grit to limit cross-contamination. Secure small workpieces and follow the tool manufacturer’s guard, speed, and eye-protection instructions.
Frequently Asked Questions
Do I always need to sand before polishing?
No. If the surface has only light haze or tarnish, a compatible polish may be enough. Sanding removes more material and should be used only when needed.
What grit creates a mirror finish?
There is no universal final grit. The required abrasive sequence depends on the initial scratch depth, alloy, abrasive system, and polishing compound.
Can I use the same buffing wheel for every compound?
It is better to keep final-stage wheels clean and avoid cross-contamination from coarser compounds.
Can I Polish a Plated or Clear-Coated Metal as if It Were Bare Metal?
No. Abrasive polishing can remove thin protective layers. Identify the surface finish and use the maker’s approved cleaning method.
Is Metal Buffing Dust Safe in an Ordinary Wood-Dust Vacuum?
Not necessarily. Some fine metal dusts are combustible or incompatible with other collected material. Use controls designed for the actual hazard.
Metal Polishing Guide: Plan the Job Before Choosing a Compound
A repeatable finish begins with a decision about the workpiece, not with buying the most aggressive polishing kit. Record the base material, whether a coating is present, the current surface condition, and the intended appearance. A polished handrail, an antique brass fitting, a stainless appliance panel, and an aluminum wheel may all look metallic, yet each can require a different process. The wrong treatment can permanently alter the part.
| Surface condition | Reasonable first approach | What to avoid |
|---|---|---|
| Light fingerprints or surface haze | Clean and test a compatible mild polish | Coarse sanding before evaluating the finish |
| Fine scratches in bare metal | Test a fine abrasive on an inconspicuous area | Skipping directly to a cutting wheel |
| Deep scratches or pits | Assess whether material removal is acceptable | Assuming buffing alone will level damage |
| Plated or coated part | Use the coating maker’s approved care method | Grinding through a thin surface layer |
| Brushed stainless finish | Follow the original grain direction | Creating a random circular scratch pattern |
Test the proposed sequence in a small, inconspicuous area. Compare the test section under the same lighting used to judge the finished part. A compound that appears successful in a dim workshop may reveal haze or swirl marks in direct light.
How to Set Up a Controlled Polishing Work Area
- Remove loose objects and combustible clutter from the bench. Provide lighting that reveals the scratch pattern without excessive glare.
- Inspect the workpiece for cracks, sharp edges, fragile details, coatings, and nearby components that should not be abraded.
- Choose compatible cleaning supplies and abrasives. Read the safety data and manufacturer directions for polishing compounds and cleaners.
- Secure the work in a way that does not crush, mar, or distort it. Small parts should not be casually held against a fast rotating wheel.
- Check the polishing machine, wheel, guards, arbor fit, and rated operating speed before starting. Never exceed the wheel or accessory rating.
- Arrange separate clean cloths and finishing wheels for coarse and fine stages to limit abrasive carryover.
- Wear task-appropriate eye protection and any additional protection required by the machine, abrasive, and exposure assessment. Avoid loose sleeves, jewelry, and gloves that can be caught by rotating machinery.
For an unfamiliar part or machine, consult the manufacturer or a qualified metal-finishing professional rather than improvising a wheel or compound combination. Some parts are unsuitable for powered buffing because of shape, fragility, coating, or critical dimensions.
Progressive Scratch Removal Without Unnecessary Material Loss
Inspect the deepest defect first. A polishing compound generally refines an existing surface; it cannot reliably erase a deep groove without removing surrounding material. If the defect cannot be removed safely, accepting a less-than-mirror finish may be the right decision.
When abrasion is appropriate, make a short test pass with a suitably fine abrasive and inspect whether the defect is actually diminishing. If it is not, evaluate whether a slightly more aggressive step is justified. Do not automatically begin with a coarse grit because a generic online chart recommends it.
At each stage, remove abrasive residue and examine the entire surface. The previous scratch pattern should be consistently refined before moving to the next stage. Changing to a finer product too early can leave deeper lines that become obvious only after final buffing.
On broad flat surfaces, use a method that maintains even contact and avoids rounding edges. On decorative contours, reduce pressure and preserve intentional details. On plated or anodized parts, do not apply a bare-metal sanding sequence unless the coating is intentionally being removed as part of an approved restoration.
Hand Buffing Versus Powered Buffing: A Practical Decision
Hand polishing is often preferable for small trim, sensitive coatings, irregular surfaces, and projects where the finish needs only light correction. It offers feedback and makes it easier to stop before excessive material is removed. Work in small sections and frequently change to a clean cloth to avoid dragging trapped grit across the surface.
Powered buffing can reduce labor on appropriate bare-metal surfaces, but it introduces additional hazards. The wheel can catch edges and throw a workpiece; friction can generate heat; and the wheel can remove material faster than expected. Use the equipment only with the required guards and training, keep the work positioned as specified by the manufacturer, and never force an accessory that does not fit the spindle correctly.
Troubleshooting Common Metal Polishing Results
| Problem | Possible cause | Next check |
|---|---|---|
| Cloudy or hazy appearance | Compound residue, incomplete refinement, or an incompatible product | Clean a test area and reassess the previous abrasive stage |
| New circular scratches | Contaminated pad or wheel, trapped grit, or unsuitable technique | Inspect and replace contaminated consumables |
| Dark residue on cloth | Metal oxides or polishing residue on some bare metals | Check product instructions and clean before judging the finish |
| Uneven shine | Inconsistent preparation or pressure | Inspect under consistent lighting and refine a small section |
| Discoloration or overheating | Excess friction, incompatible chemistry, or coating damage | Stop, cool, identify the surface, and reassess the method |
| Fine details losing definition | Overly aggressive buffing or repeated abrasion | Stop material removal; consider professional restoration |
Do not assume every visible mark is a polishing defect. Pitting, corrosion damage, plating failure, and casting porosity may remain even after an otherwise correct finishing sequence. Excessive polishing can make those problems worse rather than solve them.
Protect the Finish According to the Metal and Its Use
After polishing, remove residue using a cleaner that is compatible with the material. Dry the surface thoroughly. Bare copper and brass may tarnish again in ordinary air; some aluminum surfaces oxidize naturally; stainless steel care depends on grade, exposure, and surface finish. The appropriate protective treatment therefore varies.
A decorative part may accept a manufacturer-approved wax or coating, while a food-contact, high-temperature, electrical-contact, or dimension-critical component may require a completely different treatment or no added coating at all. Avoid generic sealants on functional parts without verifying compatibility.
For routine maintenance, use mild cleaning before returning to abrasives. Keep separate cloths for different metals and compounds, and inspect for new damage rather than polishing on an arbitrary schedule.
When to Stop and Seek Professional Finishing Help
Stop if the part has flaking plating, unknown protective coatings, structural cracks, deep corrosion, heat-sensitive assemblies, or safety-critical dimensions. A mirror finish is not worth compromising fit, electrical function, food safety, or structural integrity. Professional restoration may be appropriate for valuable antiques, precision components, and large architectural surfaces.
Machine-Buffing Safety: Prevent Wheel Grab and Entanglement
Powered buffing is not simply a faster version of hand polishing. A wheel can grab an edge or a small component and throw it. Exposed shafts and rotating wheels can also pull in loose sleeves, hair, jewelry or gloves. Secure the work as the machine and accessory manufacturers require, and do not casually grip a tiny loose part against a high-speed wheel. Do not remove guards to gain access; if the part cannot be held and finished safely with the available equipment, use an appropriate alternative or seek a professional finisher.
Before starting, inspect the wheel for wear, cracks or looseness, check the approved rotation speed and compound compatibility, and keep flammables away from sparks and hot work. Use appropriate eye and face protection, ventilation and task-specific respiratory protection. Never wear loose clothing or jewelry near the rotating spindle. Consult the machine-specific instructions for whether any hand protection is permitted: gloves can create an entanglement hazard on rotating machinery. The OSHA interpretation addressing polishing and buffing wheels distinguishes types of wheel hazards and related controls.
Takeaway
Polish metal by identifying the surface, correcting defects progressively, controlling heat and contamination, and using abrasives and compounds that match the material and finish goal.