
A smooth, flat piece of wood can make or break your project, whether you’re building a table, cabinet, or a simple shelf. When you look at raw lumber, it’s rarely perfect. Most boards have twists, cups, or rough surfaces. That’s where two powerful tools step in: the planer and the jointer. Both are essential in woodworking, but they do very different jobs. If you’re new to woodworking, you might wonder: Do you need both? Which one should you buy first? How do you use them together for the best results?
Understanding the differences between a planer and a jointer can save you time, money, and a lot of frustration. It’s more than just knowing what each tool does—you need to know when and how to use them for the best outcome.
Let’s break down these two tools, compare their features, and see which one fits your workshop needs.
What Is A Jointer?
A jointer is a woodworking machine used to create flat surfaces along the edge or face of a board. It’s perfect for preparing rough lumber by removing warps and twists.
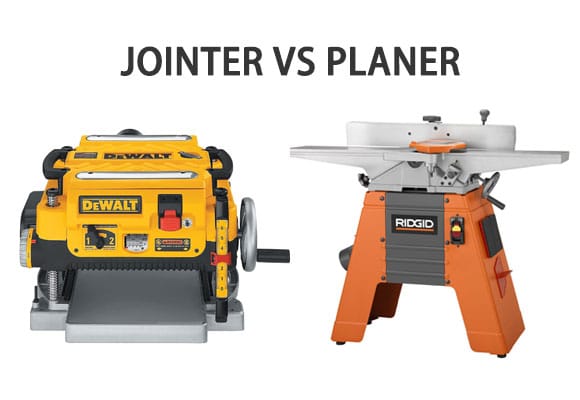
The jointer has a flat bed with an infeed and outfeed table. A rotating cutter head sits between these tables. As you push the wood across the infeed table, the blades cut away high spots, leaving a flat surface.
Key Functions Of A Jointer
- Flattening one face of a board
- Squaring one edge to the flattened face
- Removing warps, bows, and twists
When To Use A Jointer
You use a jointer when your wood is uneven, twisted, or has a rough edge. By passing the board over the jointer, you create a reference face and a straight edge—essential steps before moving to the planer.
Practical Example
Suppose you bought a piece of rough-sawn maple. It’s slightly twisted, and the edges are wavy. The jointer helps you create one perfectly flat face and one straight edge, so you can move to the next stage.
What Is A Planer?
A planer (also called a thickness planer) is a machine that makes the other side of your board parallel and smooth. It works by feeding the board through rollers under a cutting head, shaving the surface to your desired thickness.
Key Functions Of A Planer
- Making the opposite face parallel to the reference face
- Smoothing rough surfaces
- Bringing wood to exact thickness
When To Use A Planer
After you have one flat face (from the jointer), you run the opposite face through the planer. The planer copies the flatness of the reference face and creates a board with consistent thickness.
Practical Example
If you want all your boards for a tabletop to be exactly 20mm thick, the planer ensures each piece is uniform, flat, and ready to glue up.
Credit: www.konetool.com
Planer Vs Jointer: Core Differences
Let’s make the comparison clear. Both tools are for flattening wood, but they do different things. Here’s a side-by-side look:
| Feature | Jointer | Planer |
|---|---|---|
| Main Purpose | Flattens one face or edge | Makes faces parallel and sets thickness |
| Surface | Creates a reference surface | Copies reference surface on opposite face |
| Removes Twist/Bow | Yes | No |
| Thickness Control | No | Yes |
| Common Size | 6″–8″ wide | 12″–15″ wide |
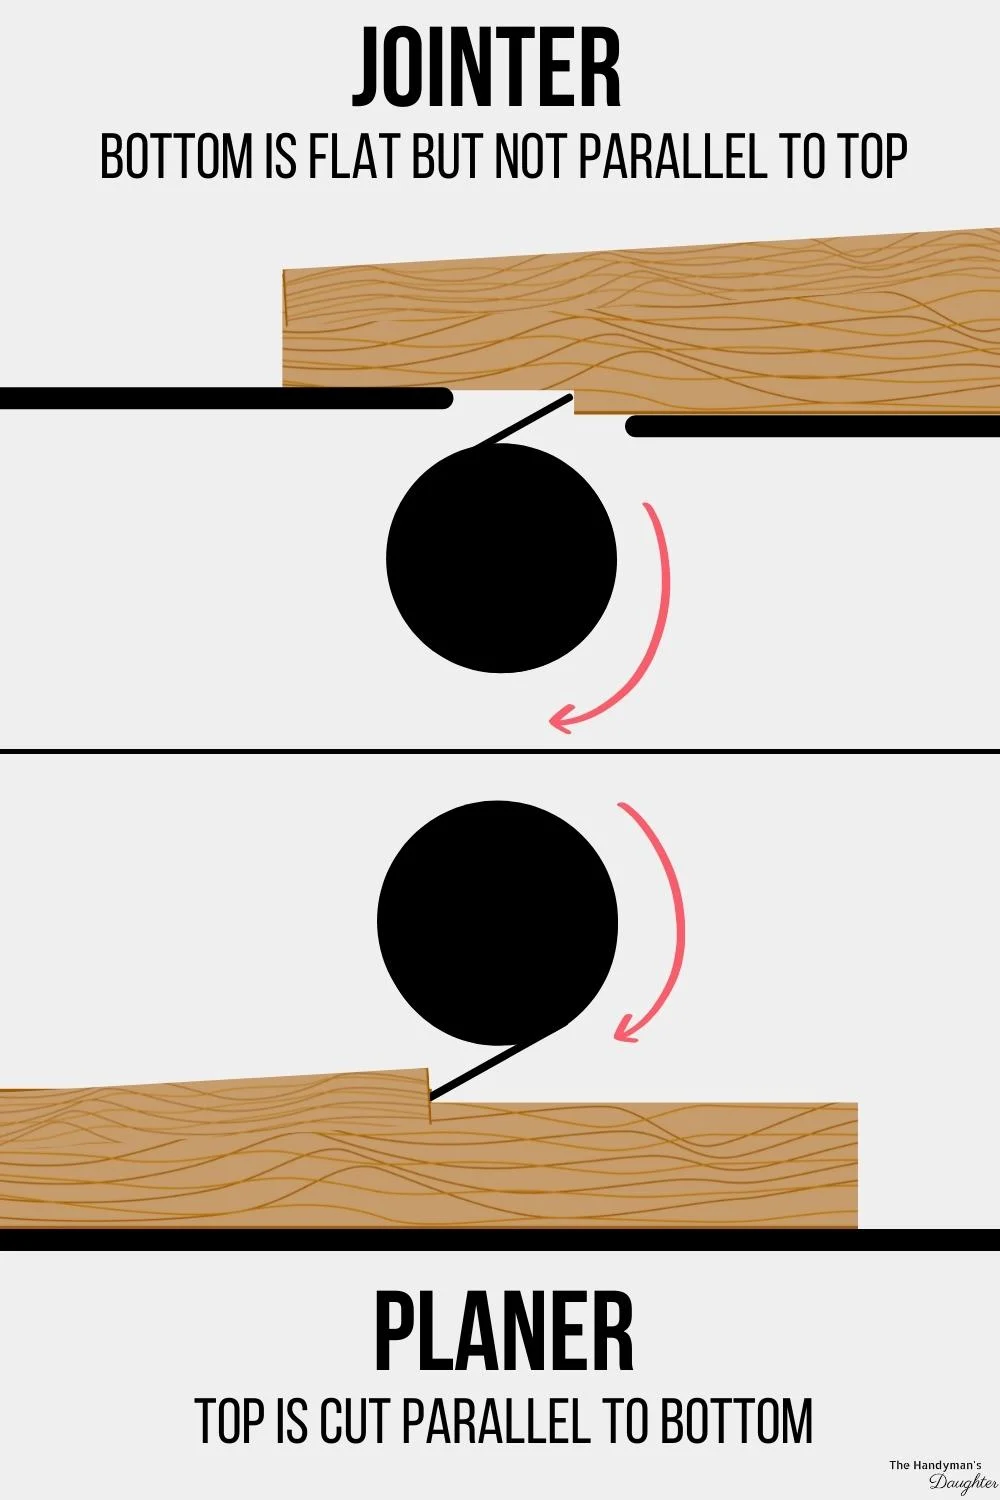
A simple rule: jointer for flat, planer for parallel and thickness.
How They Work Together
Most woodworkers use both tools in sequence. Here’s a typical workflow:
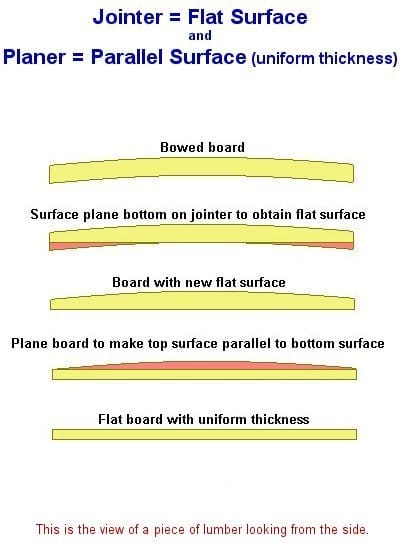
- Joint one face to create a perfectly flat surface.
- Joint one edge (with the flat face against the fence) to get a square, straight edge.
- Plane the opposite face to make it parallel and bring the board to final thickness.
- Rip the board to width on a table saw, using the jointed edge as a guide.
- (Optional) Joint the second edge for a smooth finish.
This process removes warps and makes every board uniform.
Why Can’t A Planer Replace A Jointer?
A common mistake is thinking a planer alone can flatten wood. It can’t fix twists or bows because it only copies the bottom face. If the bottom is not flat, the top will not be flat either; the board just becomes uniformly twisted.
Example: Cup Or Twist
If you send a cupped board through a planer, the rollers press it flat, but as soon as it comes out, it springs back to its original shape—just thinner. You still need a jointer to get a truly flat reference surface.
Credit: www.thehandymansdaughter.com
Which Should You Buy First?
This is one of the biggest debates in woodworking. Most beginners can’t afford both tools at once. So, which is more important?
Common Advice
Many experts recommend buying a jointer first. Without a flat face and edge, the planer can’t do its job well. However, some people buy a planer first because:
- Planers can handle wider boards.
- You can flatten boards with a sled (a jig you make to hold the board flat in the planer).
- Planers can thickness rough lumber for other projects.
When A Jointer Makes More Sense
- You often buy rough or warped lumber.
- You want perfectly straight edges for glue-ups.
- You’re building fine furniture or cabinets.
When A Planer Might Be Enough (for Now)
- You mostly use pre-surfaced (S4S) lumber that’s already flat.
- You’re comfortable making a planer sled for flattening boards.
- Your space or budget is limited.
Pro tip: Many small shops start with a planer and use a hand plane or sled for flattening. But if you want speed and accuracy, owning both is the best.
Practical Tips For Using Each Tool
Getting great results means using each tool correctly. Here are key tips for success:
Jointer Tips
- Always joint the face before the edge. The flat face supports the edge for a square cut.
- Use light passes to avoid tear-out and get a smoother surface.
- If your board is longer than your jointer, go slow and support the wood at both ends.
- Keep blades sharp for the best results.
Planer Tips
- Only plane after jointing one face.
- Don’t try to remove too much in one pass—2mm is usually safe.
- Watch for snipe (a dip at the beginning or end). Support the board and use sacrificial pieces if needed.
- Clean the rollers regularly to prevent slipping.
Alternatives And Workarounds
If you can’t afford both tools, you’re not out of options. Here are some common workarounds:
- Jointer sled for planer: Build a flat sled, place shims under the warped board, and run it through the planer. This flattens the board, but it’s slower.
- Hand planes: A sharp hand plane can flatten faces and edges, though it takes skill and effort.
- Edge jointing on a table saw: With a special jig, you can straighten edges, but you can’t flatten faces.
These methods work, but they’re more time-consuming. For serious woodworking, owning both tools is a big advantage.
Key Features To Compare Before Buying
When shopping for a planer or jointer, pay attention to these features:
| Feature | Planer | Jointer |
|---|---|---|
| Width Capacity | 12″–15″ (common) | 6″–8″ (common) |
| Motor Power | 1.5–2 HP | 1–1.5 HP |
| Knife Type | 3-blade or spiral | 2- or 3-blade, spiral |
| Dust Collection | Yes (important) | Yes (important) |
| Portability | Many benchtop models | Benchtop rare, usually floor-standing |
Insider tip: Spiral cutter heads cost more, but they stay sharper longer and reduce tear-out, especially on figured woods.
Common Beginner Mistakes
Many new woodworkers run into the same problems:
- Planing twisted boards without jointing first—the twist remains.
- Trying to joint short boards (less than 30 cm) or very long boards (over 2 meters) on small machines—results are poor.
- Ignoring grain direction—jointing against the grain causes tear-out.
- Feeding too fast—both machines work best at moderate speed.
- Not checking squareness—always use a square to check your results.
Fixing these mistakes will save you materials and frustration.
Safety Considerations
Both jointers and planers are powerful machines. They can be dangerous if misused.
- Always use push blocks on the jointer to keep your hands safe.
- Keep fingers away from cutter heads.
- Never joint or plane wood with loose knots, nails, or other metal.
- Wear hearing and eye protection.
- Disconnect the tool from power before changing blades or cleaning.
Cost Considerations
Prices can vary a lot. Here’s a rough idea:
- Planers: Entry-level benchtop models start around $350–$600 USD. Larger, professional models can cost $1,000+.
- Jointers: Small 6″ jointers are $400–$700. Larger 8″ models can be $1,200 or more.
You’ll also need space. Planers are usually more portable, while jointers are heavy and take up more floor area.
When To Upgrade
If you’re building more complex projects or working with rough lumber often, you’ll quickly see the value of having both machines. Furniture makers, cabinet builders, and serious hobbyists usually upgrade to a bigger jointer and planer as their skills grow.
Credit: woodworking.stackexchange.com
Real-world Example
Imagine you want to build a dining table with solid wood planks. You buy rough boards from the lumberyard. To get perfect glue joints and a smooth top:
- Jointer: Flattens one face and one edge.
- Planer: Smooths and levels the opposite face to match the first.
- Table saw: Rips the board to width.
- Jointer (again): Cleans up the second edge for a tight fit.
Skipping any step means you may have gaps or uneven surfaces.
Frequently Asked Questions
What’s The Main Job Of A Jointer?
A jointer creates one flat face and one straight edge on rough or warped boards. It’s the first step to getting perfectly flat wood.
Can You Use A Planer Instead Of A Jointer?
No, a planer can’t remove twists or warps. It only makes the top face parallel to the bottom. For true flatness, you need a jointer first.
Is It Safe To Joint Both Faces Of A Board?
You should only joint one face. The second face is made parallel with the planer. If you try to joint both faces, the board may not be parallel or even in thickness.
What Size Jointer And Planer Do I Need?
A 6″ jointer and 12″ planer handle most boards for small projects. For larger work, an 8″ jointer and 15″ planer are ideal. Always choose the widest tools your budget allows.
Where Can I Learn More About Using These Tools?
A great resource for deeper learning is the Wikipedia page on woodworking machines, which covers jointers, planers, and other essential tools.
Using both a jointer and planer is the secret to pro-quality woodworking. They each play a unique role, and together, they unlock the full potential of your lumber. Whether you’re just starting or ready to upgrade, knowing the difference will help you build better, safer, and smarter.
