Cutting copper pipe might seem difficult if you have never done it before. Whether you are fixing a leak, installing a new faucet, or upgrading your plumbing, knowing how to cut copper pipe is a valuable skill. The good news is, with the right tools and some simple tips, you can get a clean, professional result.
Many beginners worry about damaging the pipe or making mistakes that cause leaks later, but with some guidance, you can avoid common problems. In this guide, you will learn everything you need to know about how to cut copper pipe properly, from choosing tools to making perfect cuts.
Even if you are new to plumbing projects, this step-by-step advice will give you the confidence to get started.
Understanding Copper Pipe
Copper pipe is popular in plumbing because it is strong, resists corrosion, and lasts a long time. You will find it in most homes for water supply lines, heating systems, and sometimes even for gas. There are two main types: Type M (thinner, usually for indoor water lines) and Type L (thicker, for outdoor or higher-pressure use). The pipe comes in different diameters, most commonly 1/2-inch and 3/4-inch for home use.
Copper pipe is easy to cut, but you must use the right method. If you use the wrong tool or technique, you can bend the pipe or leave rough edges that cause leaks. It is also important to know that copper pipe is measured by its inside diameter, not outside.
This can be confusing for beginners, so always check the size before buying tools or fittings.
Essential Tools For Cutting Copper Pipe
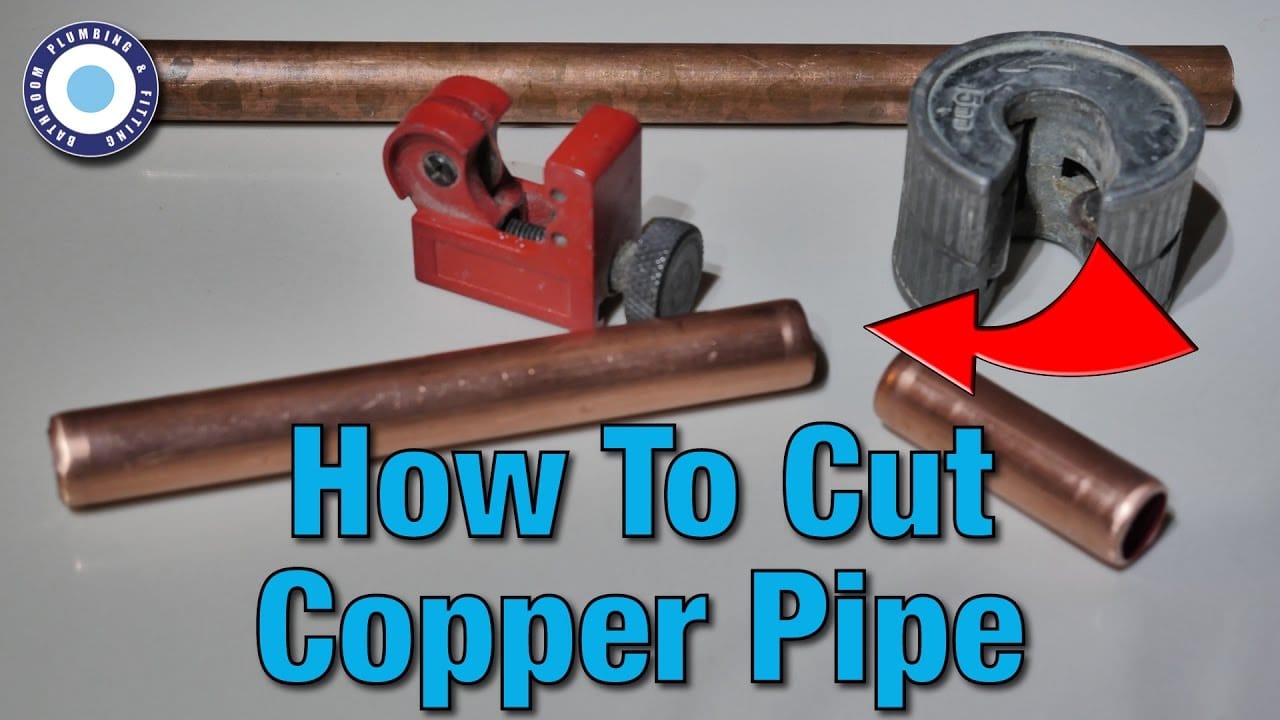
There are several tools you can use to cut copper pipe. The best tool depends on your project and what you have available. Here is a comparison of the most common tools:
| Tool | Best For | Pros | Cons |
|---|---|---|---|
| Pipe Cutter | Standard plumbing jobs | Easy to use, clean cuts, safe | Not for tight spaces |
| Hacksaw | Quick, rough jobs | Cheap, works in most cases | Edges need cleaning, hard to cut straight |
| Mini Tube Cutter | Tight spaces | Fits where larger cutters don’t | Slower, not for thick pipes |
| Oscillating Tool | Advanced users | Fast, can cut many materials | Expensive, needs practice |
You will also need a measuring tape, a marker or pencil, and a de-burring tool (or sandpaper) to smooth the pipe edges after cutting.
Step-by-step Guide: How To Cut Copper Pipe
Cutting copper pipe is straightforward if you follow these steps. Here’s how to get a clean, leak-free result every time.
1. Measure And Mark
First, use a measuring tape to find the exact spot you want to cut. Always measure twice—mistakes are hard to fix once you cut the pipe. Mark the spot clearly with a permanent marker or pencil. Make sure your mark goes all around the pipe, especially if you are using a hacksaw.
2. Secure The Pipe
Hold the pipe firmly so it does not move while you cut. If the pipe is already installed, support it with your hand or a pipe clamp. For loose pipe, a workbench vise is best. Never try to cut a pipe that moves around—you will get a crooked cut and risk injury.
3. Choose And Use The Right Tool
Using A Pipe Cutter
This is the easiest and safest tool for most jobs.
- Open the cutter and place it over the pipe where you marked.
- Tighten the tool so the cutting wheel touches the pipe, but don’t overtighten.
- Rotate the cutter around the pipe. After each full turn, tighten a little more.
- Continue rotating and tightening until the pipe snaps cleanly apart.
Using A Hacksaw
- Place the blade on your mark.
- Use slow, steady strokes to avoid bending the pipe.
- Hold the pipe tightly, and keep the saw straight.
- After cutting, check for jagged edges.
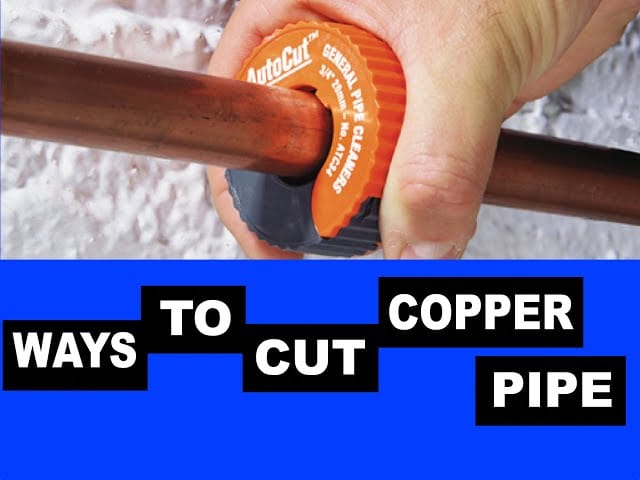
Using A Mini Tube Cutter
This tool is perfect for tight spaces.
- Place the cutter over the pipe at your mark.
- Tighten the knob gently.
- Rotate the tool around the pipe. Tighten slightly with each turn.
- Keep going until the pipe is cut.
Using An Oscillating Tool
Only use this if you are comfortable with power tools.
- Fit the tool with a metal-cutting blade.
- Line up the blade with your mark.
- Hold the tool steady and cut slowly through the pipe.
- Wear safety glasses and gloves.
4. Clean And Deburr The Pipe
No matter which tool you use, the cut edge will have small burrs or rough spots. These can cause leaks or damage pipe fittings. Use a de-burring tool, round file, or sandpaper to remove all sharp edges inside and outside the pipe. Run your finger around the edge—if it is smooth, you are done.
5. Double-check The Fit
Test the cut pipe in your fitting or connector before installing. If it does not fit easily, clean the edge again. Never force copper pipe into a fitting—this can damage both and lead to leaks.
Tips For Perfect Cuts
Getting a smooth, straight cut is not just about the tool. Here are some practical tips:
- Always use a sharp blade or wheel. Dull tools crush or bend the pipe.
- Rotate, don’t force. With pipe cutters, let the tool do the work.
- Cut slowly. Fast, hard cutting causes rough edges.
- Wipe the pipe before cutting. Dirt or grit can scratch the copper.
- Check for roundness. Sometimes, cutting can slightly squash the pipe. Use pliers to gently reshape if needed.
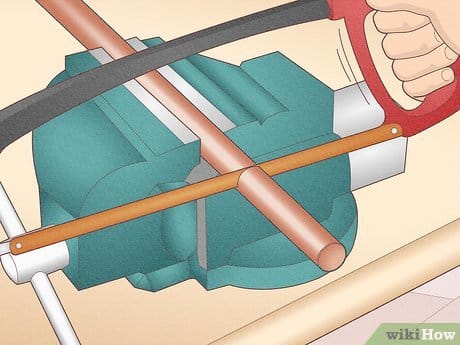
Credit: www.wikihow.com
Common Mistakes And How To Avoid Them
Even experienced DIYers make mistakes. Knowing what to look out for can save you time and prevent leaks.
- Not deburring: Leaving rough edges inside the pipe causes water turbulence and can damage O-rings in push-fit connectors.
- Cutting too short: Always measure twice. A pipe that’s too short cannot be easily fixed.
- Using the wrong tool: A hacksaw is fine for emergencies, but a pipe cutter gives the cleanest result.
- Not supporting the pipe: This causes crooked cuts and can crack fittings.
- Ignoring pipe type: Type L and Type M pipes have different wall thicknesses. Make sure your tool fits your pipe.
Many beginners also forget to dry the pipe before cutting. If the pipe is wet, your marker can wash off, and tools might slip—always dry the area first.
When To Replace Or Repair Copper Pipe
Sometimes, you cut copper pipe to fix a problem. But when should you replace instead of repair? If you see green corrosion, deep pitting, or multiple leaks in a short section, it is better to replace the whole piece. For simple leaks or small damage, cutting out a short section and adding a coupler is usually enough. Pipes over 50 years old should be checked by a plumber, as old copper can become brittle and crack easily.
Safety Tips When Cutting Copper Pipe
Safety is important, especially if you are new to plumbing work.
- Wear safety glasses. Small metal shavings can fly off when cutting or deburring.
- Wear gloves. Copper edges can be sharp.
- Don’t force power tools. Let the blade or wheel do the work.
- Check for water and electricity. Always turn off the water supply and check for nearby electrical wires before cutting.
Never try to cut a pressurized pipe. Even a small amount of water pressure can make the pipe jump or spray water everywhere.
Cutting Copper Pipe In Tight Spaces
Sometimes, you need to cut a pipe that is already installed in a wall or cabinet. This is tricky but possible.
- Use a mini tube cutter. It is designed for tight spots.
- If there is no room for a full turn, use a cable-style cutter or a compact oscillating tool.
- Protect nearby surfaces with a cloth or shield. Copper dust can stain.
In older homes, pipes may be close to other materials like wood or electrical wiring. Go slowly and check what is behind the pipe before you cut.
Preparing The Pipe For Soldering Or Fittings
After you cut the copper pipe, you need to prepare it for joining. Clean the outside with emery cloth or sandpaper. Make sure all burrs are removed. For soldering, the pipe must be shiny and free of oil or dirt. For push-fit or compression fittings, the edge must be perfectly round and smooth.
Here’s a simple table showing which fittings work best with cut copper pipes:
| Fitting Type | Preparation Needed | Best For |
|---|---|---|
| Solder (sweat) fitting | Clean and deburred, shiny | Permanent joints |
| Push-fit fitting | Deburred, smooth, round | Quick repairs |
| Compression fitting | Deburred, no scratches | Removable connections |
If you skip preparation, you risk leaks, weak joints, or fittings that won’t attach.
Alternatives To Cutting Copper Pipe
In some cases, you might not want to cut the copper pipe at all. For example, if you are adding a new line, you can use slip couplings or push-fit tees that don’t require precise cutting. These are useful for quick repairs or temporary fixes. However, for long-lasting, leak-free plumbing, a proper cut with the right tool is always best.
Credit: www.youtube.com
Real-world Example
Let’s say you need to replace a leaky section under your kitchen sink. First, measure the damaged section and mark where you will cut. Turn off the water supply and dry the pipe. Use a pipe cutter for a clean cut, deburr the edges, and test-fit the new pipe section.
After preparing the ends, use a compression fitting or solder the new piece in place. When you turn the water back on, check for leaks. This process is the same whether you are working under a sink, in a basement, or behind a wall.
Practical Insights Most Beginners Miss
- Pipe expansion: After cutting, copper can sometimes expand slightly, making fittings tight. Gently round out the pipe with pliers if needed.
- Hidden water: Even after turning off the main valve, some water can remain in pipes. Open a faucet below the cutting point to drain extra water.
- Tool maintenance: Keep your pipe cutter wheel clean and sharp. A dull wheel can slip and scratch the pipe, leading to leaks later.
Where To Learn More
If you want to explore more about plumbing materials and methods, Wikipedia’s article on copper tubing offers in-depth information about types, uses, and history of copper pipes.
Frequently Asked Questions
How Do I Know Which Tool To Use For Cutting Copper Pipe?
If you have enough space and want the cleanest cut, use a pipe cutter. For tight spaces, a mini tube cutter is best. Use a hacksaw only if you have no other option and plan to clean the edges thoroughly.
Can I Cut Copper Pipe With A Regular Saw?
You can use a hacksaw with a fine-tooth blade, but it is harder to get a straight, smooth cut. Always deburr the edge after using a hacksaw to remove sharp pieces that may cause leaks.
Is It Safe To Cut Copper Pipe By Myself?
Yes, it is safe if you follow the steps: turn off the water, secure the pipe, and wear gloves and safety glasses. Avoid cutting pipes near electrical wires or with water still inside.
How Do I Stop The Pipe From Slipping While Cutting?
Use a pipe clamp or hold the pipe steady with a vise. If cutting an installed pipe, support it with your hand or a small block of wood. Never try to cut a loose pipe—it can cause injury or damage.
What Should I Do If My Cut Is Not Straight?
If the cut is slightly uneven, deburr and smooth the edge. For a very crooked cut, re-cut the pipe just past the bad section. A straight, smooth edge is important for a leak-free joint.
Cutting copper pipe is a simple skill that can save you time and money on home repairs. With the right tools, careful measuring, and attention to detail, you can make clean, professional cuts every time. Don’t rush—take your time, follow the steps, and always double-check your work.
Soon, you’ll find that plumbing repairs are less intimidating, and you might even enjoy the process.
Credit: www.youtube.com
