AC voltage is easy to check once you know the right meter setting and a few safety rules. If you want to know How to Test AC Voltage With a Multimeter, the good news is that the process is simple, but only if you do it the correct way.
A multimeter can tell you whether an outlet, switch, wire, or appliance is carrying live AC power. The key is to use the proper range, place the probes in the right spots, and avoid common mistakes that can damage the meter or create a shock risk.
This guide walks you through the full process step by step. You will learn what to set on the meter, how to read the display, how to test outlets and wires safely, and how to avoid the errors that beginners make most often.
What you need before you start
Before you test anything, gather the right tools and check that your meter is safe for the job. A digital multimeter is the best choice for most people because the display is easy to read and it usually gives a more stable reading than an old analog meter.
For AC voltage testing, you need a meter with an AC voltage setting marked as V~ or sometimes VAC. Make sure the meter and probes are rated for the circuit you are testing. For household power, that usually means a meter rated for at least 600V CAT III or better for general indoor electrical work.
You should also have insulated test probes in good shape. If the probe tips are cracked, bent, or loose, replace them before testing. A damaged probe can give false readings or expose you to unnecessary risk.
- Digital multimeter with AC voltage mode
- Test probes with intact insulation
- Safety glasses
- Dry hands and a dry work area
- Access to the circuit or outlet you want to test
If you are checking household wiring, it also helps to know the expected voltage. In the United States, standard outlets are usually around 120 volts AC. Large appliances may use 240 volts AC. That number matters because it tells you whether the reading is normal or not.
For general electrical safety guidance, the official OSHA electrical safety guidance is a useful reference for basic hazards and safe work habits.
Set up the multimeter the right way
The meter setup is where many beginners make mistakes. The most common one is leaving the meter on the wrong function, such as DC voltage, resistance, or current. If you do that, the reading will be useless and you may even blow a fuse inside the meter.
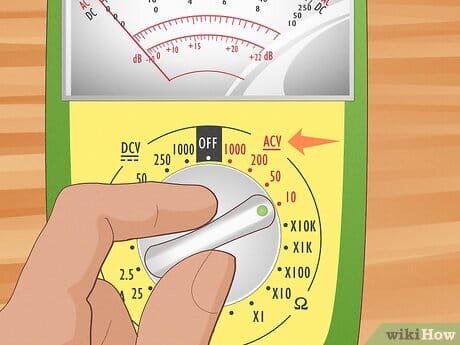
Select the correct function
Turn the dial to AC voltage. On most meters, that is marked V~. If the meter has multiple voltage ranges, choose the next range above the expected voltage. For example, if you expect 120V AC and your meter does not auto-range, select the 200V or 600V range depending on the model.
If your meter is auto-ranging, this step is easier. You still need to make sure you are on AC voltage mode, not DC. The symbol is the important part, not just the number on the dial.
Check the probe ports
Plug the black probe into the COM port. Plug the red probe into the port labeled for voltage, often marked V or VΩ. Do not use the current ports, which are often labeled 10A or mA, unless you are measuring current. That is one of the easiest mistakes to avoid.
Using the wrong port can damage the meter the moment you touch a live source. A lot of beginner meters fail this way, not because the meter is bad, but because the setup was wrong.
Inspect the meter before use
Look at the screen, the dial, and the probe leads. Make sure the battery symbol is not showing low power. A weak battery can cause unstable readings, especially on low-voltage AC circuits.
Also check the meter’s category rating, sometimes called CAT rating. This tells you where the meter is meant to be used. A meter rated for CAT II is meant for simpler loads and outlets, while CAT III is better for distribution circuits and fixed wiring.
How to test AC voltage with a multimeter step by step
Once the meter is set correctly, testing AC voltage is straightforward. The exact probe placement depends on the thing you are measuring, but the basic idea is always the same: place the probes across the two points where you expect voltage to exist.
Here is the simple process to follow.
- Turn the meter to AC voltage mode.
- Plug the black probe into COM and the red probe into V.
- Choose a range above the expected voltage if the meter is not auto-ranging.
- Touch the probe tips to the two test points.
- Read the number on the display.
- Remove the probes carefully and return the meter to a safe setting.

Credit: mrelectric.com
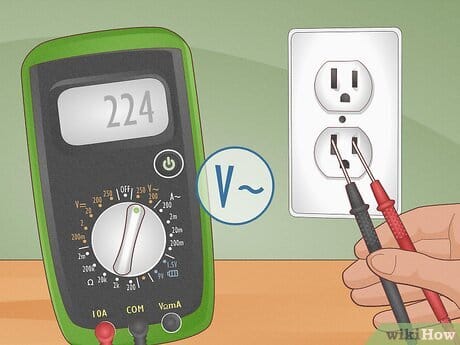
Testing a standard wall outlet
For a 120V household outlet, insert one probe into each slot. In the United States, the narrower slot is usually hot and the wider slot is neutral, but for a basic voltage reading, the order of the probes does not matter because AC voltage changes direction many times per second.
You should see a reading near 120V AC, often somewhere between about 114V and 126V depending on load and utility conditions. If the outlet reads 0V, it may be dead, tripped, or wired incorrectly. If it reads far above normal, stop and investigate before using it.
Testing a wire or terminal
When checking a wire, place one probe on the live conductor and the other on neutral or ground, depending on what you want to test. Be careful not to let the metal probe tips touch each other or nearby metal parts. That can short the circuit.
If you are testing a loose conductor, use one hand when possible and keep the other away from the area. This is a simple habit that reduces the chance of current passing across your chest if something goes wrong.
Testing a switch or appliance input
For a switch, test across the terminals when the switch is on and again when it is off. A live switch should show voltage when closed and little or none when open. For an appliance input, test at the power terminals only if you know the access points are safe and exposed for testing.
Do not open sealed appliances unless you are trained to do so. Internal parts can hold stored energy even after the plug is removed.
How to read the results correctly
Reading the number is only part of the job. You also need to know what the number means. A reading near the expected voltage usually means the circuit is live and functioning. A very low reading, zero, or a value that jumps around tells you something is wrong or unstable.
AC meters may show small fluctuations. That is normal. For example, a reading on a 120V outlet might move between 118.6V and 121.4V. Small changes like that are common and usually not a problem.
| Reading | What it may mean | What to do next |
|---|---|---|
| About 120V AC | Outlet or circuit is likely normal | Continue with your next check if needed |
| About 240V AC | Likely a higher-voltage appliance circuit | Confirm the circuit type before using it |
| 0V or near 0V | No power, open circuit, or wrong test points | Check breaker, switch, wiring, and meter setting |
| Much lower than expected | Loose connection, heavy load, or wiring issue | Test again with the load removed if possible |
| Unreadable or unstable | Poor probe contact, damaged lead, or meter issue | Inspect leads and retest |
One non-obvious point: a reading can look normal even when the circuit is still unsafe. Loose connections can briefly show correct voltage with no real ability to carry load. That is why voltage testing is useful, but it does not tell you everything about circuit health.
Common mistakes to avoid
Most testing problems come from a small set of errors. If you avoid these, your results will be more reliable and your risk will be much lower.
Using the wrong mode
Do not measure AC voltage while the meter is set to resistance, continuity, or current. Current mode is especially risky because it often creates a near-short path through the meter. That can blow the internal fuse instantly.
Forgetting to move the red probe
The red lead should be in the voltage port for voltage testing. Many people forget it after using the meter for current measurement. This is a small mistake with big consequences, because the meter may seem to work until it is placed on a live circuit.
Touching the metal probe tips
Keep your fingers behind the finger guards on the probes. The exposed metal should touch only the test points, not your hand. This matters even at lower household voltages because accidental contact can still cause a shock.
Testing on damaged cords or wet surfaces
Water and damaged insulation change the risk level fast. A wet floor, damp outlet, or cracked cord can turn a simple test into a dangerous one. If the area is wet, dry it first or do not test until it is safe.
Another detail beginners often miss is probe contact pressure. A light touch may give a false low reading. A firm, stable contact is better, but never force the probes into a connector or slot.
Troubleshooting if the reading does not make sense
If the display is blank, too low, or jumping around, do not assume the circuit is dead. Start with the meter itself, then move to the test points, then check the source.
Credit: wikihow.com
Check the meter first
Test the meter on a known live source, such as a working outlet you trust. If the meter reads normally there, the meter is probably fine. If it does not, the problem is likely the meter setting, probe placement, battery, or internal fuse.
Confirm the probe placement
Make sure one probe is on each side of the circuit you want to measure. If both probes are touching the same conductor, the meter will show little or no voltage. That is a common mistake when testing outlets, terminals, or loose wires in tight spaces.
Look for a hidden switch or breaker issue
Sometimes the answer is simple. A wall switch may be off, a breaker may be tripped, or a GFCI outlet may have opened the circuit. Resetting the correct device may restore power. If you do not know which breaker controls the circuit, label it carefully as you test.
Watch for voltage drop under load
A circuit may show normal voltage with no load, but drop when a device turns on. That often points to a weak connection, overloaded circuit, or failing component. This is one of the most useful reasons to test under real operating conditions, not just when everything is idle.
If you suspect damaged wiring, burning smell, heat, or sparking, stop immediately. That is no longer a simple meter test. It is a safety issue that may need a licensed electrician.
Safety habits that make a big difference
Most AC voltage tests are quick, but safety should still come first. A few habits can protect both you and the meter.
- Keep one hand away from the circuit when possible.
- Stand on a dry surface.
- Use the meter only within its rating.
- Never touch exposed metal with your fingers.
- Remove jewelry before working near live power.
Also remember that voltage testing does not mean the circuit is harmless. A circuit with only 120V AC can still cause serious injury. The current path through the body matters, and even brief contact can be dangerous if conditions are right.
One practical tip: after finishing, return the meter dial to an unused setting or off position. That prevents the next person from picking it up in the wrong mode and making a mistake later.
When to call a professional
Call a qualified electrician if the voltage is unstable, a breaker trips repeatedly, or you see burn marks, melted insulation, buzzing, or heat around an outlet or panel. Those are signs of a deeper problem.
You should also stop and get help if the circuit is in a main panel, if the meter reading does not match the expected voltage by a wide margin, or if you are unsure where the probes should go. A wrong move near service equipment is not worth the risk.
For general homeowner electrical safety and repair guidance, a good starting point is your local utility advice or a licensed electrician. If the issue is in a larger system, professional testing is the safer choice.
Credit: wikihow.com
Final takeaways for accurate AC testing
If you remember just three things about How to Test AC Voltage With a Multimeter, make them these: use the AC voltage setting, place the probes on the correct two points, and trust the reading only after you confirm the meter setup is correct. Those three steps solve most beginner mistakes.
Also keep in mind that a normal voltage reading does not prove a circuit is perfect. It only tells you that voltage is present where you tested. Loose wiring, poor connections, and overloaded circuits can still hide behind a normal number.
With the right setup and a careful approach, AC voltage testing becomes a fast, useful skill. Once you can read a meter confidently, you can check outlets, switches, and appliance circuits with much more certainty and far less guesswork.
If you also need to measure battery-powered circuits, see how to test DC voltage with a multimeter. And if you are specifically checking a car or backup battery, this guide on how to test a 12V battery with a multimeter covers the readings in more detail.
Safety note: AC voltage testing is done on an energized circuit, so use a CAT-rated meter and intact leads, keep your fingers behind the probe guards, and stop if insulation is damaged or bare conductors are exposed.
FAQs
1. What setting do I use to test AC voltage on a multimeter?
Use the AC voltage setting, usually marked V~ or VAC. Do not use DC voltage, resistance, or current mode for this test. If your meter is not auto-ranging, choose a range above the voltage you expect.
2. Can I test a wall outlet with a multimeter?
Yes. Put the meter on AC voltage mode and touch one probe to each outlet slot. A standard U.S. outlet should usually read close to 120V AC. If the reading is zero or far off, there may be a wiring or breaker issue.
3. Why does my multimeter show a low or unstable AC voltage reading?
This can happen if the probe contact is poor, the battery is weak, the circuit is under load, or the meter is on the wrong range. It can also mean the circuit has a loose connection or other wiring problem.
4. Is it dangerous to measure AC voltage?
It can be dangerous if you use the wrong setting, touch exposed metal, or test damaged wiring. Use dry hands, intact probes, and the proper meter rating. If the circuit shows signs of heat, sparks, or burning, stop and call a professional.
5. What is the difference between AC voltage and DC voltage on a multimeter?
AC voltage measures alternating current, which is used in household outlets and many appliances. DC voltage measures direct current, which is common in batteries, electronics, and solar systems. The meter must match the type of power you are testing.
