Glass cracks not because you pushed too hard, but because the bit got too hot. That single fact is the reason 9 out of 10 first-time glass drilling attempts fail.
Glass is not really cut — it is ground away, very slowly, with a diamond or carbide-tipped bit and a steady stream of water to keep heat under control. A regular metal or wood bit will skate across the surface, then suddenly punch through and shatter the whole piece.
This guide shows you the exact bit to pick, how to set up the glass so it does not move, and the slow, patient technique that gives you a clean hole every time — even on a wine bottle, a tile, or a pane of window glass.
Choosing The Right Drill Bit
Choosing the right drill bit is crucial when drilling into glass. Glass is fragile and can crack easily. Using the correct bit prevents damage and ensures a clean hole. Different drill bits suit different types of glass and projects. Understanding the differences helps pick the best option for your needs.
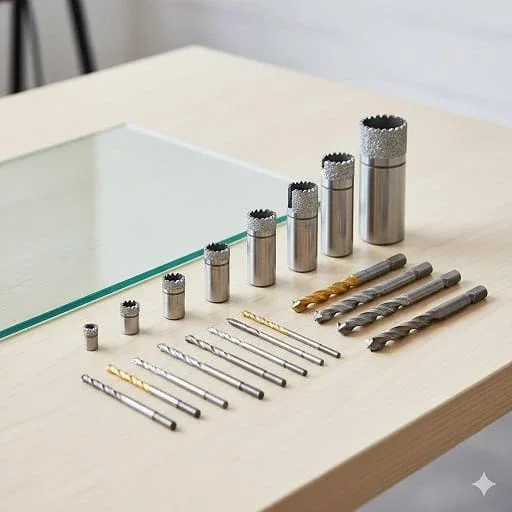
Diamond-Tipped Vs Carbide-Tipped Bits
You really only have two good options for glass. Pick based on the thickness and type of glass:
- Diamond-tipped bits (best choice for most jobs) — Tiny industrial diamonds embedded on the tip grind the glass instead of cutting it. They handle thick glass, tempered glass, ceramic, and tile. They stay sharp far longer and produce the cleanest holes.
- Carbide-tipped spear point bits (budget option for thin glass) — A hardened carbide tip in a spear shape. Works on thin window glass, mirrors, and bottles. Cheaper than diamond bits but wears out faster, especially on hard or tempered glass.
Why Standard Bits Fail On Glass
Wood and metal bits cut by shaving material with a sharp edge. Glass does not shave — it shatters under that kind of pressure. The sharp edge catches a tiny flaw on the surface, the heat builds up in seconds, and the glass cracks outward from the bit. The fix is simple: use a bit that grinds rather than cuts, and never let the tip overheat.
Preparing The Glass Surface
Preparing the glass surface is a key step before drilling a hole. Proper preparation helps avoid cracks and ensures accuracy. Take your time to get this step right. It improves the drilling experience and results.
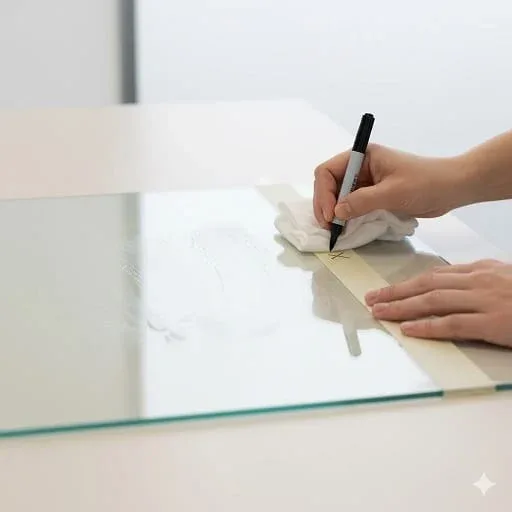
Start by cleaning the glass. Remove all dirt and grease. Then mark the exact spot to drill. Secure the glass firmly to stop any movement. These steps protect the glass and give you control.
Cleaning And Marking The Spot
Clean the glass with a soft cloth and rubbing alcohol. This removes dust, oils, and residues. A clean surface helps the drill bit stay stable. Use a non-permanent marker or masking tape to mark the drill spot. The tape also prevents the drill bit from slipping at the start.
Securing The Glass To Prevent Movement
Place the glass on a flat, stable surface. Use clamps or heavy objects to hold it in place. Avoid pressing too hard to prevent cracks. Secure the glass firmly to stop shaking. Steady glass reduces the risk of breakage and ensures a clean hole.
Setting Up Your Drill
Setting up your drill correctly is key to drilling holes in glass safely. Proper setup helps avoid cracks and keeps the glass intact. It also makes drilling easier and more precise. Preparing your drill involves controlling speed and keeping the drill bit cool.
Adjusting Speed Settings
Set your drill to a low speed before starting. High speed can cause the glass to crack. Slow drilling allows better control and reduces heat build-up. Use the lowest speed your drill offers for this task. A steady pace prevents slipping and damage to the glass.
Using Water For Cooling
Water cools the drill bit and glass during drilling. It stops overheating, which can cause cracks. Keep the drill bit wet by dripping water or using a damp cloth. Continuous cooling helps the bit cut smoothly through the glass. This simple step greatly lowers the chance of breakage.
Drilling Techniques For Smooth Holes
Drilling smooth holes in glass requires careful techniques. Glass is fragile and can crack easily without proper handling. Using the right methods helps avoid damage and creates clean holes. These drilling techniques focus on control and patience. They ensure a professional finish and preserve the glass’s strength.
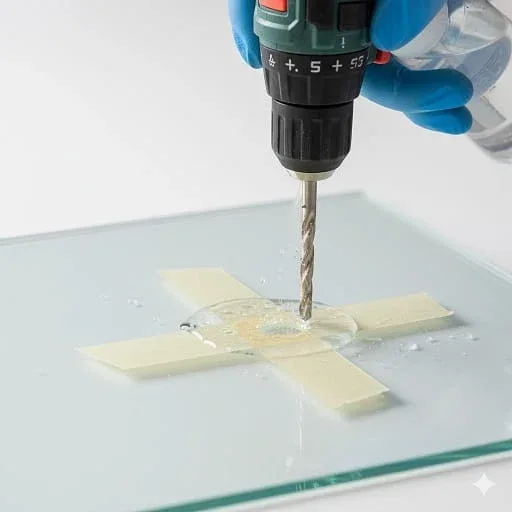
Once the glass is clean, marked, secured, and the drill is set to low speed, follow these six steps in order. Do not skip any — each one prevents a specific kind of crack.
- Start at a slight angle, then straighten up. Tilt the bit about 45° to score a tiny groove on your mark. Once the bit has bitten into the surface, slowly bring it upright. This stops the bit from skating across the glass.
- Run the drill in reverse first (for spear-point bits). A few seconds of reverse rotation grinds a starter dimple without grabbing the surface. Then switch to forward. Diamond core bits do not need this step.
- Use very light pressure — let the bit do the work. Imagine you are pressing the weight of a coin onto the glass. Heavy pressure cracks glass; gentle pressure grinds it cleanly.
- Keep water flowing on the bit at all times. Use a putty dam, a sponge, or a helper dribbling water from a bottle. The moment the tip stops being wet, it overheats — and cracks follow within seconds.
- Pause every 5–10 seconds. Lift the bit, let water flow into the hole, then continue. This clears glass dust and resets the temperature.
- Slow down dramatically near breakthrough. The last 1 mm is where most glass cracks. Ease off the pressure as you feel the bit start to push through. Let the bit grind the rest, do not punch through.
Post-drilling Care
After drilling a hole in glass, proper care ensures safety and lasting results. The glass surface may have tiny fragments or rough spots. Cleaning and smoothing these areas prevents injury and improves the glass’s appearance. Follow simple steps to handle the glass carefully and keep it in good condition.
Removing Debris
Remove all glass dust and small shards from the drilled area. Use a soft brush or a damp cloth to wipe the surface gently. Avoid using your fingers directly to prevent cuts. Rinse the glass with water to clear any remaining particles. Let the glass dry completely before handling further.
Smoothing Rough Edges
Check the hole edges for sharp or uneven spots. Use fine-grit sandpaper or a diamond file to smooth these edges carefully. Move the sandpaper gently in a circular motion around the hole. Do not press too hard to avoid cracking the glass. Clean the area again after smoothing to remove dust.
Mistakes Most Beginners Don’t See Coming
Even with the right bit and water, a few hidden problems crack glass on the first try. Knowing them ahead of time saves a wasted piece.
Tempered Glass Cannot Be Drilled
This is the biggest surprise. If you try to drill tempered glass — like a shower door, oven door, or modern car window — the entire pane will explode into pebble-sized chunks. Tempering creates internal stress; piercing the surface releases it all at once. Always check before you drill. According to the U.S. Consumer Product Safety Commission, tempered glass is required for safety in many home applications, so assume any modern shower or door is tempered until proven otherwise.
The Bit Slips On The First Try
Glass is so smooth that a fresh bit will skate across the surface and scratch the area around your mark. Two cheap fixes: place a piece of masking tape over the mark to give the bit something to grip, or build a small dam of putty around the spot to hold a puddle of water that also helps stop the slip.
Drilling On A Hard Surface Cracks The Glass
Glass placed directly on a wooden bench or concrete floor will crack the moment the bit punches through. The hard surface bounces the impact back into the glass. Always rest the glass on a soft, flat backing — a piece of scrap wood, a folded towel, or a foam pad — to absorb the breakthrough.
Forgetting Eye Protection On Small Jobs
Glass dust is sharp and microscopic. Even a tiny hole sends fine fragments into the air. Goggles are non-negotiable, even for a single 5 mm hole.
Conclusion
Drilling glass cleanly comes down to four things: the right bit, water on the tip at all times, gentle pressure, and a slow finish at breakthrough. Get those right and the rest is just patience.
- Bit: Diamond-tipped for thick or tough glass; carbide spear point for thin glass and bottles.
- Speed: Lowest setting on your drill. Faster does not mean better.
- Cooling: Constant water flow. Dry tip equals cracked glass.
- Support: Soft backing under the glass, never bare wood or stone.
Your next step: Practice on a piece of scrap glass first — an old jam jar or a broken pane works fine. Once you have made one clean hole on something you do not care about, the real project will feel easy.
Frequently Asked Questions
You cannot safely drill glass with a regular drill bit. Use a diamond or carbide-tipped bit at low speed, keep it cool with water, and apply gentle pressure to avoid cracking.
Yes, use a special drill bit like carbide-tipped or diamond-tipped for glass. Regular bits can crack or break it. Drill slowly, keep the bit cool with water, and apply gentle pressure for best results.
The best drill bit for glass is a diamond-tipped or carbide-tipped bit. Use slow speed, water cooling, and gentle pressure to prevent cracking.
Yes, a Dremel can drill glass using a diamond or carbide-tipped bit. Drill slowly, keep the bit wet, and apply gentle pressure to avoid cracking.
Use a diamond-tipped or carbide-tipped drill bit for clean, safe holes in glass.
Drill slowly, use water to cool, and apply gentle pressure to avoid cracks.
Read also: Drilling and Driving Tools: Complete Guide
