Ready to take your welding skills to the next level? Setting up a MIG welder might seem tricky at first, but with the right steps, you can get it up and running smoothly in no time.
Whether you’re a beginner or just need a quick refresher, this guide will walk you through everything you need to know to set up your MIG welder the right way. By the end, you’ll be confident in handling your equipment and creating strong, clean welds.
Let’s dive in and make sure your MIG welder is ready to work for you!
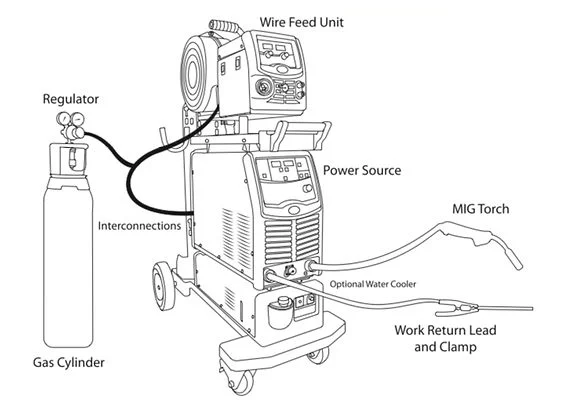
Credit: www.jasic.co.uk
Gathering Essential Equipment
Gathering the right equipment is the first step in setting up a MIG welder. Having all the necessary tools and materials ready will make your welding process smoother and safer. This section covers the essential items you need before you start your MIG welding project.
Selecting the MIG Welder Machine
Choose a MIG welder that fits your welding needs. Consider the power output, duty cycle, and input power. A machine with adjustable settings works best for beginners. Check if it supports the wire type you plan to use.
Choosing the Welding Wire
Select the correct welding wire for your project material. Common types include solid wire for steel and flux-cored wire for outdoor welding. Match the wire diameter to your machine and material thickness. Proper wire choice ensures better weld quality.
Getting the Shielding Gas
Shielding gas protects your weld from contamination. Argon or a mix of argon and CO2 is common for MIG welding. Ensure you have a full gas cylinder with the right regulator. Gas flow rate should be adjustable for different welding tasks.
Safety Gear Essentials
Wear safety gear to protect yourself. Use a welding helmet with a proper shade lens. Gloves, long sleeves, and boots keep you safe from sparks and heat. Proper ventilation or a fume extractor is important for clean air.
Choosing The Right Wire And Gas
Choosing the right wire and gas is key to good MIG welding. The wire and gas work together to create a strong weld. Picking the wrong types can lead to poor weld quality and wasted material.
Each project may need different wire and gas. Know the metal type and thickness before selecting. This makes your setup efficient and your welds clean.
Choosing The Correct Wire Type
Steel, aluminum, and stainless steel all need different wires. Solid wire is common for steel and stainless steel. Flux-cored wire works well outdoors or on rusty metals. The wire diameter also matters. Thinner wire suits thin metals; thicker wire fits heavy metals.
Selecting The Right Gas
Gas shields the weld from air and contamination. Argon and carbon dioxide are popular choices. Pure argon is great for aluminum. A mix of argon and carbon dioxide suits steel. High carbon dioxide levels give deeper weld penetration but more spatter. Choose gas based on metal and welding position.
Matching Wire And Gas For Best Results
Match wire and gas to avoid poor welds. Steel wire pairs with 75% argon and 25% carbon dioxide gas. Aluminum wire needs pure argon gas. Stainless steel wires require argon mixes with small oxygen or carbon dioxide. Correct pairs reduce defects and improve bead appearance.
Installing The Welding Wire
Installing the welding wire is a key step in setting up a MIG welder. The wire feeds continuously during welding, acting as the filler metal. Proper installation ensures smooth wire feeding and stable welding arcs.
Follow clear steps to load the wire correctly. This avoids common issues like wire tangling or jamming. Correct wire installation also improves weld quality and safety.
Preparing The Wire Spool
Start by checking the wire spool for damage or rust. Make sure the spool fits your welder’s wire feeder. Remove any packaging and secure the spool on the spindle. Ensure the spool rotates freely without wobbling.
Feeding The Wire Into The Guide Tube
Cut the wire end cleanly at a straight angle. Insert the wire into the wire feeder inlet. Push the wire through the guide tube slowly. Continue feeding until the wire reaches the welding gun.
Adjusting The Drive Rollers
Open the drive roller tension. Place the wire between the rollers carefully. Tighten the tension just enough to hold the wire firmly. Too much pressure can deform the wire and cause feeding problems.
Testing The Wire Feed
Turn on the welder and press the trigger. Observe the wire as it feeds out of the welding gun. The wire should feed smoothly without jerking or slipping. If needed, adjust the drive roller tension or wire speed.
Credit: yeswelder.com
Connecting The Gas Supply
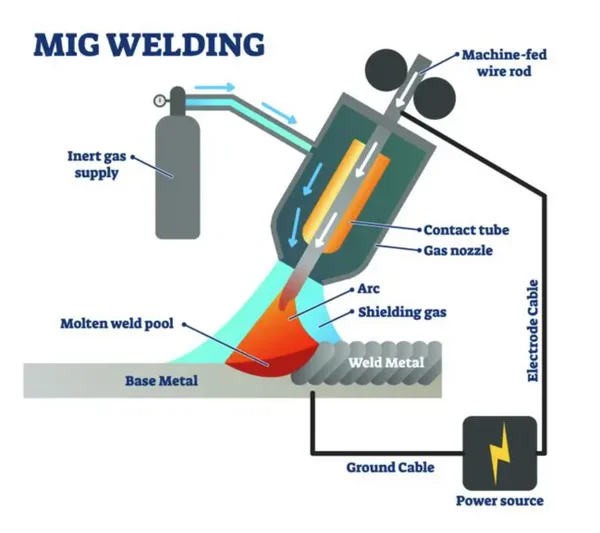
Connecting the gas supply is a crucial step in setting up a MIG welder. The gas protects the weld from contamination and helps produce a clean, strong joint. Using the correct gas type and ensuring a secure connection improves welding quality and safety.
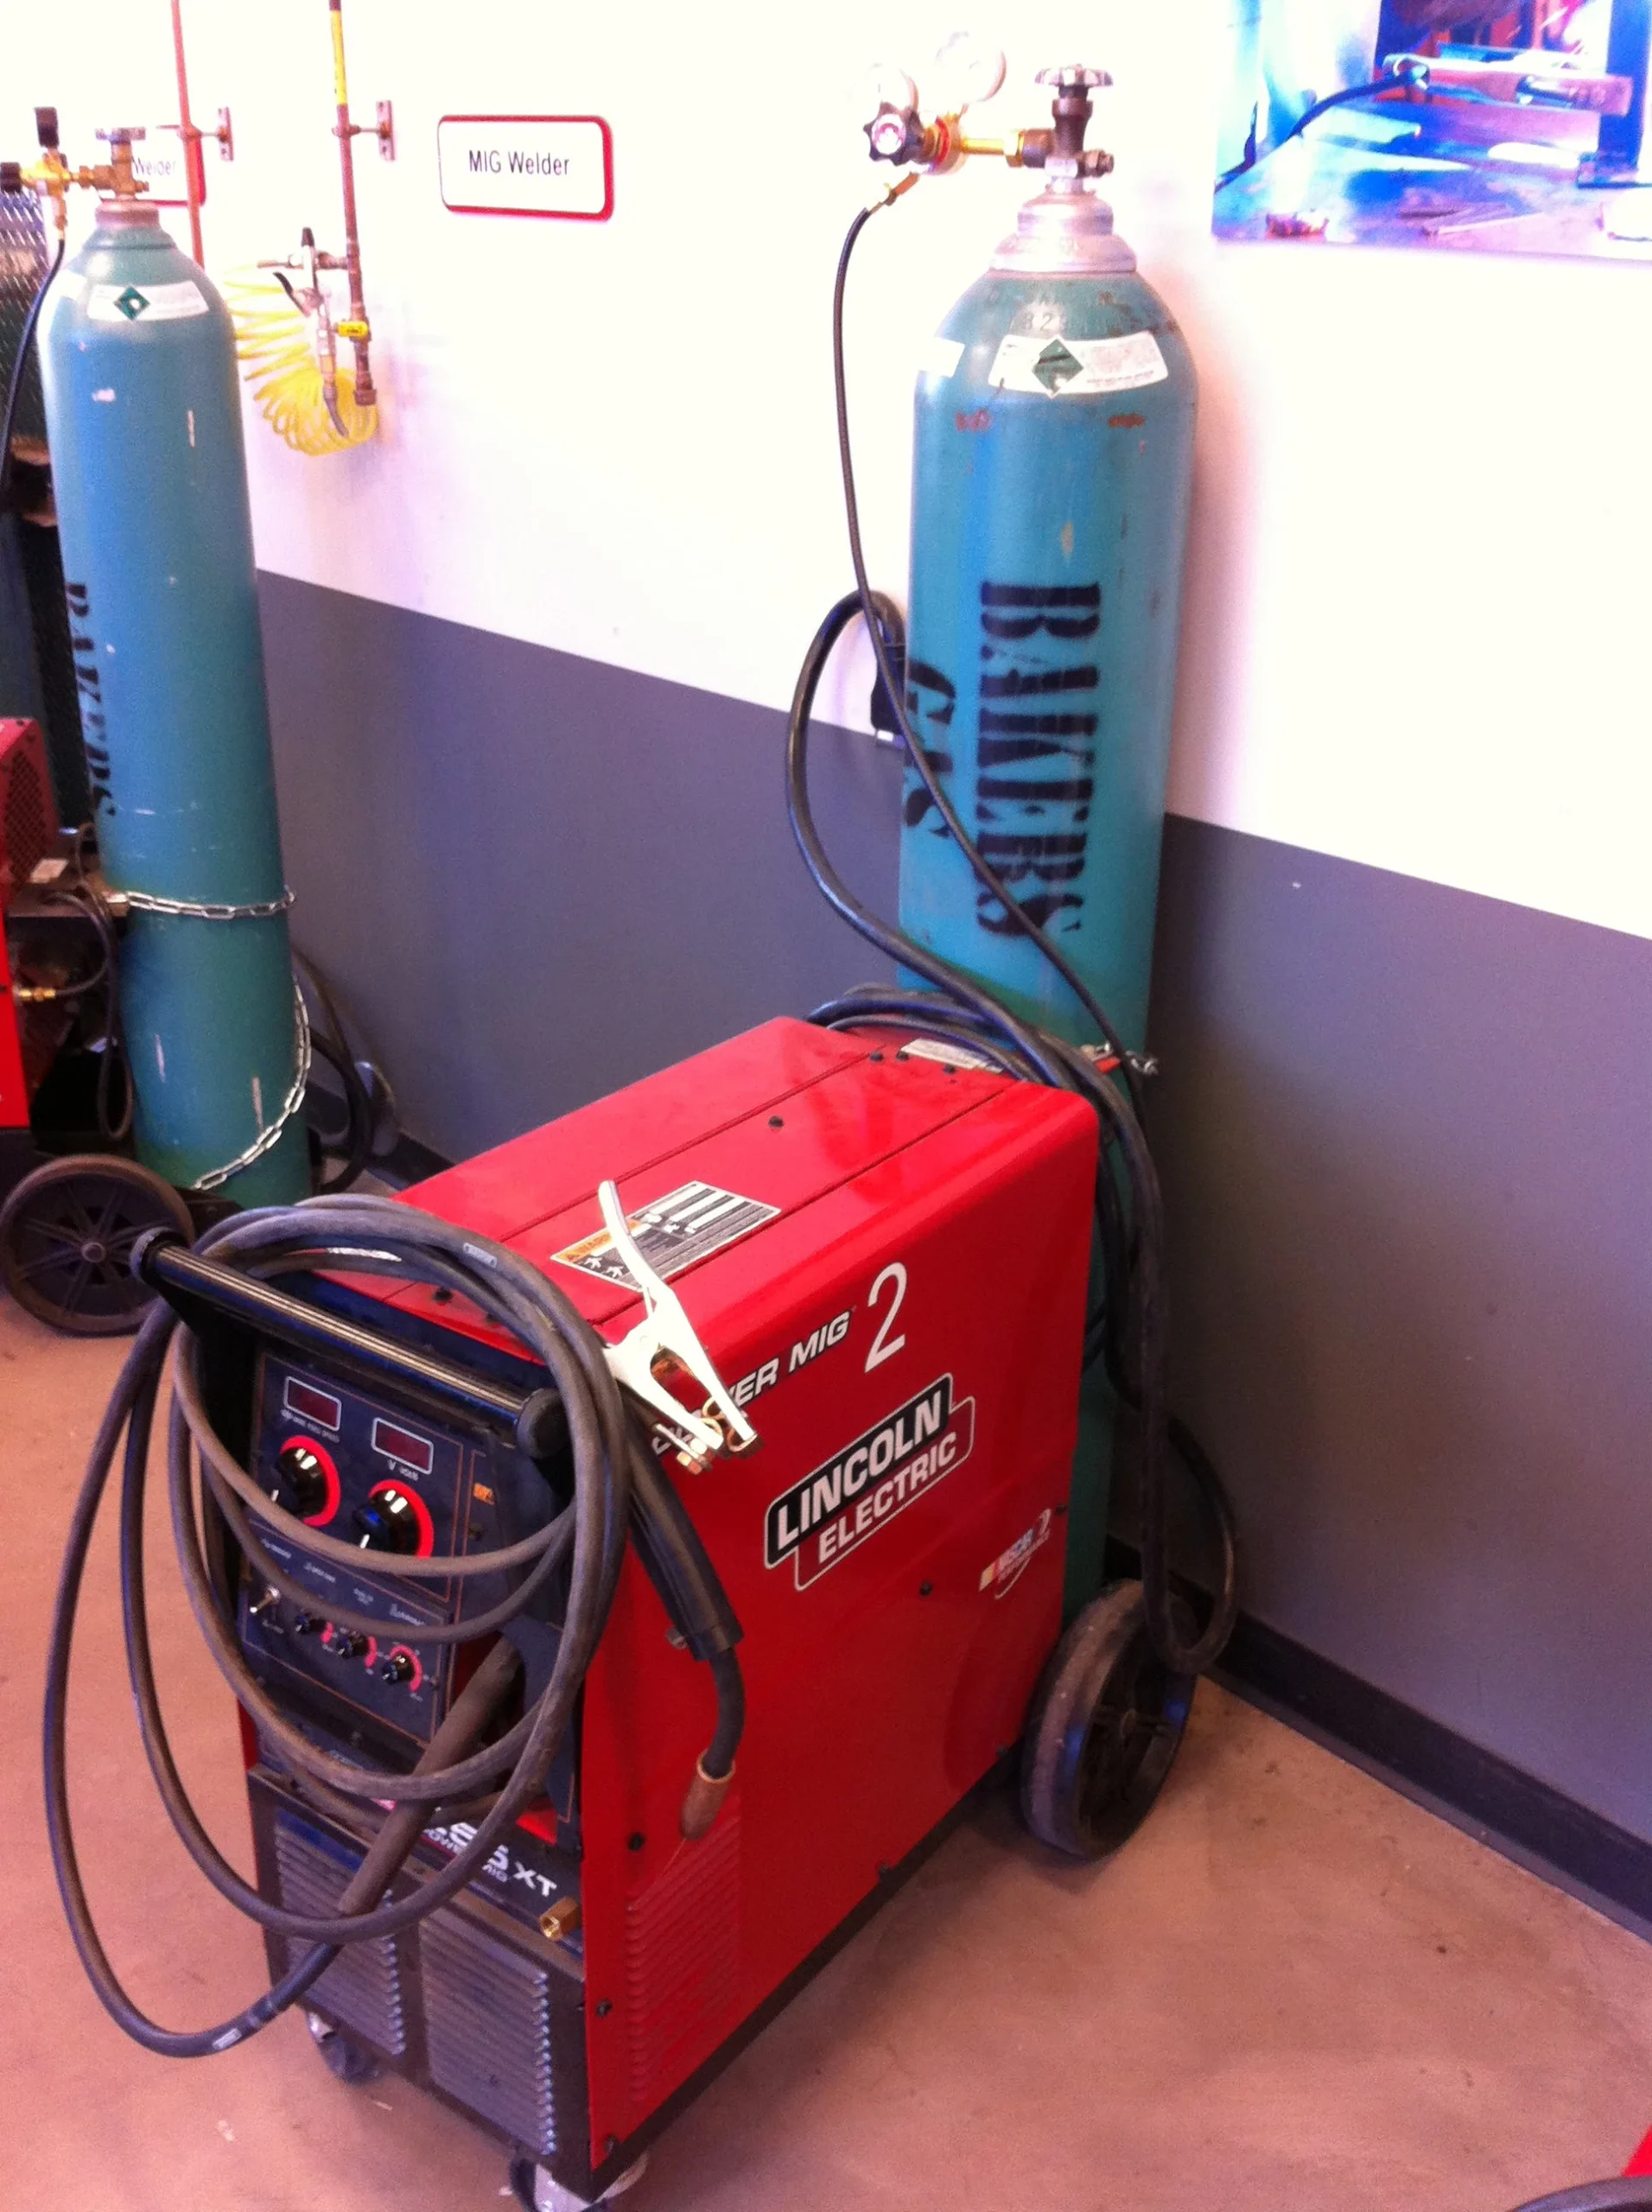
Choosing The Right Gas Cylinder
Select a cylinder with the correct gas for your welding project. Most MIG welding uses a mix of argon and carbon dioxide. Pure CO2 is an option for thicker metals but may create more spatter. Check the gas type recommended for your welder and materials.
Attaching The Regulator To The Cylinder
Start by placing the regulator on the gas cylinder valve. Hand-tighten the regulator nut securely. Use a wrench for a final snug fit, but avoid overtightening. The regulator controls gas flow and pressure to the welder.
Connecting The Gas Hose To The Welder
Attach the gas hose to the regulator outlet. Tighten the hose clamp or fitting to prevent leaks. Then, connect the other end of the hose to the welder’s gas input port. Confirm all connections are firm and secure.
Checking For Gas Leaks
Open the cylinder valve slowly. Listen and smell for leaks near connections. Use a soap-water mix on joints to spot bubbles indicating leaks. Tighten fittings if needed. Never weld with a leaking gas supply.
Setting The Gas Flow Rate
Adjust the regulator knob to set the flow rate. A typical flow is 15 to 20 cubic feet per hour. Too much gas wastes supply and causes turbulence. Too little gas allows air to contaminate the weld. Find the right balance for clean results.
Adjusting Voltage And Wire Speed
Adjusting voltage and wire speed is crucial to get clean, strong welds with a MIG welder. These settings control the heat and the filler metal flow. Correct adjustments prevent defects like spatter or weak joints. Start with recommended settings for your metal thickness and type. Then fine-tune for the best results.
Understanding Voltage Settings
Voltage controls the arc length and heat. Higher voltage makes a longer, hotter arc. Lower voltage creates a shorter, cooler arc. Too high voltage causes spatter and burns through metal. Too low voltage results in poor fusion and weak welds. Adjust voltage based on metal thickness and welding position.
Setting The Wire Speed
Wire speed controls how fast the filler metal feeds into the weld pool. Faster wire speed adds more metal quickly. Slower wire speed deposits less metal and cools the weld. Match wire speed with voltage for a smooth, stable arc. Too fast wire speed causes a bulging bead. Too slow wire speed leads to a thin, weak bead.
Tuning For Different Metals
Steel, aluminum, and stainless steel need different settings. Steel usually works well with moderate voltage and wire speed. Aluminum needs higher wire speed and voltage because it melts faster. Stainless steel requires lower voltage to avoid burning. Use a test piece to adjust settings before welding your project.
Credit: www.instructables.com
Setting Up The Ground Clamp
Setting up the ground clamp is a key step in using a MIG welder safely and effectively. The ground clamp completes the electrical circuit needed for welding. Without a proper ground connection, the welder will not work correctly and can cause poor weld quality or safety hazards.
Make sure the area where you attach the ground clamp is clean and free of rust, paint, or dirt. A good metal-to-metal contact ensures stable current flow. Take time to check the clamp and cable condition before starting your welding project.
Choosing The Right Spot For The Ground Clamp
Select a solid metal surface close to your welding area. The metal should be clean and bare. Avoid painted, rusty, or dirty spots. This helps the clamp hold tightly and ensures a strong electrical connection.
Cleaning The Surface Before Clamping
Use a wire brush or sandpaper to remove paint, rust, and dirt. A clean surface improves conductivity. Make sure the metal shines bright before attaching the clamp. This step prevents welding problems later.
Securing The Ground Clamp Properly
Attach the clamp firmly to the cleaned metal surface. It should not move or slip. A loose clamp can cause sparks or weak welds. Check the cable for damage and ensure it connects tightly to the welder.
Performing Safety Checks
Performing safety checks is the first step before setting up a MIG welder. Safety ensures a smooth welding process. Skipping this step can lead to accidents or damage.
Always inspect your equipment and workspace carefully. Prepare yourself with proper safety gear. Check for any hazards that may cause injury.
Inspecting The Welding Machine
Start by checking the welding machine for damage. Look for cracks, loose parts, or exposed wires. Confirm the power cord is in good condition and plug it into a grounded outlet. Ensure all switches and controls work properly. A faulty machine can cause electric shocks or poor weld quality.
Checking The Gas Supply
Examine the gas cylinder for dents or leaks. Make sure the regulator and hoses are tightly connected. Open the valve slowly to check pressure levels. Proper gas flow prevents contamination and weak welds. Always use the correct gas type for your welding project.
Preparing Personal Protective Equipment (ppe)
Wear a welding helmet with the correct lens shade. Use flame-resistant gloves and a long-sleeve jacket. Ensure your boots cover your ankles and are non-slip. Avoid loose clothing or jewelry that can catch sparks. PPE protects your skin and eyes from burns and UV light.
Clearing The Work Area
Remove flammable materials from the welding zone. Keep a fire extinguisher nearby and know how to use it. Make sure the area is well-ventilated to avoid fumes. Secure your workpiece to prevent movement. A clean space reduces risks and improves welding accuracy.
Testing And Practicing Welds
Testing and practicing welds is a key step after setting up your MIG welder. It helps you understand how your machine works and improves your welding skills. This stage allows you to adjust settings and get comfortable with the process. Practicing on scrap metal prepares you for real projects and reduces mistakes.
Preparing Your Work Area
Clear a flat surface with good lighting. Use scrap metal pieces similar to your project material. Wear all safety gear like gloves, helmet, and apron. Make sure your welding machine is properly grounded to avoid shocks.
Adjusting Your Welder Settings
Start with the recommended voltage and wire speed for your metal thickness. Test a few short welds and watch the arc. If the weld splatters or is weak, tweak the settings slightly. Keep adjusting until the weld looks smooth and solid.
Practicing Basic Welding Techniques
Hold the torch steady and move it at a consistent speed. Practice making straight beads and small circles. Focus on maintaining the right distance between the torch and metal. Try welding in different positions to build confidence.
Inspecting Your Test Welds
Look closely at the weld bead for uniformity and strength. Check for gaps, cracks, or excessive spatter. A good weld is shiny, smooth, and well fused to the base metal. Fix any issues by changing your technique or welder settings.
Frequently Asked Questions
How To Set Up A Mig Welder For Welding?
Set wire feed speed and voltage according to metal thickness. Attach the ground clamp securely. Load the correct wire type. Connect shielding gas and adjust flow rate. Test on scrap metal before welding.
What Should A Mig Welder Be Set At For Beginners?
Set a MIG welder at 70-90 amps for 18-gauge steel. Adjust voltage between 18-20 volts for smooth welding.
How To Start Mig Welding For Beginners?
Clean the metal surface. Set the welder to the correct voltage and wire speed. Feed the wire through the torch. Use shielding gas if required. Hold the torch at a 15-degree angle and start welding with steady, even movements. Practice on scrap metal.
Is .030 Or .035 Wire Better?
. 030 wire offers better control and is ideal for thin metals. . 035 wire provides deeper penetration for thicker materials. Choose based on metal thickness and welding needs.
What Are The Basic Steps To Set Up A Mig Welder?
Connect the ground clamp, feed the wire, adjust the voltage and wire speed, and check the gas flow.
Conclusion
Setting up a MIG welder is simple with the right steps. Follow the guide carefully for safe and smooth welding. Adjust your settings based on the metal type and thickness. Always wear proper safety gear before starting. Practice on scrap metal to build confidence and skill.
Consistent setup leads to better, cleaner welds every time. Keep your equipment clean and well-maintained for best results. Enjoy your welding projects with patience and care.
Related reading: what gas a MIG welder uses.
Read also: Welding Defects Guide: Identify, Prevent, and Fix
