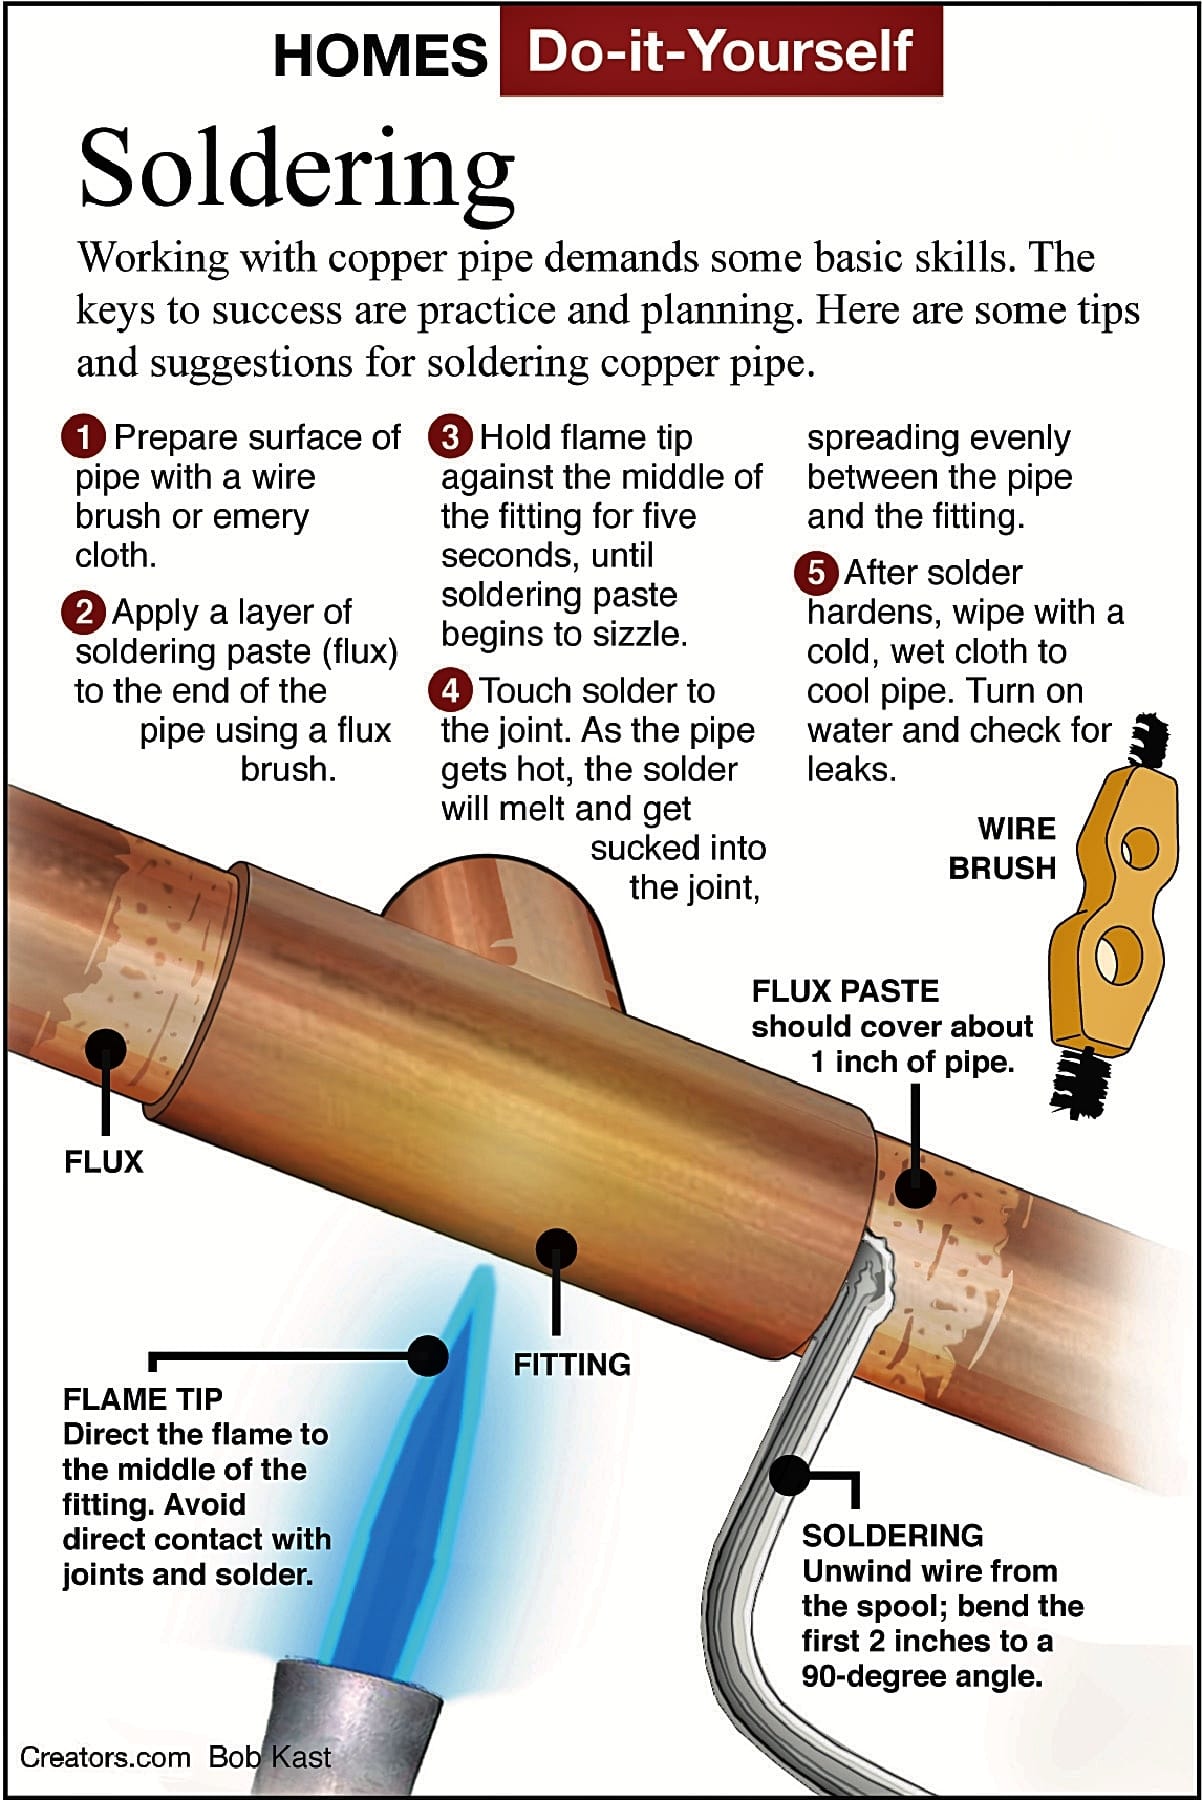
Soldering copper pipes is a key skill for anyone working with plumbing, heating, or even small home repairs. If you want strong, watertight connections that last for years, learning how to solder correctly is essential. Many people feel nervous the first time they try, but with the right steps, tools, and safety tips, you can achieve professional results—even as a beginner.
This guide will walk you through everything you need to know about soldering copper pipes. From choosing the right materials to cleaning, fitting, and heating, you’ll learn the secrets that make the difference between a perfect seal and a leaky joint.
Along the way, you’ll also find tips that even some experienced plumbers overlook.
What You Need Before You Start
Before you pick up a torch, you need the right tools and materials. Having everything ready makes the job smoother and safer.
Tools
- Pipe cutter: For clean, straight cuts
- Emery cloth or sandpaper: For cleaning pipe ends
- Wire brush: For cleaning inside fittings
- Propane or MAPP gas torch: For heating the joint
- Heat shield: Protects nearby surfaces
- Soldering flux brush: For applying flux
- Pipe cleaning brush: For removing residue
- Wet rag or sponge: For cooling and cleaning
Materials
- Copper pipe: Type M for residential water lines, Type L for heavier-duty use
- Copper fittings: Elbows, tees, couplings as needed
- Lead-free solder: Safe for drinking water
- Soldering flux: Helps solder flow and prevents oxidation
Safety Gear
- Gloves: Protect your hands from heat and sharp edges
- Safety glasses: Shield your eyes from sparks and hot solder
- Fire extinguisher: Always keep one nearby
Why Preparation Matters
Using the wrong tools or skipping safety gear is a common mistake. For example, using pliers instead of a pipe cutter can crush the pipe, leading to leaks. Always prepare your work area and gather everything before starting.
How To Cut And Prep Copper Pipe
The first step in soldering is to cut and clean the pipe properly. A good connection depends on smooth, debris-free surfaces.
- Measure and mark: Use a tape measure and marker for accurate lengths.
- Cut with a pipe cutter: Place the cutter on the mark, tighten the knob, and rotate until the pipe is cut. Tighten slightly after each turn.
- Deburr the ends: Use a deburring tool or the pipe cutter’s built-in reamer to remove sharp edges inside and outside. This prevents water turbulence and future leaks.
- Clean the pipe and fittings: Use emery cloth on the pipe ends until shiny. Use a wire brush for the inside of fittings. Even new pipes have oxidation that can stop solder from bonding.
Practical Tip
Many beginners skip cleaning, which leads to weak joints. Even a fingerprint can prevent a good seal. Clean both the pipe and the fitting every time.
Credit: www.noozhawk.com
Dry Fitting And Alignment
Before applying flux or heat, check that everything fits together.
- Assemble all pieces dry: Push pipes into fittings firmly. There should be little or no gap, but parts should slide together smoothly.
- Check alignment: If you’re working on a long run or several joints, make sure everything lines up. Misaligned pipes can cause stress and leaks later.
If something doesn’t fit, check for burrs or dents. Never force a pipe into a fitting—this can damage both parts.
Applying Flux
Flux is a paste that cleans the joint and helps the solder flow evenly.
- Use a brush: Apply a thin, even layer of flux to both the outside of the pipe and the inside of the fitting.
- Don’t overdo it: Too much flux can run inside the pipe and later cause corrosion.
- Assemble the joint: Twist the pipe into the fitting to spread the flux evenly.
Non-obvious Insight
Some people only apply flux to the pipe or the fitting, not both. For best results, always cover both surfaces.
Heating The Joint
This is the heart of soldering copper pipes. Proper heating makes all the difference.
Choosing A Torch
- Propane torches: Good for small pipes (up to 3/4 inch)
- MAPP gas torches: Burn hotter, better for larger pipes or quick work
How To Heat
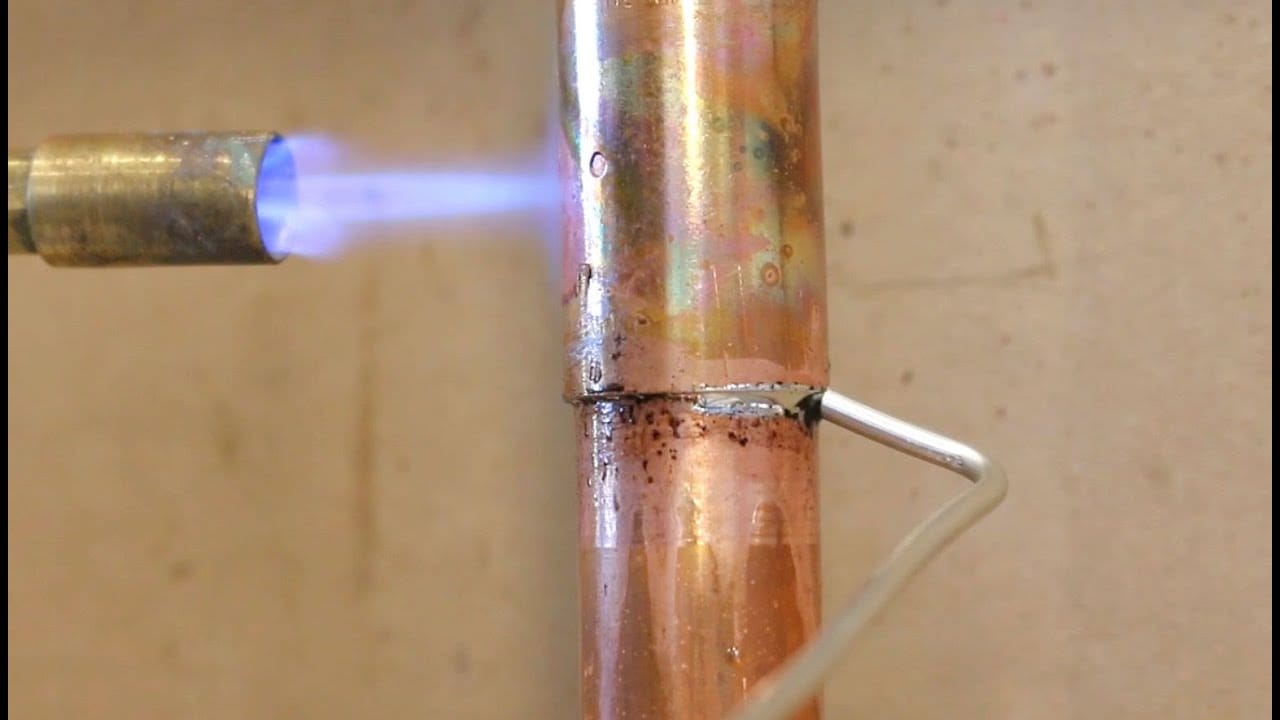
- Position the flame: Aim the blue cone of the flame at the middle of the fitting, not directly at the joint.
- Move the torch: Heat evenly, moving around the fitting. This prevents overheating one spot.
- Test the temperature: After 10–20 seconds, touch the solder to the joint. If it melts and flows, the joint is hot enough.
Key Mistake To Avoid
Don’t heat the solder directly. Always heat the fitting and let the heat pull the solder in. This is called “capillary action. ”
Applying Solder
Once the joint is hot, it’s time to add solder.
- Touch solder to the joint: The solder should melt and be drawn into the joint.
- Feed solder all the way around: For a typical 1/2-inch joint, about 3/4 inch of solder is enough. Too much can clog the pipe.
- Remove heat and wipe: As soon as the joint is filled, move the torch away. Quickly wipe excess solder with a damp rag for a clean finish.
Example
If you see solder dripping or bubbling, the joint was overheated. If solder beads up and doesn’t flow in, the joint was not hot enough or not clean.
Credit: www.familyhandyman.com
Cooling And Cleaning
Let the joint cool naturally for a minute or two. Avoid touching or moving it while hot—this can break the seal.
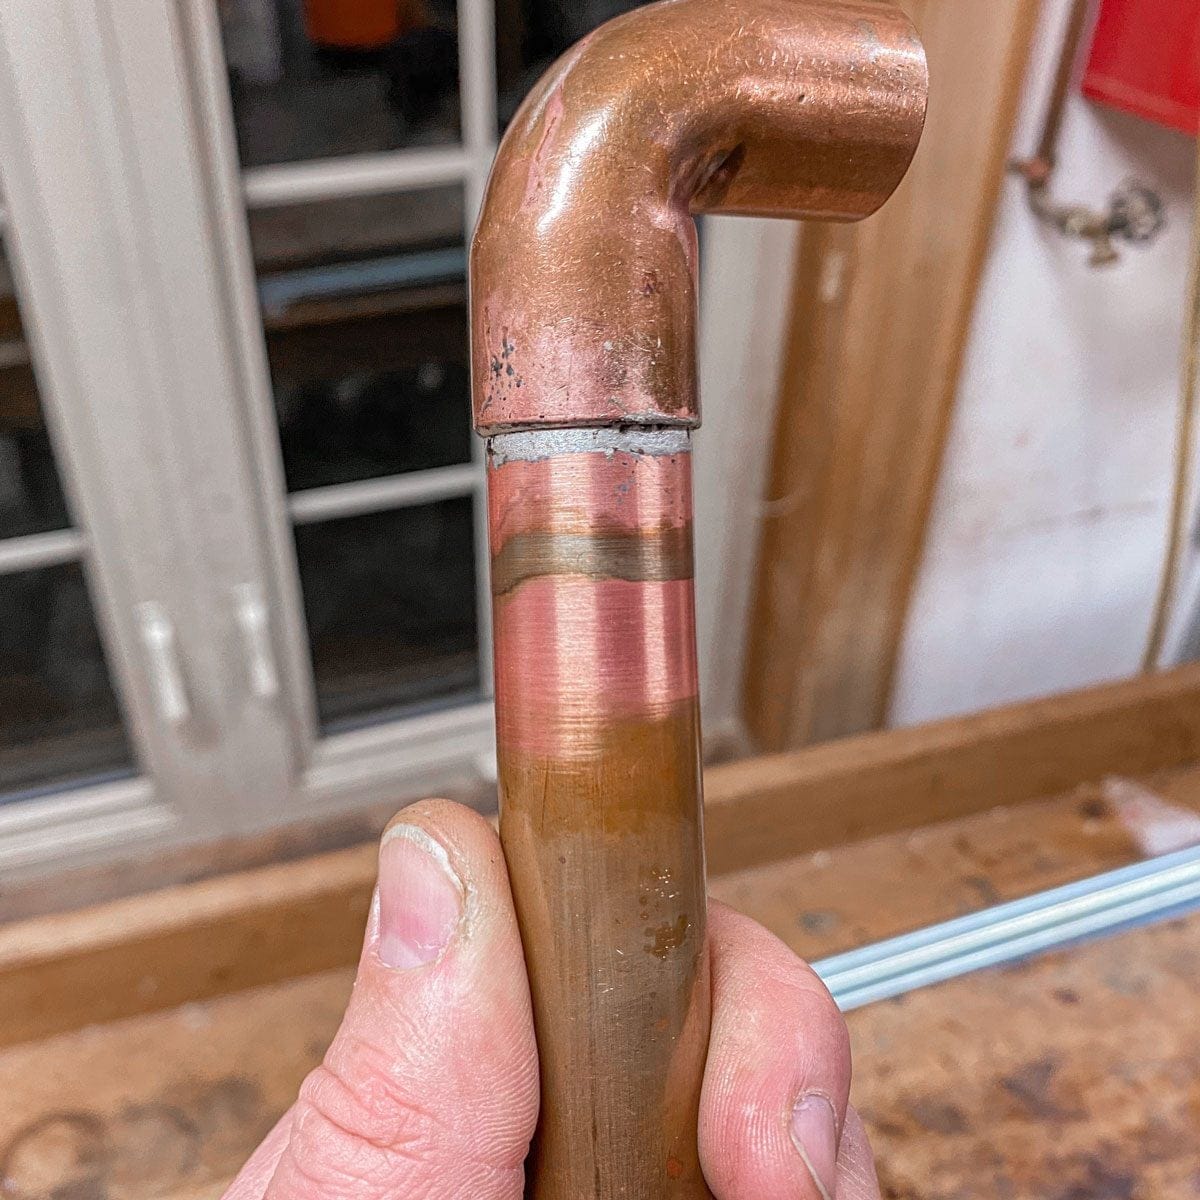
- Check your work: A well-soldered joint looks shiny and has a neat ring of solder all around.
- Remove excess flux: Wipe with a wet rag to prevent corrosion.
Testing The Connection
Always test your work before using the pipes for water or gas.
- Wait at least 5–10 minutes: Let all joints cool.
- Pressurize the system: Slowly turn on water and check for leaks.
- Inspect every joint: Use a dry tissue or paper towel to check for moisture.
If you find a leak, you’ll need to reheat, add flux, and try again. Don’t try to add solder to a cold or dirty joint.
Common Problems And Troubleshooting
Even with care, issues can happen. Knowing what to look for helps you fix mistakes quickly.
Cold Joints
- What it looks like: Dull, lumpy solder
- Why it happens: Joint wasn’t hot enough
- Fix: Reheat, add more flux, and apply new solder
Overheated Joints
- What it looks like: Burnt, blackened copper or dripping solder
- Why it happens: Held the torch too long in one spot
- Fix: Clean and start over—overheated flux won’t work
Poor Solder Flow
- What it looks like: Solder beads up or won’t enter joint
- Why it happens: Surfaces not cleaned, or not enough flux
- Fix: Disassemble, clean, and repeat the process
Solder Types And Comparisons
Choosing the right solder is important for safety and long-term results. Here’s how common solders compare:
| Type of Solder | Lead Content | Melting Point | Use Case |
|---|---|---|---|
| Lead-free | 0% | 430°F–450°F | Drinking water, plumbing |
| 50/50 (Tin/Lead) | 50% | 361°F–421°F | Heating, non-potable |
| 95/5 (Tin/Antimony) | 0% | 450°F–464°F | High-pressure systems |
For home plumbing, always choose lead-free solder to meet health and building codes.
Comparing Propane And Mapp Torches
Choosing the right torch can make a big difference, especially with larger pipes.
| Torch Type | Max Temperature | Best For | Cost |
|---|---|---|---|
| Propane | ~3,600°F (1,982°C) | Small pipes (up to 3/4″) | Low |
| MAPP Gas | ~3,730°F (2,054°C) | Large pipes, quick work | Medium |
For most home repairs, propane torches are enough. Use MAPP gas for speed or thicker pipes.
Safety Tips Most Beginners Miss
Many people focus on the soldering steps but miss important safety details.
- Work in a well-ventilated area: Soldering produces fumes that can irritate your lungs.
- Clear the work area of flammable materials: Newspapers, sawdust, or cleaning rags can catch fire easily.
- Use a heat shield: Protects wood, drywall, and wires behind the pipe.
- Keep water handy: A spray bottle can quickly stop small fires.
- Check local codes: Some areas require specific types of solder or flux for drinking water lines.
Credit: www.youtube.com
Advanced Tips For Long-lasting Joints
If you want your work to last for decades, try these expert tips:
- Preheat large fittings: For pipes over 1 inch, heat the fitting first, then the pipe.
- Stagger your joints: When soldering several fittings in a row, let each cool before doing the next. Heat from one joint can melt the solder in another.
- Label your pipes: If you’re working in a complex area, label each pipe before cutting. This avoids confusion later.
- Practice on scrap pipe: If you’re new, try a few practice joints before working on your home system.
When To Call A Professional
Soldering is a great DIY skill, but sometimes it’s best to call a plumber.
- Complex systems: If your project involves many connections or is part of a main water line.
- Limited access: If pipes are close to walls, floors, or insulation, mistakes can cause fires or water damage.
- Building codes: For any work inspected by your city, check local rules. Some areas require licensed professionals.
Frequently Asked Questions
How Long Does It Take To Solder A Copper Pipe Joint?
For a single joint, expect about 5–10 minutes from start to finish, including cleaning, fluxing, heating, and cooling. With practice, you can work faster, but never rush the cleaning or heating steps.
Can I Solder A Wet Copper Pipe?
No. Water absorbs heat and prevents the joint from reaching the right temperature. Always make sure pipes are dry before soldering. If you can’t drain all water, use a pipe plug or compressed air.
What Is The Difference Between Sweating And Soldering Copper Pipe?
There is no difference—sweating is just another term for soldering copper pipe. Both mean heating and sealing with solder.
How Can I Remove Old Solder From A Copper Fitting?
Heat the joint with a torch until the solder melts, then pull the pipe out with pliers. Clean the fitting with a wire brush and emery cloth before reusing.
Is It Safe To Solder Copper Pipes Near Electrical Wires?
It’s best to keep at least 6 inches away from wires. Use a heat shield and move wires if possible. If unsure, turn off power and consult an electrician.
Soldering copper pipes may look tricky at first, but with careful preparation and practice, you can make strong, leak-free connections every time. Remember the importance of cleaning, using the right amount of heat, and always working safely. With these tips and techniques, you’re ready to tackle most home plumbing repairs and projects confidently. For more in-depth guides and safety standards, check resources like the Wikipedia Soldering Article.
