Is your water heater not delivering the hot water you need? Before calling a repair service, you can troubleshoot the problem yourself by testing the heating element.
Knowing how to test a water heater element with a multimeter puts you in control and can save you time and money. In this guide, you’ll learn simple, step-by-step instructions to check if your water heater element is working properly.
No confusing jargon or complicated tools—just clear, easy steps anyone can follow. Keep reading to find out how you can quickly diagnose your water heater and get your hot water flowing again.
Safety Precautions
Testing a water heater element with a multimeter requires careful attention to safety. Electrical appliances can cause shocks or injuries if handled improperly. Taking the right precautions protects you and ensures accurate testing.
Always prepare your workspace before starting. Clear the area and have all tools ready. This helps prevent accidents and distractions.
Turn Off Power Supply
Switch off the circuit breaker that controls the water heater. Confirm no electricity flows to the unit. Use a non-contact voltage tester to be sure.
Wear Protective Gear
Use insulated gloves to avoid electric shock. Safety glasses protect your eyes from sparks or debris. Dress in non-conductive clothing.
Discharge The Water Heater
Drain the tank partially to avoid hot water burns. Open a hot water tap to release pressure. Allow the element to cool before testing.
Use The Multimeter Correctly
Set the multimeter to the correct ohm range. Connect the probes firmly to the element terminals. Avoid touching metal parts with your hands.
Work In A Dry Environment
Keep the testing area dry to prevent slips and shocks. Do not stand on wet surfaces. Wipe off moisture from the water heater before testing.
Tools Needed
Essential tools include a multimeter, screwdriver, and safety gloves. A multimeter checks electrical resistance in the heating element. Safety gear protects you during testing.
Testing a water heater element with a multimeter requires a few basic tools. These tools help you check if the heating element works properly or needs replacement. Using the right tools makes the process safe and accurate.
Gather all tools before starting the test. This saves time and avoids interruptions.
Digital Multimeter
A digital multimeter is essential for this test. It measures electrical resistance and continuity. Choose one that shows clear numbers and has a low resistance setting (ohms). This tool tells you if the element is broken or working.
Screwdriver
You need a screwdriver to remove the water heater’s access panel. It also helps to disconnect the wires from the heating element. Use the correct size to avoid damaging screws or parts.
Insulated Gloves
Wear insulated gloves for safety. They protect you from electric shock while handling electrical parts. Always assume the power is on until confirmed it is off.
Voltage Tester
A voltage tester checks if the power is off before you touch the element. This tool ensures your safety by confirming no electricity flows through the wires.
Flashlight
A flashlight helps you see inside the water heater. Good lighting is important to avoid mistakes and to spot the heating element clearly.
Power Shutdown
Start by turning off the power to the water heater to ensure safety. Use a multimeter to check the heating element’s resistance by touching its terminals. A proper reading shows if the element works or needs replacement.
Before testing a water heater element, always shut down the power. This step is crucial for safety.
Turn off the circuit breaker that controls the water heater. This prevents electric shock during testing.
Use a non-contact voltage tester to confirm no power is flowing. Double-checking avoids accidents.
Never skip this step. Water heaters carry high voltage that can cause serious injury.
After powering down, wait a few minutes to let the heater cool. Hot parts can burn your skin.
Only then proceed to open the access panel and test the element with your multimeter.
Accessing The Element
Testing a water heater element starts with safely reaching the element inside. The element is hidden behind a metal plate on the water heater. You must remove this plate to check the element with a multimeter.
Always turn off the power to the heater at the circuit breaker. This step keeps you safe from electrical shocks. Next, drain some water from the tank to avoid spills when opening the panel.
Use a screwdriver to remove the screws holding the access panel. Carefully take off the panel and set it aside. You will see insulation behind the panel. Pull it back gently to expose the element and wiring.
Turn Off Power Supply
Locate the circuit breaker for the water heater. Flip it off to cut power. Confirm the power is off by testing the wires with a voltage tester. Never work on the heater with power on.
Remove Access Panel
Find the screws on the metal panel covering the element. Use a screwdriver to loosen and remove them. Lift the panel away to reveal the insulation and wiring behind it.
Expose The Element
Pull back the insulation carefully to see the element and its terminals. Keep the insulation intact for reinstallation later. Now, you can prepare to test the element with your multimeter.
Setting The Multimeter
Setting the multimeter correctly is the first step in testing your water heater element. This ensures accurate readings and helps identify if the element is working properly. A multimeter measures electrical resistance, which shows if the element has a break or short.
Before starting, make sure the multimeter has fresh batteries. Also, check that the probes and dial are in good condition. A damaged multimeter can give false readings and lead to wrong conclusions.
Choosing The Right Setting
Turn the dial on your multimeter to the lowest resistance or ohms (Ω) setting. This setting measures how much electrical resistance the heating element has. Most water heater elements should show a resistance between 10 and 30 ohms. If the reading is much higher or shows infinite, the element may be broken.
Preparing The Multimeter Probes
Attach the multimeter probes securely to the meter. The black probe goes to the common (COM) port. The red probe fits into the port marked for ohms or resistance. Make sure the probes do not touch each other during the test, as this can cause a short circuit and incorrect readings.
Calibrating The Multimeter
Before testing the element, touch the two probes together. The multimeter should show a reading close to zero ohms. This step confirms the multimeter is working well. If the reading is not zero, adjust the dial or consult your multimeter’s manual for calibration instructions.
Credit: www.youtube.com
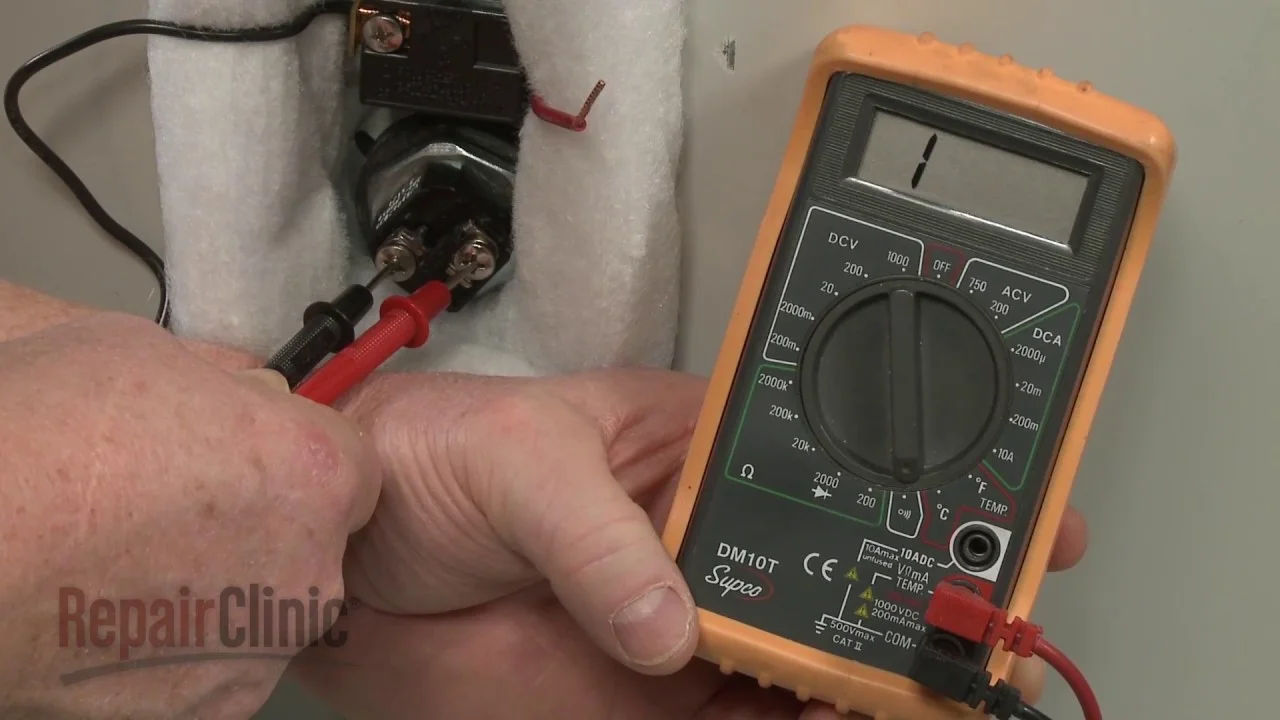
Testing Element Resistance
Start by turning off the power to the water heater for safety. Use a multimeter set to the lowest ohms to check element resistance. Place the probes on the element screws; a low reading means the element works well.
Understanding Element Resistance
Testing the resistance of a water heater element helps find if it works properly. Resistance means how much the element stops electric current. A good element has a specific resistance range. Too high or too low means the element might be bad.
Knowing the right resistance value is key. Most water heater elements should show between 10 and 30 ohms. This varies by model, so check your heater’s manual. Resistance outside this range usually signals a problem.
Setting Up Your Multimeter
First, turn off power to the water heater at the breaker box. This keeps you safe. Remove the access panel and insulation to reach the element screws. Set your multimeter to the lowest ohms setting, often marked with the Ω symbol.
Make sure the multimeter leads are plugged in correctly. The black lead goes to the common (COM) port. The red lead goes to the port marked for resistance or ohms. This setup lets you read the element resistance accurately.
Measuring The Element Resistance
Touch one multimeter lead to each screw on the heating element. Hold the leads steady to get a clear reading. The multimeter will show a number in ohms. If the reading is within the normal range, the element is likely good.
If the multimeter shows a very high number or “OL” (open loop), the element is broken. A zero or near zero reading means a short circuit, which is also bad. Testing resistance this way quickly shows if the element needs replacement.
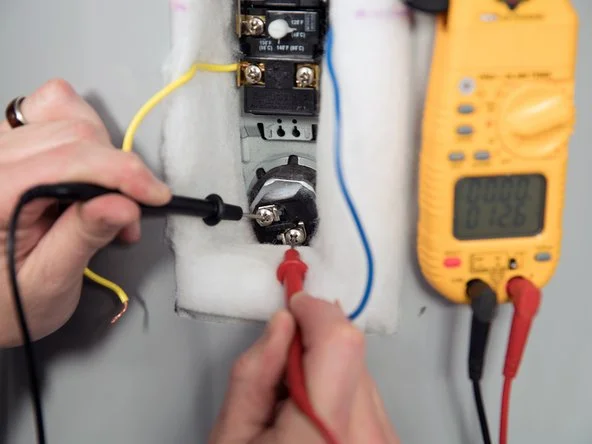
Checking For Continuity
Start by turning off the power to the water heater. Place the multimeter probes on each terminal of the heating element to check for continuity. A reading on the meter shows the element is working; no reading means it needs replacement.
Understanding Continuity In Water Heater Elements
Checking for continuity means testing if electricity flows through the heating element. A continuous path allows current to heat the water. If there is no continuity, the element is broken and needs replacement.
This test helps find faults inside the element. It saves time and cost by avoiding guesswork. Using a multimeter makes this process easy and accurate.
Preparing Your Multimeter For The Test
Turn the multimeter dial to the lowest ohms or continuity setting. This mode checks if the circuit is complete. Ensure the device is working by touching the two probes together. The meter should beep or show zero resistance.
Always unplug the water heater before testing. This step prevents electric shock and protects your multimeter. Remove the access panel to reach the heating element terminals.
Performing The Continuity Test
Touch one probe to one terminal of the heating element. Place the other probe on the second terminal. The multimeter will show a reading if the element has continuity.
A reading close to zero ohms means good continuity. If the meter shows no reading or infinite resistance, the element is faulty. Repeat the test on both terminals to confirm results.

Credit: www.wikihow.com
Interpreting Results
Interpreting the results of your multimeter test is crucial to understand the condition of your water heater element. This step determines if the element is working properly or needs replacement. The readings you get help diagnose issues like breaks or shorts in the element.
Each number on the multimeter has a specific meaning. Knowing what these numbers indicate will guide your next actions. Below are key points to help you interpret your multimeter readings accurately.
Understanding Resistance Readings
Resistance is measured in ohms (Ω). A healthy water heater element usually shows a resistance between 10 and 30 ohms. This range means the element allows electric current to pass through properly.
A reading of zero or close to zero means the element is shorted. This is a sign that the element is damaged and should be replaced. A very high or infinite reading means the element is broken or open, showing no continuity.
Continuity means the electrical path is complete. Use the multimeter’s continuity setting to check this. If the meter beeps or shows a low number, the element has continuity and is likely good.
No beep or a very high reading means no continuity. This suggests the element is faulty and not conducting electricity as it should.
Testing For Ground Faults
Ground faults occur when the element touches the metal tank, causing leaks of electricity. To test this, place one probe on the element terminal and the other on the metal tank.
If the multimeter shows any reading other than infinite resistance, a ground fault exists. The element must be replaced to avoid electrical hazards.
Credit: www.aosmithatlowes.com
Frequently Asked Questions
How Do You Test A Water Heater Element With A Multimeter?
Turn off power, disconnect one wire from the element. Set multimeter to ohms. Touch probes to both element terminals. A reading around 10-30 ohms shows a good element; no or infinite reading means a faulty element.
How Many Ohms Should A Water Heater Element Be?
A typical water heater element should measure between 10 and 16 ohms. Check manufacturer specs for exact values.
Should A Water Heater Element Have Continuity?
A water heater element should have continuity, indicating an unbroken electrical path. No continuity means the element is faulty.
How Many Volts Should A Water Heater Element Read?
A water heater element should read the supply voltage, typically 120 or 240 volts, depending on your system. Always test with power off and follow safety guidelines.
How Do You Test A Water Heater Element With A Multimeter?
Set the multimeter to ohms, touch probes to element terminals, and check for resistance reading.
What Resistance Should A Good Water Heater Element Show?
A good element typically shows resistance between 10 and 30 ohms.
Conclusion
Testing a water heater element with a multimeter is simple and effective. Always turn off power before you start. Check for continuity by placing probes on the element terminals. A reading close to the manufacturer’s ohm rating means the element works well.
No reading or infinite resistance shows a faulty element. Regular testing helps avoid unexpected water heater failures. Follow these steps carefully to keep your hot water flowing. Remember, safety first when working with electrical appliances. This quick test saves time and money on repairs.
Related reading: Best Multimeters for HVAC.
Related reading: Best Clamp Meters.
Related reading: Best Multimeters for Automotive.
