If you’ve ever wanted to master the art of precise, clean metal joining, learning how to use a TIG welder is your first step. TIG welding might sound complex, but with the right approach, you can quickly gain confidence and create strong, flawless welds.
Whether you’re working on a DIY project, repairing something around the house, or aiming to build your skills for a professional path, this guide will walk you through every key step. By the time you finish reading, you’ll know exactly how to handle your TIG welder like a pro—no confusion, no guesswork.
Ready to unlock your welding potential? Let’s dive in.
Credit: www.millerwelds.com
Tig Welder Basics
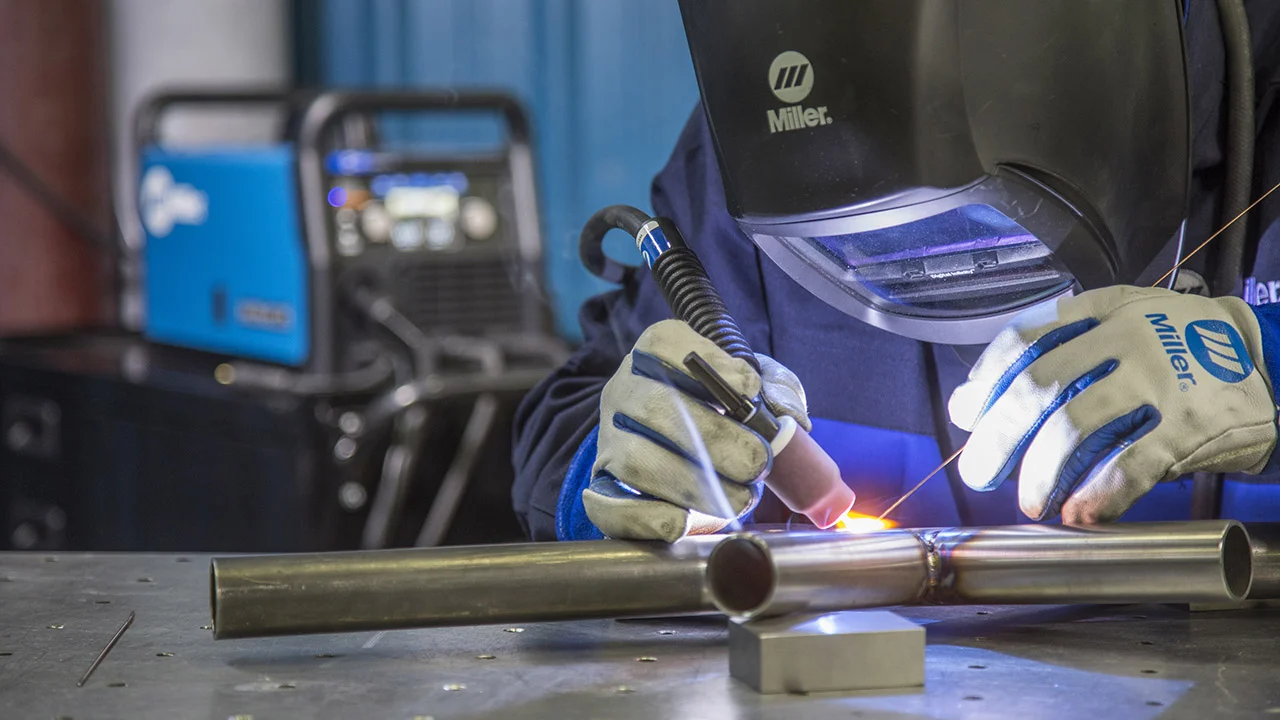
TIG welding is a precise and clean welding method. It uses a non-consumable tungsten electrode to create the weld. The process gives strong and neat welds on thin metals. Understanding the basics helps beginners work safely and effectively. This section covers the main parts of a TIG welder and the types of power sources used.
Components And Setup
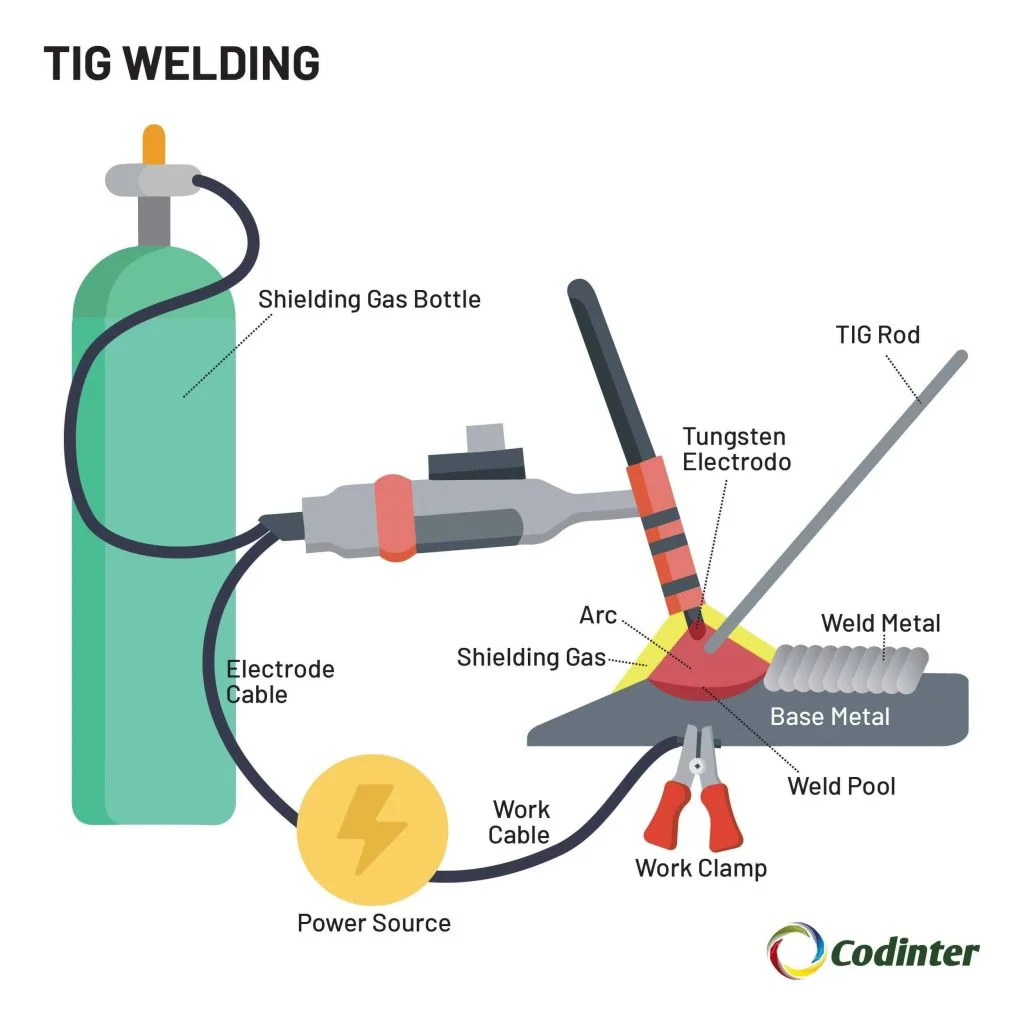
A TIG welder has several key parts. The torch holds the tungsten electrode that makes the arc. A foot pedal or hand control adjusts the welding current. A gas cylinder provides shielding gas, usually argon. This gas protects the weld from contamination. The work clamp connects the metal piece to the welder’s electrical circuit. Proper setup means checking all connections and gas flow before welding.
Set the tungsten tip sharp for better arc control. Clean the metal surface to avoid weak welds. Position the torch at a 70 to 80-degree angle. Hold the filler rod in the other hand if extra metal is needed. Practicing the setup helps improve welding skills quickly.
Power Source Types
TIG welders use two main power sources: AC and DC. DC welding is common for steel, stainless steel, and other metals. It gives a stable and focused arc. AC welding works well for aluminum and magnesium. The alternating current cleans the metal surface during welding.
Some TIG welders offer both AC and DC options. Choose the correct power type based on the metal and job. The power source controls how the arc behaves. This affects weld quality and ease of use. Knowing power types helps welders pick the right settings for each project.
Credit: www.codinter.com
Safety Measures
Safety is the top priority when using a TIG welder. This process involves high temperatures, bright light, and harmful fumes. Taking the right safety measures reduces risks and protects your health. Proper preparation and protective gear are essential before starting any TIG welding project.
Protective Gear Essentials
Wear a welding helmet with a dark lens to protect your eyes. The bright arc light can cause serious eye damage. Use flame-resistant gloves to shield your hands from burns. Long-sleeve shirts and pants made of heavy cotton or leather help protect your skin. Avoid synthetic fabrics that can melt. Use ear protection if working in a noisy environment. Respirators may be needed to avoid inhaling fumes. Always check your gear for damage before welding.
Workspace Preparation
Keep your workspace clean and free of flammable materials. Sparks can ignite paper, cloth, or chemicals. Make sure there is good ventilation to remove harmful gases. Work in a well-lit area to see clearly. Set up a fire extinguisher nearby for emergencies. Use a welding blanket or screen to protect others from the arc light. Ensure all electrical connections are secure and dry. Organize cables to avoid tripping hazards. A safe workspace prevents accidents and injuries during welding.
Preparing Materials
Preparing materials is a key step before starting TIG welding. Good preparation leads to strong, clean welds. It helps avoid common mistakes and saves time during welding.
This process includes cleaning the metal and selecting the right filler rod. Both steps ensure better results and longer-lasting joints.
Cleaning And Positioning
Remove all dirt, rust, and oil from the metal surface. Use a wire brush or chemical cleaner for best results. Clean metal allows the welding arc to flow smoothly.
Position the metal pieces firmly. Use clamps or fixtures to hold them steady. Proper positioning prevents movement and misalignment during welding.
Choosing The Right Filler Rod
Select a filler rod that matches the metal type. Using the correct rod improves the weld’s strength and appearance. For example, use a 4043 rod for aluminum and 6013 for mild steel.
Check the rod diameter to fit the joint size. Thinner rods work well for delicate jobs. Thicker rods are better for heavy-duty welding.
Credit: www.youtube.com
Starting The Arc
Starting the arc is the first and most important step in TIG welding. It sets the foundation for a strong, clean weld. Proper control and technique can prevent damage to the tungsten tip and ensure a smooth start. This section explains how to begin the arc effectively.
Striking Techniques
To start the arc, gently tap the tungsten on the metal surface. This action is similar to striking a match. Avoid dragging the tungsten across the metal to prevent contamination. Lift the tungsten slightly after striking to create a stable arc.
Use a steady hand and maintain a short distance between the tungsten and the workpiece. This helps to control the arc length and prevent sticking. Practice this motion to develop confidence and precision.
Controlling The Flame
Once the arc is established, control the flame by adjusting the torch angle and distance. Hold the torch at about 70 to 80 degrees from the workpiece. This position allows better visibility and flame stability.
Keep the tungsten tip close enough to maintain the arc but avoid touching the metal. Adjust the gas flow to shield the weld area from contamination. A steady flame ensures a clean and strong weld bead.
Welding Techniques
Using a TIG welder requires precise control and steady hands. Proper welding techniques ensure strong, clean welds. Each step affects the quality of the joint and the overall finish.
Focus on mastering torch handling and feeding the filler material. These skills help create smooth and consistent weld beads. They also reduce defects like porosity and cracks.
Torch Handling
Hold the torch firmly but comfortably. Keep a steady hand to control the arc length. Maintain a short arc, about one to two times the tungsten diameter. This prevents contamination and ensures good heat control.
Keep the torch angle between 10 and 15 degrees from vertical. Move the torch steadily along the weld joint. Avoid sudden stops or fast movements. Consistent speed helps create an even weld bead.
Adjust the torch travel speed to match the material thickness. Slower travel adds more heat and filler. Faster travel reduces heat input and avoids warping thin metal.
Feeding The Filler Material
Use filler rods that match the base metal type and thickness. Hold the rod at a 15 to 20-degree angle to the workpiece. Dip the filler rod into the molten weld pool gently.
Add filler material smoothly and steadily. Avoid pushing too much filler at once. Let the weld pool guide the filler rod into the joint.
Withdraw the filler rod slightly before moving the torch forward. This prevents dragging or contamination. Keep a rhythm between torch movement and filler feeding.
Common Mistakes
Many beginners face common mistakes while learning to use a TIG welder. These errors can affect the quality of the weld and safety. Knowing what to avoid helps improve skills faster and creates stronger welds. Focus on key areas to prevent these issues.
Avoiding Contamination
Contamination is a major problem in TIG welding. Dirt, oil, or rust on the metal can weaken the weld. Always clean the metal surface before starting. Use a wire brush or grinder to remove any impurities.
Keep your welding torch and filler rod clean. Touching them with dirty hands or placing them on dirty surfaces spreads contamination. Use clean gloves and store tools properly. Shielding gas protects the weld pool from air. Make sure the gas flow is steady and covers the weld area fully.
Maintaining Consistent Speed
Inconsistent travel speed causes uneven weld beads. Move too fast and the weld lacks penetration. Move too slow and the metal overheats or burns through. Find a steady speed that produces a smooth, even weld.
Practice steady hand movements before welding on important projects. Keep your torch angle consistent. Avoid sudden stops or jerky motions. Consistent speed helps control heat input and produces better welds. Watch your weld pool and adjust speed as needed.
Advanced Tips
Advanced TIG welding techniques help improve weld quality and control. These tips refine your skills and expand your welding abilities. Understanding pulse settings and metal types makes a big difference in your results. Apply these methods for better precision and stronger welds.
Pulse Settings
Pulse settings control the welding arc’s intensity and timing. Adjusting pulse frequency and duration helps manage heat input. This reduces warping and distortion on thin metals. Use a higher pulse rate for better bead appearance. Lower pulse rates create deeper weld penetration. Experiment with settings to find the best balance for each job.
Welding Different Metals
Each metal type needs specific TIG welding techniques. Aluminum requires AC current and a clean surface. Stainless steel works well with DC current and argon gas. Copper demands careful heat control to avoid burn-through. Preheating some metals improves weld quality and reduces cracking. Know the metal’s properties before starting your weld. This knowledge ensures stronger, cleaner joints every time.
Troubleshooting
Troubleshooting is an essential skill when using a TIG welder. Small problems can affect the quality of your welds. Identifying issues early helps save time and materials. This section covers common TIG welding problems and how to fix them quickly.
Fixing Porosity
Porosity appears as tiny holes or bubbles in the weld. It weakens the weld and looks bad. Porosity happens due to trapped gas or contamination.
Clean the metal surface before welding. Remove rust, oil, and dirt. Use a clean tungsten electrode. Check your shielding gas flow. Too little or too much gas causes porosity. Keep the gas nozzle close to the weld. Avoid drafts and wind that blow away the shielding gas.
Dealing With Cracks
Cracks are serious and can break the weld. They often appear after the metal cools. Cracks happen from rapid cooling or poor technique.
Use the right welding rod for the metal type. Preheat thick metals to slow cooling. Make smooth, even passes to avoid stress. Avoid welding over dirty or oily areas. Let the weld cool slowly and evenly.
Frequently Asked Questions
How Does A Tig Welder Work For Beginners?
A TIG welder uses a tungsten electrode to create an arc that melts metal. Beginners hold the torch steadily, add filler rod manually, and control heat with a foot pedal. This process produces precise, clean welds ideal for thin metals.
Is Tig Welding Hard For Beginners?
TIG welding can be challenging for beginners due to its precision and control requirements. Practice improves skill and confidence.
Do You Push Or Pull With Tig?
In TIG welding, you generally push the torch away from the weld pool. This technique ensures better visibility and a cleaner weld bead. Pulling is less common and used in specific situations. Pushing promotes a stable arc and reduces contamination, enhancing weld quality.
Is A Tig Weld Stronger Than A Mig Weld?
TIG welds often provide stronger, cleaner joints due to precise heat control and better fusion. MIG welds work faster but may be less strong.
What Safety Gear Is Needed For Tig Welding?
Wear a welding helmet, gloves, long sleeves, and safety glasses to protect from sparks and UV rays.
Conclusion
Using a TIG welder takes patience and practice. Start with simple projects to build confidence. Always wear proper safety gear to protect yourself. Adjust settings carefully for different metals and thicknesses. Keep your workspace clean and well-ventilated. With steady hands and focus, your welds will improve.
Remember, learning TIG welding is a step-by-step process. Enjoy creating strong, precise welds every time you practice.
Related reading: How to Set Up a TIG Welder.
