Pulling up to a Blink Charging Station for the first time can feel confusing, especially when the screen is dim, the cable is heavy, and another driver is waiting behind you. The good news: once you know the exact sequence — app, plug, start, stop — charging takes about 30 seconds of actual effort, and the rest is just waiting.
This guide walks through how to use a Blink Charging Station from the moment you open the app to the moment you unplug. You’ll see what each button does, which charger speeds match which cars, the small mistakes that cause failed sessions, and the troubleshooting steps that actually work when the station won’t start. Everything is based on how Blink’s Level 2 and DC fast chargers behave in real US locations.
What You Need Before You Plug In
Before you drive to a station, three things should already be set up: the Blink Mobility app, a payment method, and a basic idea of which connector your EV uses. Skipping any of these is the most common reason new drivers stand around the charger for 10 minutes wondering why it won’t start.
The app is free on iOS and Android. After installing, you’ll add a credit or debit card and confirm your vehicle. Blink also accepts an RFID member card and tap-to-pay on most newer stations, but the app gives you the most control — including session monitoring, fault codes, and the ability to start a charge without standing at the screen in the rain.
Match the Connector to Your Car
Blink runs three connector types in the US, and using the wrong one is a frequent mistake. J1772 is the standard Level 2 plug used by every non-Tesla EV. CCS1 is the DC fast charging plug for most American and European EVs. CHAdeMO is the older fast-charging plug used mainly by the Nissan Leaf and a handful of older models.
Tesla owners can use J1772 with the adapter that ships with every Model 3, Y, S, and X. For DC fast charging on a Tesla, you’ll need a CCS1 adapter, which Tesla sells separately. The Blink app shows the connector type for each station before you drive there — check it once, and you’ll never waste a trip.
Know Which Speed You’re Getting
Blink Level 2 chargers deliver 6.6 to 7.2 kW in most locations, which adds roughly 25 miles of range per hour. The DC fast chargers (often labeled “IQ 200”) push up to 200 kW, but real-world output for most cars sits between 50 and 150 kW depending on your vehicle’s onboard limits.
A common piece of advice says “always pick the fastest charger.” On Level 2 charging, that’s fine. On DC fast charging, it’s actually wrong for short top-ups — battery taper kicks in around 80% state of charge, and you’ll often pay a higher per-minute rate to charge slower than a cheaper 50 kW unit nearby. Check your car’s peak DC rate before paying premium for 200 kW you can’t use.
How to Use a Blink Charging Station: Step-by-Step
Once you’re parked at the station with the app open, the actual charging process takes four steps. The order matters — plugging in before authorizing payment will sometimes start the session, but on newer IQ 200 units it triggers an error and you’ll have to unplug and try again.
Here is the sequence that works on every current Blink station in the US:
- Park so the connector cable reaches your charging port without stretching. The cables are heavier than they look — about 12 to 18 pounds on DC fast units.
- Open the Blink Mobility app and tap “Find a Station.” Select the station you’re at, then choose the specific charger number printed on the unit (often “1A” or “1B” for dual-port stations).
- Tap “Start Charge” in the app. The station screen will display a message asking you to plug in within 60 seconds.
- Lift the connector, line it up with your car’s port, and push it in firmly until you hear a click. The charging light on your dashboard or the station screen should turn green or show kW flowing within 10 seconds.
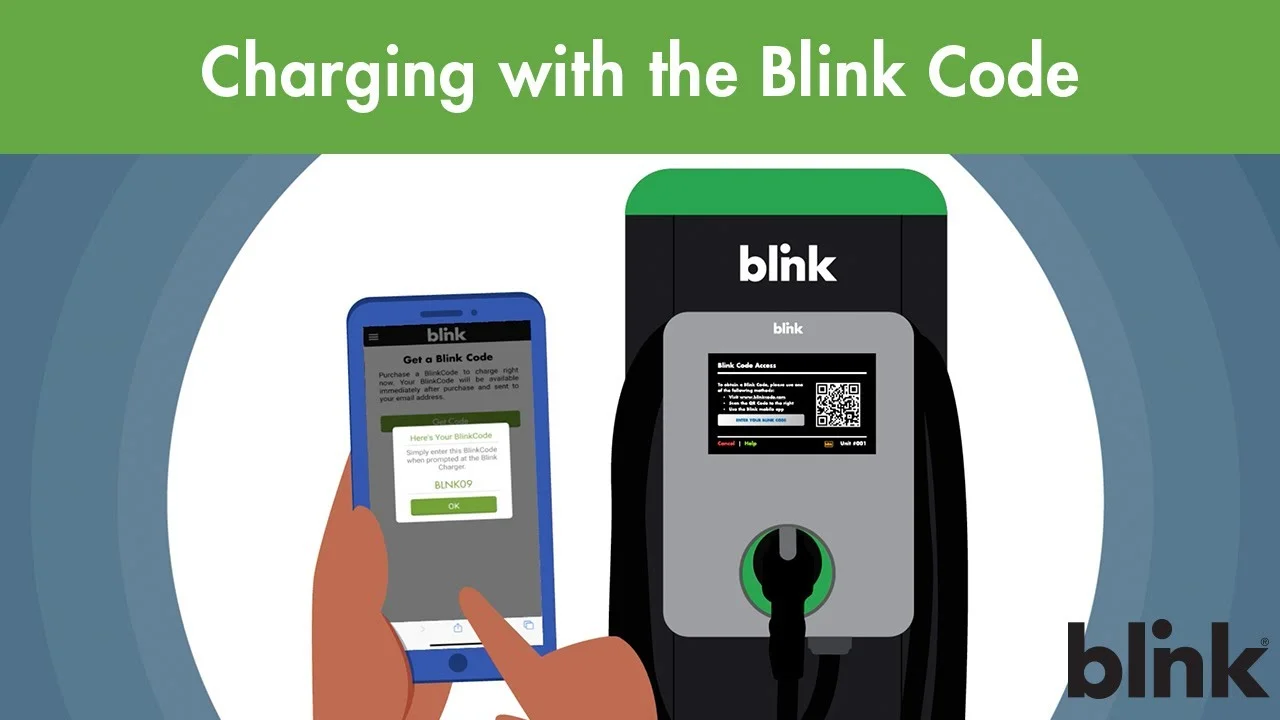
If you prefer not to use the app, tap your Blink RFID card or a contactless credit card on the reader after the screen prompts you. Phone support at 1-888-998-2546 is the third option — useful when the screen is broken or the app keeps timing out.
Monitoring and Stopping a Session
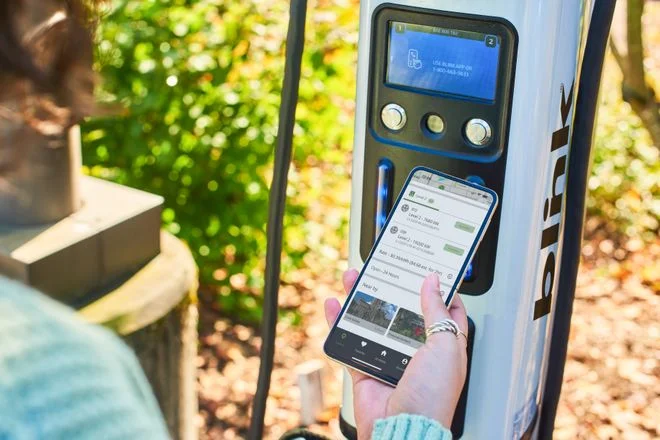
The app’s session screen is where Blink actually shines. Real-time kW, total energy delivered, current cost, and elapsed time all update every few seconds. You can leave the car charging and walk away — the app sends a push notification when the session ends or if the connection drops.
To stop a session early, open the app and tap “Stop Charge.” Wait for the screen to confirm the session has ended before pulling the connector. On most cars, the plug stays locked into the port until the session is fully closed and you press the unlock button on your key fob. Forcing it out can damage the latch — a repair that runs around $200 to $400 on most EVs.
Idle Fees and Time Limits
Blink charges idle fees at many high-traffic locations once your battery is full. The fee usually starts 10 minutes after charging completes and is billed per minute. The app sends a warning notification before the timer kicks in — that’s the cue to walk back to your car and unplug.
Some hosts also set a hard session limit, often 4 hours on Level 2 and 60 minutes on DC fast. The session ends automatically at the limit, even if your battery isn’t full. If you need more time, you can usually start a new session immediately, but a few stations enforce a cooldown of 5 to 15 minutes.
Common Mistakes That Cause Failed Sessions
Most “broken” Blink stations aren’t actually broken. The same handful of user errors cause the majority of failed starts, and once you recognize them, you’ll rarely have a charging trip go sideways.
- Plugging in before authorizing. On IQ 200 units, this throws a “session not authorized” error. Always start the session in the app first, then plug in.
- Selecting the wrong charger number. Dual-port stations have two separate charger IDs. Picking 1A when you’re plugged into 1B starts a session your car can’t see.
- Loose connector seating. If you don’t push until the click, the station reports “connector not detected.” A firm two-handed push solves this 90% of the time.
- Outdated app version. Blink rolled out a new payment backend in 2024, and old app versions silently fail at the payment step. Update before driving out.
- Weak cell signal at the station. Underground garages and rural sites sometimes drop the app’s connection mid-session. Tap-to-pay or the RFID card works without cell signal once the station itself has connectivity.
Troubleshooting When the Station Won’t Start
When a session won’t start, work through the fixes in order from simplest to most involved. Most issues clear up in the first two steps, and you only call support when the station hardware itself is the problem.
The table below covers the issues that come up most often at Blink stations and how to handle each one without standing in the cold for 20 minutes:
| Issue | Likely Cause | What to Try |
|---|---|---|
| “Authorization failed” in app | Expired card or app version | Update payment method, then update the app |
| Screen is blank or frozen | Station rebooting or offline | Try the second port; if both are dead, call 1-888-998-2546 |
| Charging starts then stops after 30 seconds | Loose connector or vehicle handshake fail | Unplug, wait 10 seconds, push connector in firmly |
| App shows session active but car isn’t charging | Vehicle charging schedule blocking it | Check your car’s app for a delayed charging timer |
| Connector won’t release after stopping | Session not fully closed | Press your car’s unlock button; wait 30 seconds before pulling |
If two stations in a row fail with the same error, the problem is usually your account, not the hardware. A quick call to Blink support — or a logout-login cycle in the app — clears most account-side issues in under five minutes.
Safety Habits Worth Building
EV charging is low-risk compared to gasoline refueling, but a few habits prevent the small problems that do show up. Inspect the connector before plugging in — bent pins, melted plastic, or visible burn marks mean the unit has had a fault and shouldn’t be used until Blink services it.
Never charge with a cracked connector housing or a frayed cable, even if the station screen says it’s available. The US Department of Energy’s guidance on EV charging equipment covers basic inspection points worth glancing at once. In wet weather, the connector and port are sealed against rain, but you should still wipe water off the connector face before plugging in to avoid arcing on the contacts.
For drivers comparing public charging to home setups, our breakdown of installing an EV home charging station covers when a home unit pays back the install cost. If you’re researching cable specs and amperage limits, the guide on what a Level 2 charging station delivers explains why your effective speed sometimes caps below the station’s rating.
Getting the Most Out of a Blink Membership
Blink offers a paid membership that lowers per-kWh and per-minute pricing at most company-owned stations. For drivers charging at Blink units more than once or twice a month, the math usually works out — saving a few cents per kWh adds up across a 60 kWh charging session.
Membership also unlocks the RFID card, which is faster than pulling out your phone in bad weather. The card works at every Blink station and a growing number of partner networks through roaming agreements. For drivers who travel between states, this matters more than the discount — one tap and the session starts without juggling apps. Compare it to your usage patterns by reviewing our complete guide to using public EV charging stations before paying for any membership.
Frequently Asked Questions
Can I use a Blink Charging Station without the app?
Yes. Most current Blink stations accept tap-to-pay credit cards and the Blink RFID member card. Older units may require the app or a phone call to support at 1-888-998-2546. The app gives you session control and notifications that the card alone doesn’t, so it’s still worth installing.
How long does a full charge take at a Blink station?
On a Level 2 unit at 7.2 kW, expect 6 to 10 hours for a full charge depending on battery size. On a DC fast charger, most EVs reach 80% in 25 to 45 minutes. The last 20% always takes longer because the car automatically slows the charging rate to protect the battery.
What happens if I unplug while charging?
The session stops safely — there’s no spark or arc because the station cuts power before the latch releases. You’ll be billed only for what you used. If the connector won’t release, press the unlock button on your key fob and wait 30 seconds before trying again.
Why is my charging speed lower than the station’s rated power?
Three things cap real speed: your car’s onboard charger limit, the battery’s current state of charge, and ambient temperature. A car rated for 11 kW AC charging will never exceed 7.2 kW on a Level 2 Blink station. On DC fast, charging speed drops sharply above 80% battery and in cold weather below 40°F.
Does Blink charge a fee if I leave my car plugged in after charging?
At many locations, yes. Idle fees usually start 10 minutes after the session ends and are billed per minute. The Blink app sends a warning notification before fees begin, which is your cue to move the car.
Can I reserve a Blink Charging Station in advance?
Reservations aren’t available on the standard Blink network as of 2025. Stations are first-come, first-served. The app does show real-time availability so you can avoid driving to an occupied unit, and it’ll alert you if a station you’re heading to is suddenly offline.
The single habit that prevents almost every Blink charging headache is to start the session in the app before plugging in — not after. Build that into your routine and the rest of public charging stops feeling like a gamble.
