If you want a safe, fast answer to live power questions, How to Test Voltage With a Multimeter is one of the most useful skills you can learn. It tells you whether a circuit is dead, live, low, or unstable before you touch anything else.
Use the right voltage guide for the job
If you already know what you are testing, use one of these focused guides instead of relying only on this general overview: How to Test AC Voltage With a Multimeter, How to Test DC Voltage With a Multimeter, and How to Test a 12V Battery With a Multimeter.
The process is simple, but the details matter. A wrong dial setting, a damaged probe, or the wrong test points can give you a bad reading or create a shock risk. This guide shows you how to check voltage the right way, read the display correctly, and avoid the common mistakes that trip up beginners.
You will also learn when to use AC or DC mode, how to pick the right range, and how to test outlets, batteries, and wires with more confidence. If you only remember one thing: measure voltage in parallel, not in series, and always start with the meter set correctly.
What voltage testing actually tells you
Voltage is the electrical “push” that moves current through a circuit. When you test voltage, you are checking the difference in electrical potential between two points. That sounds technical, but the practical idea is simple: you are asking, “Is there power here, and how much?”
This matters because voltage tells you a lot before any repair starts. A battery may still look fine but be too weak under load. An outlet may show power on one side of a circuit but not the other. A wire may appear connected while actually carrying no usable voltage.
Most beginners mix up voltage, current, and resistance. Voltage is not the same as current. Current is the flow of electricity, while voltage is the pressure that helps it flow. A multimeter can measure all three, but for this guide, we are focusing on voltage because it is the first and most common test.
AC vs. DC voltage
There are two main types of voltage you will see on a multimeter: AC and DC. AC, or alternating current, is what comes from wall outlets in most homes. In the U.S., many outlets should read about 120 volts AC.
DC, or direct current, is used by batteries, electronics, vehicles, and many low-voltage systems. A common AA battery reads about 1.5 volts DC, while a car battery is usually around 12.6 volts DC when fully charged and not running.
If you choose the wrong mode, the meter may show nonsense, a minus sign, or a reading that does not make sense. That is one of the easiest mistakes to avoid once you know what kind of power source you are checking.
What you need before you start
You do not need a fancy setup to test voltage. A basic digital multimeter is enough for most home, car, and small appliance checks. Still, a few simple habits make the test safer and more accurate.
Before you begin, gather the meter, two test leads, and any item you want to test. If the probes look cracked, bent, or loose, stop and replace them. A bad probe is a safety problem, not just a bad tool.
It also helps to know the source you are testing. A 9V battery, a 120V outlet, and a 24V HVAC transformer all use different voltage ranges. If you know the expected voltage first, you can choose the right meter setting faster.
- Digital multimeter with AC and DC voltage settings
- Red probe for the positive or “hot” side
- Black probe for common or ground
- Known voltage source such as a battery, outlet, or wire
- Basic safety gear such as dry hands and stable footing
For home electrical safety guidance, the CPSC electrical safety guidance is a helpful reference. It explains simple habits that reduce shock risk when working around household power.
Set the meter correctly before touching the probes
This step is where many people make the first mistake. If the meter is set wrong, the reading can be useless even if your test points are correct. Always check the selector dial before the probes touch anything.
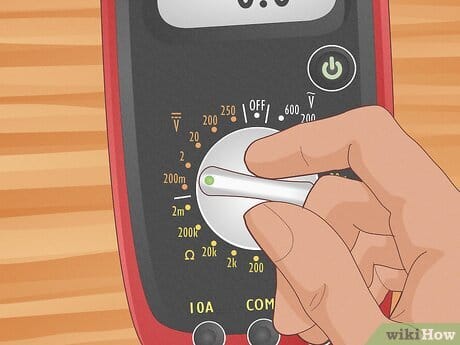
Start by turning the dial to voltage. If your meter has separate settings, choose V~ for AC and V⎓ or V— for DC. Some meters use one voltage setting with a button to switch between AC and DC, so read the label on the dial carefully.
On many meters, the red lead goes into the port marked V, Ω, or VΩ. The black lead usually goes into COM. If the red lead is plugged into a current port by mistake, the meter may not read voltage correctly, and on some meters it can damage the fuse.
Pick the right range
If your meter is not auto-ranging, choose a range that is higher than the voltage you expect. For example, if you are testing a 12V battery, use the 20V DC range if available. If you are testing a household outlet, choose a range above 120V AC, such as 200V or 600V, depending on the meter.
Auto-ranging meters handle this for you, but you still need to choose AC or DC correctly. That part never changes. A 120V outlet is AC, while a 12V battery is DC.
One useful habit is to start higher, then move down if needed. That prevents overload and gives you a more stable reading on unfamiliar circuits.
How to test voltage with a multimeter step by step
Once the meter is set correctly, the actual test is straightforward. Move slowly, keep your fingers behind the probe guards, and think about what type of source you are testing. The method is nearly the same, but the source determines the mode and range.
- Turn the meter on and set it to the correct voltage mode.
- Insert the probes into the right ports: black in COM, red in V.
- Choose AC or DC based on the power source.
- Select a range if your meter is not auto-ranging.
- Touch the probes to the two test points at the same time.
- Read the display and compare it with the expected voltage.
- Remove the probes before changing meter settings or moving to another circuit.
That is the core method. The only part that changes is where you place the probes. On a battery, you touch the positive and negative terminals. On a wall outlet, you test hot and neutral or hot and ground, depending on what you are checking.
Credit: wikihow.com
How to read the number on the screen
If the display is close to the expected value, the circuit is likely behaving normally. For example, a AA battery at 1.58 volts is still in good shape, while a 1.1V reading may show that it is weak. A car battery around 12.4 to 12.7 volts is usually fine at rest, while a much lower reading can signal trouble.
For AC outlets, you may see a number between about 114 and 126 volts in the U.S. Small variation is normal. A reading much lower than expected can point to wiring issues, a bad connection, or a loaded circuit.
If the meter shows a minus sign on DC, the probes are reversed. That usually does not mean the circuit is bad. It only means the red and black probes are touching the opposite polarity from what you expected.
Test common voltage sources the right way
Different sources need slightly different handling. The meter does the same job each time, but the test points and safety level change. Knowing the expected range also helps you catch bad readings faster.
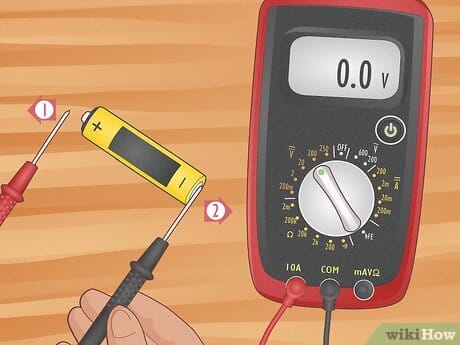
Testing a battery
Batteries are the easiest place to begin. Set the meter to DC voltage, start with a range above the battery’s rated voltage, and touch red to positive and black to negative. A fresh AA battery should often read around 1.5 to 1.6 volts, while a 9V battery may read about 9.4 volts when new and slightly less in use.
Battery testing is useful because voltage alone does not always tell the whole story. A battery can show a decent voltage with no load but fail under real use. That is why a weak device may still act dead even when the battery looks okay on the meter.
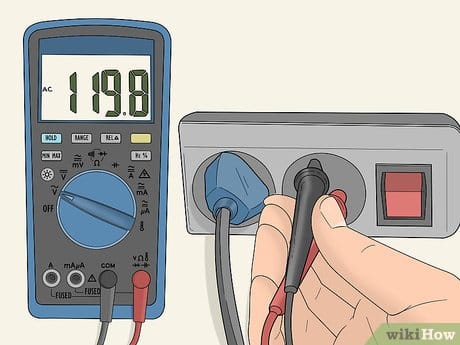
Testing a wall outlet
For an outlet, use AC voltage mode. Hold the probes carefully and insert them into the correct slots. In a standard U.S. outlet, the longer slot is neutral, the shorter slot is hot, and the round opening is ground. You should normally see about 120 volts AC between hot and neutral or hot and ground.
Do not force the probe tips into the receptacle. If the outlet looks damaged, loose, burned, or cracked, stop and replace it or call a qualified electrician. A voltage test is useful only if the outlet itself is still mechanically safe.
Testing automotive voltage
For a vehicle, use DC mode. Test at the battery terminals with the engine off first. A healthy 12V lead-acid battery usually sits near 12.6 volts when fully charged. With the engine running, many vehicles should charge around 13.7 to 14.7 volts, though exact specs vary by vehicle.
If you test a circuit fuse or wire, be sure you know what the circuit should be doing. For example, a fuse may have voltage on both sides if the circuit is powered properly. If power is present on one side only, the fuse may be blown or the circuit may be open.
| Source | Meter mode | Typical reading | What it often means |
|---|---|---|---|
| AA battery | DC volts | 1.5V to 1.6V | Usually healthy if fresh |
| 9V battery | DC volts | About 9V to 9.6V | Good if close to rated value |
| House outlet | AC volts | About 120V | Normal U.S. household power |
| Car battery, engine off | DC volts | 12.4V to 12.7V | Generally charged |
| Car battery, engine running | DC volts | 13.7V to 14.7V | Alternator is charging |
Common mistakes that give bad readings
Most voltage testing problems come from a few repeat mistakes. The good news is that all of them are easy to avoid once you know what to look for. If a reading seems strange, do not assume the circuit is broken right away.
The most common error is choosing the wrong mode. AC and DC are not interchangeable. Another frequent mistake is putting the probes on the wrong points, such as testing across two points that are both at the same potential.
Some beginners also press the probes too hard or move them while reading. That can make the display jump around. A steady, light touch is usually better than force.
- Wrong mode: AC instead of DC, or DC instead of AC.
- Wrong port: Red lead in a current jack instead of the voltage jack.
- Bad contact: Probes not touching clean metal well.
- Wrong reference point: Measuring across two points that are not meaningful.
- Weak meter battery: Some meters give unstable readings when their own battery is low.
Credit: wikihow.com
One mistake beginners often miss
Many people test voltage, see a normal number, and assume the circuit is fine. But voltage only tells part of the story. A wire can show full voltage with no load and still fail when power demand increases.
That is why a circuit that powers a small LED may still fail a motor, relay, or heater. Voltage under load is often more useful than voltage with nothing connected. If a reading changes a lot when the device turns on, you may have a weak connection or undersized wire.
How to troubleshoot when the reading looks wrong
If the result does not match what you expected, work backward from the simplest cause. Most problems are not mysterious. They are usually caused by the meter setting, probe placement, or a bad connection.
Start with a quick diagnosis
First, confirm the meter is on the correct AC or DC setting. Then check the lead ports again. After that, test a known source, like a fresh battery, so you know the meter is working. If the meter reads that known source correctly, the problem is likely in the circuit you were testing.
Next, inspect the test surface. Rust, paint, dirt, and oxidation can block contact and make a live point look dead. Clean metal contact matters more than many people expect.
If the reading is unstable, gently move the probes and see whether the number changes. A jumpy reading often means a loose connection, damaged wire, or failing switch. If the meter shows zero on a live source, stop and re-check everything before assuming there is no power.
When the source itself may be the issue
Sometimes the meter is fine, but the source is not. A weak battery may still show some voltage but not enough to run a device. A circuit may have voltage at one point and none at another because a fuse, switch, or connector has failed.
If you are checking household power and an outlet reads far below normal, avoid repeated probing. That can be a sign of a serious wiring problem. In that case, the safer move is to stop and get qualified help.
Safety habits that matter every time
Voltage testing is simple, but electricity does not forgive careless habits. Use one hand when possible, keep your body stable, and do not touch bare metal probe tips. Dry hands and dry floors matter more than most people realize.
For live household power, never let the two probe tips touch each other while connected to the circuit. That can create a short circuit. Keep your focus on the target points, and remove the probes before changing settings.
Also, do not test a circuit if the meter or probes are damaged. A cracked insulation jacket, a loose lead, or a blown fuse inside the meter can turn a basic check into a risk. If anything looks off, replace the damaged part first.
For outdoor or higher-risk electrical work, it is smart to follow the official safety advice from your tool or device manufacturer. The OSHA electrical safety guidance is also a solid reference for household shock prevention and basic safe-use practices.
Getting better results with practice
The fastest way to improve is to compare known voltages with what your meter shows. Test a new battery, then an older battery. Test a working outlet, then compare it with another outlet in the same room. Small comparisons train your eye quickly.
Another smart habit is to write down normal readings for the tools and machines you use often. A 12V battery system, a doorbell transformer, and a lawn equipment battery may each have a normal range that is slightly different. Once you learn those numbers, troubleshooting becomes much easier.
Keep your tests simple at first. Do not jump straight into complex circuit boards or live wiring if you are still learning the meter. Start with batteries, then household outlets, then automotive systems. That sequence builds confidence without overload.
When done the right way, How to Test Voltage With a Multimeter becomes a quick, reliable habit. You will know when power is present, when it is weak, and when a circuit deserves a closer look before any repair begins.
Credit: wikihow.com
This draft is being kept as a broader hub article, so the detailed step-by-step procedures should point readers to the more specific AC, DC, and battery guides above when those topics overlap.
Safety note: Use AC mode for mains power and DC mode for batteries or electronics. Never use resistance or continuity mode on a live circuit.
FAQs
1. What is the safest way to test voltage with a multimeter?
The safest method is to set the meter to the correct AC or DC mode before touching the probes, keep your fingers behind the probe guards, and test only clean, accessible points. For household power, avoid damaged outlets and never let the probe tips touch each other while connected to a live circuit.
2. Why does my multimeter show a negative voltage reading?
A negative reading on DC usually means the probes are reversed. The meter is telling you that the red lead is touching the lower-potential side and the black lead is touching the higher-potential side. It does not always mean anything is broken.
3. Can I test voltage without a multimeter?
You can use a non-contact tester to check if a wire or outlet is live, but it will not give you an exact voltage number. A multimeter is better when you need a real measurement, not just a yes-or-no check.
4. What should a healthy 12V battery read?
A healthy 12V battery usually reads around 12.6 volts when the engine is off and the battery is fully charged. Readings around 12.2 volts or lower can suggest the battery is getting weak or partially discharged.
5. Why does my meter read voltage, but the device still does not work?
That usually means voltage is present, but the circuit fails under load. The problem may be a weak battery, a bad connection, a blown fuse, or a faulty switch. Voltage alone does not prove that the circuit can deliver enough current to run the device.
